
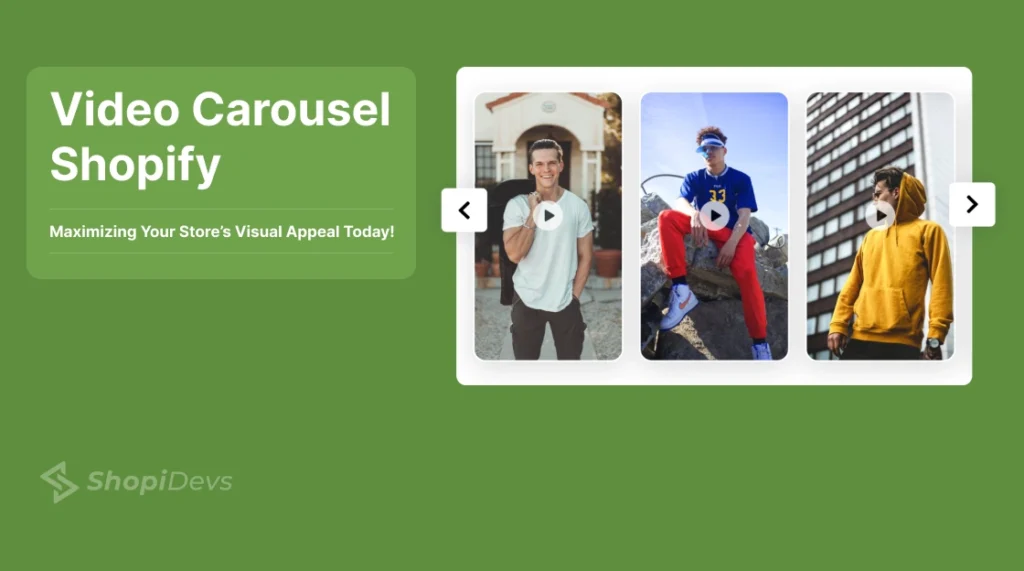
Static product images are no longer enough. Shopify merchants who switched to video carousels report higher time-on-page and stronger engagement with product details. The problem: Shopify’s default theme editor does not include a native video carousel section. You have to build it or install it.
There are 3 ways to add a video carousel to Shopify: custom Liquid code (no app, full control), Essential Grid Gallery (shoppable video carousel with product tagging), or Slider Revolution (template-based, rich animation). This guide covers all three, with full screenshots and the complete Liquid code you can paste directly into your theme.
To add a video carousel to Shopify without an app, go to
Online Store > Themes > Edit Code,
create a new section file (for example,
video-carousel.liquid),
paste the custom Liquid code (provided below), save it, and then add the section through
Customize > Add Section.
If you want a shoppable video carousel where customers can purchase products directly from the video, use
Essential Grid Gallery.
For animated templates and advanced transitions, use
Slider Revolution.
For most Shopify stores, Essential Grid Gallery is the fastest solution because it includes ready-made video carousel templates.
Key Takeaways
- 3 methods: Custom Liquid code (free and developer-friendly), Essential Grid Gallery (shoppable video), and Slider Revolution (prebuilt templates and animations).
- The custom Liquid method works with any Shopify theme, including Dawn, Debut, and headless storefronts.
- Essential Grid Gallery is the only option in this guide that supports shoppable videos, allowing customers to purchase tagged products directly from the carousel.
- Slider Revolution supports YouTube, Vimeo, TikTok, and self-hosted HTML5 videos in a single responsive carousel.
- You don’t need to upload videos to Shopify. All three methods support external videos from YouTube and Vimeo.
- Test your carousel on real mobile devices before publishing. The Shopify thumbnail image size also affects loading speed and overall mobile performance.
- If you only need image sliders, you can add an image carousel on Shopify using many of the same techniques.
What Is a Shopify Video Carousel?
A Shopify video carousel is a scrollable or auto-playing display of multiple videos embedded directly on your storefront. Unlike a single embedded video, a carousel lets you showcase product demos, tutorials, customer reviews, or brand content in a sequence, without cluttering the page.
Video carousels differ from image carousels in one critical way: video autoplay and thumbnail loading add page weight. A poorly built video carousel can slow down your store significantly. The methods in this guide are all tested for performance.
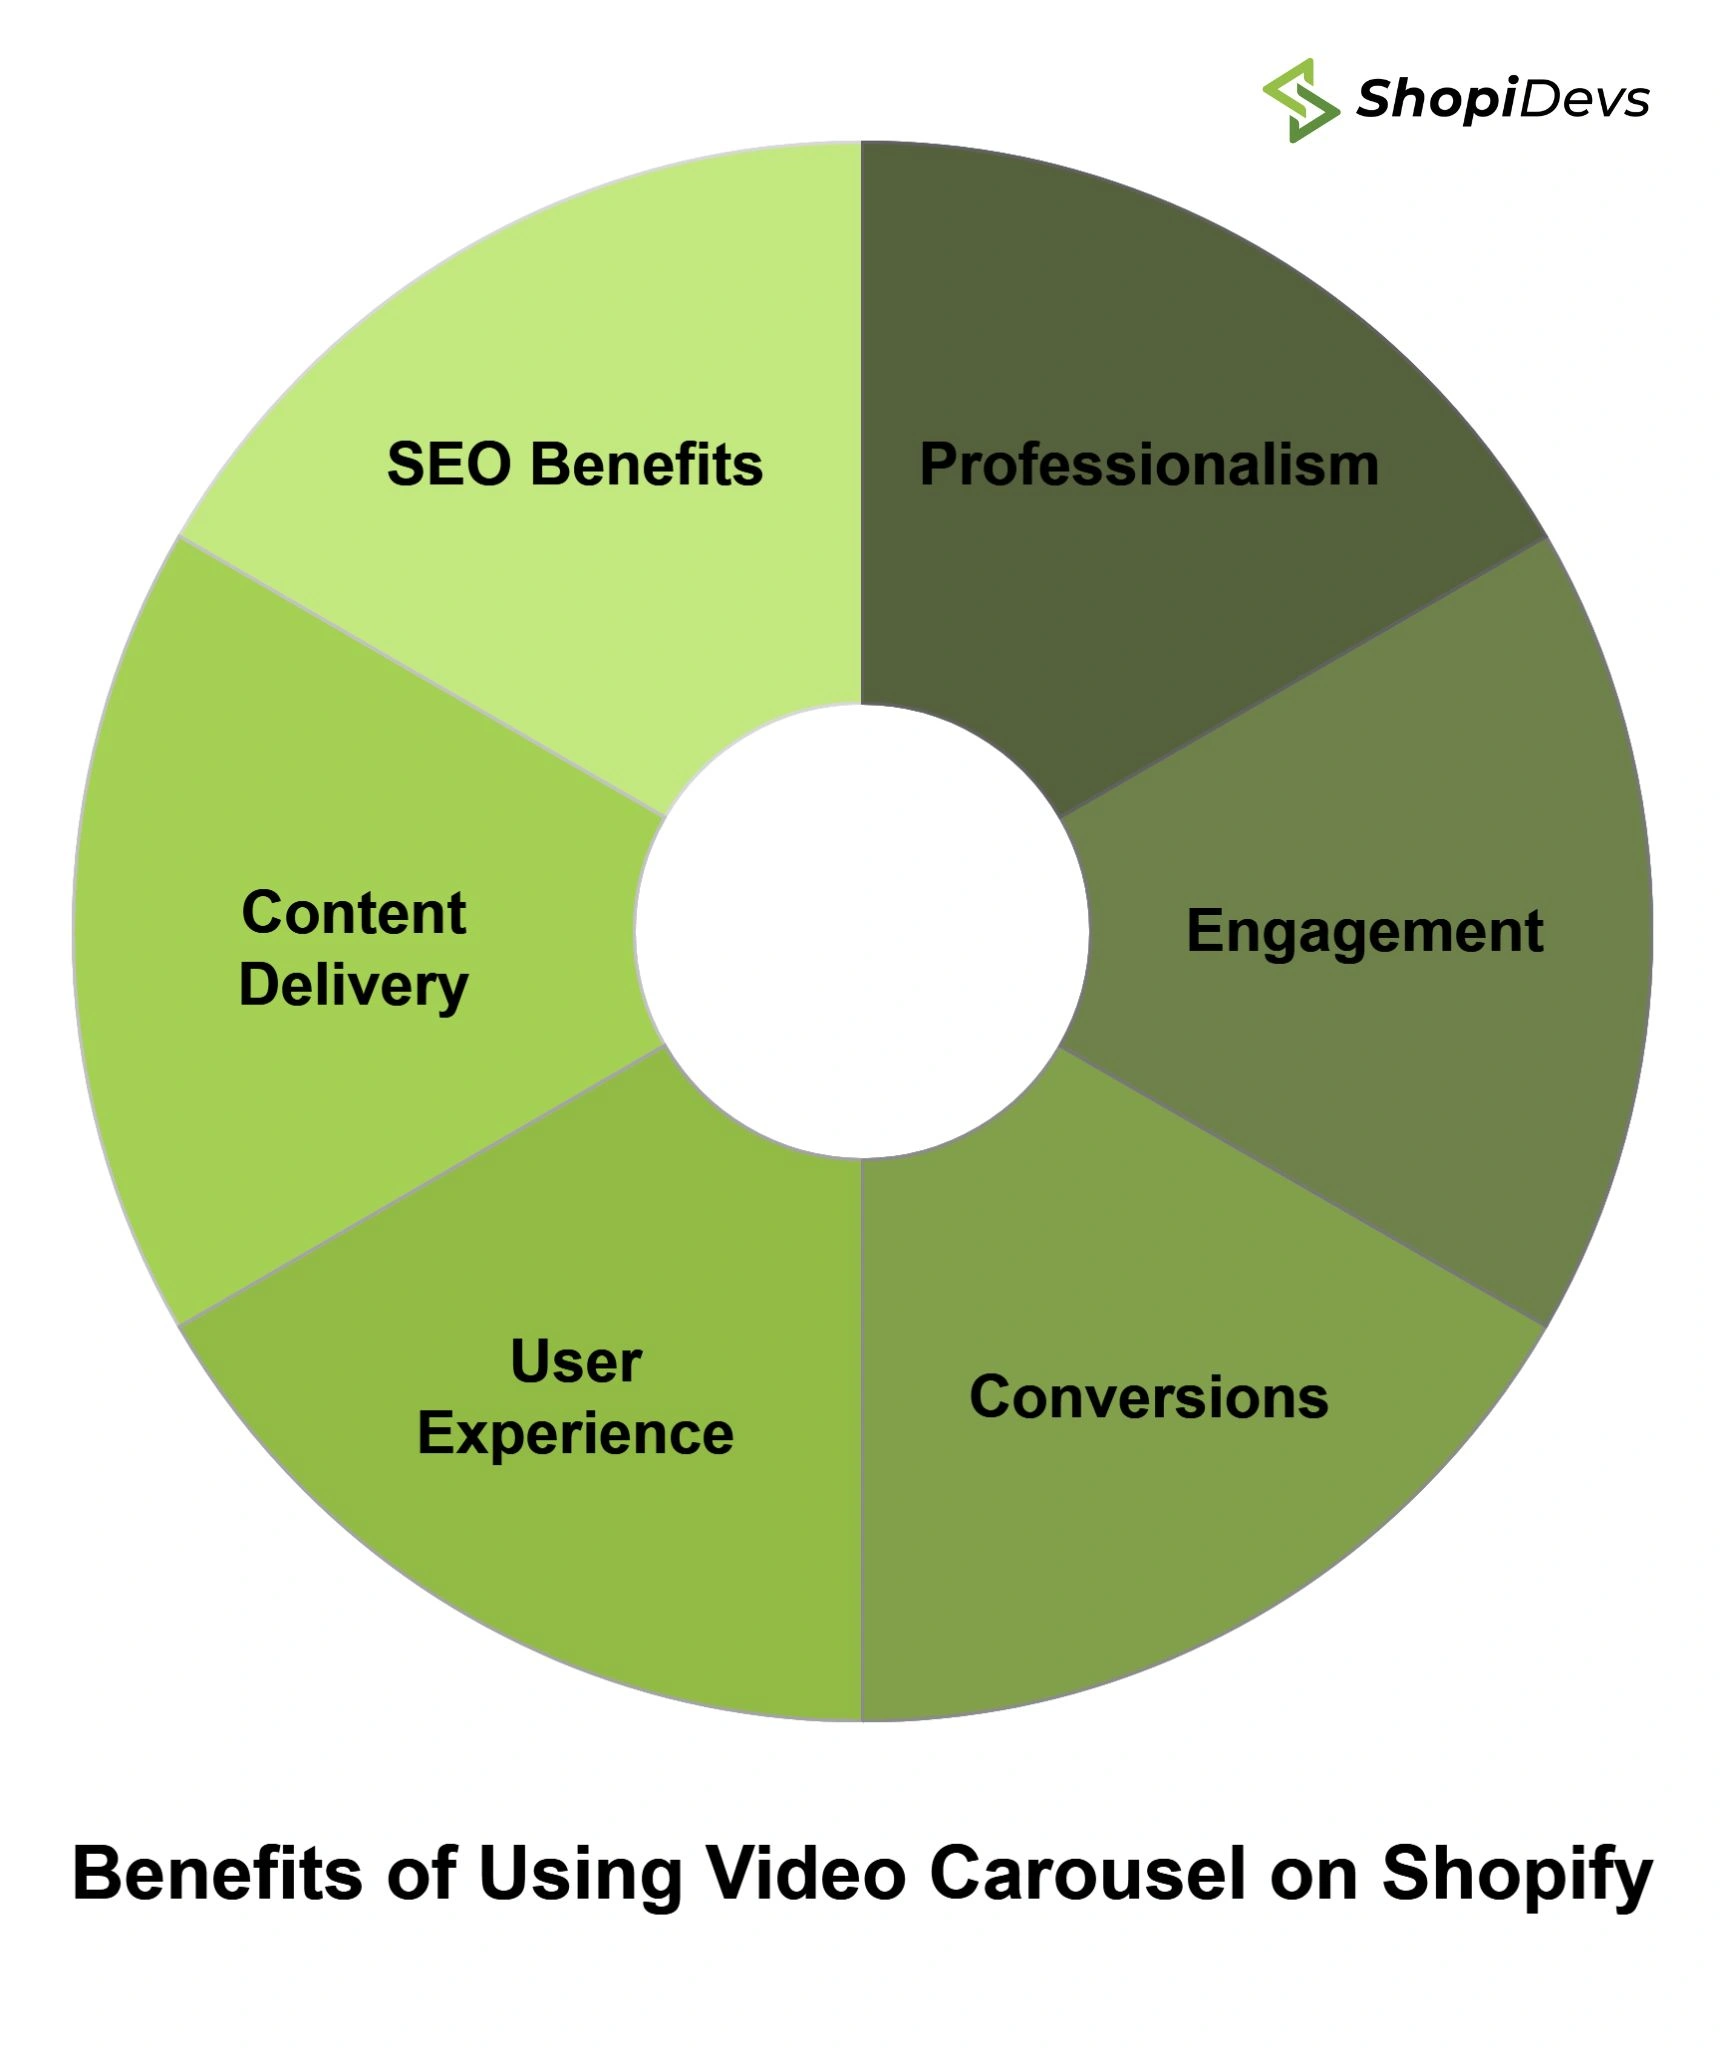
Common use cases for Shopify video carousels include product demo reels, before/after comparisons (alongside a before/after slider), influencer unboxing videos, size and fit guides, and shoppable lookbook videos.
How to Add Video Carousel to Shopify – [3 Methods]
You can add a video carousel to your Shopify store in 2 ways:
- Method 1 Custom Liquid Code (No App)
- Method 2: Essential Grid Gallery (Shoppable Video Carousel)
- Method 3: Slider Revolution (Templates + Animation):
Choose the method that best suits your needs and expertise!
| Feature | Custom Liquid Code | Essential Grid Gallery | Slider Revolution |
|---|---|---|---|
| Cost | Free | From $12/mo | From $9/mo |
| Code required | Yes (Liquid) | No | No |
| Shoppable video | No | Yes | No |
| Video sources | YouTube, Vimeo | YouTube, Vimeo, TikTok | YouTube, Vimeo, HTML5, TikTok |
| Templates | None (build from scratch) | Prebuilt video layouts | 200+ templates |
| Animation/transitions | Basic CSS | Medium | Advanced |
| Best for | Developers, custom themes | Stores selling products with video demos | Rich visual storytelling |
Recommendation: If you want visitors to buy products directly from the video, choose Essential Grid Gallery. If you only need a lightweight video carousel to showcase content, the custom Liquid method is completely free and keeps your Shopify theme fast.
Method 1: Custom Liquid Code (No App)
This method creates a native Shopify section using Liquid. It works on any theme (Dawn, Craft, Sense, Debut, headless setups). No third-party app, no monthly fee. You control the markup and styles completely.
Before you start: Back up your Shopify theme first. Go to Online Store > Themes, click the three dots beside your active theme, then select Duplicate. Make all changes on the duplicated theme until you’re satisfied with the result.
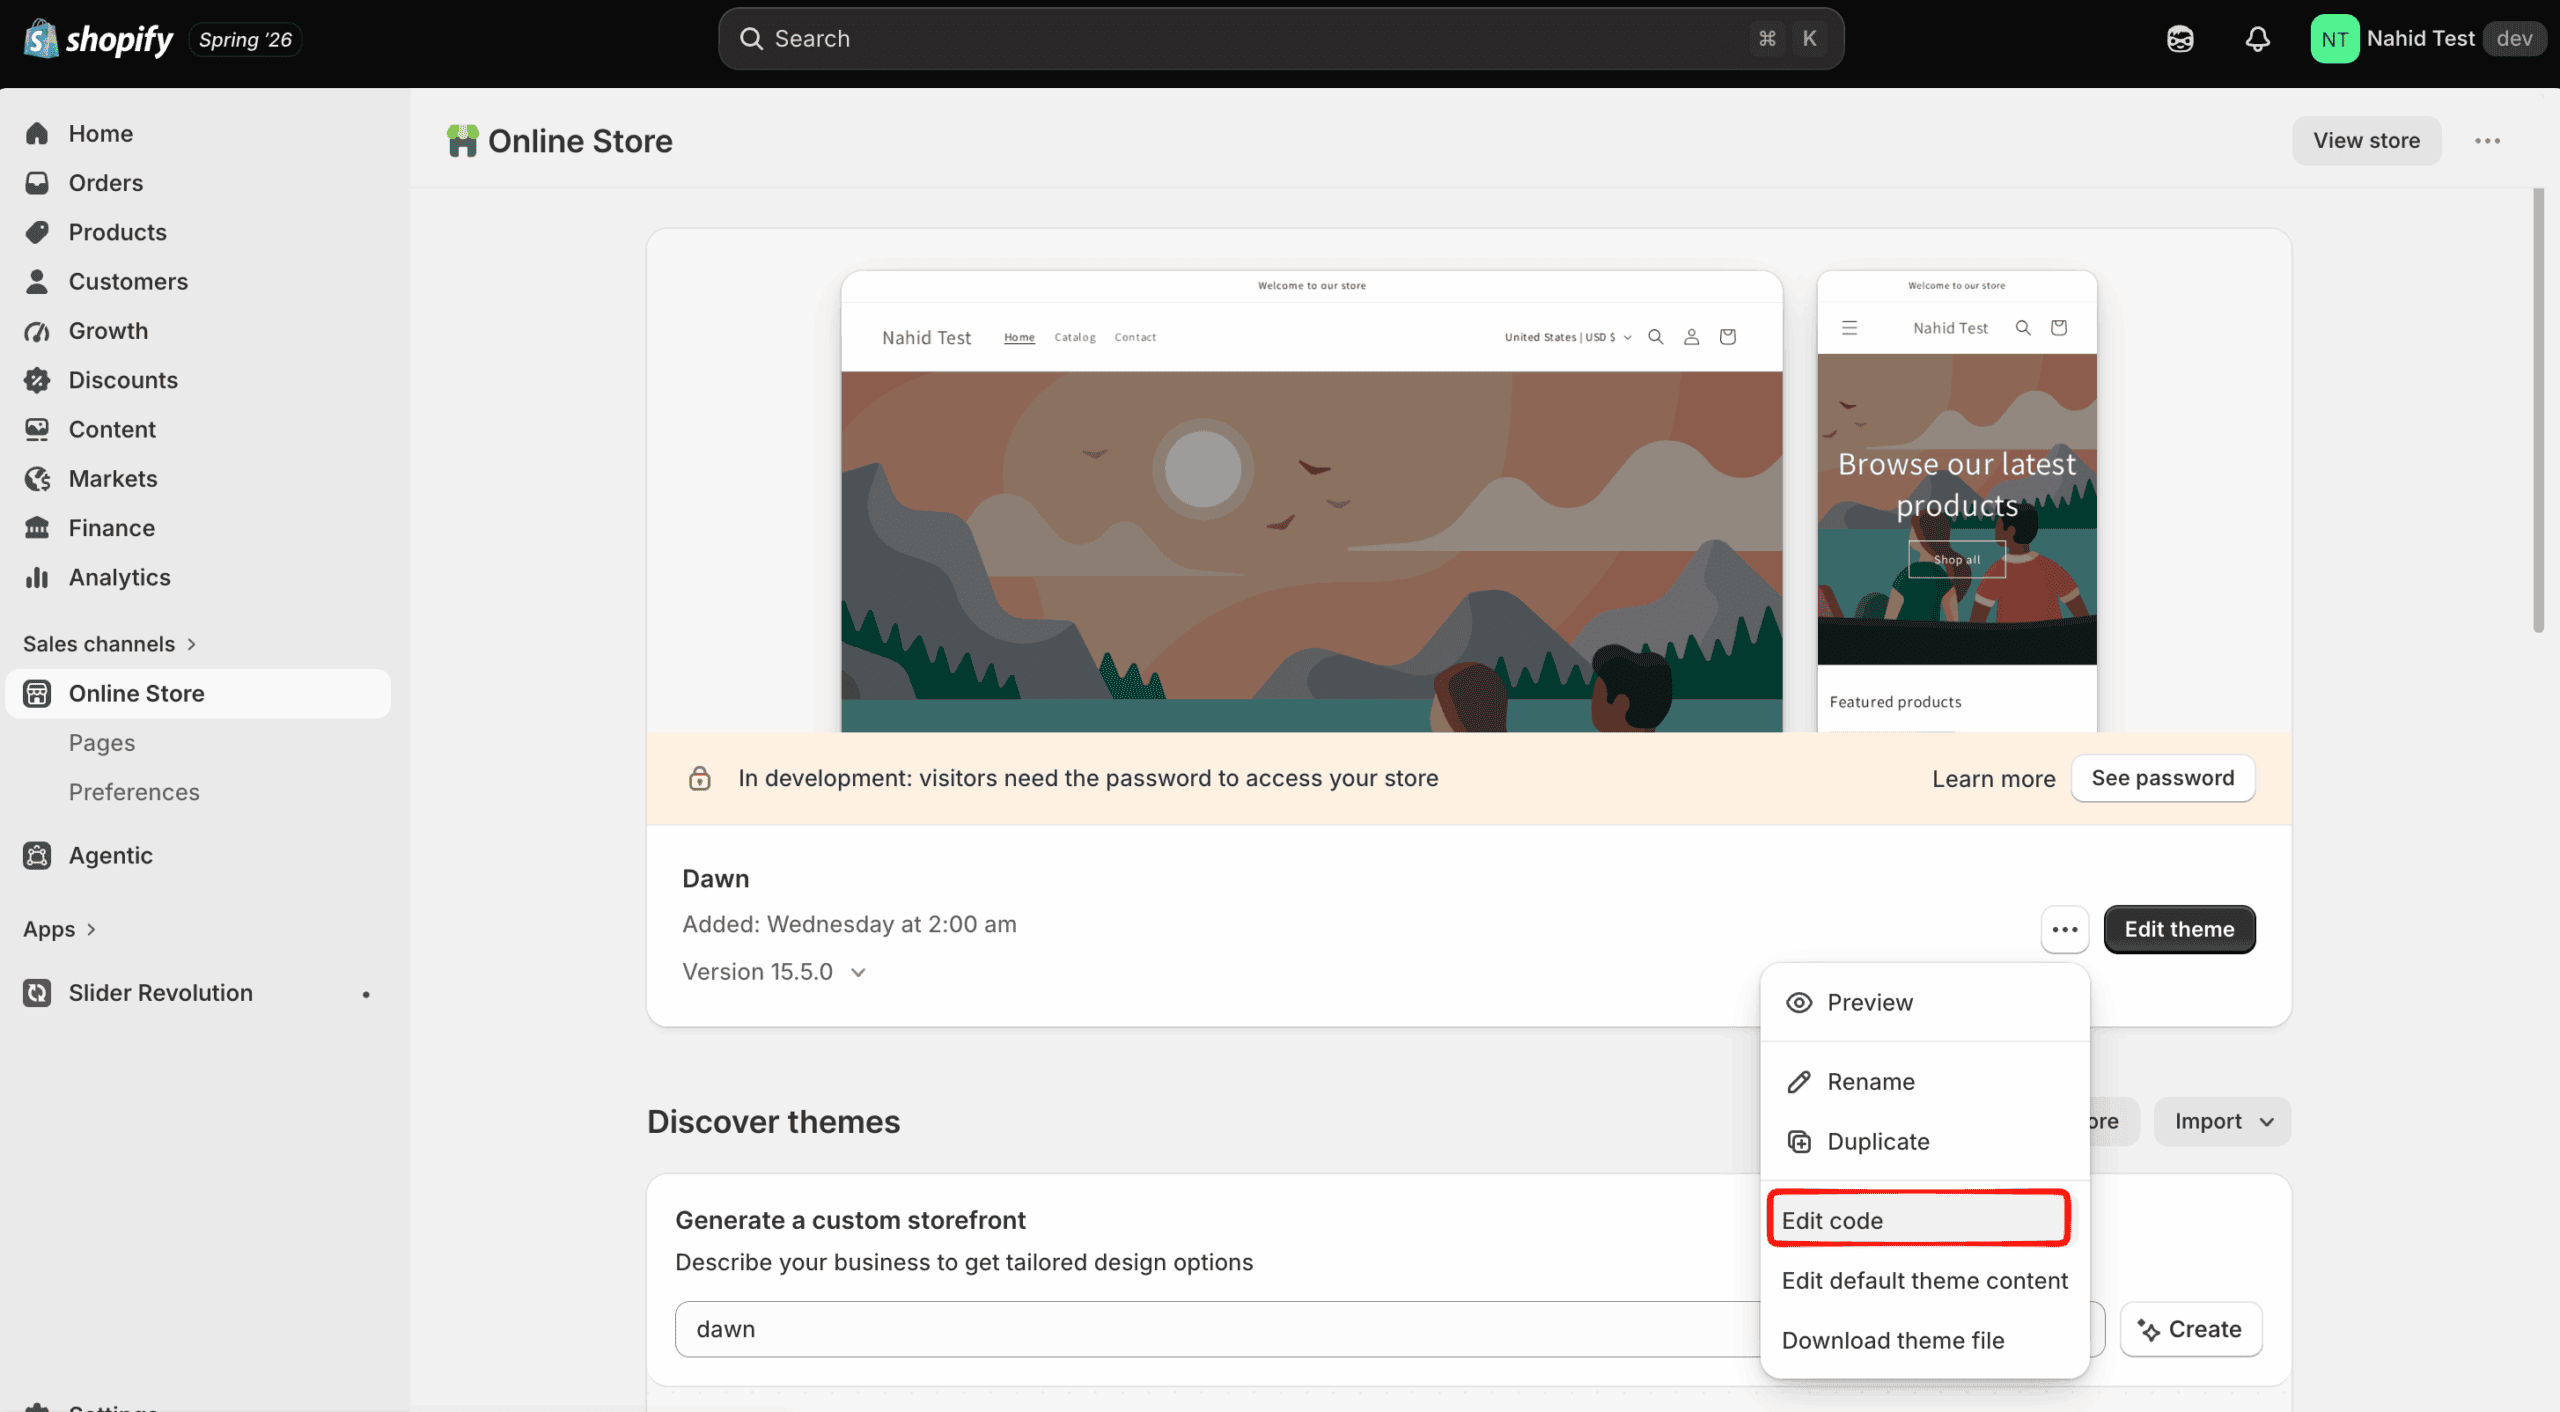
Step 1: Open Theme Code Editor
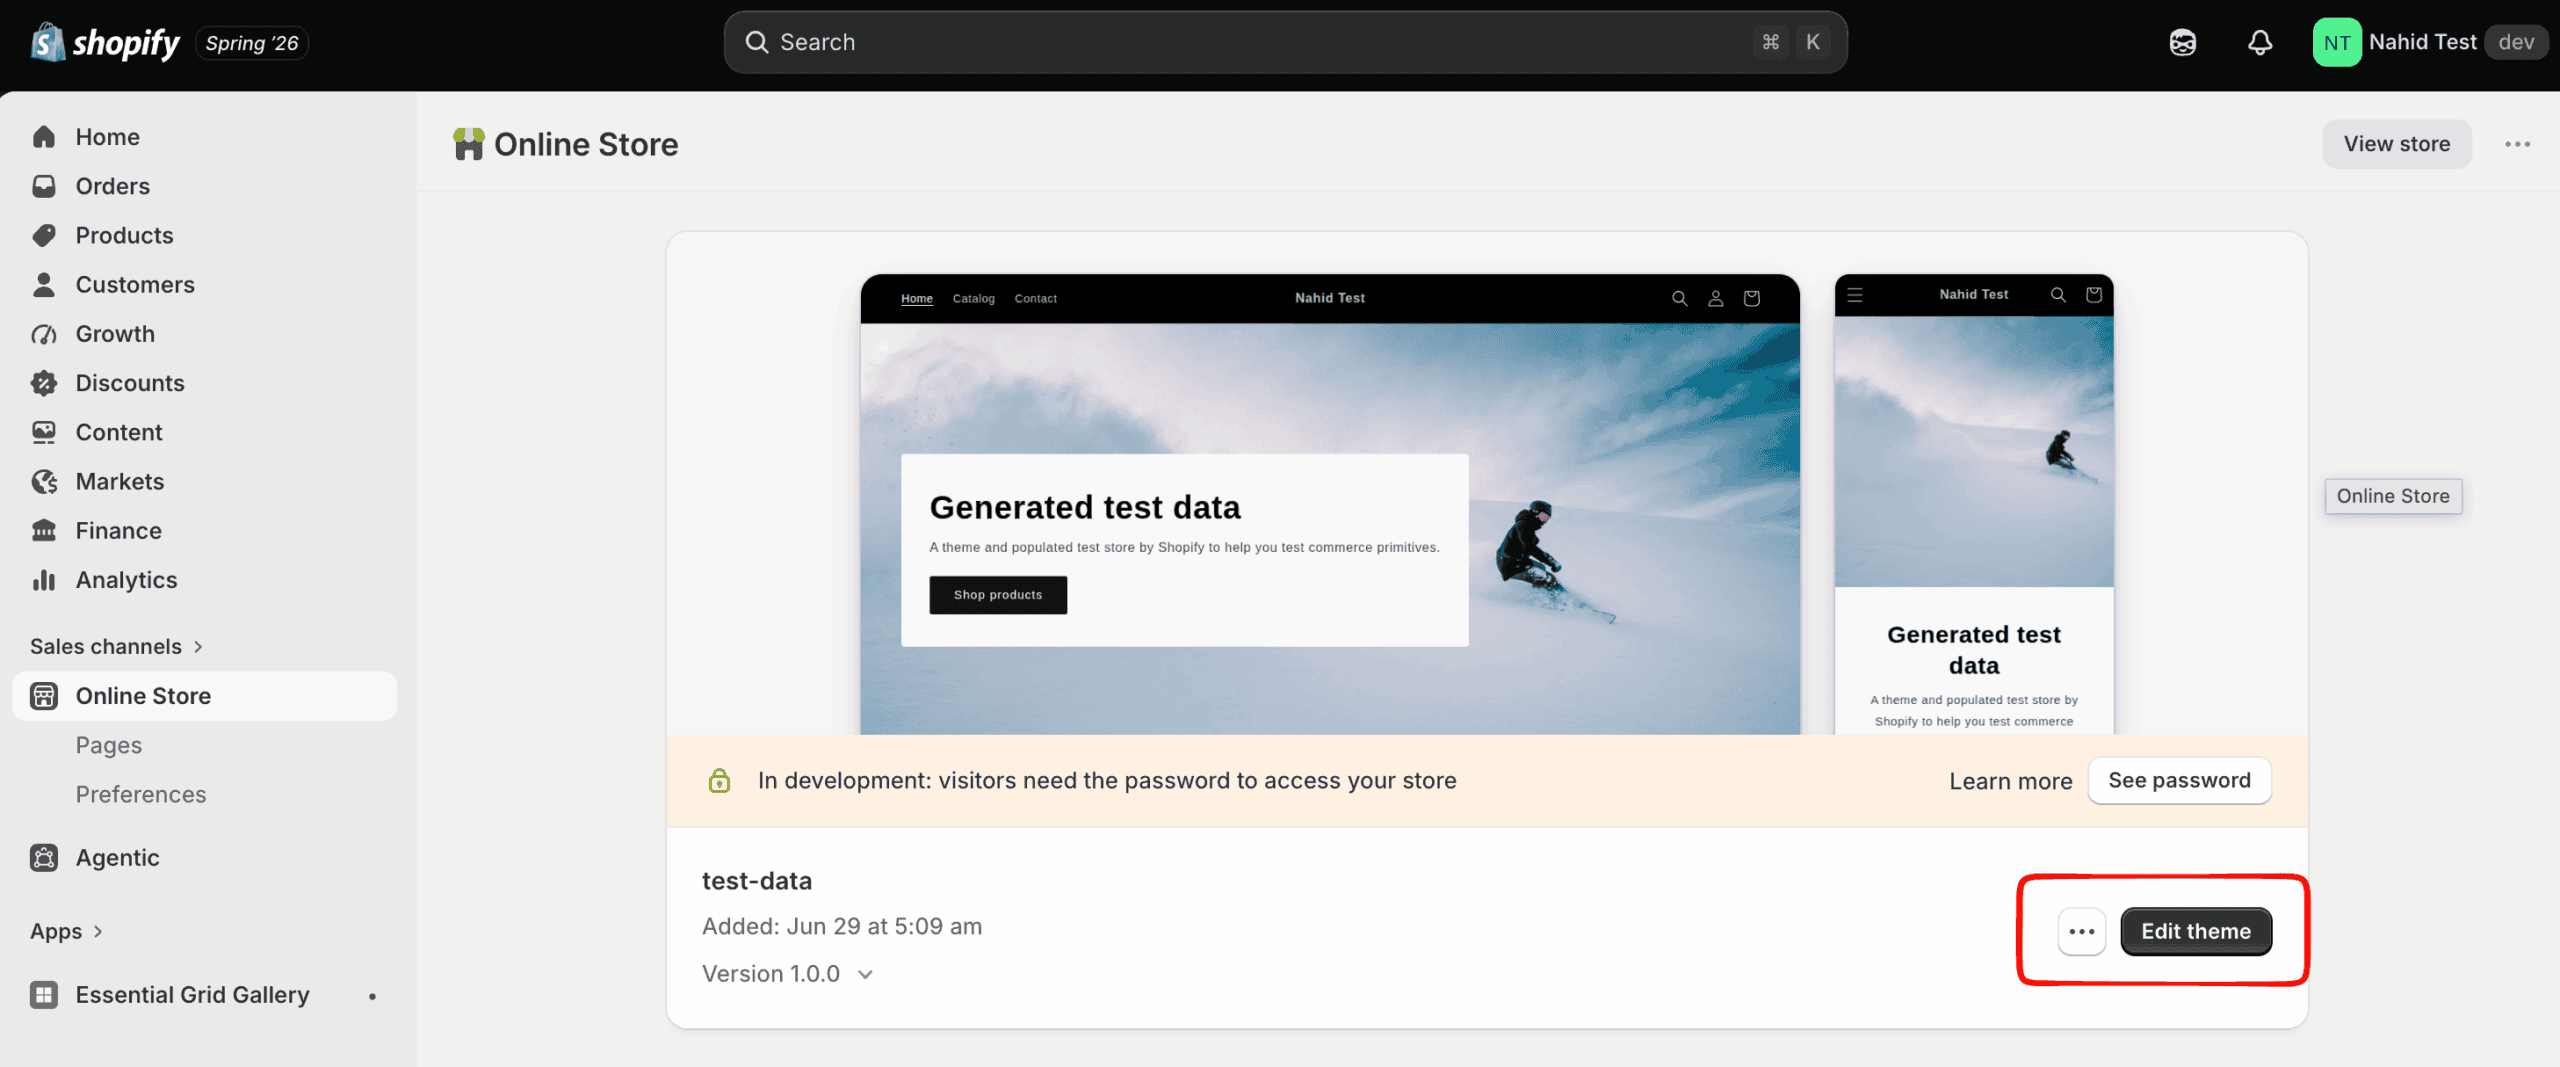
Go to Online Store > Themes. Click the three-dot menu next to your active theme and select Edit code.
Step 2: Create a New Section File
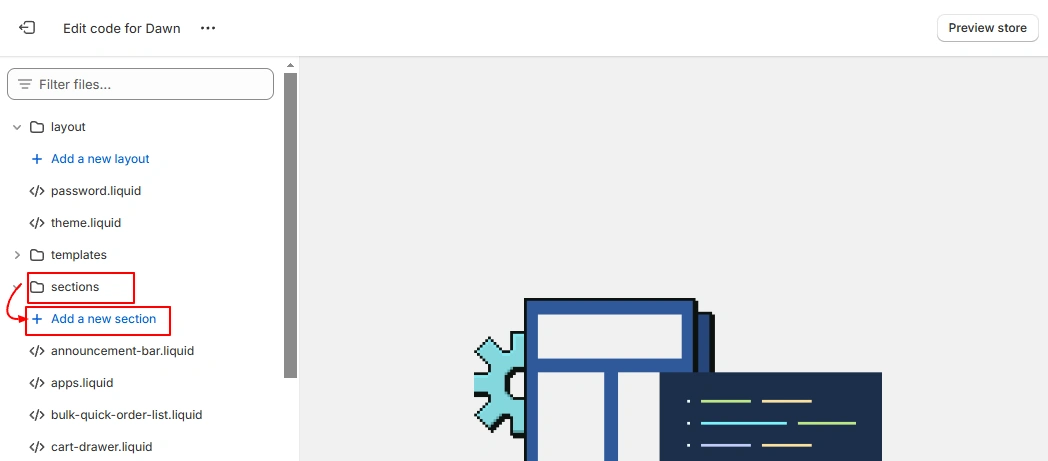
In the left sidebar, click the Sections folder. Then click Add a new section. Name it video-carousel And click Done.
Step 3: Open the New Liquid File
Click the newly created video-carousel.liquid File to open it in the editor.

Step 4: Delete the Default Code
Select all existing placeholder code in the file and delete it. The file should be empty before you paste the new code.

Step 5: Paste the Video Carousel Code
Copy and paste the complete Liquid code below into the empty file:
{%- style -%}
  .section-{{ section.id }}-padding {
    padding-top: {{ section.settings.padding_top }}px;
    padding-bottom: {{ section.settings.padding_bottom }}px;
  }
  .video-slider .testimonial__image {
    height: 500px;
    max-width: 27rem;
  }
  .video-slider testimonials-component {
    --block-width: 300px !important;
  }
  .video-slider .testimonial__image {
    background: none;
  }
  .video-slider video {
    height: 100% !important;
    border-radius: 15px;
  }
  .video-slider .testimonial__image.media-wrapper {
    margin-right: 0;
  }
  .video-slider .video-slider-list:before,
  .video-slider .video-slider-list:after {
    width: 0%;
  }
  .video-slider-item {
    margin-left: 10px;
    margin-right: 10px;
  }
  .video-slider-list {
    overflow-y: hidden;
    -webkit-overflow-scrolling: touch;
    scrollbar-width: auto;
    -webkit-overflow-scrolling: auto;
    scrollbar-color: #cccccc #ffffff;
    scrollbar-width: thin;
    padding-bottom: 10px;
  }
  .video-slider-list::-webkit-scrollbar-track {
    background: white;
  }
  .video-slider-list::-webkit-scrollbar-thumb {
    background: lightgray;
    border: 4px solid transparent;
    border-radius: 10px;
    background-clip: padding-box;
  }
  .video-slider:hover .video-slider-list::-webkit-scrollbar-thumb {
    background: gray;
  }
  .video-slider-list::-webkit-scrollbar-thumb:hover {
    background: black !important;
  }
  .video-slider-list {
    position: static;
    display: flex;
  }
  @media only screen and (max-width: 800px) {
    .video-slider .testimonial__image {
      margin-left: 0;
    }
    .video-slider .video-slider-list {
      width: 100%;
    }
  }
{%- endstyle -%}


<div class="video-slider section-{{ section.id }}-padding">
  <div class="testimonials page-width">
    {%- if section.settings.title != blank -%}
      <h2 class="title inline-richtext {{ section.settings.heading_size }}{% if settings.animations_reveal_on_scroll %} scroll-trigger animate--slide-in{% endif %} {{ section.settings.heading_alignment }}">
        {{ section.settings.title }}
      </h2>
    {%- endif -%}

    {%- assign block_count = section.blocks.size -%}
    {%- if block_count > 0 -%}
      <svg class="visually-hidden">
        <defs>
          <clipPath id="testimonial-clip-path" clipPathUnits="objectBoundingBox"><path d="M0.11,0.09 C0.014,0.174,-0.003,0.398,0,0.499 C-0.003,0.618,0.015,0.849,0.125,0.919 C0.235,0.989,0.413,0.997,0.504,0.999 C0.604,0.999,0.719,0.999,0.869,0.924 C0.974,0.849,0.994,0.704,0.999,0.499 C1,0.295,0.984,0.155,0.879,0.075 C0.796,0.011,0.593,-0.003,0.504,0 C0.413,-0.005,0.206,0.006,0.11,0.09"></path></clipPath>
        </defs>
      </svg>
      <testimonials-component data-slider="{% if block_count > 1 %}true{% else %}false{% endif %}" data-autorotate="{{ section.settings.autorotate }}" data-autorotate-speed="{{ section.settings.autorotate_speed | times: 1000 }}" style="--block-count: {{ block_count | minus: 1 }};">
        <div class="testimonial__list-wrapper">
          <div class="video-slider-list" id="Testimonials-{{ section.id }}">
            {%- for block in section.blocks -%}
              <div class="video-slider-item{% if section.blocks.first == true or block_count == 1 %} is-selected{% endif %}" {{ block.shopify_attributes }}>
                <div class="testimonial__image media-wrapper media-wrapper--small">
                  {%- if block.settings.video != blank -%}
                      <!-- <video src="https://cdn.shopify.com/videos/c/o/v/176c5f40b3cb49d7b72a5dfaa681345b.mp4" muted  playsinline autoplay loop></video> -->
                        {{ block.settings.video | video_tag:
                          image_size: "3840px",
                          autoplay: true,
                          loop: true,
                          controls: false,
                          muted: true,
                          playsinline: true
                        }}
                      <!-- <video autoplay="autoplay" loop="loop" muted playsinline>
                        <source src="{{ block.settings.video }}" type="video/mp4">
                      </video>  -->
                  {%- else -%}
                    <div class="media media--square">
                      {{ 'image' | placeholder_svg_tag: 'placeholder' }}
                    </div>
                  {%- endif -%}
                </div>
              </div>
            {%- endfor -%}
          </div>
        </div>
      </testimonials-component>
    {%- endif -%}
  </div>
</div>

{% schema %}
{
  "name": "Videos slider",
  "tag": "section",
  "class": "section",
  "settings": [
    {
      "type": "inline_richtext",
      "id": "title",
      "default": "Video slider",
      "label": "Videos title"
    },
    {
      "type": "select",
      "id": "heading_size",
      "options": [
        {
          "value": "h2",
          "label": "H1"
        },
        {
          "value": "h1",
          "label": "H2"
        },
        {
          "value": "h0",
          "label": "H3"
        }
      ],
      "default": "h1",
      "label": "Heading size"
    },
    {
      "type": "select",
      "id": "heading_alignment",
      "label": "Heading alignment",
      "options": [
        {
          "value": "left",
          "label": "Left"
        },
        {
          "value": "center",
          "label": "Center"
        },
        {
          "value": "right",
          "label": "Right"
        }
      ],
      "default": "center"
    },
    {
      "type": "select",
      "id": "heading_tag",
      "options": [
        {
          "value": "h1",
          "label": "H1"
        },
        {
          "value": "h2",
          "label": "H2"
        },
        {
          "value": "h3",
          "label": "H3"
        },
        {
          "value": "h4",
          "label": "H4"
        },
        {
          "value": "h5",
          "label": "H5"
        },
        {
          "value": "h6",
          "label": "H6"
        },
        {
          "value": "div",
          "label": "H7"
        },
        {
          "value": "span",
          "label": "H8"
        },
        {
          "value": "p",
          "label": "Normal"
        }
      ],
      "default": "h2",
      "label": "H2",
      "info": "Headings"
    },
    {
      "type": "header",
      "content": "Spacing"
    },
    {
      "type": "range",
      "id": "padding_top",
      "min": 0,
      "max": 100,
      "step": 4,
      "unit": "px",
      "label": "Padding top",
      "default": 36
    },
    {
      "type": "range",
      "id": "padding_bottom",
      "min": 0,
      "max": 100,
      "step": 4,
      "unit": "px",
      "label": "Padding bottom",
      "default": 36
    }
  ],
  "blocks": [
    {
      "type": "testimonial",
      "name": "video",
      "settings": [
        {
          "type": "video",
          "id": "video",
          "label": "Video link"
        }
      ]
    }
  ],
  "presets": [
    {
      "name": "Videos slider",
      "blocks": [
        {
          "type": "testimonial"
        },
        {
          "type": "testimonial"
        },
        {
          "type": "testimonial"
        },
        {
          "type": "testimonial"
        },
        {
          "type": "testimonial"
        }
      ]
    }
  ],
  "disabled_on": {
    "groups": ["header", "footer", "custom.overlay"]
  }
}
{% endschema %}Step 6: Save the File
Click Save in the top-right corner of the code editor.

Step 7: Go Back to Theme Customizer
Click the back arrow to return to the main theme settings, then click Customize on your active theme.

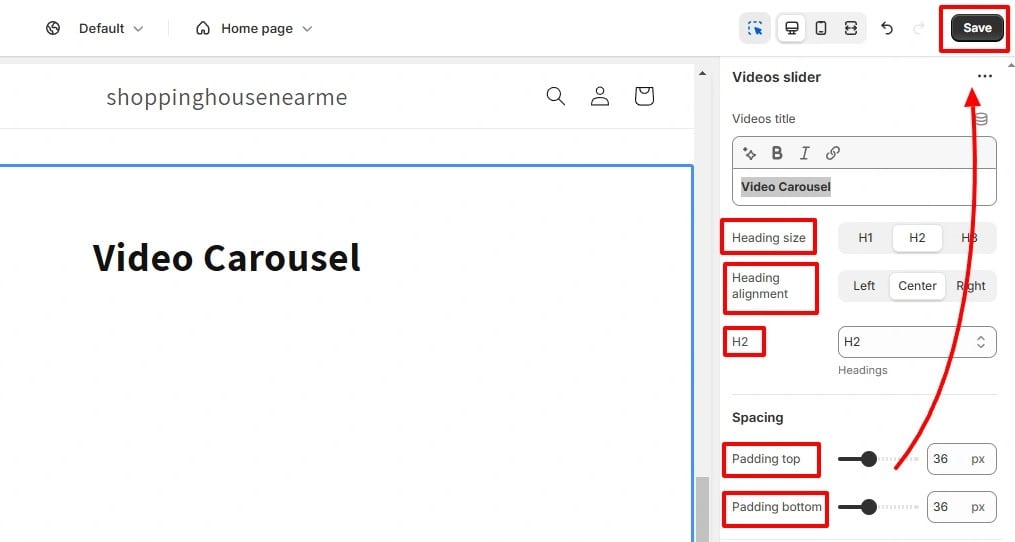
Step 8: Add the Video Carousel Section
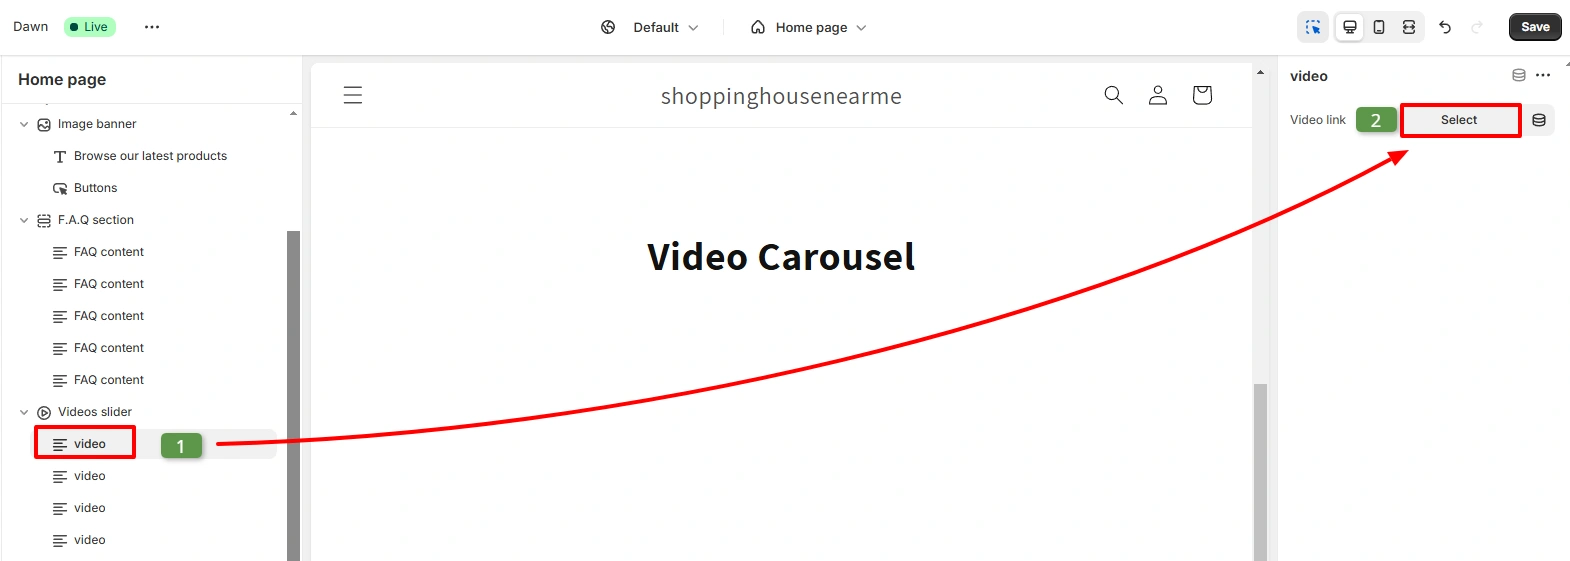
In the theme customizer, click Add section and search for “Video Carousel.” Click it to add it to your page. Then click each video block to enter the video platform (YouTube or Vimeo) and paste the video ID. Save when done.

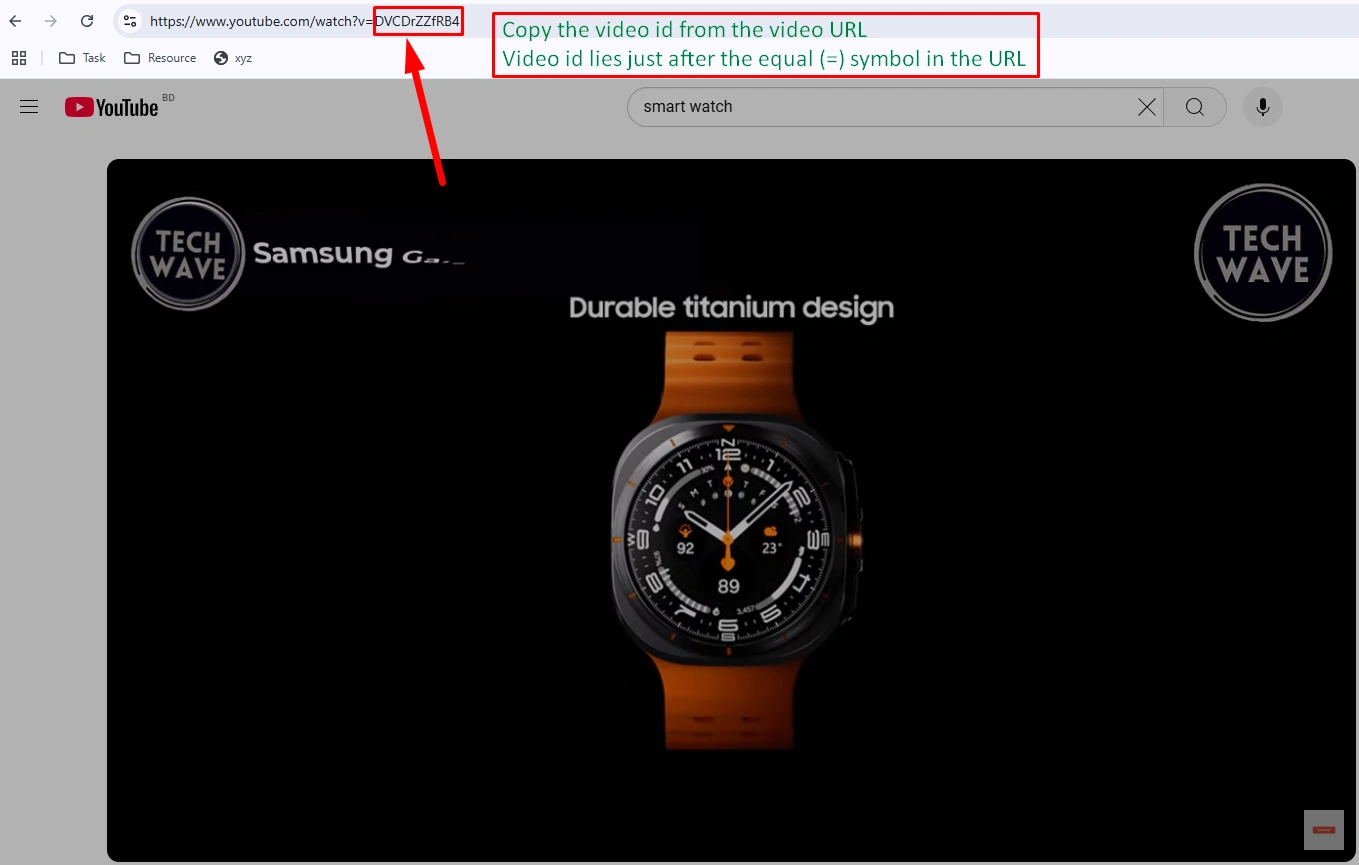
How to find your YouTube video ID:
Open your video on YouTube and look at the URL. The video ID is the string that appears after
?v=.
For example, in
https://www.youtube.com/watch?v=dQw4w9WgXcQ,
the video ID is
dQw4w9WgXcQ.
Step 9: Add Videos and Publish
Upload your first video block’s ID and click Add block to add more videos. You can add as many as needed. When done, click Save.

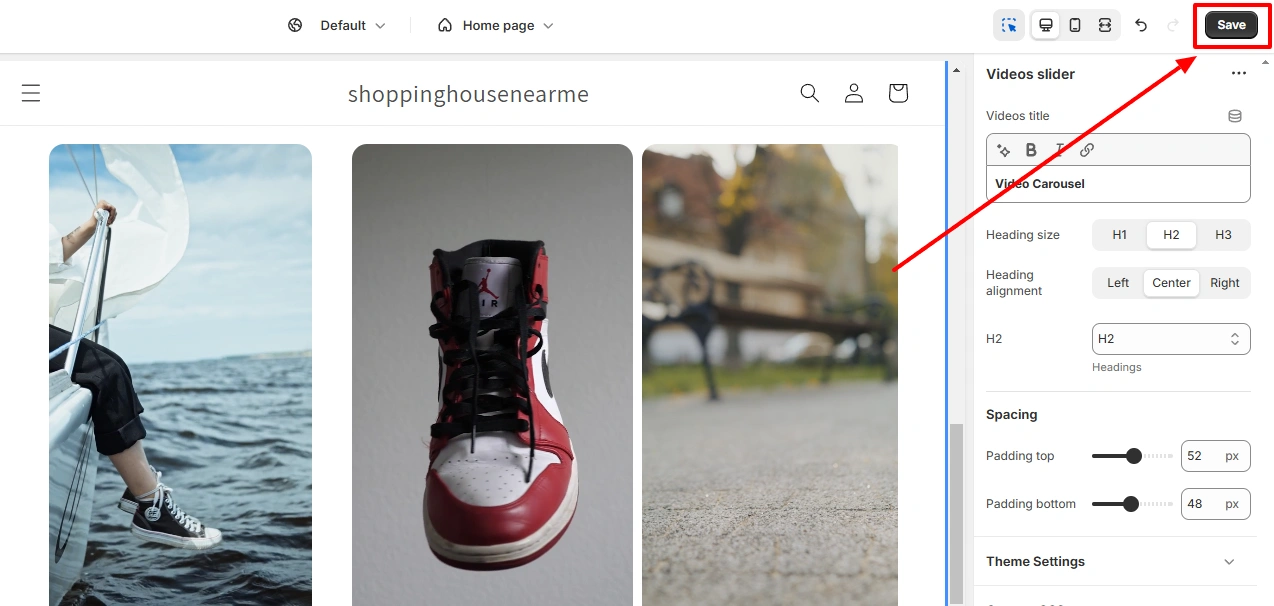
Want to embed HTML files alongside your section? You can upload HTML files to Shopify through the Content > Files page and then reference those files inside your custom Liquid section for scripts, widgets, or embedded HTML content.
Once satisfied with the changes, click the save button to apply them.
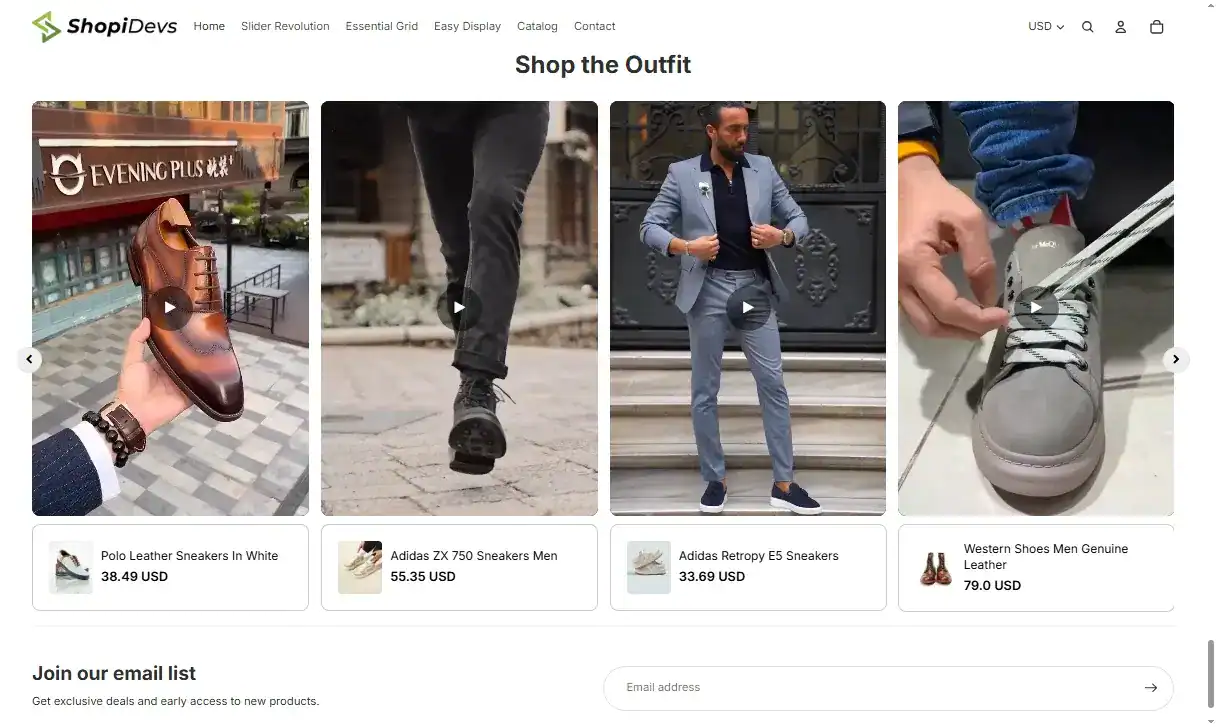
Let’s check out the output
Method 2: Essential Grid Gallery (Shoppable Video Carousel)
Essential Grid Gallery is the recommended method if you want customers to browse and buy products directly from a video carousel. It supports YouTube, Vimeo, and TikTok video sources, includes prebuilt video carousel templates, and lets you tag products on each video item so shoppers can add to cart without leaving the carousel.
This is a key difference from other methods on this page. If your competitors are using shoppable video, this is how you match or surpass them.
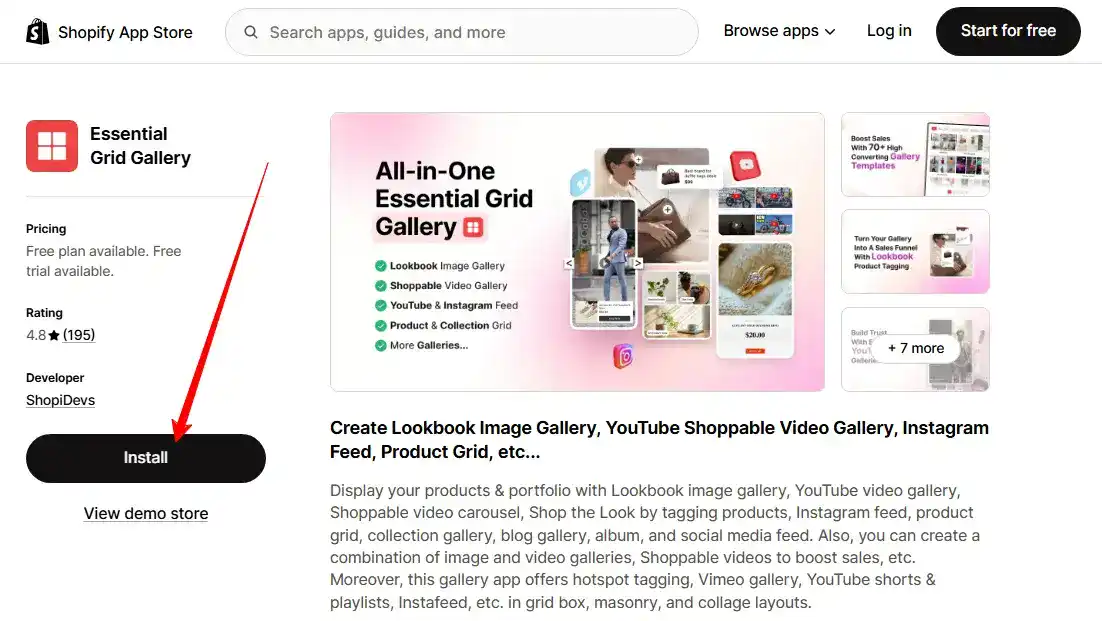
Step 1: Install Essential Grid Gallery
Go to the Shopify App Store and search for Essential Grid Gallery, or install it directly via the Shopify app listing. Click Install and accept the permissions.
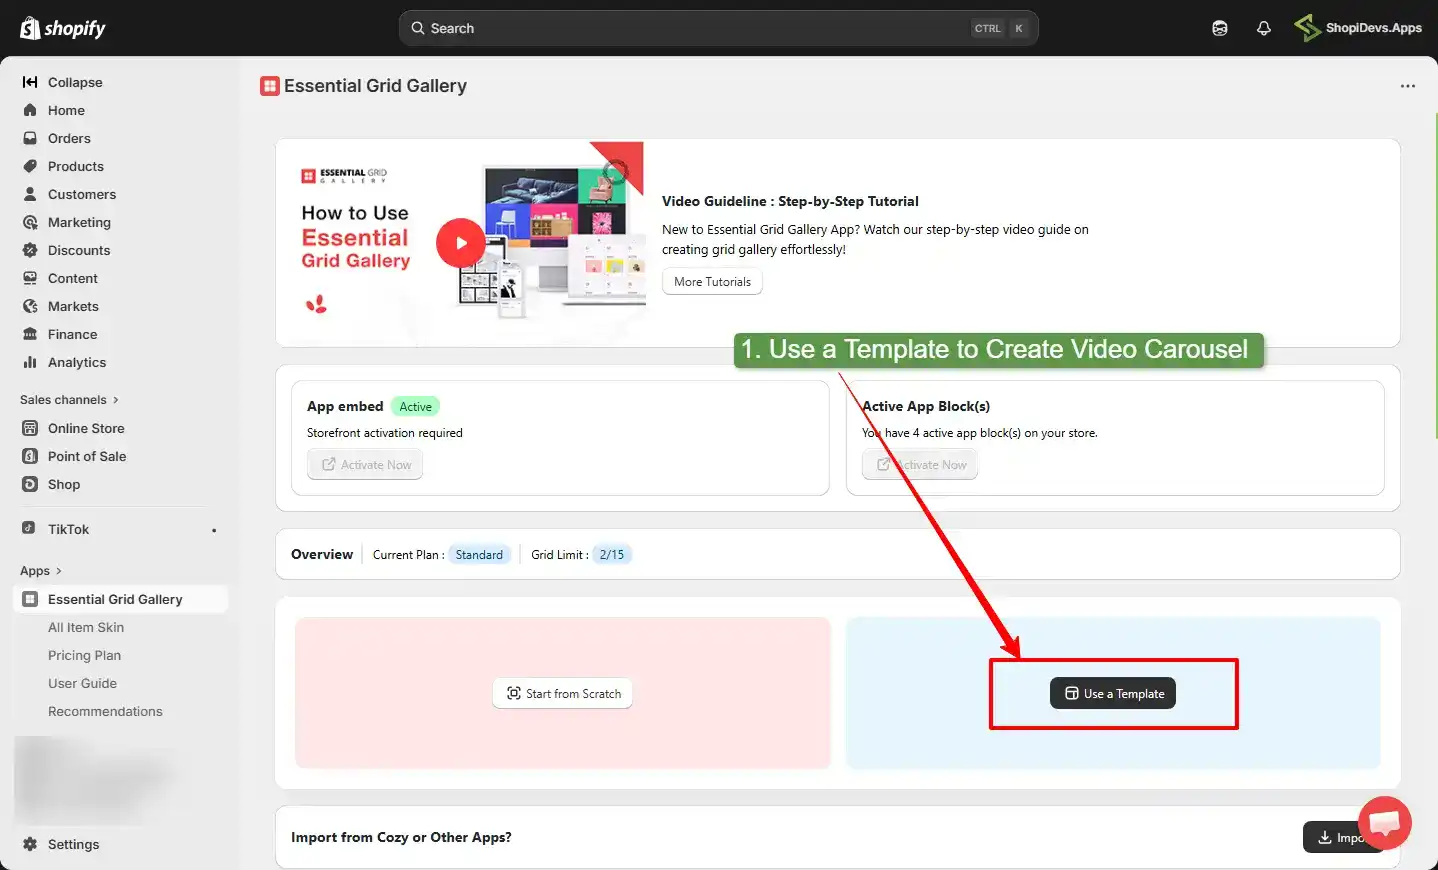
Step 2: Create a New Grid or Use a Template
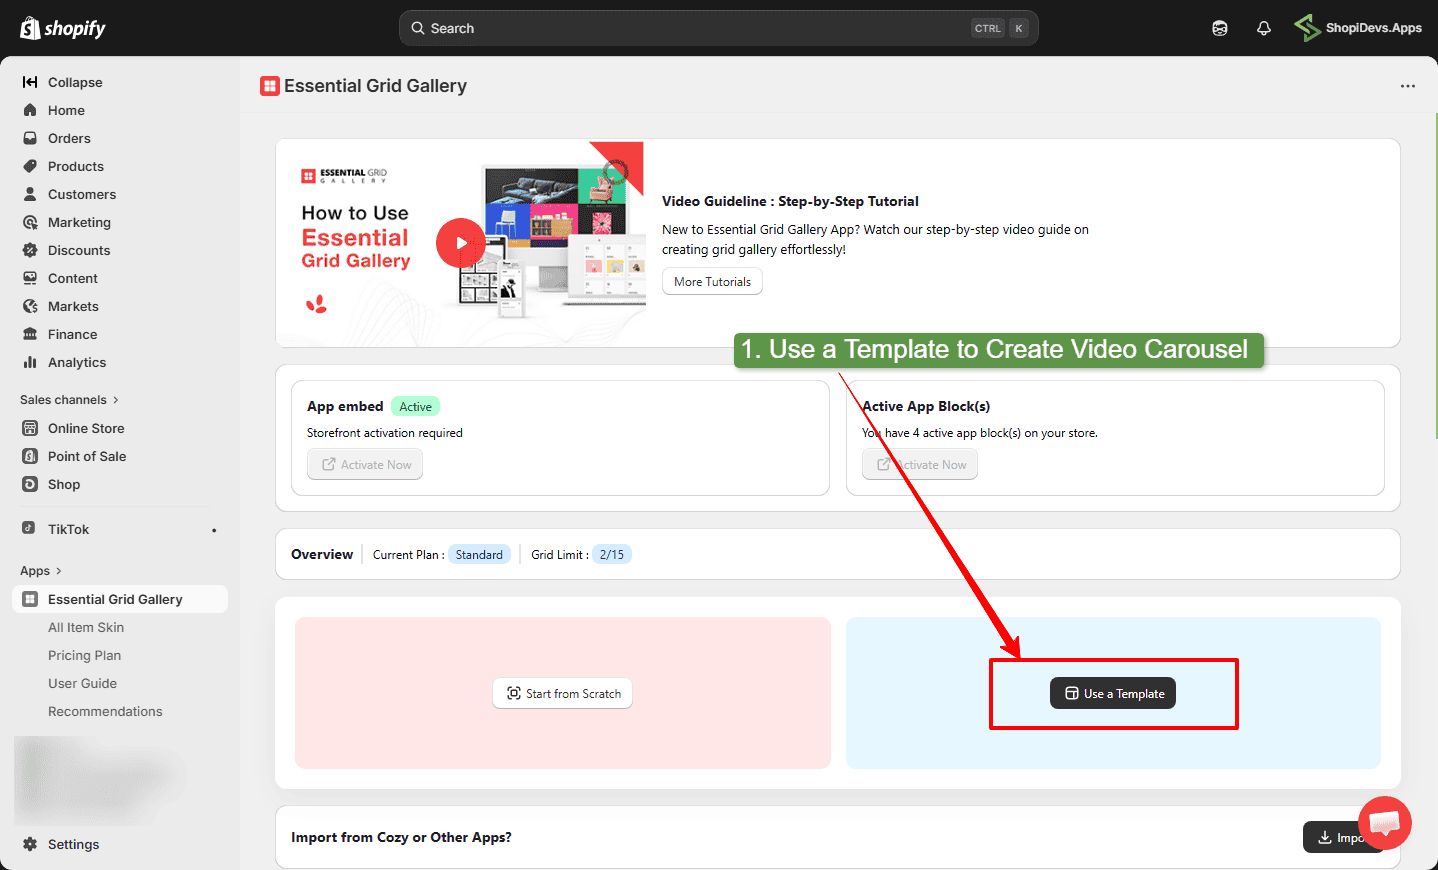
After installation, open the Essential Grid dashboard. Click New Grid. You can start from scratch or choose a prebuilt template. For a video carousel, click Start with a Template.
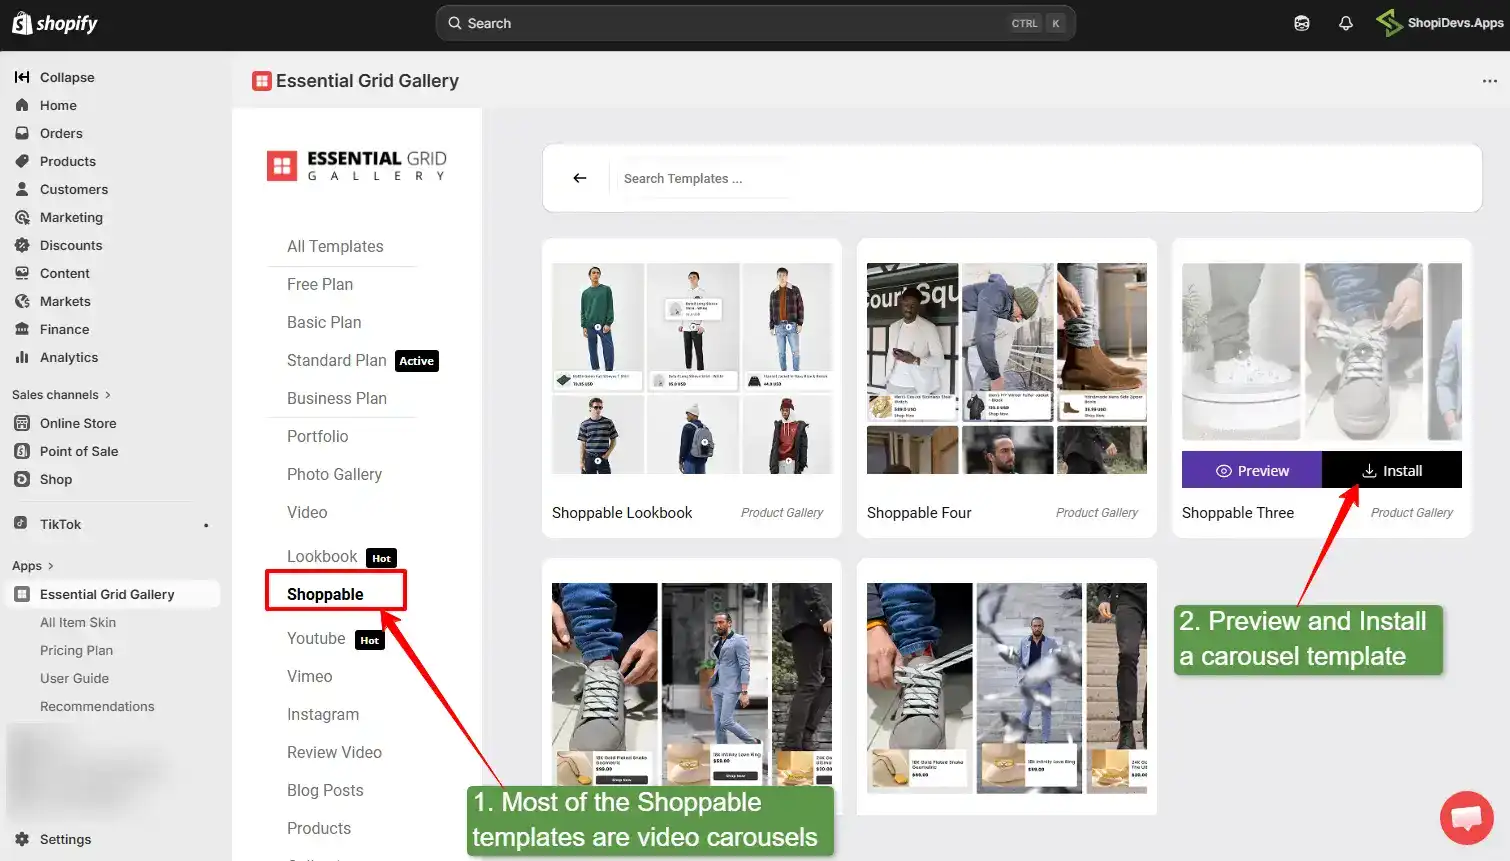
Step 3: Browse Video Carousel Templates
In the template library, filter by “Video” to see video-specific layouts. Choose a carousel-style template that matches your store’s branding.
Step 4: Install the Template
Click on your chosen template and click Install Template. This creates a new grid with the template’s layout, styles, and video placeholder items already configured.
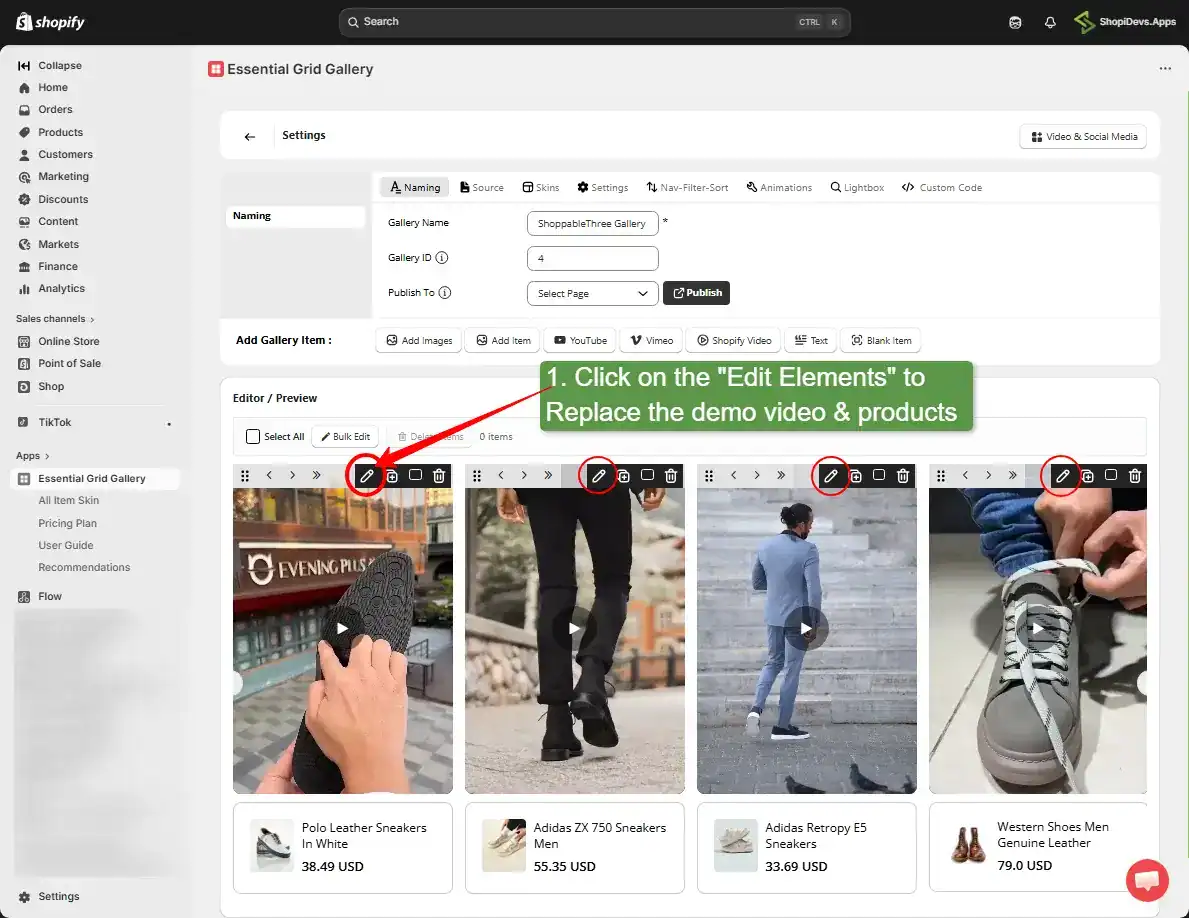
Step 5: Edit Elements to Replace Videos and Products
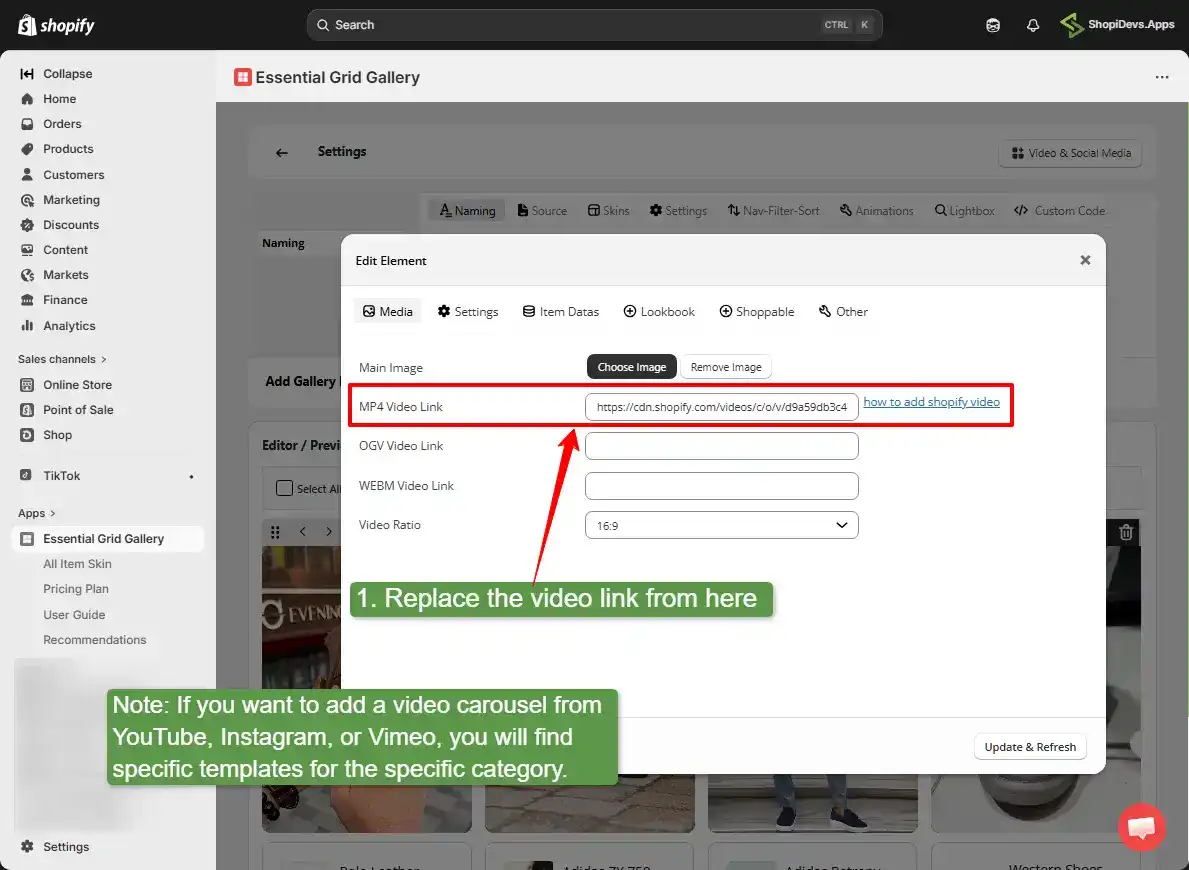
Click Edit Elements on any item in the grid. This opens the item editor where you replace the placeholder video URL and, optionally, tag a Shopify product to make the item shoppable.
Step 6: Replace the Video Link
In the item editor, find the Video URL field and paste your YouTube or Vimeo video link. Essential Grid automatically detects the video source and generates the embed.
Step 7: Tag a Product to Make the Video Shoppable
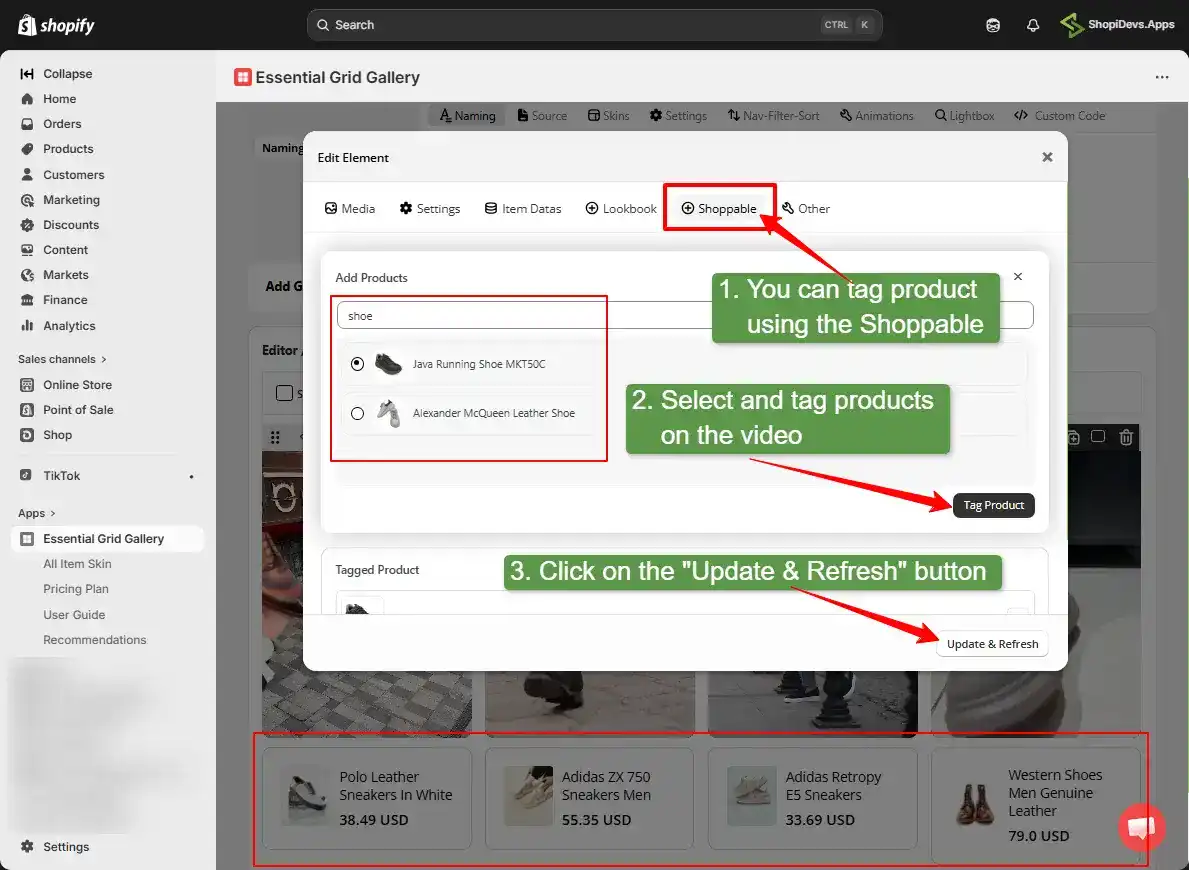
This step is what separates Essential Grid from other methods. In the item editor, look for the Link / Product field. Search for your Shopify product and select it. The carousel item will now display a product buy button or overlay when clicked.
Shoppable video tip: Use short (15 to 30 second) product demo videos for shoppable content. Customers are more likely to buy when each video focuses on a single product benefit. Save longer comparison or tutorial videos for educational content where immediate purchases are not the primary goal.
Step 8: Save and Select a Page to Publish On
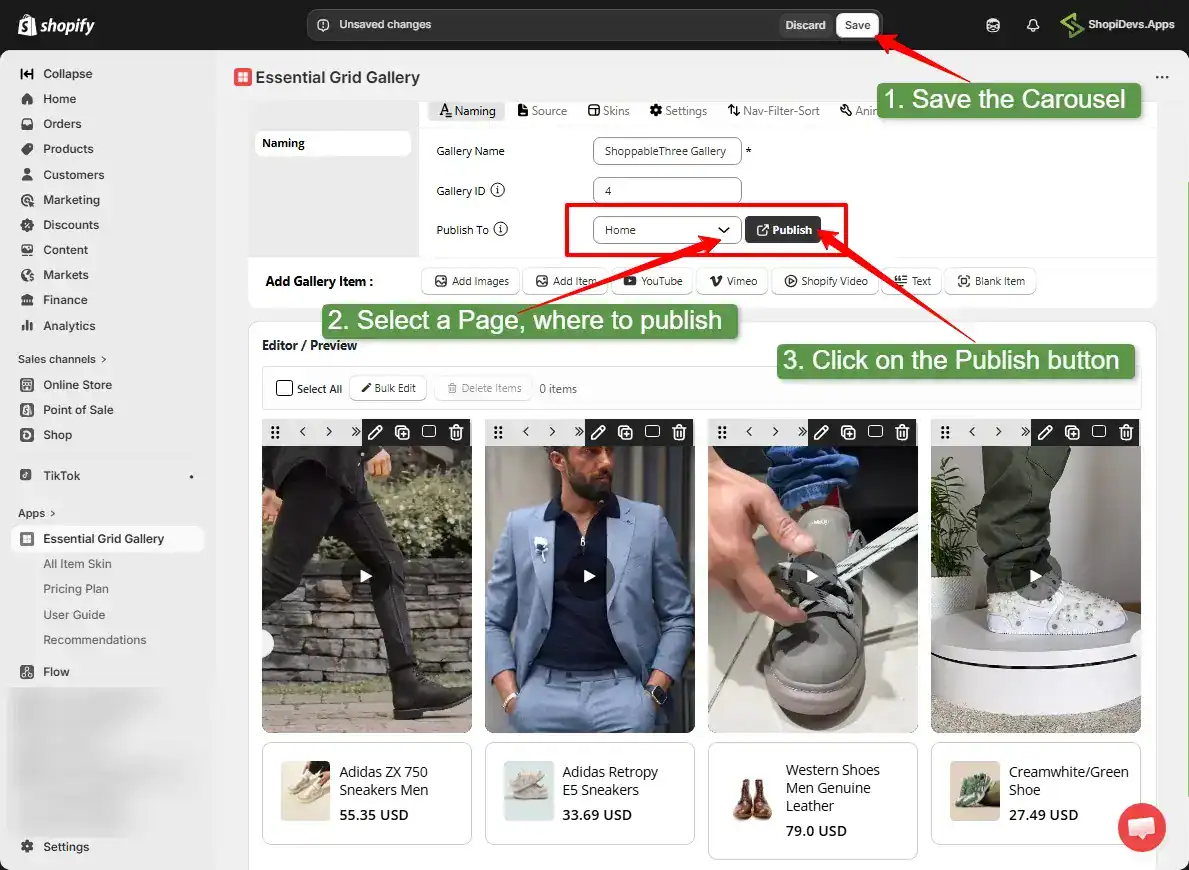
After editing all items, click Save, then select which page you want to publish the carousel on. You can publish to your homepage, a collection page, or any custom page.
Step 9: Copy the Gallery ID and Add It to Your Page
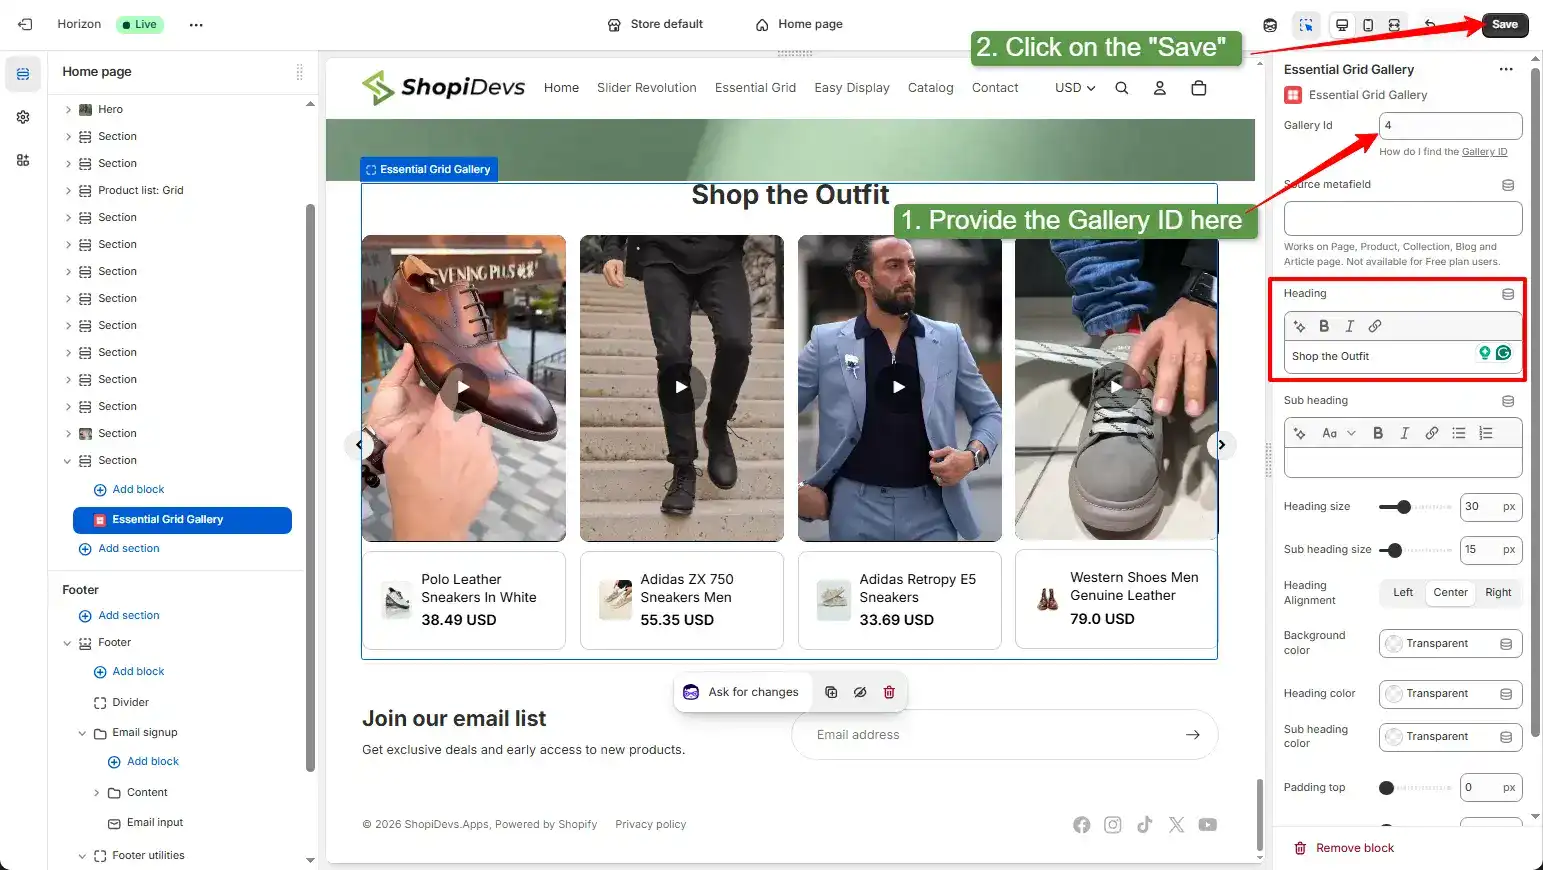
Essential Grid gives you a shortcode or a gallery ID. Enter the Gallery ID, heading name, and save the configuration. Then add the Essential Grid block to your page in Shopify’s theme customizer using the provided shortcode.
Step 10: Preview on Storefront
Open your store in a browser and navigate to the page where you published the carousel. Verify that videos load, thumbnails display correctly, and product tags are clickable. Mobile test.
Method 3: Slider Revolution (Templates + Animation)
Slider Revolution is the right choice when your video carousel needs advanced transitions, scene-based animations, or when you want to start from a professionally designed template rather than building from scratch. It supports YouTube, Vimeo, HTML5 self-hosted video, and TikTok sources in a single carousel.
If you have already used Slider Revolution for a hero slider or sale banner, adding a video carousel is done from the same app dashboard with no extra setup.
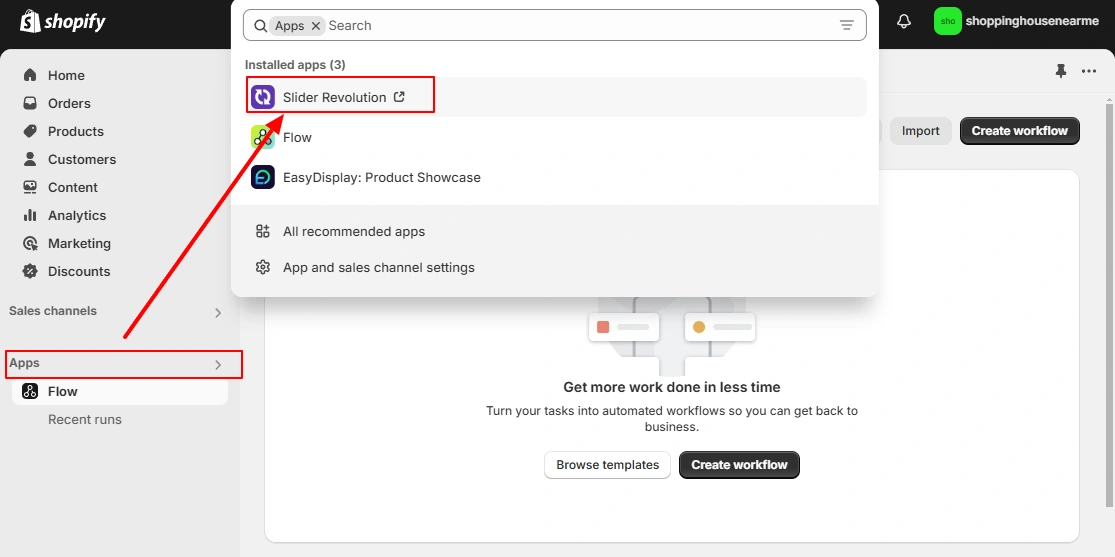
Step 1: Open Slider Revolution in Shopify
From your Shopify admin, go to Apps and open Slider Revolution. If it is not installed, install it from the Shopify App Store first.
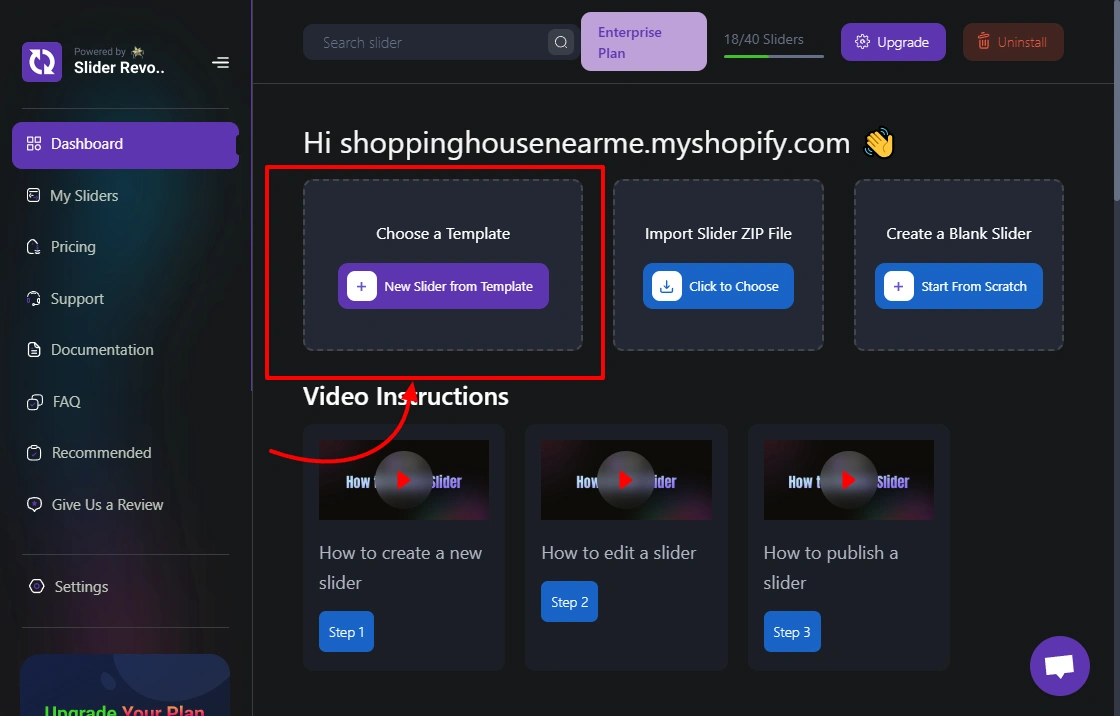
Step 2: Browse Templates
Click New Slider or Template Library. In the search bar, search for “video” to filter carousel and slider templates that feature video as the primary content.
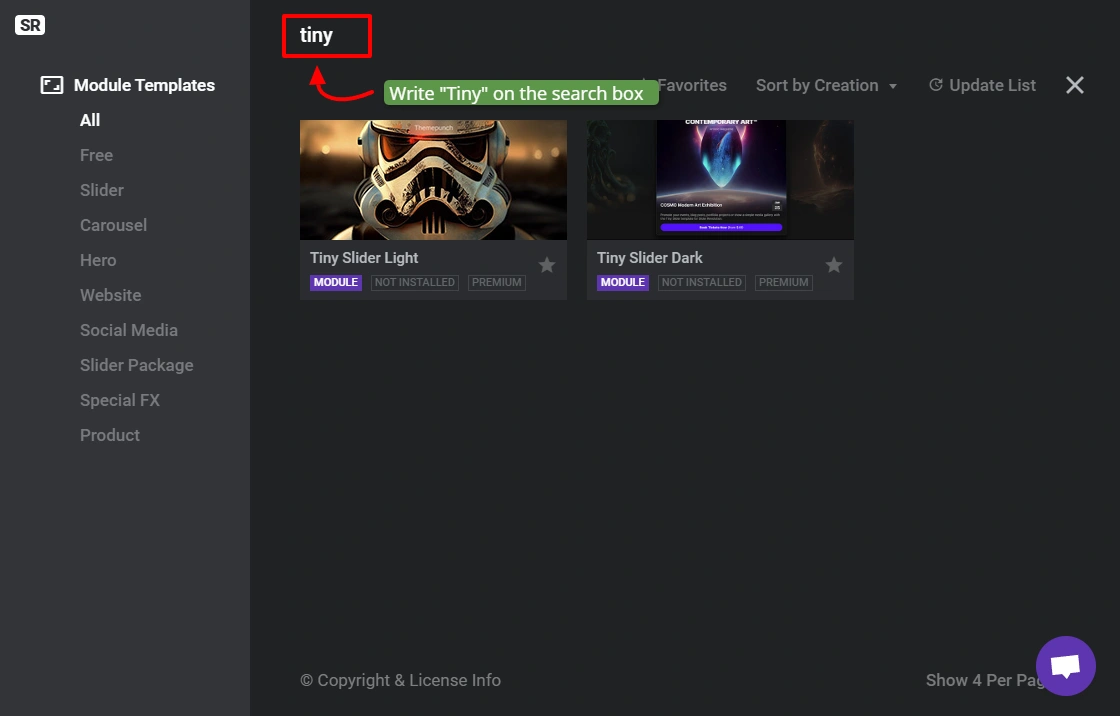
Step 3: Search for a Tiny or Minimal Video Layout
For a thumbnail-style video carousel (multiple small video items side by side), search “tiny” or “carousel” to find compact video slider layouts.
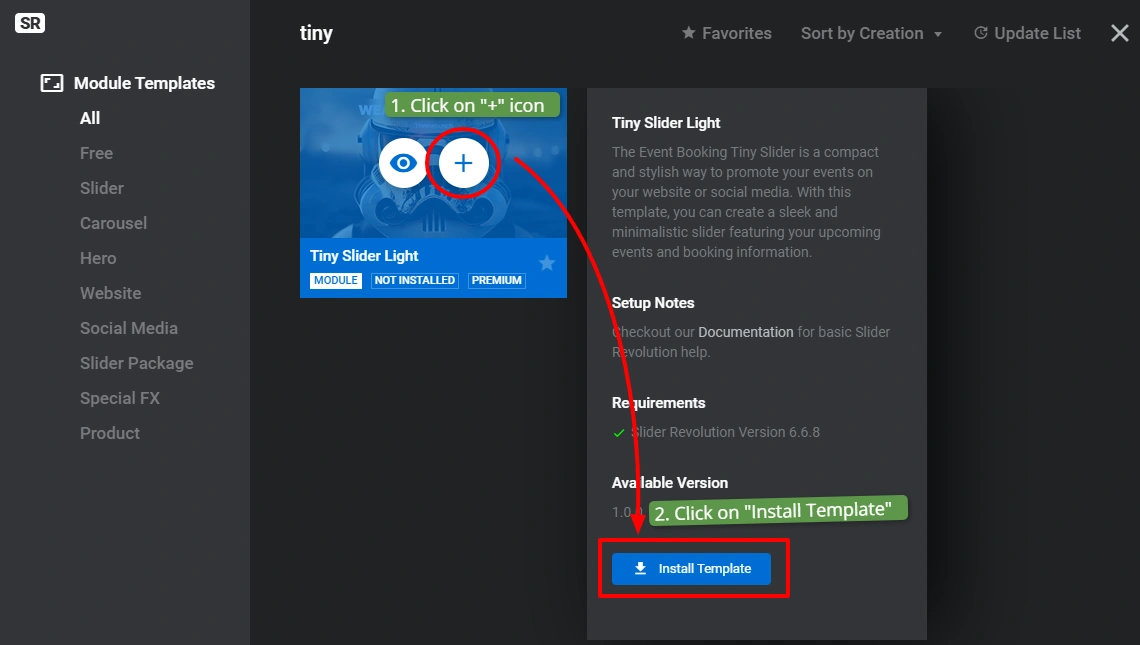
Step 4: Install the Template
Click on your chosen template and select Install Template. Slider Revolution imports all the template’s slides, animations, layers, and settings into your account automatically.
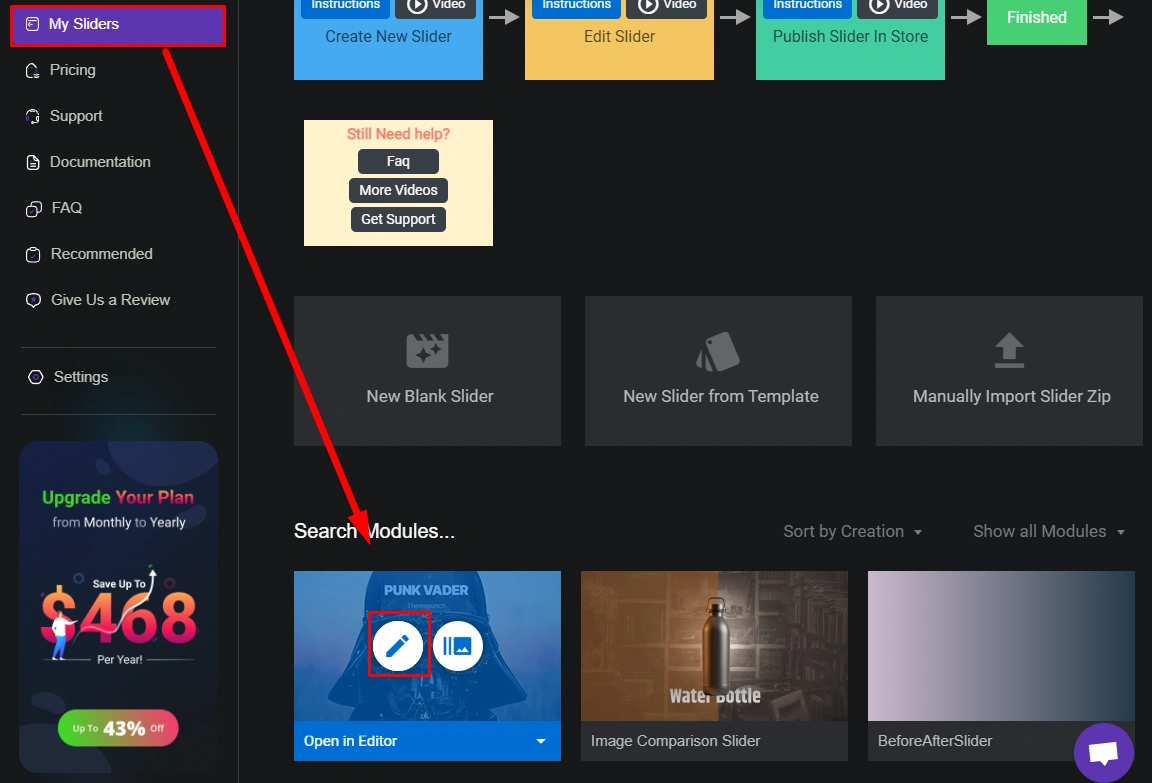
Step 5: Open in Editor
Click Edit on the newly installed template to open the Slider Revolution visual editor. This is where you replace placeholder videos with your own content.
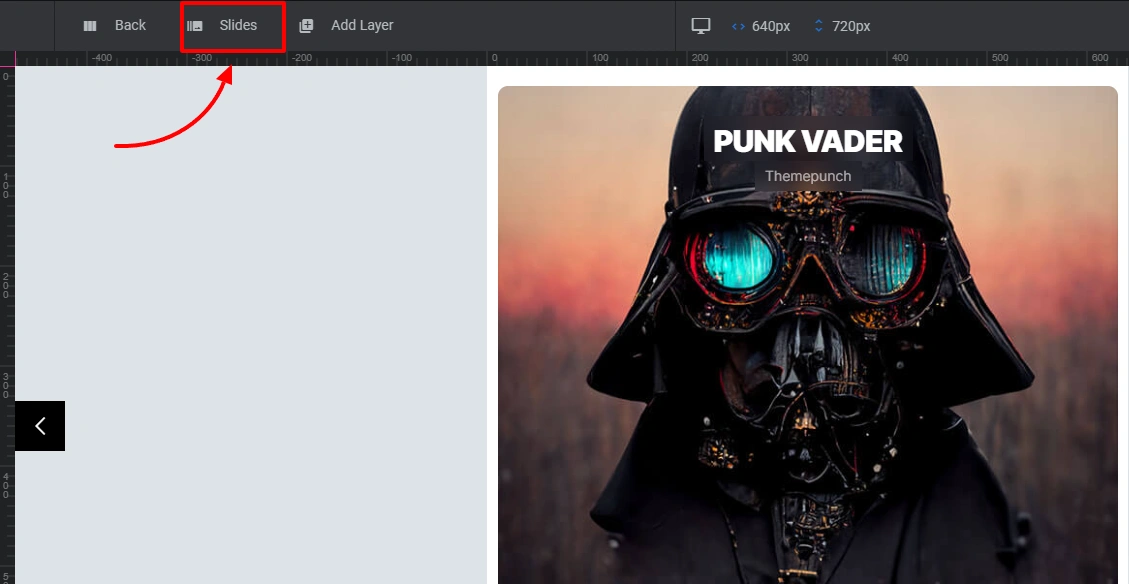
Step 6: Click on Slides to Edit
In the editor’s slide panel (bottom), click the first slide to select it. You will see the current placeholder video layer highlighted on the canvas.
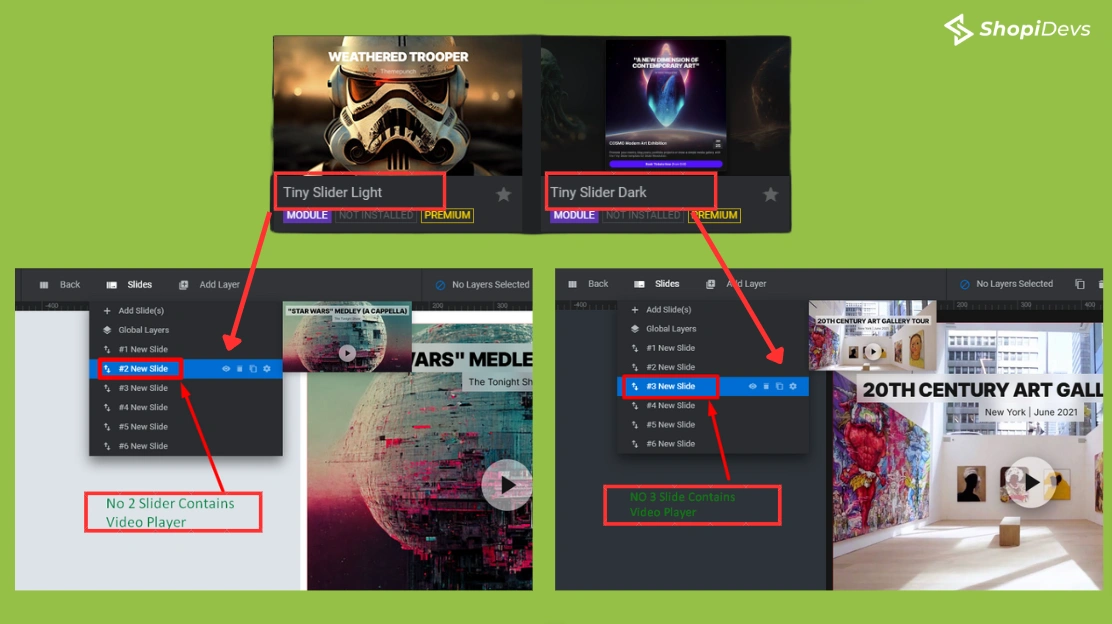
Step 7: Click the Video Player Layer
Click the video layer on the canvas (or find it in the layer list). The right panel shows the video source settings where you can change the video URL or ID.
Step 8: Delete Placeholder Slides
If the template came with placeholder slides you do not need, select them in the slide panel and click Delete. Start with only the slides you plan to use.
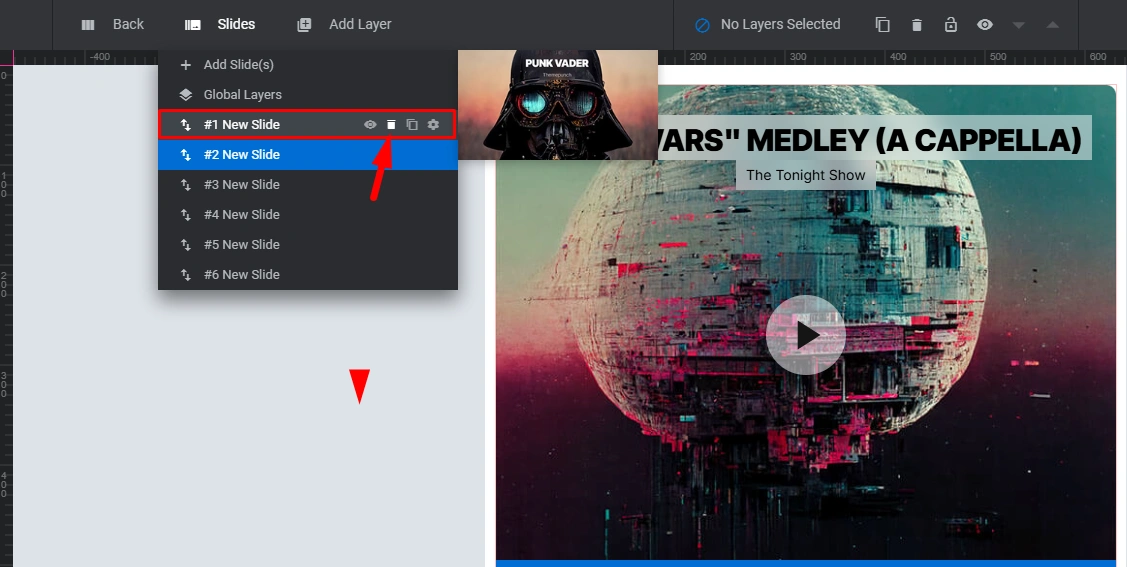
Step 9: Duplicate a Slide for Each Video
Right-click on a slide in the panel and select Duplicate Slide to create a new slide with the same layout. This is faster than building each video slide from scratch.

Step 10: Set the Video Source
Slider Revolution supports multiple video sources. Click the video layer and go to the Media Content panel to select your source type.
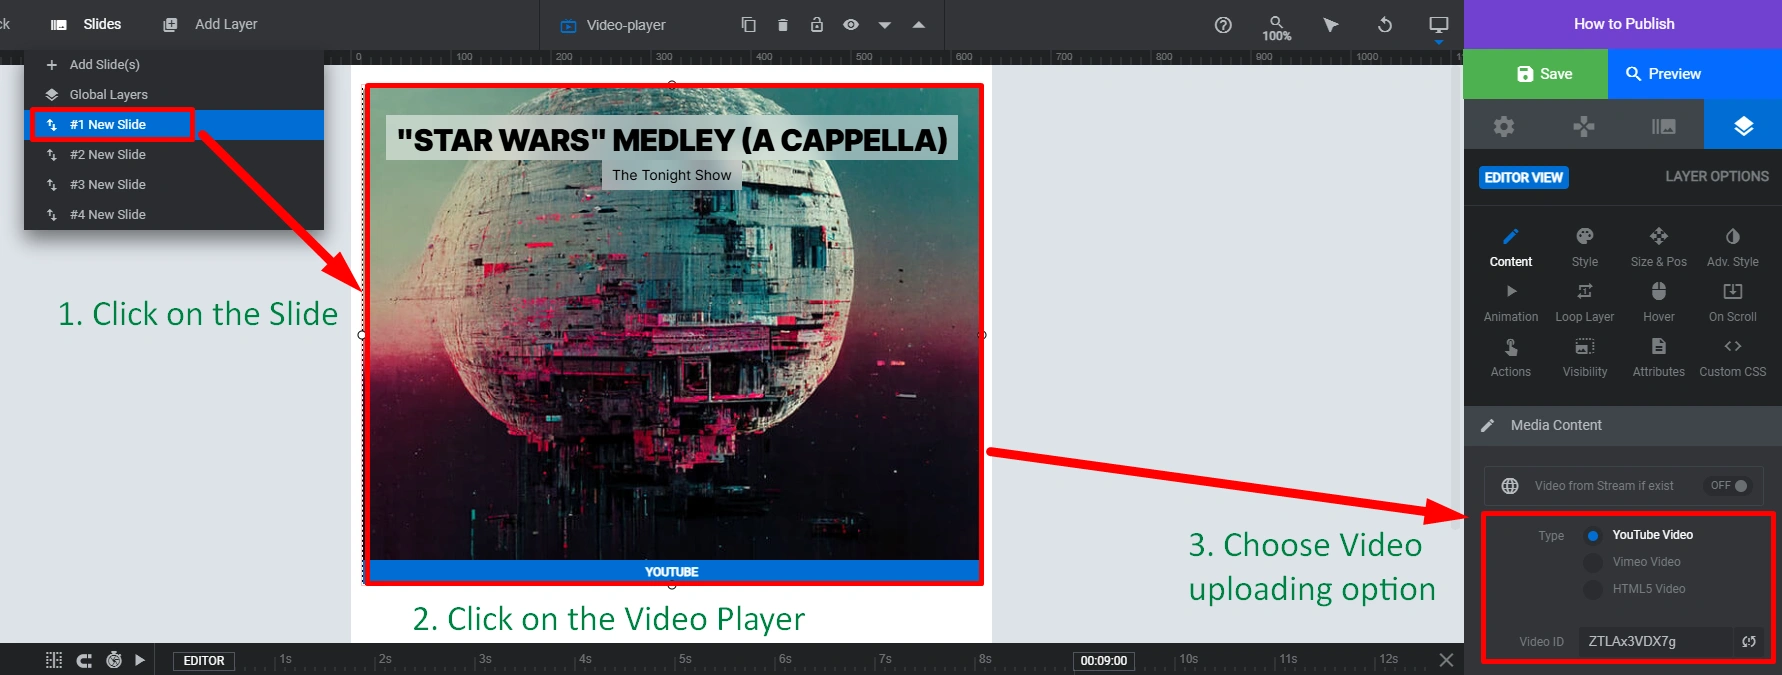

For YouTube: Select YouTube and paste the video ID (found after ?v= in the YouTube URL).
For Vimeo: Select Vimeo and paste the numeric video ID from the Vimeo URL.

For self-hosted HTML5 video: Select HTML5 and upload your video file directly.

Step 11: Upload a Video File Directly (Optional)
If you prefer to use a video stored on Shopify’s CDN rather than YouTube or Vimeo, drag your video file into the media uploader, or click Upload and select it from your computer.


Step 12: Set a Thumbnail
A video thumbnail improves load performance significantly. Set a custom thumbnail for each video slide so the browser only loads the video file when the user clicks play.

Step 13: Save the Slider
Click Save Slider in the top bar to save your changes. Repeat Steps 9-13 for each additional video slide in the carousel.

Step 14: Preview the Carousel
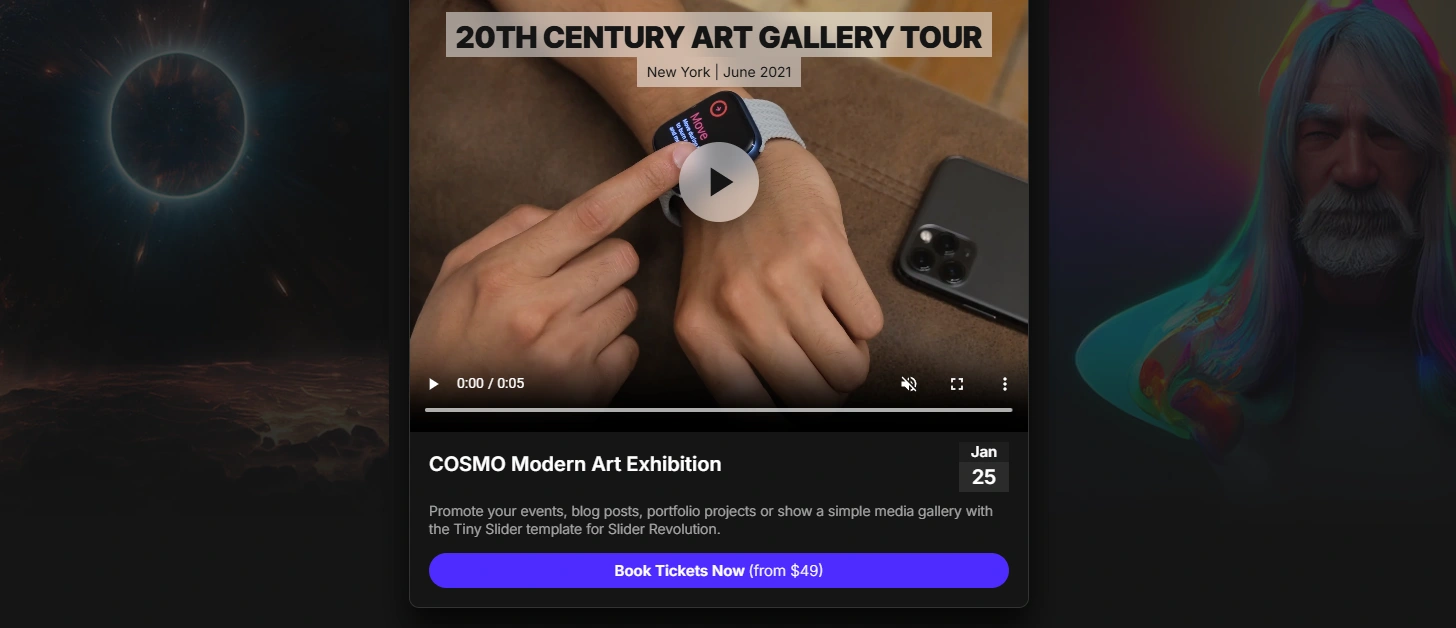
Click Preview to see how the carousel looks and behaves. Check transitions, video playback, and responsive layout before publishing.
Step 15: Copy the Shortcode
Exit the editor and return to the Slider Revolution dashboard. Find your slider and copy the shortcode (e.g., [rev_slider alias="video-carousel"]).
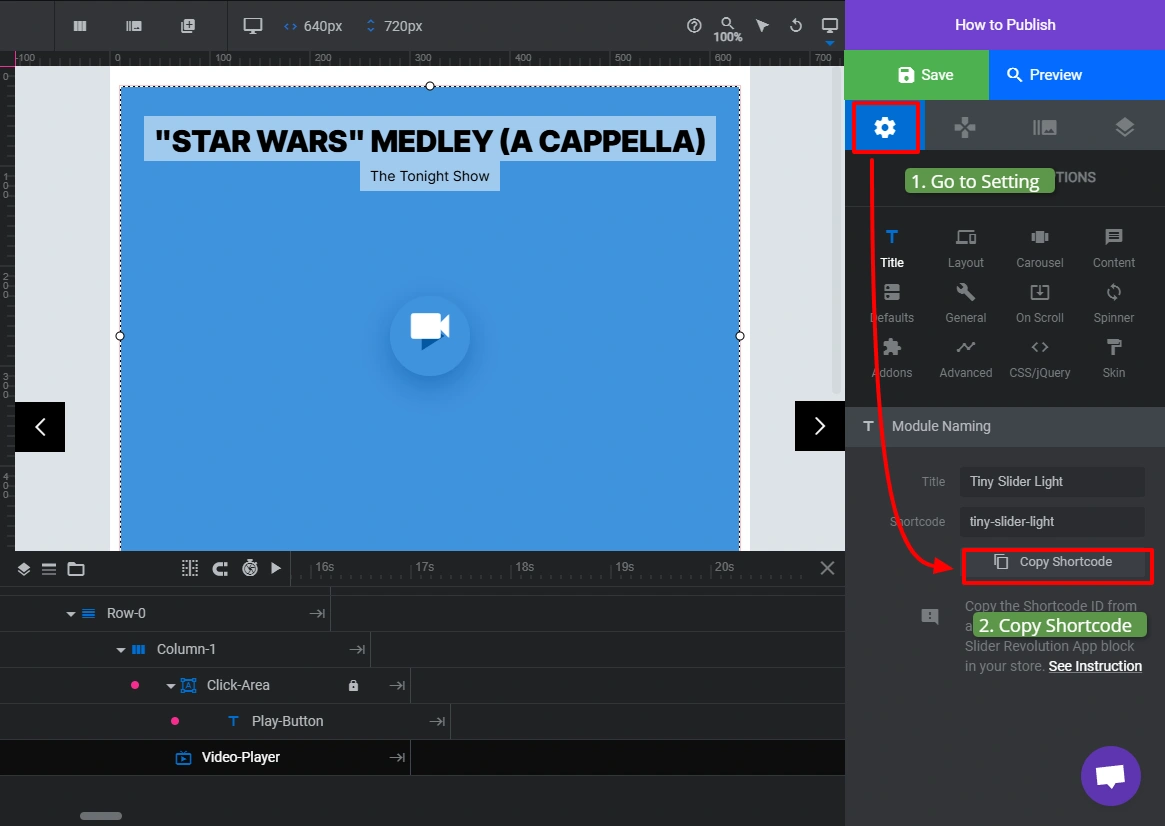
Step 16: Add to Your Shopify Theme
In Shopify, go to Online Store > Themes > Customize. Navigate to the page where you want the carousel. Click Add section, find the Slider Revolution block, and paste your shortcode. Save.
Note: Slider Revolution requires you to configure its General Settings, including autoplay, navigation arrows, looping behavior, and other slider options separately. You can find these settings in the editor under the Slider Settings panel.
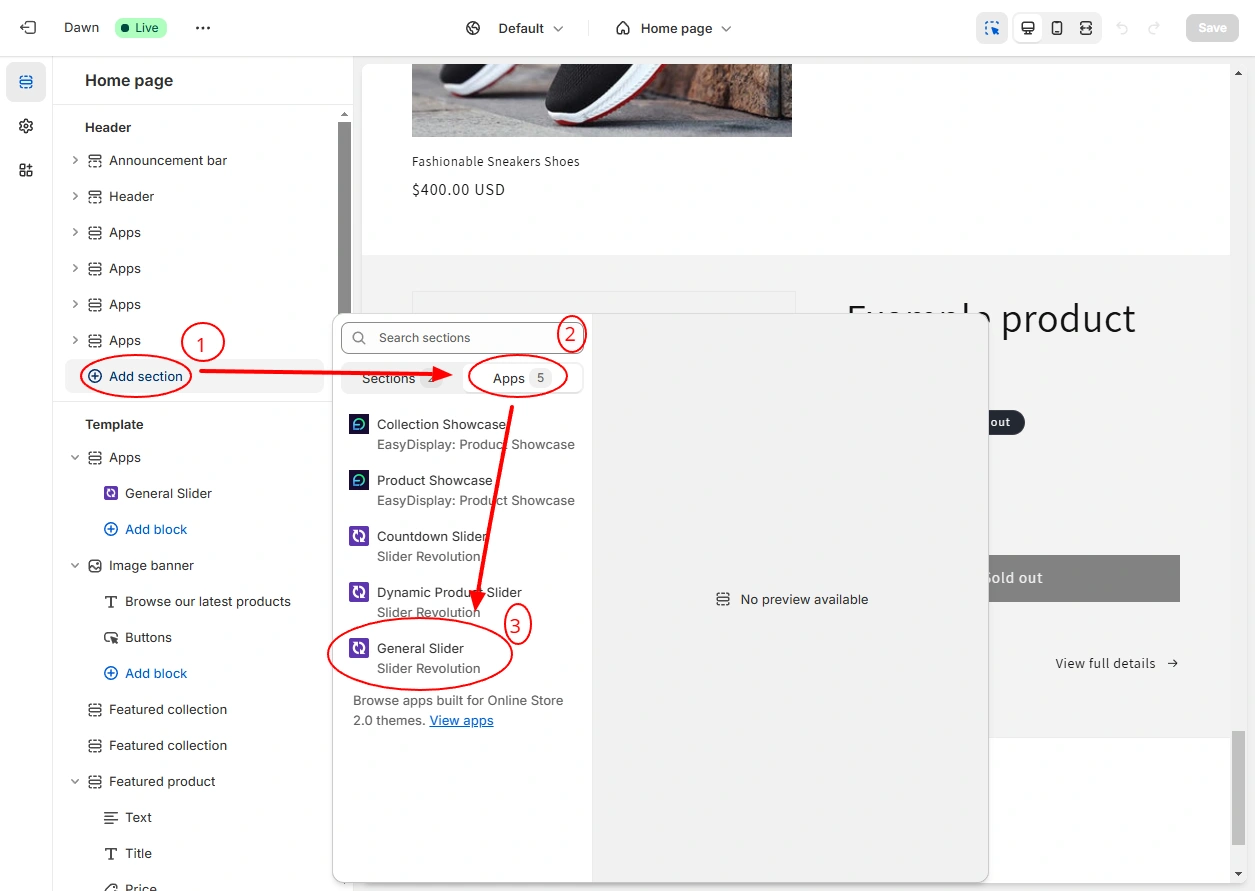
Step 17: Paste and Save the Shortcode
Paste the copied shortcode into the Slider Revolution section field in Shopify’s customizer and click Save. Your video carousel is now live on the selected page.

Now Paste the shortcode on the right at the Slider Shortcode box and click the Save button. The video carousel will now be visible in your store.
Video Sources: YouTube vs Vimeo vs TikTok vs Self-Hosted
The video source you choose affects your carousel’s performance, appearance, and control. Here is a direct comparison:
| Source | Best For | Pros | Cons |
|---|---|---|---|
| YouTube | Product demos, tutorials, brand content | Free hosting, lazy-loaded thumbnails, no bandwidth cost | YouTube branding and related video recommendations after playback ends |
| Vimeo | Premium brand content, clean embeds | No ads, clean video player, privacy controls | Paid plan required for commercial hosting beyond free limits |
| TikTok | Short-form product clips, user-generated content (UGC) | Familiar mobile-first experience, excellent for social proof | Limited embed customization and a less optimized desktop viewing experience |
| Self-hosted (HTML5) | Controlled autoplay, private videos, custom experiences | Complete control, no external branding, autoplay without third-party restrictions | Uses your own server or CDN bandwidth and storage resources |
For most Shopify stores, YouTube is the default choice because it is free and reduces page load time by using lazy loading. If you care about controlling the post-video experience (no competitor product recommendations), Vimeo is worth the cost.
You can find detailed guidance on optimizing media files for Shopify to ensure your carousel thumbnails load fast alongside the video content. If your carousel links to a sale collection, consider showing compare-at prices on linked products to reinforce the discount message visually.
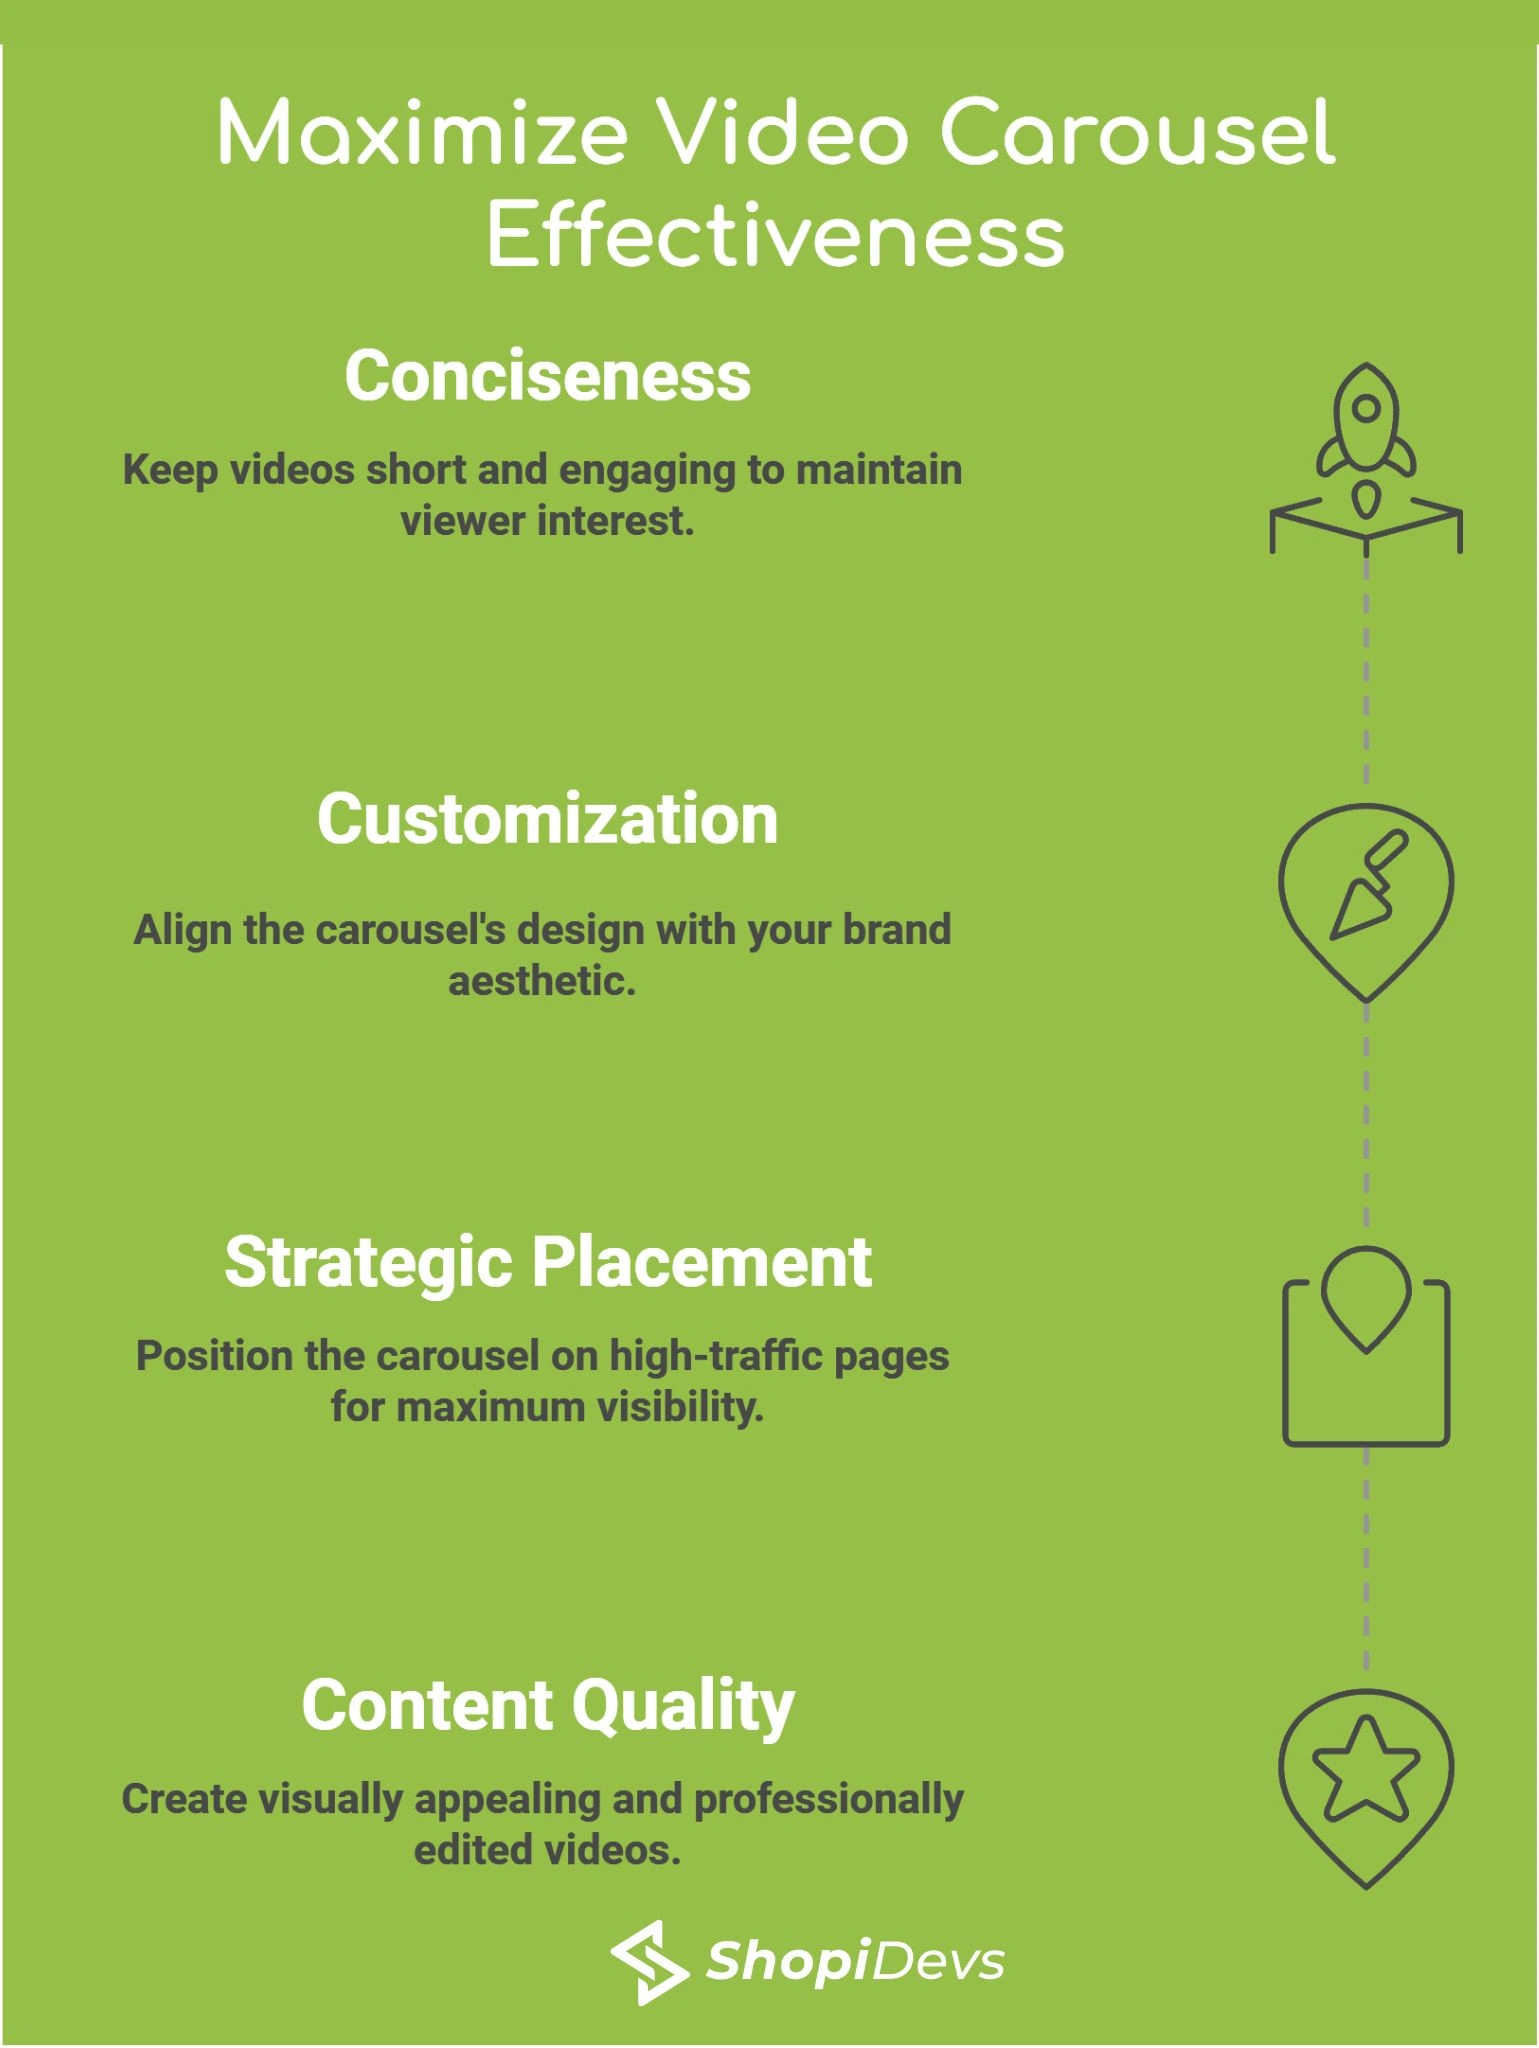
A few practical tips regardless of source: always set a custom thumbnail for each video item (both Essential Grid and Slider Revolution support this), keep video clips under 2 minutes for product-focused content, and verify your carousel renders correctly on mobile before publishing.
Use a product slider alongside your video carousel on product pages to reinforce the visual presentation. You can also make your carousel items clickable to specific product or collection pages, driving traffic from the video section directly to a purchase page.
Most common queries
Can I add a video carousel to Shopify without an app?
Yes. Use Method 1 in this guide. Create a new video-carousel.liquid section file in your theme’s Sections folder, paste the provided Liquid code, and add the section via the theme customizer. This method works on any Shopify theme and requires no paid app.
What is a shoppable video carousel on Shopify?
A shoppable video carousel lets shoppers click on a product directly within a video and add it to cart without navigating away. Essential Grid Gallery supports this through its product tagging feature. Each video item in the carousel can be linked to a specific Shopify product, turning your video content into a direct conversion channel.
Which is better for video carousels: Essential Grid Gallery or Slider Revolution?
It depends on your goal. Essential Grid Gallery is better if you need shoppable video (product tagging). Slider Revolution is better if you need rich animations, scene-based transitions, and want to control autoplay and navigation behavior in detail. For pure product conversion, use Essential Grid. For brand storytelling with cinematic transitions, use Slider Revolution. You can also use them alongside a hero slider built with Slider Revolution.
Will a video carousel slow down my Shopify store?
A video carousel adds page weight primarily through thumbnail images and iframe embed scripts. To minimize load impact: always set custom thumbnails for each video (so the actual video file is only loaded on click), use YouTube or Vimeo embedding instead of self-hosted video where possible, and add the loading="lazy" attribute to your iframes (included in the Liquid code provided above). Check your store speed with Google PageSpeed Insights after adding the carousel.
Can I add TikTok videos to a Shopify video carousel?
Yes, but TikTok embed support depends on your method. Essential Grid Gallery and Slider Revolution both support TikTok video embeds through their platform video source options. The custom Liquid code in Method 1 supports YouTube and Vimeo by default. To add TikTok support to the custom Liquid method, you would need to add a TikTok embed block using TikTok’s oEmbed URL format.
Everything built in. No apps to install.
Bundles, promos, a shoppable lookbook and a mega menu ship with the theme. Five EU languages, one-time payment, lifetime updates — and no monthly app fees eating your margin.
Get Snazzy →
Need a Custom Video Carousel for Your Shopify Store?
ShopiDevs builds custom Shopify sections, video integrations, and advanced theme features. Get expert help to create a fast, responsive video carousel tailored to your store.

Jakaria is an SEO Content Writer in Shopify, Ecommerce, WordPress, and Tech Industry with 5+ years of experience. He specialises in developing engaging, helpful content by simplifying complex topics into an amazing story for B2B, SaaS, and Shopify businesses. He’s also passionate about staying updated on growth marketing strategies and Shopify trends.