
Do you want to Upload HTML Files to Shopify? This article will explain how to Upload HTML Files to Shopify. Shopify is a popular e-commerce platform that allows merchants to create and manage their online stores with ease. HTML (Hypertext Markup Language) is the standard markup language used to create web pages or for any verification purpose. In order to make a custom-designed website or verify purpose on Shopify, it is necessary to know how to upload HTML files to the platform.
In order to Upload HTML Files to Shopify & verify your domain with third-party services such as Facebook, Google Analytics, Google Webmaster, and Pinterest, you’ll need to upload specific HTML files to the root directory of your Shopify store. This step is crucial in ensuring that these sites recognize you as the legitimate owner of your store. To do this, you must temporarily disable password protection on your store so that the verification process can be completed. If you haven’t launched your store yet, simply disable the password protection temporarily for verification, then re-enable it once the process is finished.
This article will provide a step-by-step guide on how to upload HTML files to Shopify and how to integrate them into your online store.
How to Upload HTML Files to Shopify
You can follow the following process to verify Facebook, Google Analytics, Google Search Console, and Pinterest.
- First, you have to get the HTML verification file from Google Analytics, the search console, and Pinterest.
- Copy the full HTML meta tag to the clipboard like this: <meta name=”google-site-verification” content=”…….” />
- Login to the Shopify account.
- Now go to Online Store > Themes and select your current theme.
- Now click … dot button > Edit Code
- Now find the theme. liquid file and open the code editor.
- Now paste the code inside the theme.liquid head tag: <head> your code html code </head>
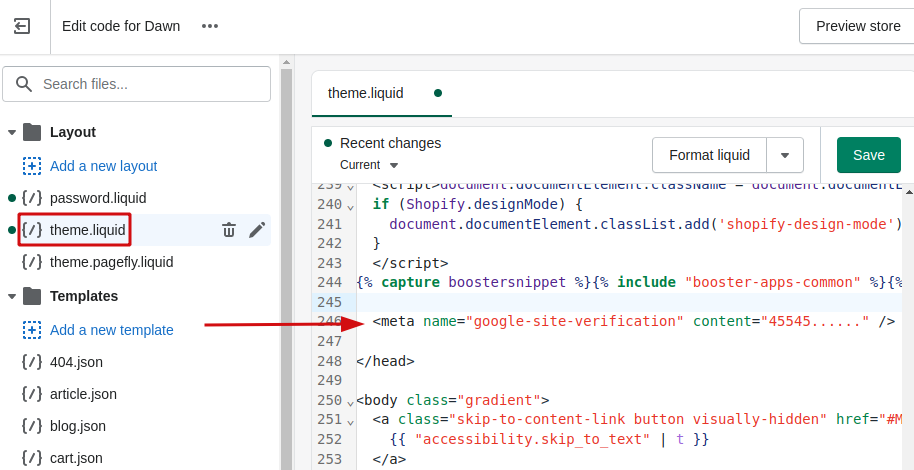
- Now click the Save button
- Now return to the search console or analytics or Facebook what you want to verify then just click the verify. When you complete it, you will see the data about your domain.
In conclusion, Upload HTML Files to Shopify for verification purposes is a simple process that can be done through the theme editor in the Shopify platform. You just need to access the theme editor, locate the appropriate HTML file, and paste your verification code into it. It is important to save your changes and then verify them with the relevant website (e.g. Google Search Console) to ensure that your website has been properly verified. This process is crucial for verifying ownership of your website and can also help improve your website’s search engine optimization.
Additionally, it is important to regularly check the status of your website’s verification to ensure that it is up-to-date. This is because verification codes can sometimes become invalid or need to be updated, especially if you make changes to your website’s code or structure.
It is also recommended to backup your website before making any changes, as well as to test your changes in a safe environment before pushing them live. This can help prevent any potential issues and ensure that your website remains functional and accessible to visitors.
Overall, uploading HTML files to Shopify for verification purposes is a straightforward process that can have a positive impact on your website’s performance and visibility. By properly verifying your website, you can demonstrate ownership and increase the credibility of your website to both search engines and visitors.
Read More:
How To Add The Shopify Video To Banner Section
I’m a digital marketing expert and mobile app developer with a deep understanding of Shopify App Store optimization. I contribute insightful articles on Shopify to help businesses thrive online.