
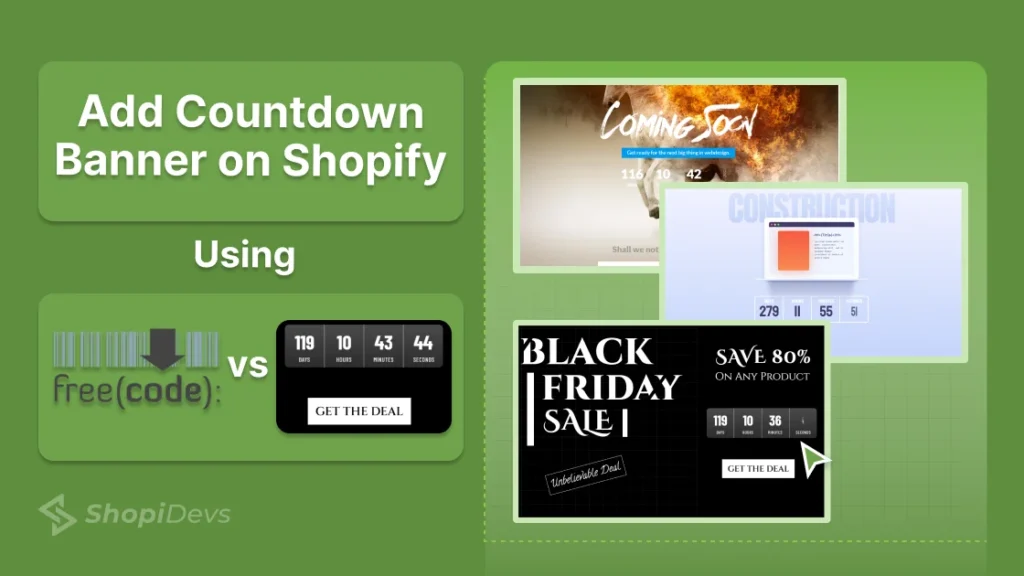
Flash sales that don’t convert. Limited-time offers that don’t feel limited. A blank page where a timer should be. Most Shopify countdown banners fail before they get a chance to work, either because they break on mobile, never get added properly, or look generic enough to be ignored.
A countdown banner works when it’s in the right place, shows the right deadline, and renders cleanly on every device. This guide gives you two ways to add one: a free Liquid code method with full customization control, and a template-based method using Slider Revolution for stores that need something ready in minutes.
Quick Answer
You can add a countdown banner to Shopify in two ways:
(1) using custom Liquid code by creating a new
countdown-banner.liquid
section, pasting the code, then adding it from the Theme Editor and setting your end date; or
(2) using the Slider Revolution & Sections app by choosing a countdown template, inserting the shortcode into your Theme Editor, and configuring the timer. Both methods require no ongoing coding once set up.
Key Takeaways
- Shopify doesn’t include a built-in countdown timer. You’ll need custom Liquid code or an app.
- The custom Liquid method is free, fully customizable, and typically takes around 20 minutes to set up.
- Slider Revolution offers 100+ ready-made countdown templates and can be set up in about 10 minutes.
- Always back up your theme before editing code by downloading a copy from Online Store → Themes.
- Countdown banners work well for flash sales, Black Friday, product launches, limited-time offers, and pre-orders.
- Test the countdown on mobile devices before publishing to ensure proper responsiveness.
When to Use a Countdown Banner on Shopify
Countdown timers don’t work everywhere. Placing one on your homepage for no reason trains customers to ignore it. Used strategically, they reduce cart abandonment and push purchase decisions forward.
Here’s where countdown banners reliably move the needle:
- Flash sales and promotions: Highlight time-limited discounts to increase conversion rates during active campaigns.
- Holiday and seasonal campaigns: Black Friday, Cyber Monday, Christmas, any event with a hard deadline benefits from a visible timer.
- Product launches and pre-orders: Build anticipation before a new product goes live. Coming soon, pages with timers capture email signups before launch.
- Limited stock urgency: Pair with low-stock messaging to show customers that waiting isn’t an option.
- Cart recovery: Place a countdown on the cart page tied to a limited-time discount code to recover abandoned buyers.
Avoid this mistake: Fake urgency damages customer trust. If your countdown timer resets every time a visitor returns, they’ll quickly notice. Only use countdown banners for genuine deadlines, limited-time promotions, or scheduled product launches.
Custom Code vs App: Which Should You Use?
| Factor | Custom Liquid Code | Slider Revolution App |
|---|---|---|
| Difficulty | Intermediate Requires theme editor access | Beginner No coding required |
| Setup Time | 20 to 30 minutes | 10 to 15 minutes |
| Design Options | Manual CSS with full design control | 100+ ready-made countdown templates |
| Cost | Free | Free plan available |
| Customization | Unlimited. Edit any HTML, CSS, or JavaScript. | Template-based but highly customizable |
| Best For | Developers and stores needing complete design control | Store owners who want faster deployment without coding |
If you’re comfortable in the Shopify theme editor and want a timer that matches your brand exactly, go with Method 1. If you want something done live in under 15 minutes with professional visual design, go with Method 2.
2 Methods to add a Countdown Banner on Shopify
You can either use custom code for full control or choose pre-made templates for an easier setup. The custom code method is ideal for advanced users, while templates make it beginner-friendly. Let’s dive into both methods to create a countdown banner:
Method 1: Add Countdown Banner Using Custom Liquid Code
This method gives you full control over the countdown banner design, colors, layout, fonts, timer behavior, and button styling. You’ll create a new Liquid section file, paste the free code below, and then configure it via the theme editor without touching code again.
1. Back Up Your Theme File First
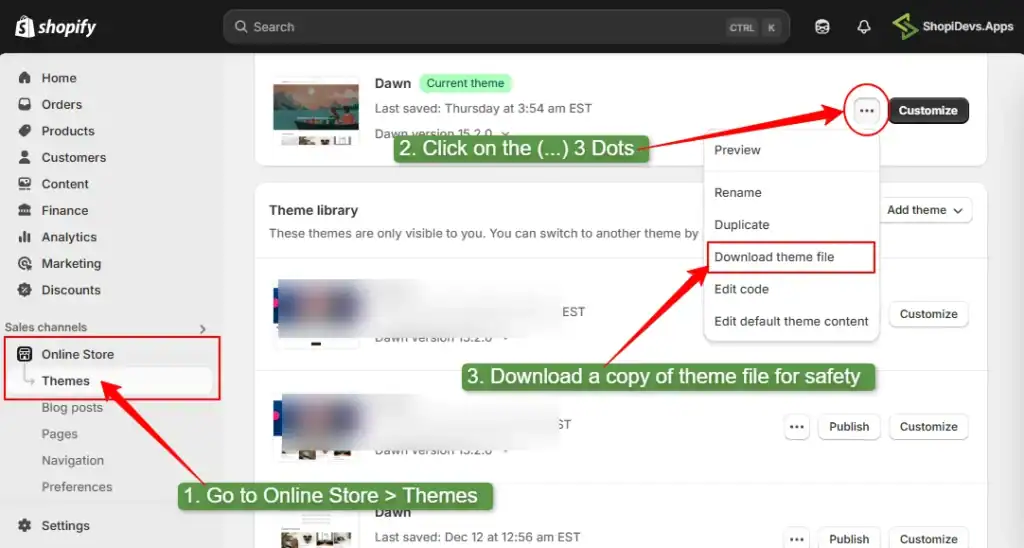
Before editing any theme code, download a backup. If something breaks, you can restore it in minutes.
- Go to Shopify Admin → Online Store → Themes
- Click the ellipsis (…) menu next to your active theme
- Click “Download theme file”, Shopify will email it to you
Automatically back up your entire store
Syncora automatically backs up your products, orders, customers, themes, and store settings on a daily, weekly, or on-demand schedule. Restore your Shopify store in minutes whenever something goes wrong. A free plan is available.
Try Syncora Free →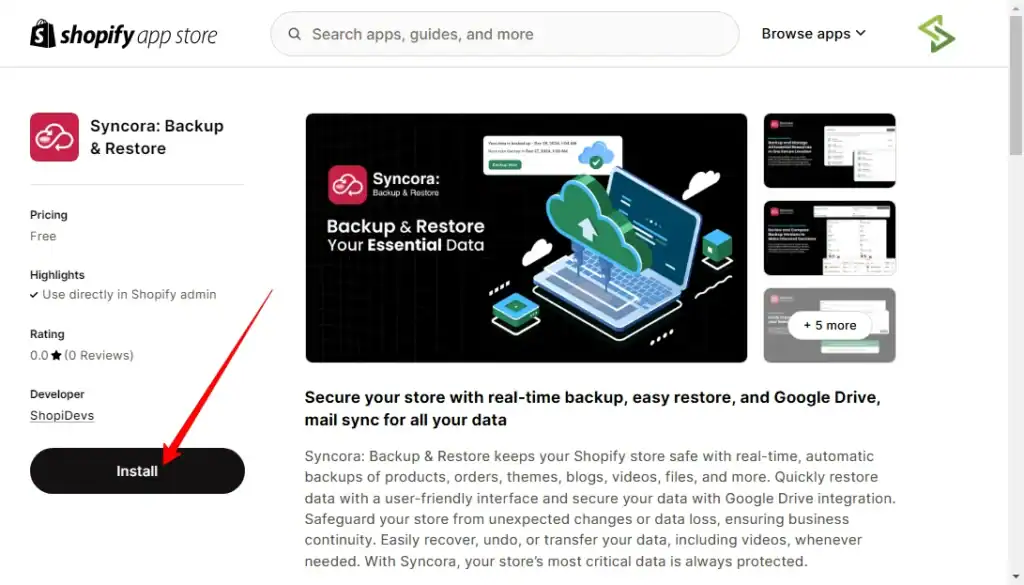
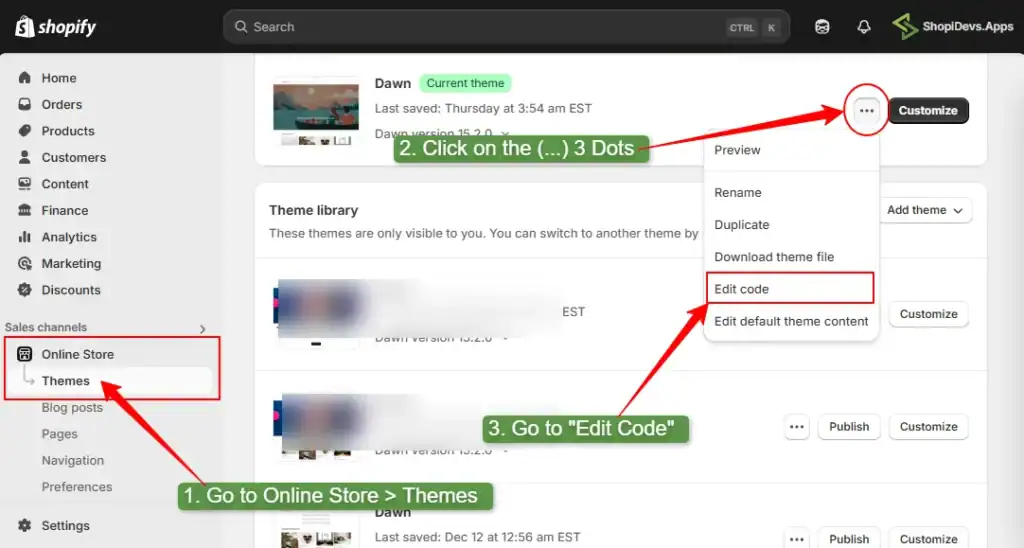
2: Go to Edit Code
- From Shopify Admin, go to Online Store → Themes
- Click the ellipsis (…) menu next to your active theme
- Click “Edit Code” to open the theme code editor
3: Add a New Countdown Banner Section
- In the left sidebar, find and click the “Sections” folder
- Click “Add a new section” at the bottom of the list
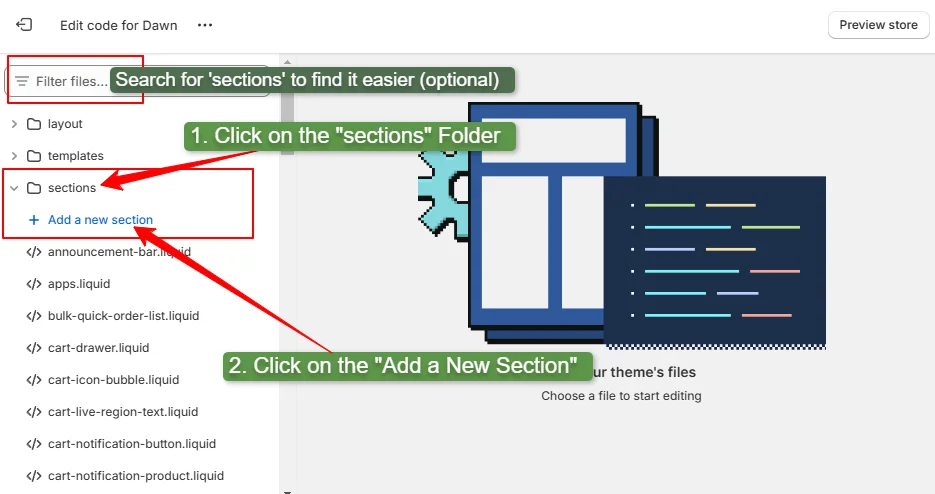
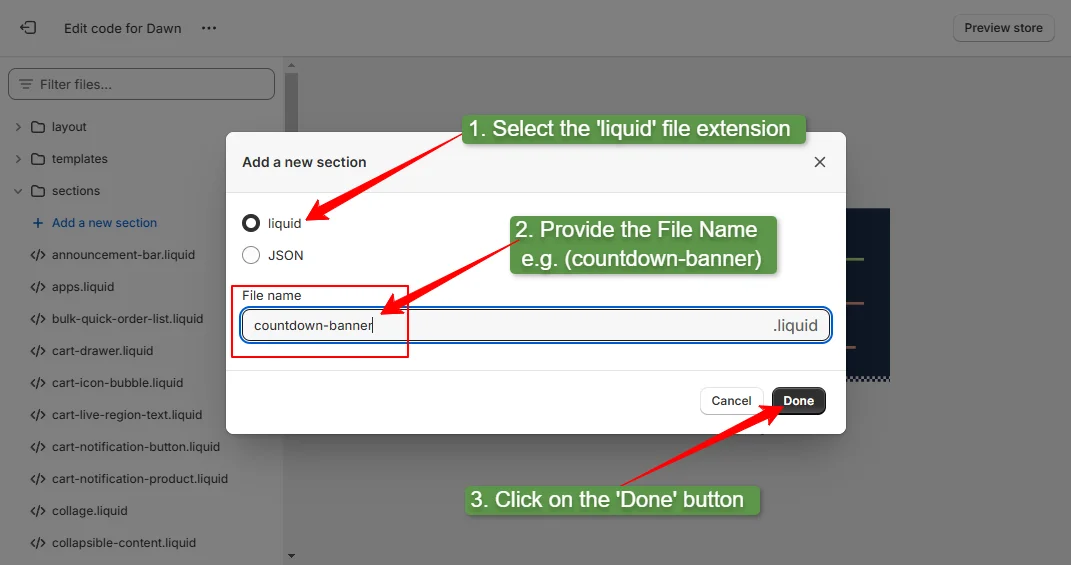
4: Select Liquid Extension and Name the File
- Choose Liquid as the file extension
- Name the file countdown-banner
- Click “Done” — this creates
countdown-banner.liquid
5: Copy the Free Countdown Banner Code
Copy the complete code block below — it includes the CSS styling, HTML structure, JavaScript countdown logic, and the Shopify schema for Theme Editor settings.
{%- style -%}
/* Hero Section */
.hero-section {
    background-color: {{ section.settings.background_color }};
    background-image: url('https://via.placeholder.com/1920x1080'); /* Add your background image URL */
    background-size: cover;
    background-position: center;
    width: 100%;
    overflow: hidden;
}
.hero-content {
    background: rgba(0, 0, 0, 0.6); /* Semi-transparent overlay */
    padding-top: 120px;
    padding-bottom: 120px;
    text-align: center;
    color: {{ section.settings.text_color }}; /* Text color from settings */
    position: relative;
}
.hero-content h1 {
    font-size: 3rem;
    margin-bottom: 20px;
    color: {{ section.settings.text_color }};
}
.hero-content p {
    font-size: 1.2rem;
    margin-bottom: 30px;
}
/* Countdown Timer */
#countdown {
    display: flex;
    justify-content: center;
    gap: 20px;
}
.countdown-item {
    background: rgba(255, 255, 255, 0.2);
    padding: 20px;
    border-radius: 10px;
    text-align: center;
    min-width: 100px;
}
.countdown-item span {
    display: block;
    font-size: 2rem;
    font-weight: bold;
}
.countdown-item .countdown-label {
    font-size: 1rem;
    margin-top: 5px;
    opacity: 0.8;
}
/* Shop Now Button */
.shop-now-btn {
    display: inline-block;
    background-color: {{ section.settings.button_bg_color }};
    color: {{ section.settings.button_text_color }};
    padding: 12px 24px;
    font-size: 1.2rem;
    font-weight: bold;
    border-radius: 8px;
    text-decoration: none;
    margin-top: 20px;
    transition: background 0.3s ease-in-out;
}
.shop-now-btn:hover {
    background-color: {{ section.settings.button_hover_bg_color }};
}
.add-a-water-text-shopidevs{}
.add-a-water-text-shopidevs>a {
    position: absolute;
    bottom: 15px;
    right: 40px;
    color: #fff;
    font-size: 18px;
    opacity: .4;
    text-decoration: none;
}
{%- endstyle -%}
<div class="hero-section">
    <div class="hero-content">
        <h1>{{ section.settings.banner_heading }}</h1>
        <p>{{ section.settings.banner_text }}</p>
        <div id="countdown">
            <div class="countdown-item">
                <span id="days"></span>
                <span class="countdown-label">Days</span>
            </div>
            <div class="countdown-item">
                <span id="hours"></span>
                <span class="countdown-label">Hours</span>
            </div>
            <div class="countdown-item">
                <span id="minutes"></span>
                <span class="countdown-label">Minutes</span>
             </div>
            <div class="countdown-item">
                <span id="seconds"></span>
                <span class="countdown-label">Seconds</span>
            </div>
        </div>
        {% if section.settings.button_link != blank %}
            <a href="{{ section.settings.button_link }}" class="shop-now-btn">
                {{ section.settings.button_text }}
            </a>
        {% endif %}
        <div class="add-a-water-text-shopidevs">
          <a target="_blank" href="https://apps.shopify.com/revolution-slider?utm_source=Shopidevs_article&utm_medium=countdown_banner_shopify&utm_campaign=ShopiDevs_marketing&utm_term=provided_free_code">Get Countdown Templates for Free</a>
        </div>
    </div>
</div>
<script>
document.addEventListener("DOMContentLoaded", function () {
    const countdownEndDate = "{{ section.settings.end_date }}";
    if (!countdownEndDate) {
        document.getElementById("countdown").innerHTML = "<p>Please set an event date in theme settings.</p>";
        return;
    }
    const countDownDate = new Date(countdownEndDate).getTime();
    function updateCountdown() {
        const now = new Date().getTime();
        const distance = countDownDate - now;
        if (distance <= 0) {
            document.getElementById("countdown").innerHTML = "<p>The event has started!</p>";
            return;
        }
        const days = Math.floor(distance / (1000 * 60 * 60 * 24));
        const hours = Math.floor((distance % (1000 * 60 * 60 * 24)) / (1000 * 60 * 60));
        const minutes = Math.floor((distance % (1000 * 60 * 60)) / (1000 * 60));
        const seconds = Math.floor((distance % (1000 * 60)) / 1000);
        document.getElementById("days").textContent = days;
        document.getElementById("hours").textContent = hours;
        document.getElementById("minutes").textContent = minutes;
        document.getElementById("seconds").textContent = seconds;
    }
    setInterval(updateCountdown, 1000);
    updateCountdown();
});
</script>
{% schema %}
{
  "name": "Countdown Section",
  "settings": [
    {
      "type": "text",
      "id": "banner_heading",
      "label": "Banner Heading",
      "default": "Welcome to the Big Event!"
    },
    {
      "type": "text",
      "id": "banner_text",
      "label": "Banner Text",
      "default": "Join us for an unforgettable experience. The event starts in:"
    },
    {
      "type": "text",
      "id": "end_date",
      "label": "Event End Date",
      "default": "2026-01-01T00:00:00",
      "info": "Enter the event end date in YYYY-MM-DDTHH:MM:SS format."
    },
    {
      "type": "color",
      "id": "background_color",
      "label": "Background Color",
      "default": "#000000"
    },
    {
      "type": "color",
      "id": "text_color",
      "label": "Text Color",
      "default": "#FFFFFF"
    },
    {
      "type": "text",
      "id": "button_text",
      "label": "Button Text",
      "default": "Shop Now"
    },
    {
      "type": "url",
      "id": "button_link",
      "label": "Button Link",
      "default": "/collections/all"
    },
    {
      "type": "color",
      "id": "button_bg_color",
      "label": "Button Background Color",
      "default": "#FF5733"
    },
    {
      "type": "color",
      "id": "button_text_color",
      "label": "Button Text Color",
      "default": "#FFFFFF"
    },
    {
      "type": "color",
      "id": "button_hover_bg_color",
      "label": "Button Hover Background Color",
      "default": "#E04E1F"
    }
  ],
  "presets": [
    {
      "name": "Countdown Section"
    }
  ]
}
{% endschema %}
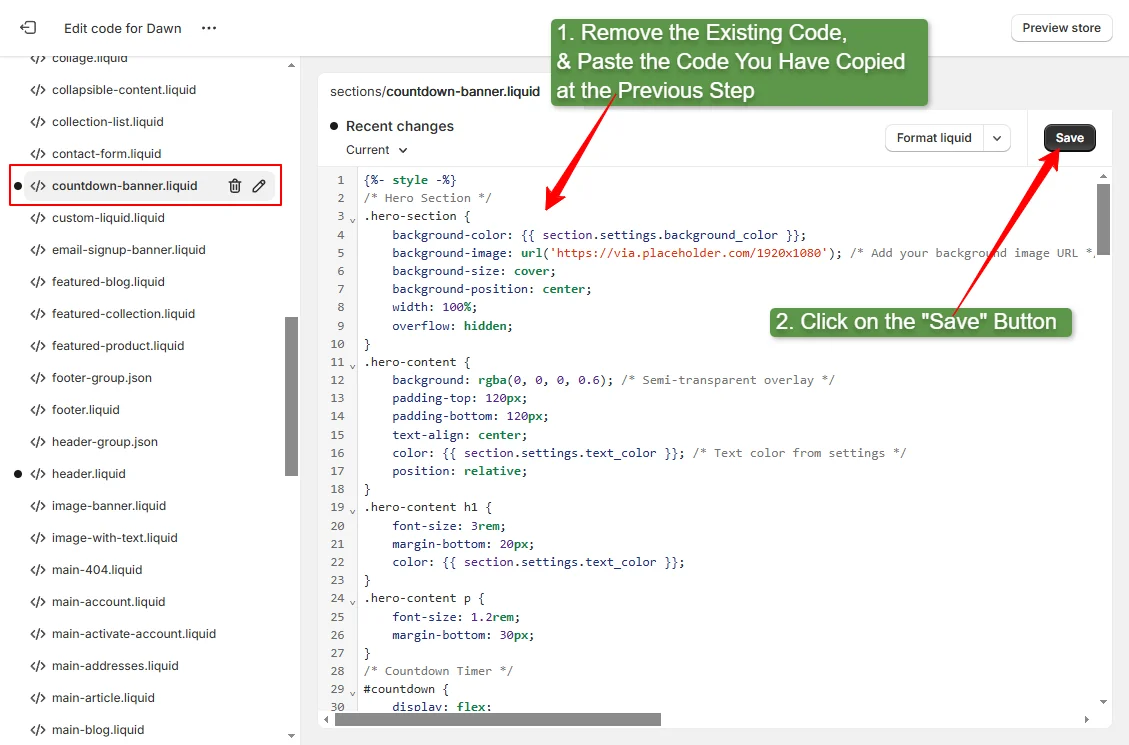
6: Paste the code into the countdown banner. liquid File
- Open the countdown-banner.liquid file you just created
- Delete any default code in the file
- Paste the code you copied in Step 5
- Click “Save”
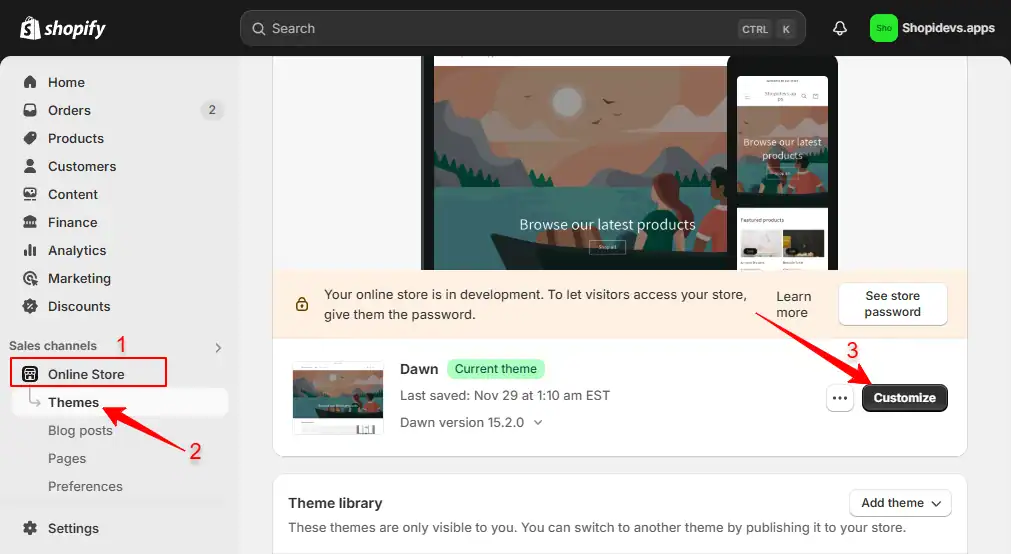
7: Go to Theme Editor
- Go to Online Store → Themes
- Click “Customize” next to your active theme
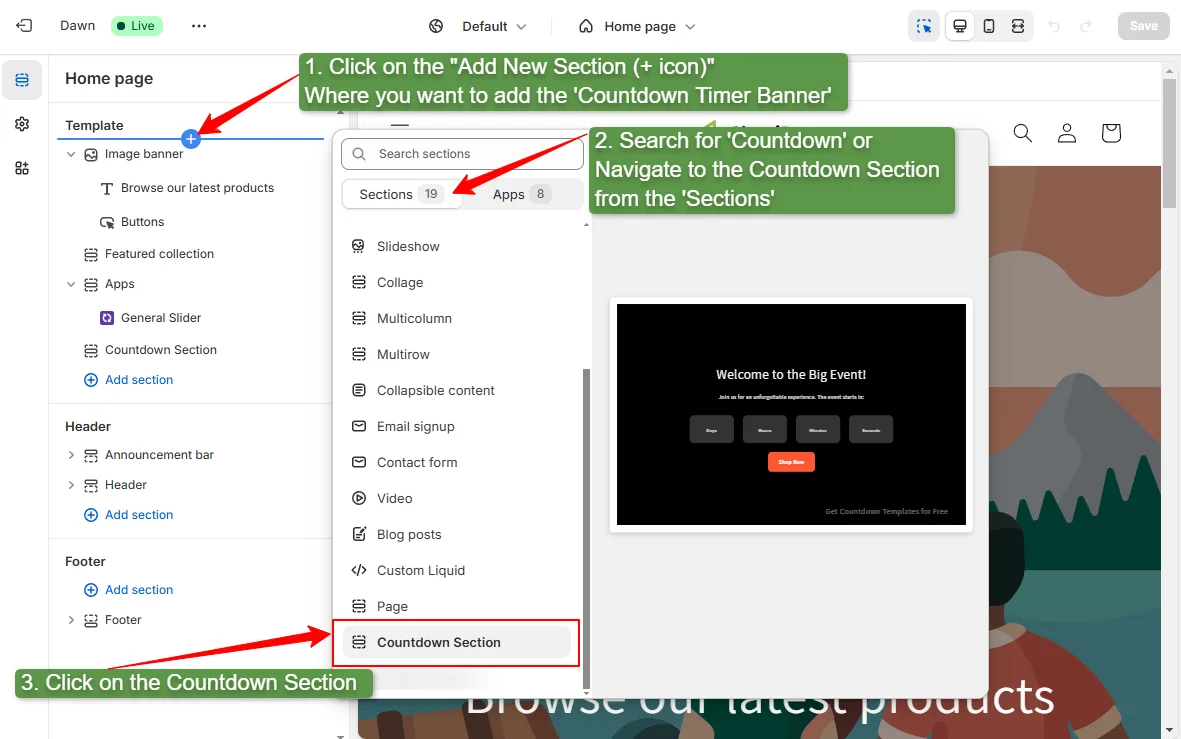
8: Add the Countdown Banner Section
- Click the “+” (Add section) button in the left sidebar
- Search for “Countdown” or scroll to find “Countdown Section”
- Click it to add it to your page layout
9: Configure the Banner Settings
In the section settings panel, customize:
- Banner heading and description text
- Event end date — use format
YYYY-MM-DDTHH:MM:SS(e.g.,2026-11-29T23:59:00for Black Friday) - Background color and text color
- Button text, link, color, and hover color
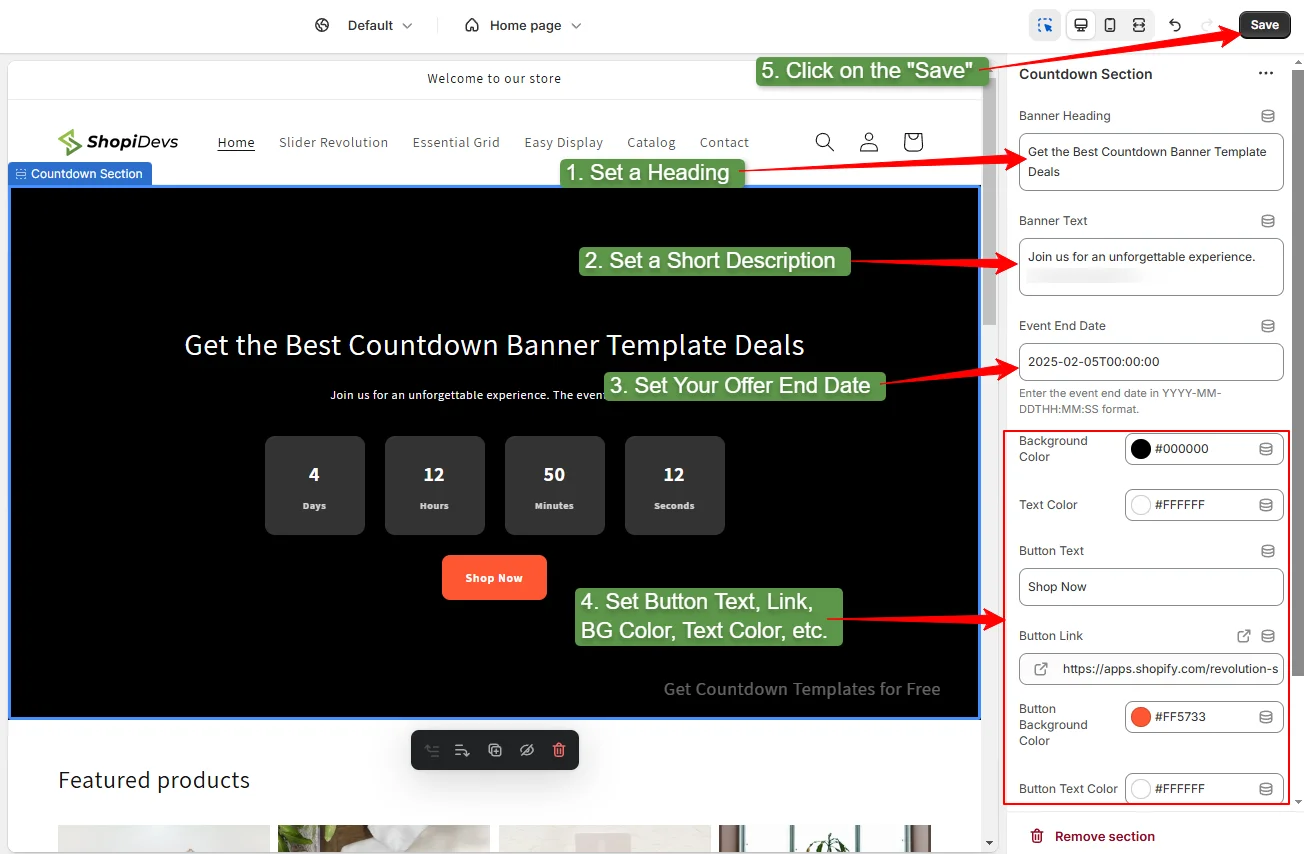
Click Save when done.
10: Preview the Storefront
Visit your store’s live URL or use the Theme Editor preview to check that the countdown timer is ticking correctly. Test on mobile too — resize the preview window to confirm the layout holds.
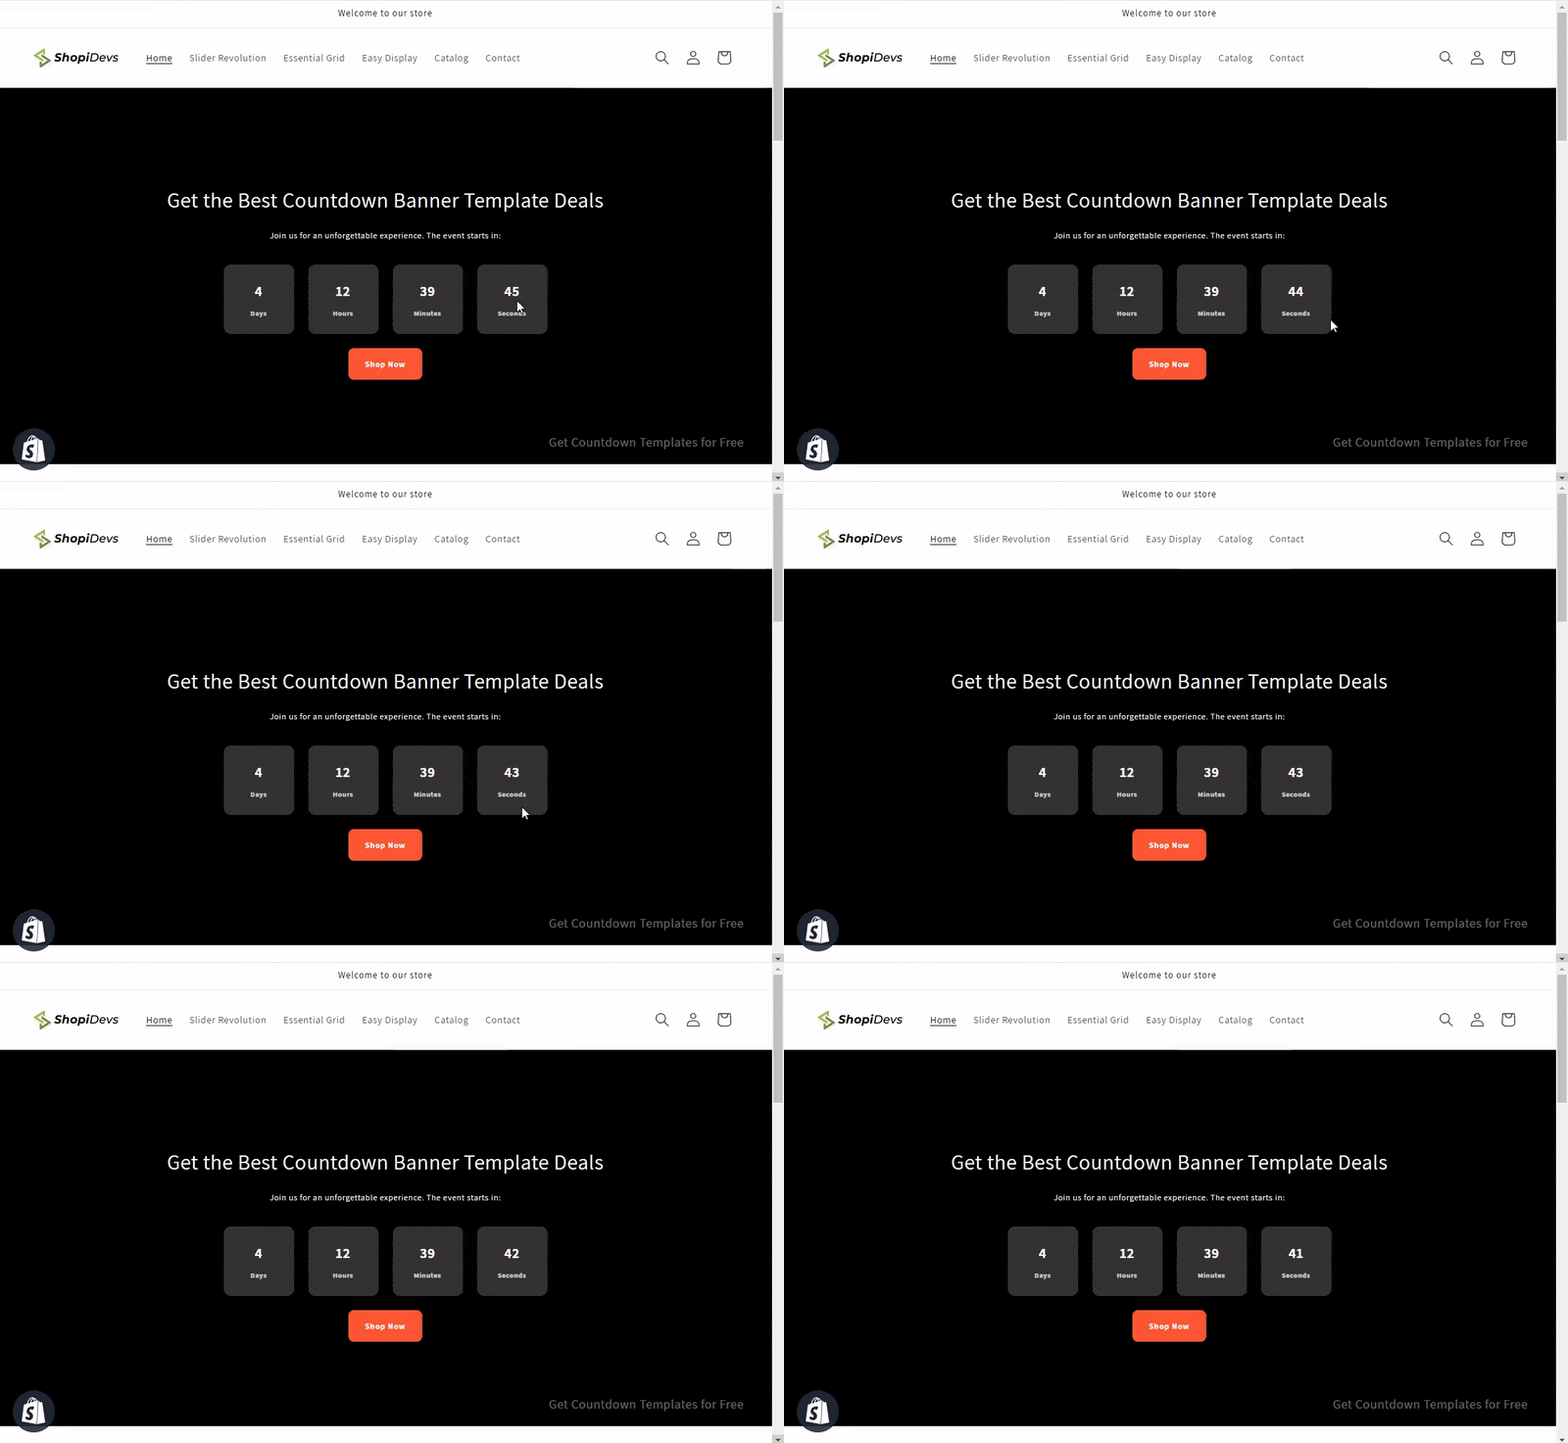
You’re done. The countdown timer will tick live on your storefront and automatically display “The event has started!” once the deadline passes, no manual reset needed.
Method 2: Add Countdown Banner Using Slider Revolution Templates
If you want professional countdown designs without writing a single line of code, Slider Revolution gives you 100+ pre-built templates — including multiple countdown and coming soon styles. Each template is customizable via a visual drag-and-drop editor.
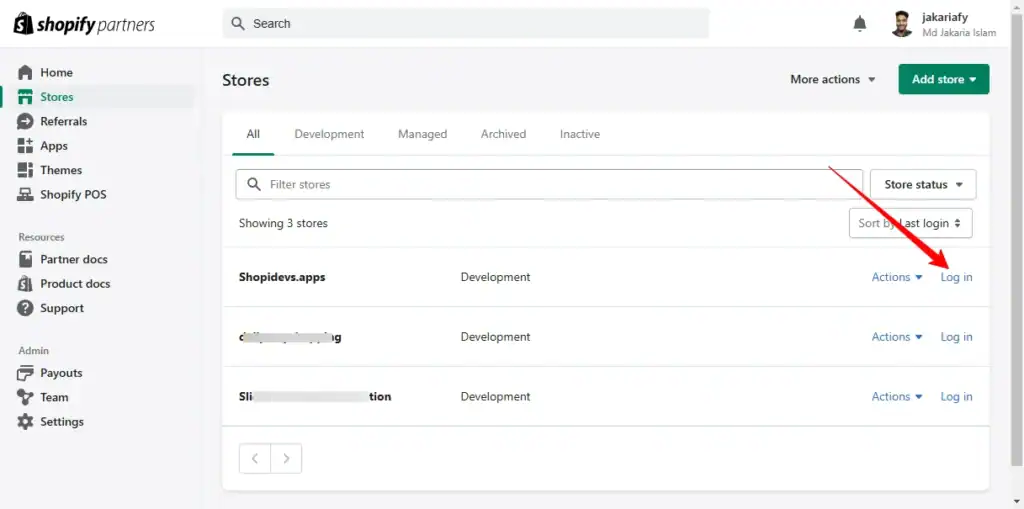
1: Log In to Your Shopify Admin
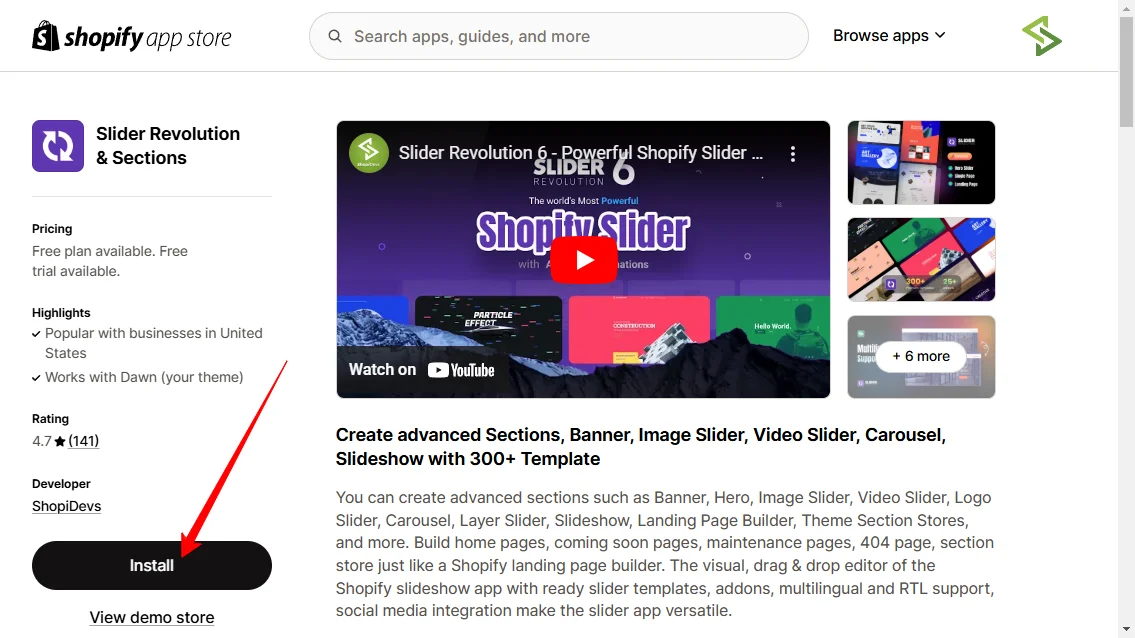
2: Install Slider Revolution & Sections App
- Go to the Shopify App Store
- Search for “Slider Revolution & Sections”
- Click Install
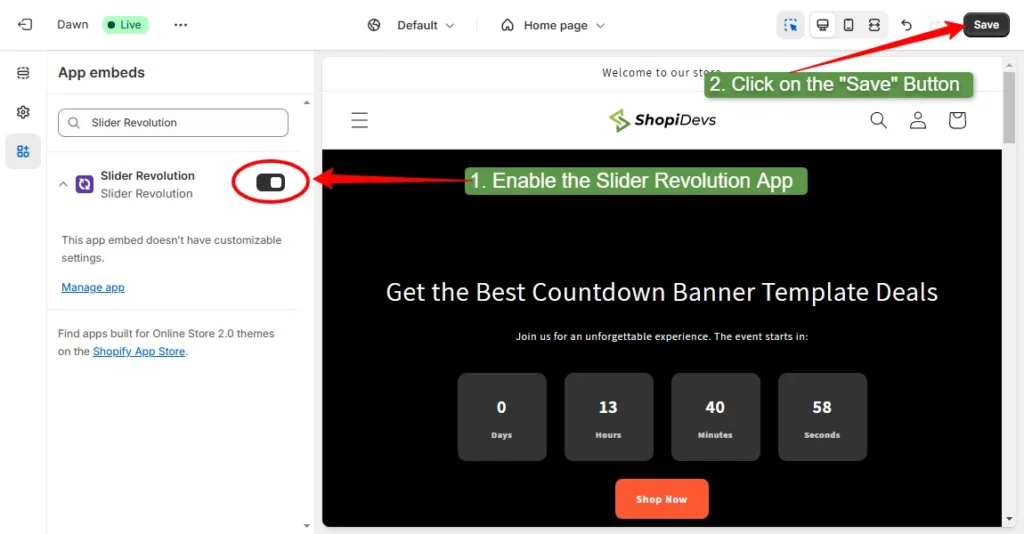
3: Activate the App
- From the Slider Revolution dashboard, click “Enable”
- This redirects you to App Embeds in the Theme Editor
- Make sure the Slider Revolution toggle is ON
- Click “Save”
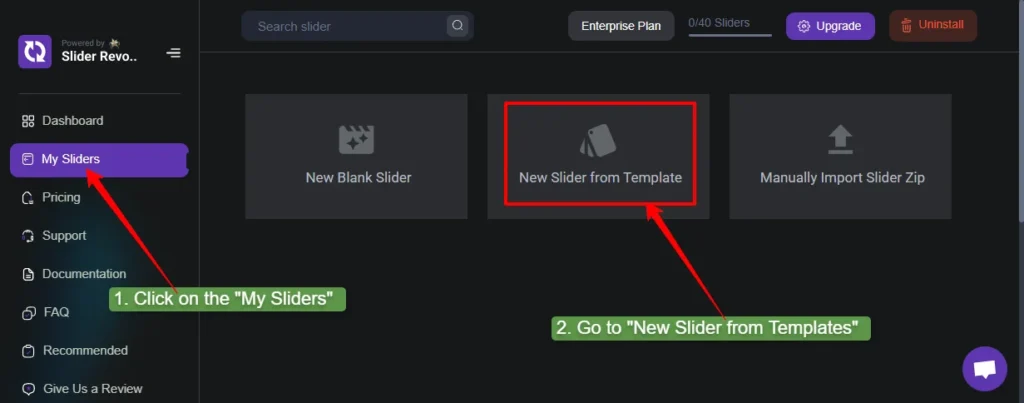
4: Go to “New Slider from Templates”
- In the Slider Revolution dashboard, click “My Slider”
- Click “New Slider from Template”
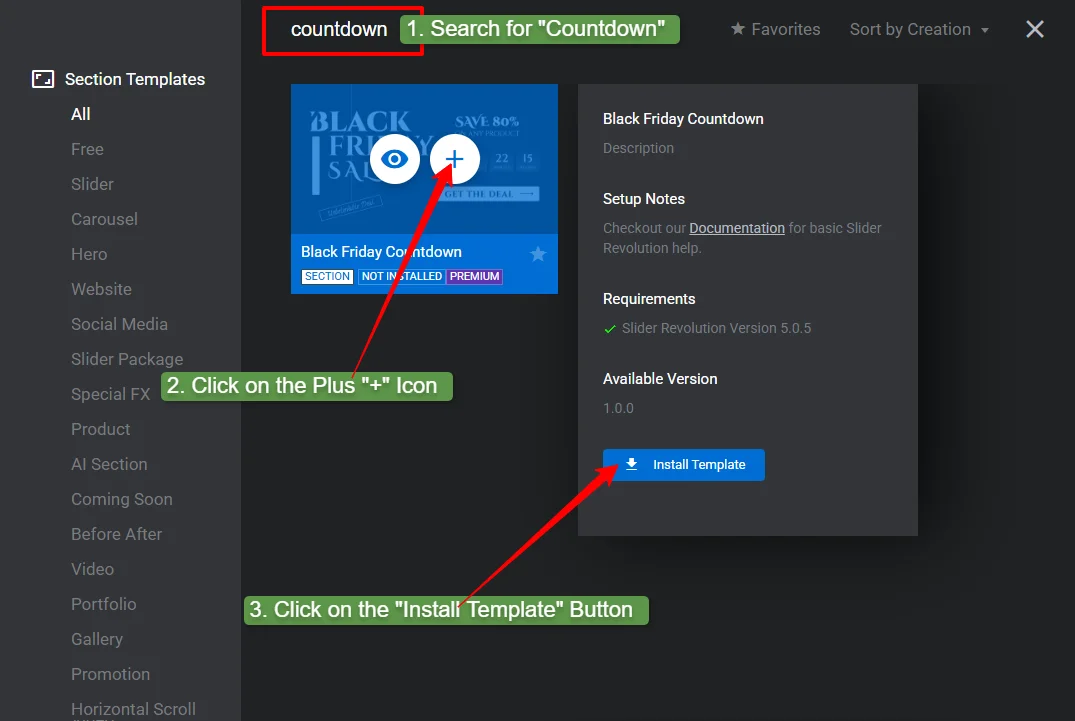
5: Search for “Countdown” and Install a Template
- Type “countdown” in the search bar
- Click the “+” icon on your chosen template
- Click “Install Template” to add it to your dashboard
6: Open the Template Editor
- Click the pen (edit) icon next to your installed countdown template
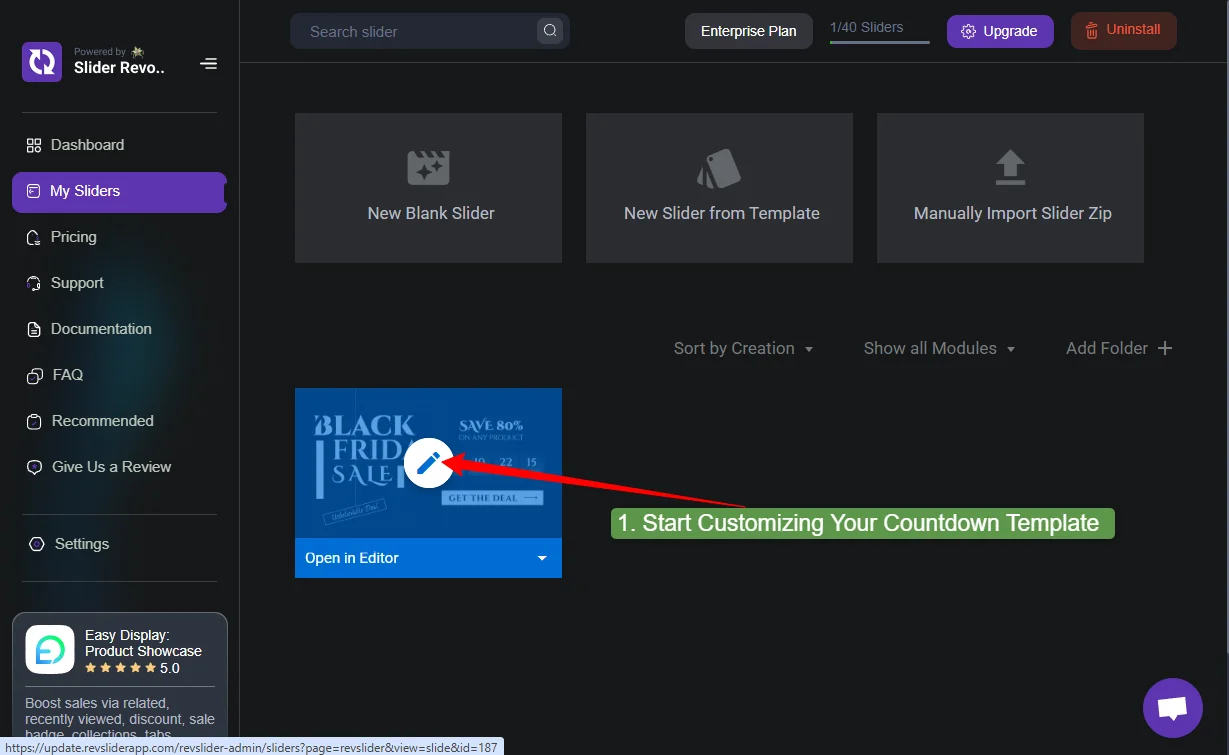
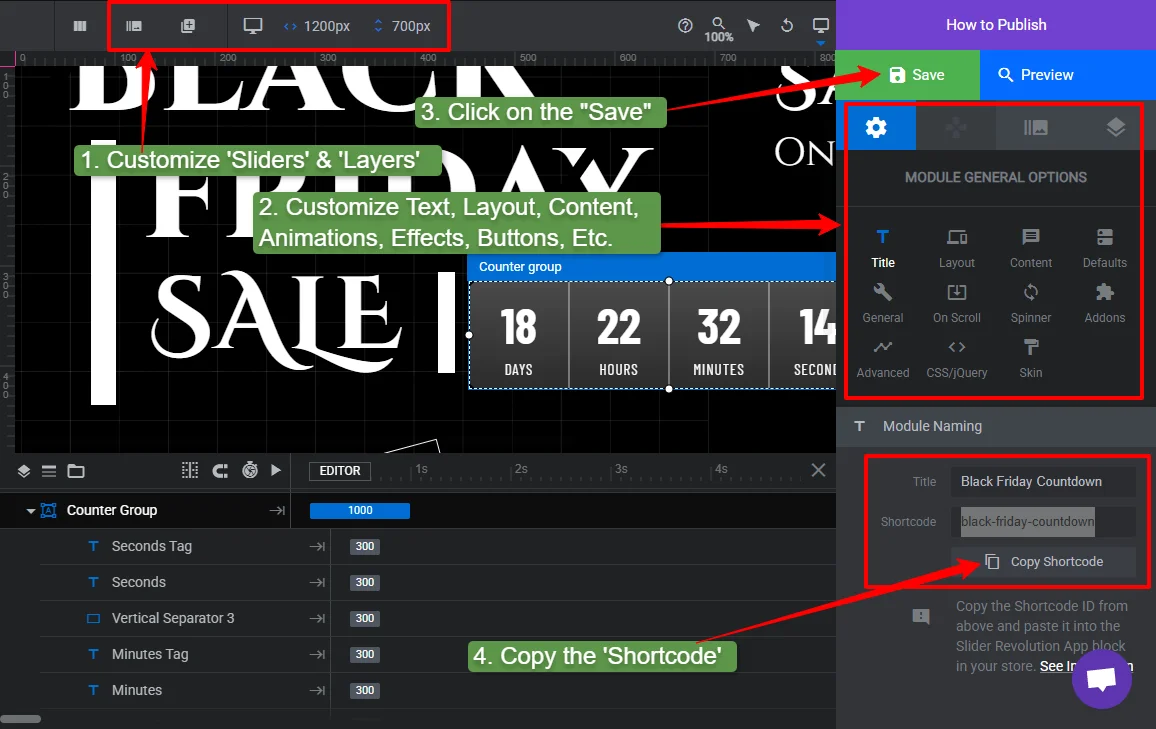
7: Customize the Template and Copy the Shortcode
In the visual editor, customize:
- Text, headings, button copy
- Background image or color
- Animation and effects
- Countdown timer position
When satisfied, click “Save” and then copy the shortcode from “How to Publish” or General Module Options → Module Naming.
Need help? If you hit issues during customization, contact the ShopiDevs support team , it’s free.
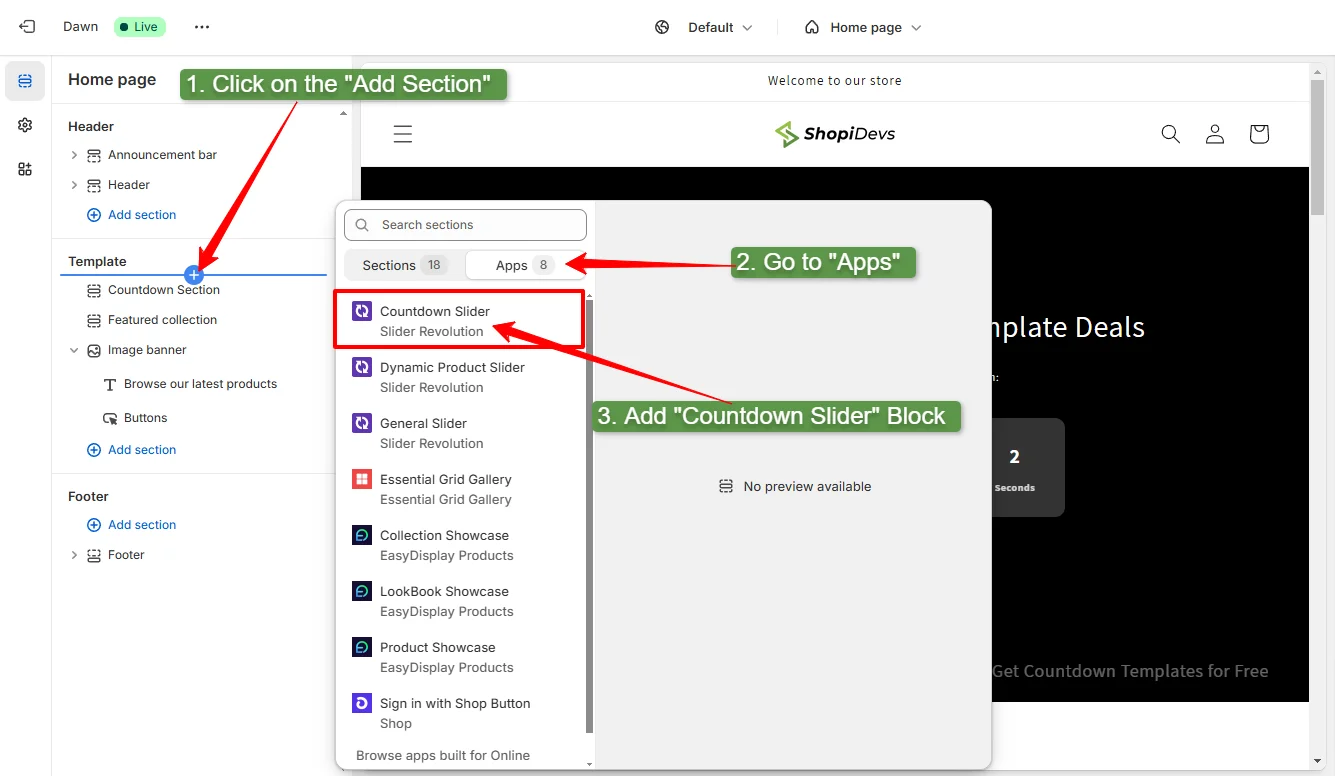
8: Add a Countdown Section in Theme Editor
- Go to Online Store → Themes → Customize
- Click “Add Section” (‘+’ icon) where you want the banner
- Go to the Apps tab and select “Countdown Slider.”
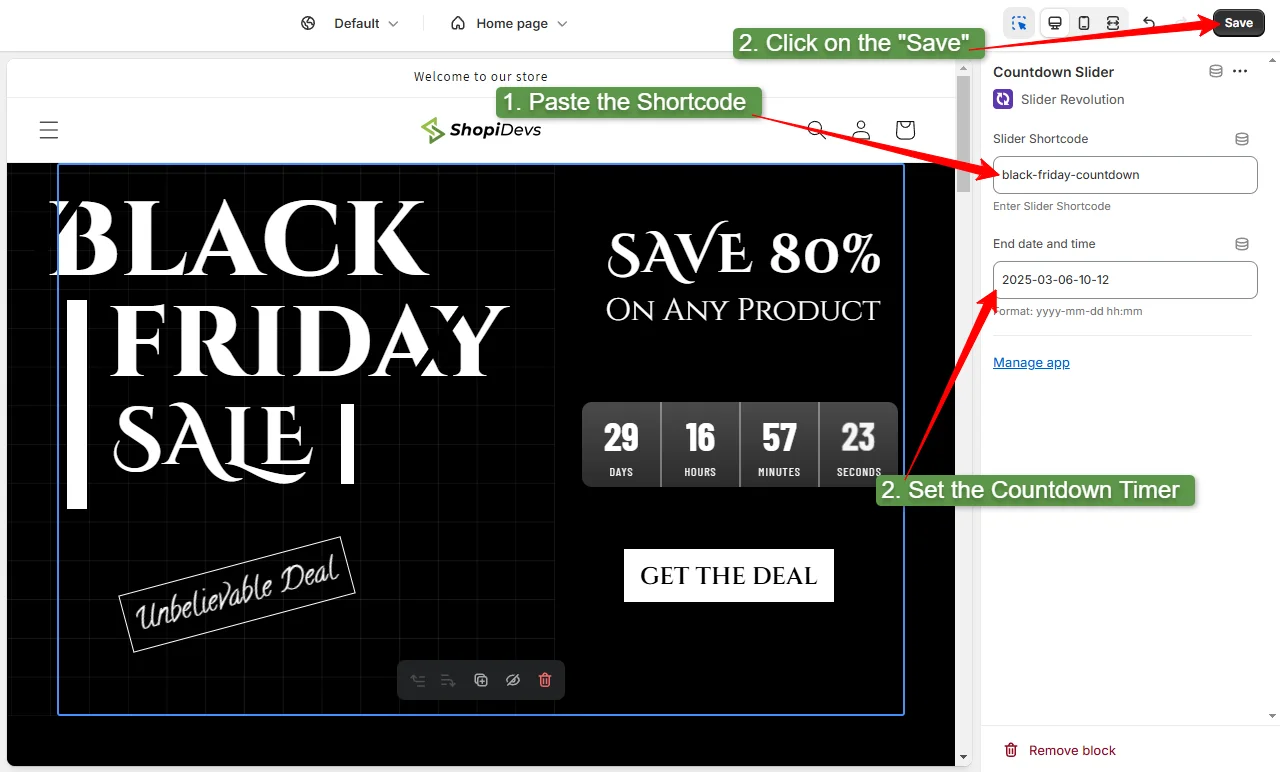
9: Paste the Shortcode and Set the Timer
- Paste the shortcode you copied in Step 7
- Set the countdown end date and time in format
yyyy-mm-dd hh:mm - Click “Save”
10: Preview the Storefront
Visit your live storefront URL to confirm the countdown banner is displaying and ticking correctly. Check on a mobile device as well.
5 Best Countdown Banner Templates for Shopify
All five templates below are available directly in the Slider Revolution & Sections app. Search the template name or browse by category to find them.
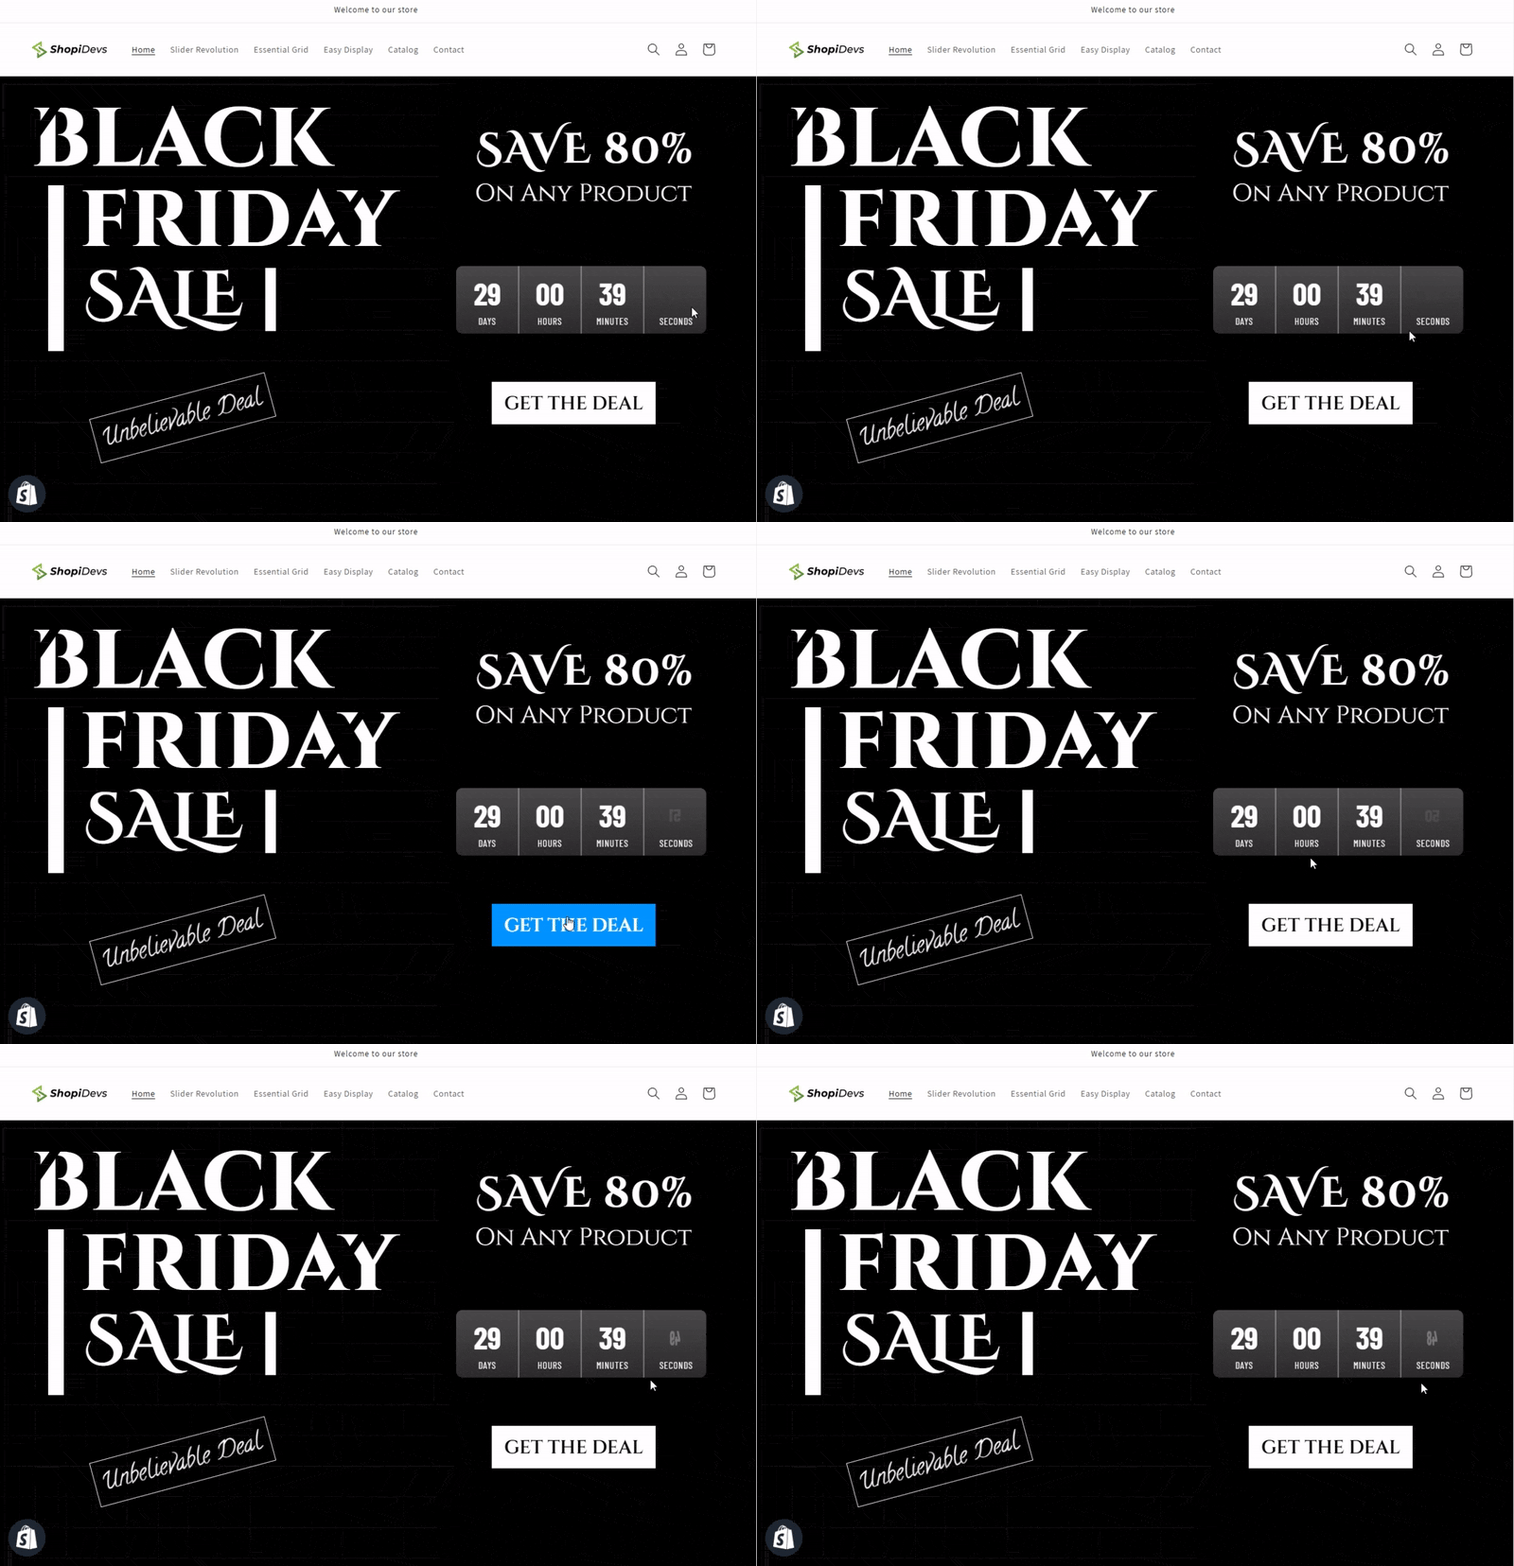
1. Black Friday Event Countdown
Bold, high-contrast countdown timer with gradient effects and animated text. Perfect for Black Friday, Cyber Monday, holiday promotions, and flash sales.
View Live Demo →2. Coming Soon Countdown
Minimalist coming soon page with a countdown timer and newsletter signup. Great for product launches, store openings, and pre-launch campaigns.
View Live Demo →3. Coming Soon Add-On
Lightweight countdown section that blends into existing landing pages without replacing your current hero section or layout.
View Live Demo →4. Under Construction Timer
Professional maintenance page with a countdown showing when your store will be available again. Ideal during redesigns and scheduled maintenance.
View Live Demo →5. Launching Very Soon
Modern pre-launch landing page featuring a sleek countdown timer, email signup, and conversion-focused layout. Perfect for product launches, new store openings, and upcoming brand announcements. Pairs perfectly with a Shopify coming soon page .
View Live Demo →5 Best Practices for Countdown Banners That Convert
A countdown timer that customers ignore is worse than no timer at all; it trains them to tune out your urgency signals. Here’s what separates a working countdown banner from a decorative one.
- Keep the design focused. One heading, one timer, one CTA. Every element you add past that competes for attention. Clean layouts consistently outperform busy ones in split tests. If you’re adding a Shopify sale banner alongside the timer, make sure they’re on different sections of the page, not stacked.
- Use real deadlines only. A timer that resets every session gets noticed immediately. Savvy shoppers check by opening an incognito window. When they see the timer reset, trust evaporates and so does the sale. Every deadline should be real and enforced.
- Test on mobile before publishing. Most Shopify traffic is mobile. The custom code method uses flexbox; it should scale, but always check with the theme editor’s mobile preview. If
.countdown-itemmin-width is breaking the layout on small screens; reduce it in the CSS. - Write a specific CTA. “Shop Now” is the lowest-performing CTA for countdown banners. “Get 30% Off Before Midnight” tells the customer exactly what they get and when they lose it. Specific CTAs tied to the urgency message convert at a higher rate.
- Track click-through rate and update regularly. A countdown banner left running past its deadline doesn’t just fail to convert — it actively damages credibility. Tie banner management to your campaign calendar. When the event ends, either update the banner for the next campaign or remove it.
Everything built in. No apps to install.
Bundles, promos, a shoppable lookbook and a mega menu ship with the theme. Five EU languages, one-time payment, lifetime updates — and no monthly app fees eating your margin.
Get Snazzy →
Frequently Asked Questions
Does Shopify have a built-in countdown timer?
No. Shopify doesn’t include a native countdown timer in its themes or admin. You need to either add one using custom Liquid code (the free method in this guide) or install a Shopify app like Slider Revolution & Sections that includes countdown template functionality.
How do I add a countdown banner on Shopify without an app?
Create a new Liquid section file named countdown-banner.liquid in your theme’s Sections folder. Paste the free code provided in this guide, save the file, and then go to your theme editor and add the new “Countdown Section” to your page. Set the end date in the section settings using YYYY-MM-DDTHH:MM:SS the format, then save and preview.
What is the best way to add a countdown timer to Shopify?
The right method depends on your skill level and design needs. Custom Liquid code is best for developers or store owners comfortable with the theme editor; it’s free and fully customizable. The Slider Revolution app is better for non-developers who want professional-looking templates without writing code. Both methods work on all Shopify themes and take under 30 minutes.
How do I set the end date for the Shopify countdown timer in the custom code?
In the Theme Editor, select the Countdown Section and find the “Event End Date” setting. Enter the date in YYYY-MM-DDTHH:MM:SS the format. For example, to end a Black Friday sale at midnight on November 29, 2026, enter it. The JavaScript countdown will automatically calculate days, hours, minutes, and seconds from that date.
Can I add a countdown banner to a specific product page on Shopify?
Yes. In the Theme Editor, use the page selector at the top to navigate to the product page template. Add the countdown section there instead of the homepage. For more granular control, showing the timer only on specific products, you’d need to add a conditional check in the Liquid code using it.
Will the countdown banner slow down my Shopify store?
The custom code method is lightweight, a small CSS block, simple HTML, and a minimal JavaScript setInterval function. It will not meaningfully affect store speed. Slider Revolution templates are heavier and load additional app scripts, but Slider Revolution is built for Shopify’s performance requirements. Either way, run a PageSpeed Insights test after adding the banner to confirm your Core Web Vitals are unaffected.
What happens to the countdown banner when the timer reaches zero?
In the custom code version, the timer displays “The event has started!” when the deadline passes. You can change this message by editing the distance <= 0 block in the JavaScript. For Slider Revolution templates, behavior at zero depends on the template’s built-in logic — most show a “Sale Ended” or “Event Started” state. Always remove or update your banner after the deadline to avoid showing an expired countdown.

Jakaria is an SEO Content Writer in Shopify, Ecommerce, WordPress, and Tech Industry with 5+ years of experience. He specialises in developing engaging, helpful content by simplifying complex topics into an amazing story for B2B, SaaS, and Shopify businesses. He’s also passionate about staying updated on growth marketing strategies and Shopify trends.