A store visitor decides whether to stay or leave in under 3 seconds. A well-placed sale banner with a clear offer is one of the fastest ways to stop that bounce. No app is needed for a basic setup. But if you want animations, countdowns, or pre-built templates, you need the right tool.
There are 3 ways to add a sale banner on Shopify: the built-in Dawn theme editor (free, static), custom HTML (flexible but requires code), and a banner app like Slider Revolution (templates, animations, countdowns). This guide covers all three, with screenshots for each method.
A Shopify sale banner is a promotional image or widget that highlights discounts, seasonal campaigns, and limited-time offers on your storefront. To add one, go to Online Store → Themes → Customize, open the Image Banner section, upload your banner, and save. For animated banners, countdown timers, and advanced promotional layouts, use the Slider Revolution app. For the best results, use 1920 × 1080 px for hero banners or 1600 × 500 px for slideshow-style sale banners.
Key Takeaways
- Three ways to add a Shopify sale banner: Dawn Theme Editor (free), custom HTML/Liquid (developer required), or the Slider Revolution app (recommended).
- The Dawn theme method works well for static image banners but does not include animations, countdown timers, or advanced promotional effects.
- Slider Revolution includes 200+ templates, countdown timers, animated layers, and drag-and-drop design tools for high-converting campaigns.
- Sale banners perform better when combined with urgency triggers such as countdown timers, “X% OFF” overlays, and limited-time messaging.
- Use 1920 × 1080 px for hero sale banners and 1600 × 500 px for slideshow-style promotional banners.
- Always preview your banner on mobile before publishing. Portrait images around 800 × 1200 px generally provide better mobile coverage.
- Make your banner clickable to a dedicated sale landing page to improve click-through rates and conversions.
What Is a Shopify Sale Banner?
A Shopify sale banner is a promotional display element placed on your store, typically at the top of the homepage or a collection page. Its job is to communicate a discount, deal, or limited-time offer the moment a visitor lands on your site.
Sale banners are different from announcement bars. An announcement bar is the thin text strip at the very top of your site (usually for free shipping or site-wide discounts). A sale banner is a full-width image or interactive slider that takes up more visual real estate and typically links to a sale collection or specific product.
Types of Sale Banners on Shopify
For full banner size specifications across all Shopify banner types, see the Shopify image banner size guide. For countdown-specific banners, there is a separate walkthrough in the Shopify countdown banner guide.
How to Add a Sale Banner on Shopify (3 Methods)
You can follow 3 different methods for adding a sale banner on your Shopify stores. The first and easiest way is to use the built-in Shopify DAWN theme customization. The second option is using custom HTML code. The final one is using Shopify apps or templates to add stunning and catchy sale banners to the Shopify store.
Method Comparison: Which One to Use
Use the Dawn theme editor if you need a quick static banner with no customization. Use Slider Revolution if you want pre-built templates, animations, or countdown timers. Skip custom HTML unless you have a developer available.
Method 1: Using Built-in Shopify Theme
This is the built-in Shopify approach. No apps, no code. Works for any static sale image banner. Limitation: no animation, no countdown, no dynamic product pulls.
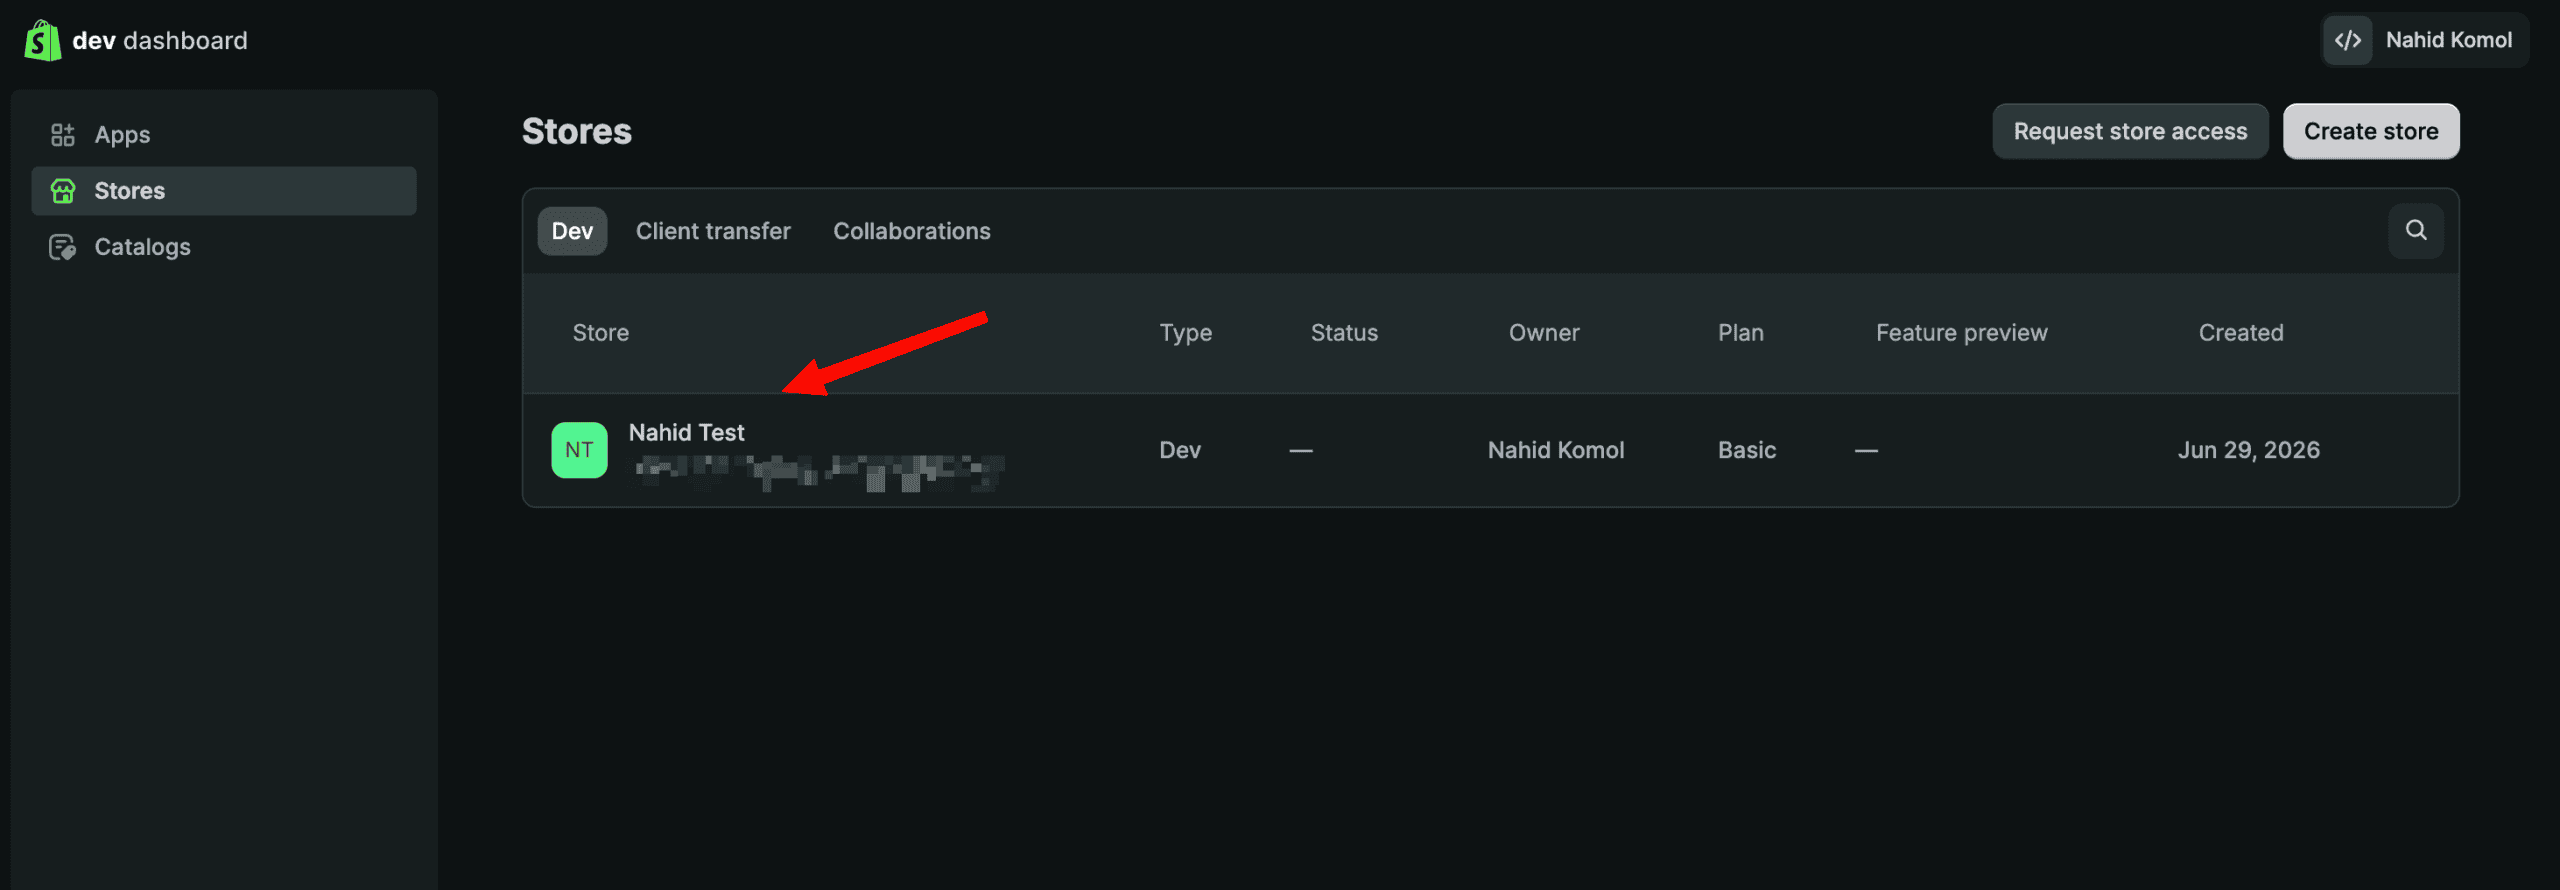
Step 1: Log in to your Shopify admin
- Go to the Shopify admin dashboard.
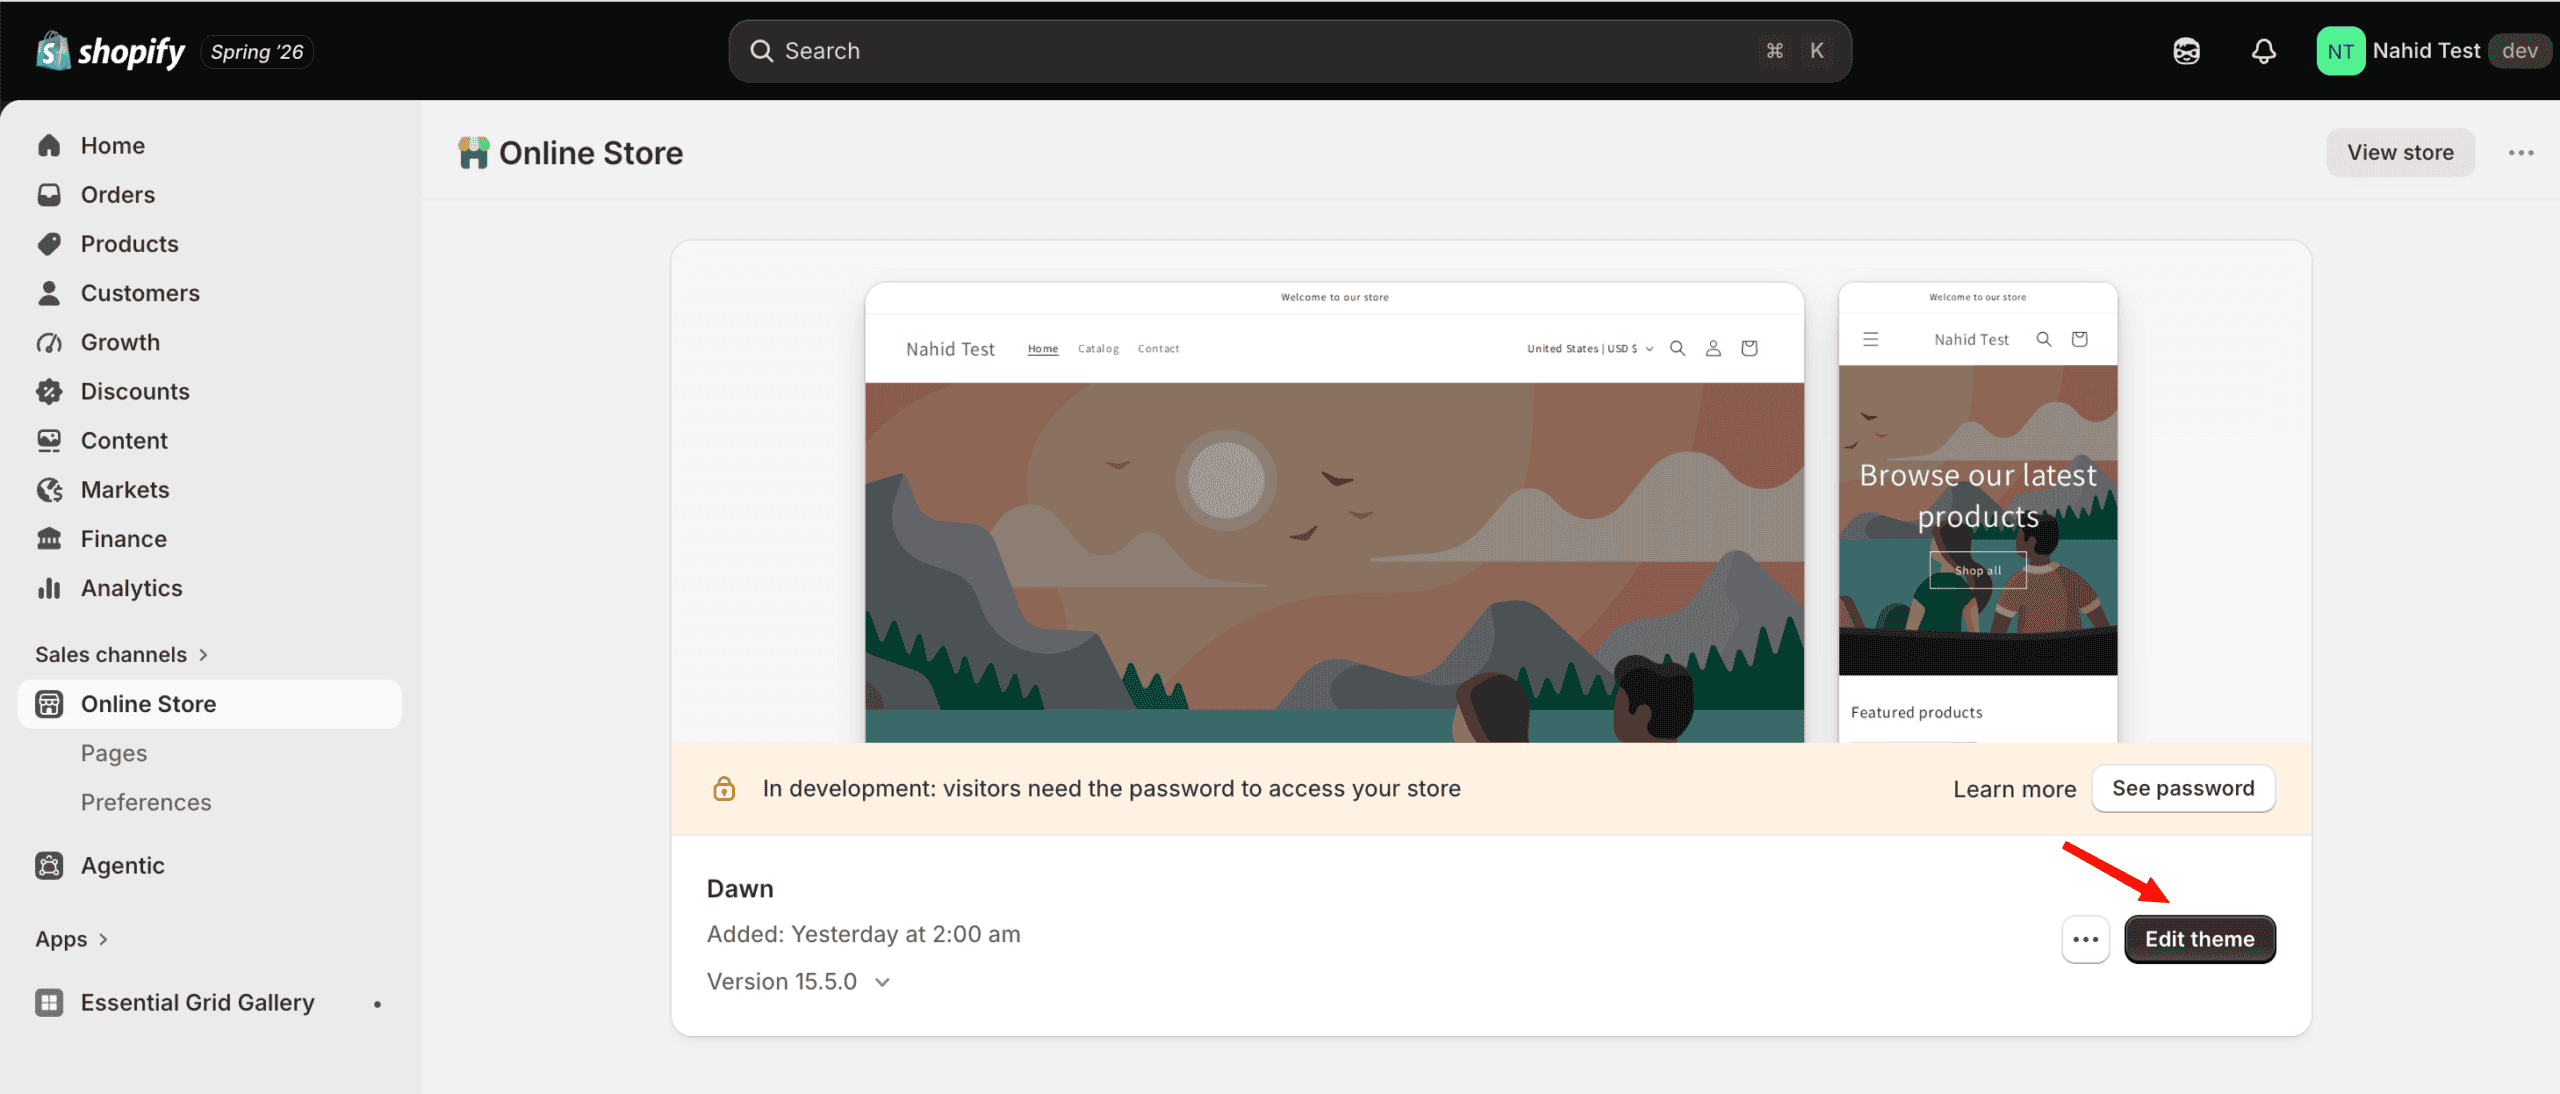
Step 2: Go to Online Store > Themes > Customize
- Navigate to the Online Store in the left sidebar.
- Then click the Edit Theme button.
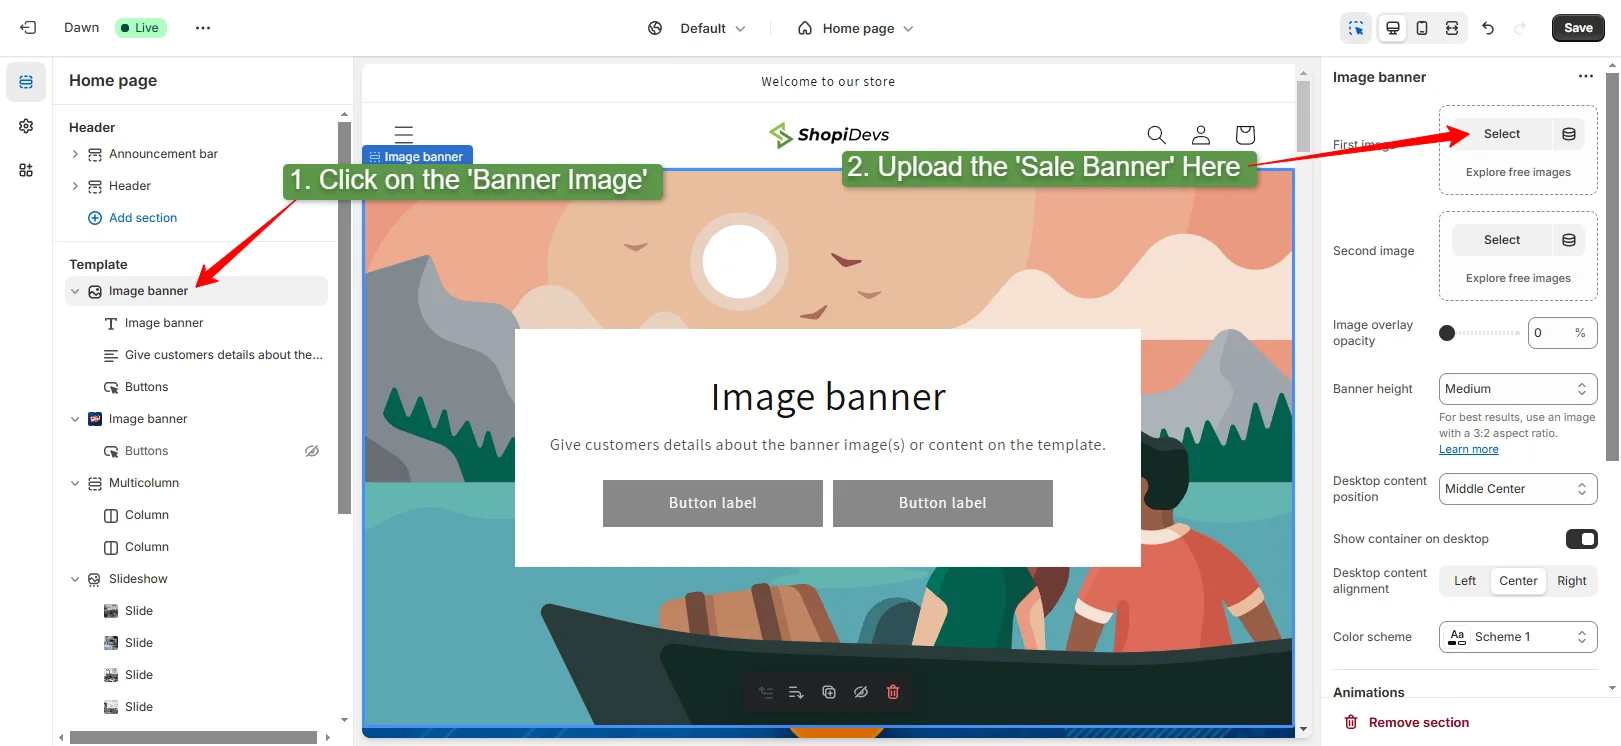
Step 3: Select the Image Banner section
- In this step, you need to navigate to the “Image Banner” section. If you don’t have the ‘image banner’ section, click on “Add Section” and then add this section to the template below the header part.
- Click on the “Image Banner” section, then look at the right sidebar.
- Here, you will have the option to upload 2 images, but we will upload only one “Sale Banner” to the store.
Step 4: Customize and clean up the section
- Remove any default overlay text, buttons, or titles that conflict with your banner design. Turn off Show container.
- So the banner spans the full width. Adjust overlay opacity to 0 if your banner already has text baked in.
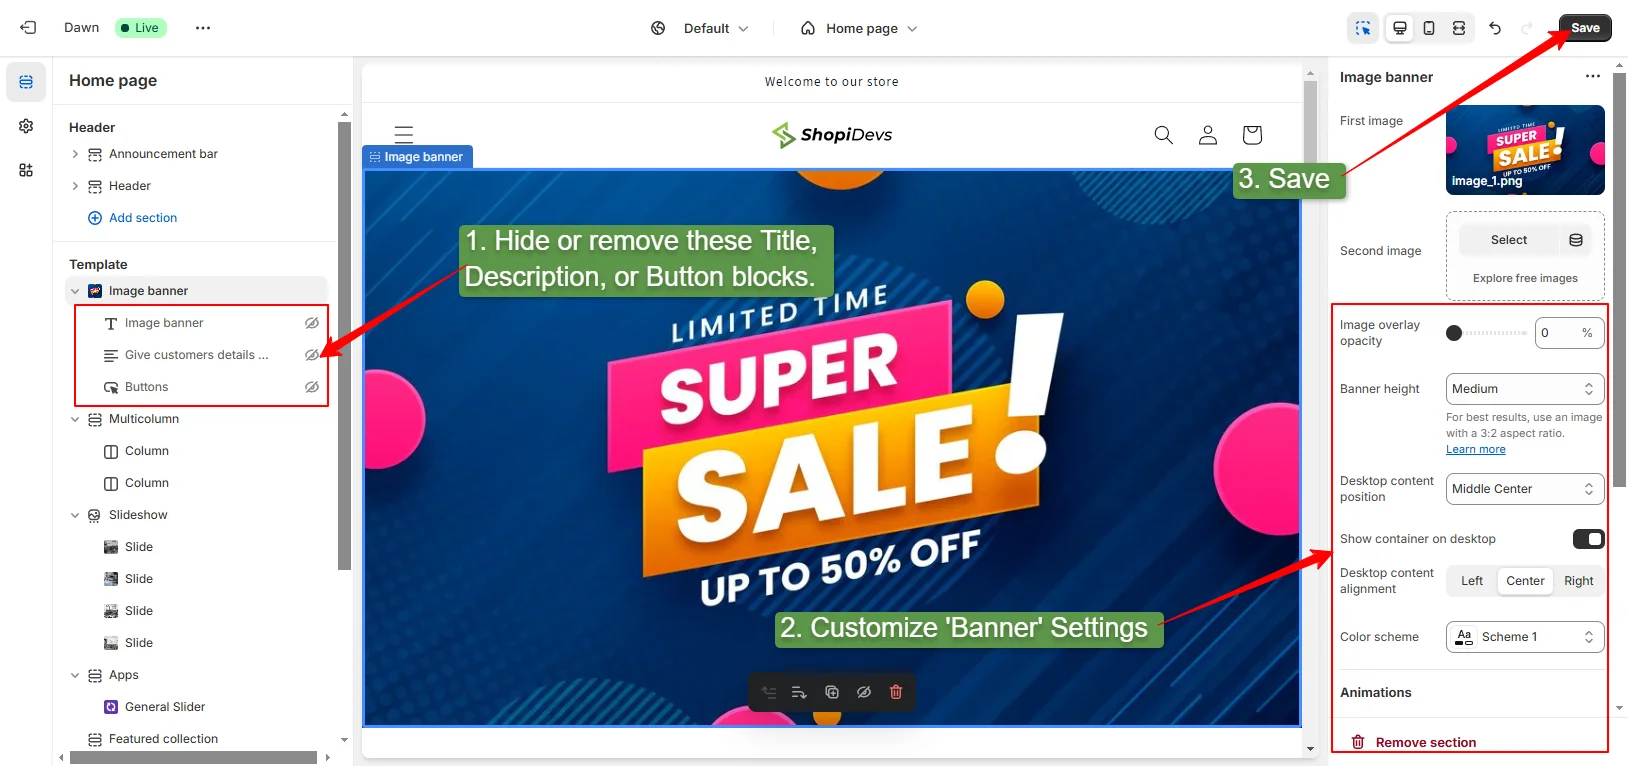
Note: You can make the Shopify sale image banner clickable to increase the click-through rates. Also, if you want to add a “Shop Now” or “Buy Now” button, then you can use it.
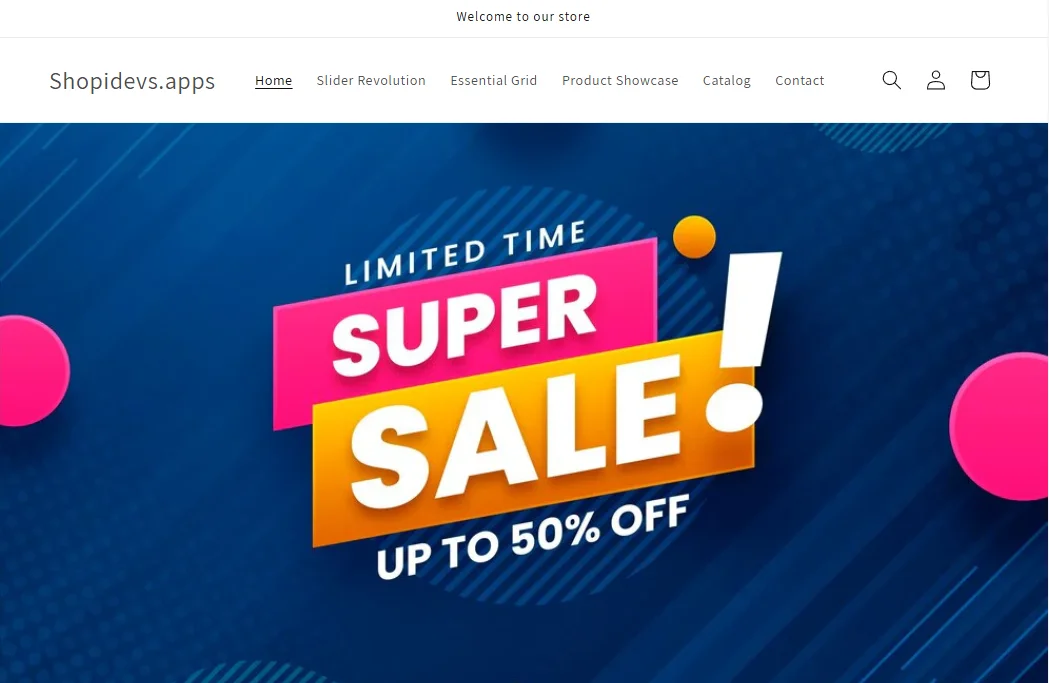
Save and preview the storefront
- Click save in the top right. Then open your store in a new tab to check the banner on both desktop and mobile. Adjust if needed.
Method 2: Use a Shopify Sale Banner App (Recommended)
Slider Revolution gives you 300+ pre-built sale banner templates with animations, countdown timers, and full mobile responsiveness. No coding needed. Install the app, pick a template, customize your text and colors, paste a shortcode, and done.
This is the same method used in the before/after slider guide and the Shopify product slider guide. The workflow is identical.
Step 1: Install the Slider Revolution App
- Go to the Shopify App Store and search for Slider Revolution, or log in to the Shopify Store, and click on “Apps” and search for Slider Revolution & Section. Then install the app.
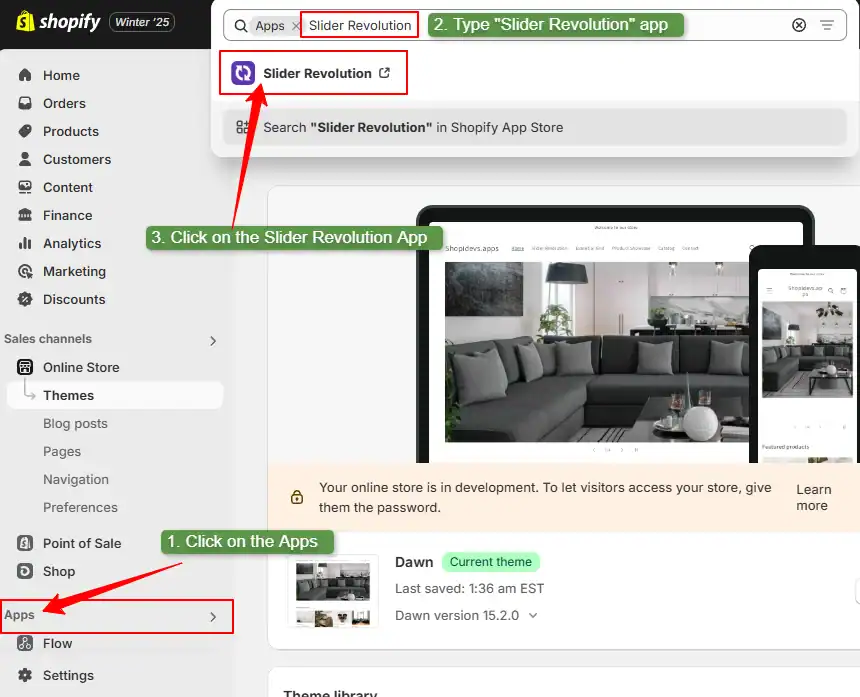
Step 2: Explore All Sale Banner Templates
- In the Slider Revolution dashboard, go to My Sliders and click New Slider from Template. This opens the full template library.
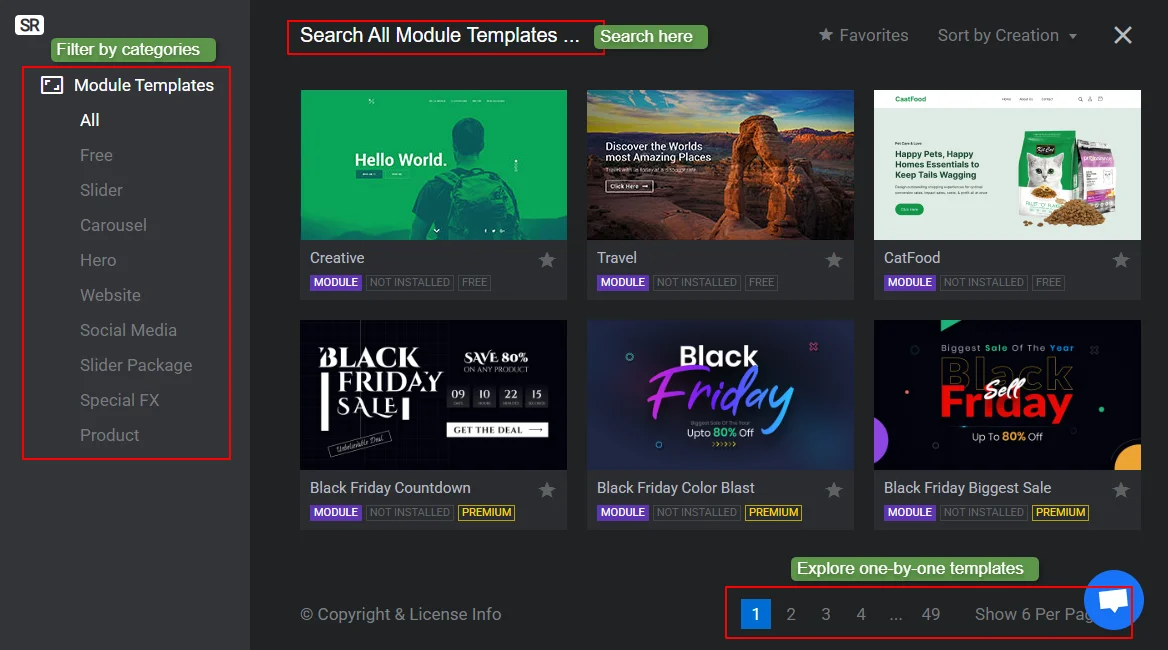
Step 3: Choose and install a sale banner template
- Browse the templates. Filter by category or search for “sale”, “promotion”, or “countdown”. Click your chosen template and hit Install Template
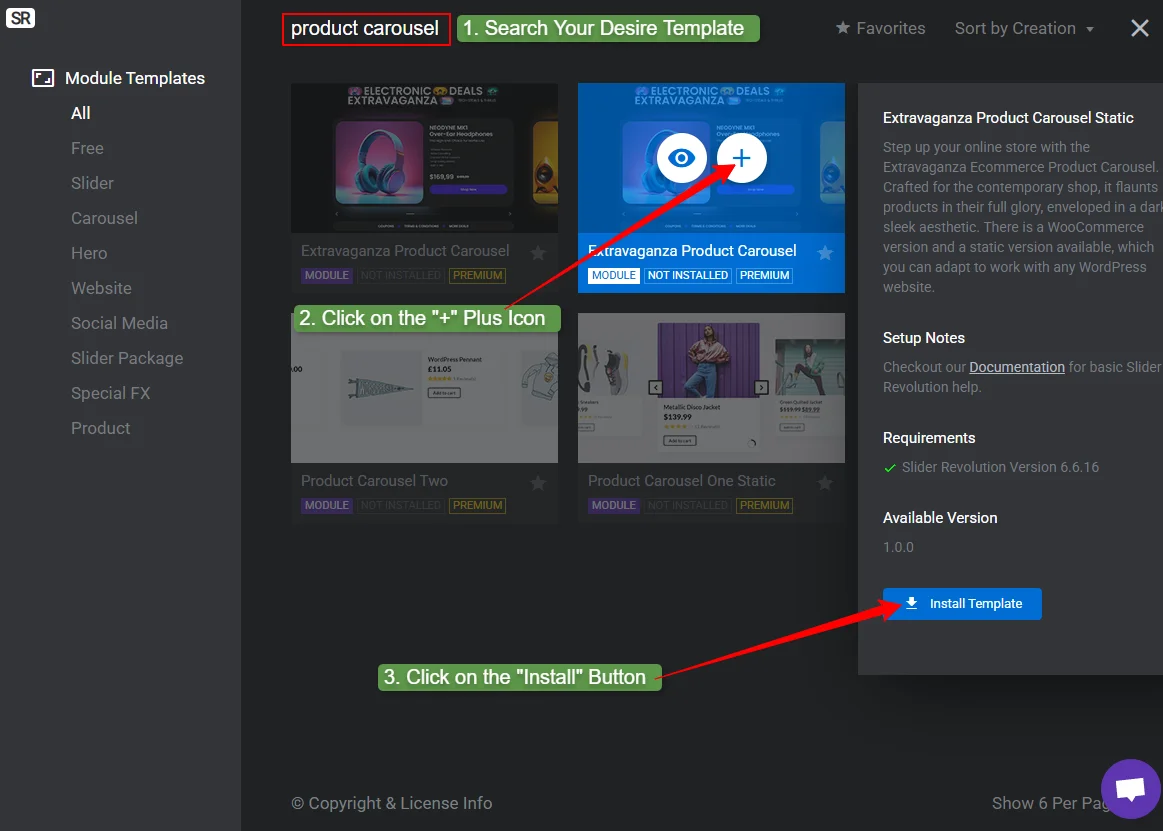
Step 4: Customize the template in the visual editor
- Hover over the template and click the pen icon to open the visual editor.
- Change text, colors, images, and button links.
- Adjust the countdown end date if your template includes a timer.
- Use the responsive toggle to preview the mobile layout.
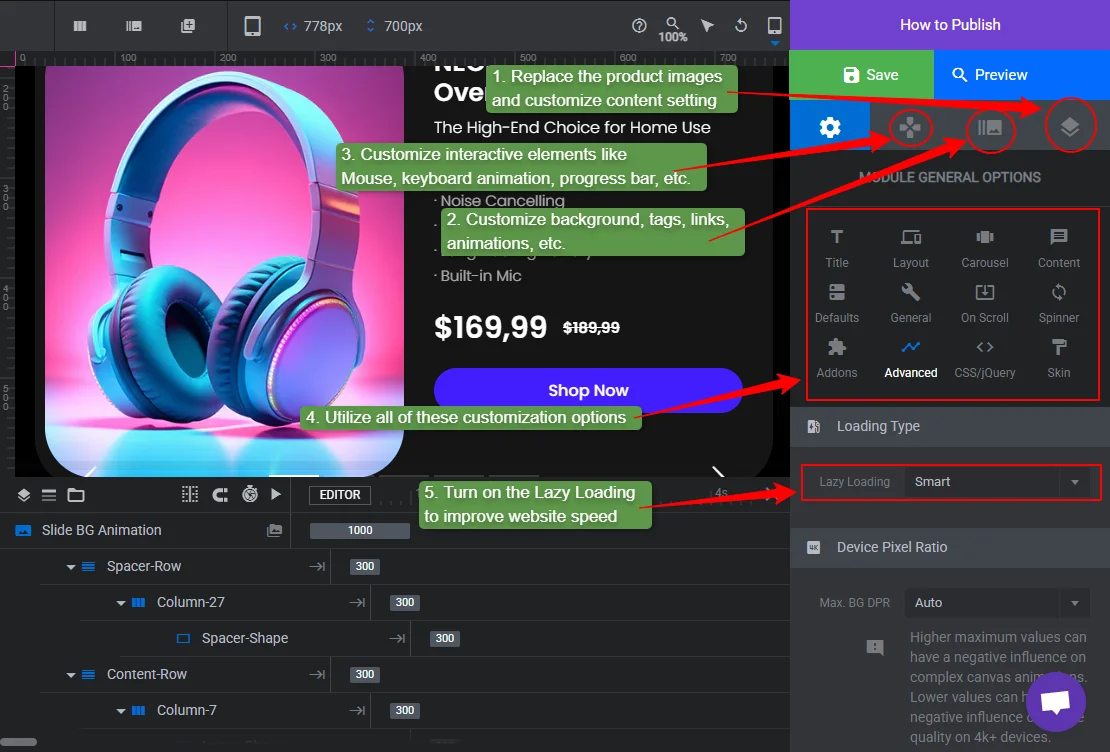
You can also add product layers to showcase multiple products directly within the banner, or include a before/after comparison for sale vs. original pricing.
Step 5: Save and copy the shortcode
- Click Save in the editor. Then click How to Publish and copy the shortcode provided. You will need this in the next step.
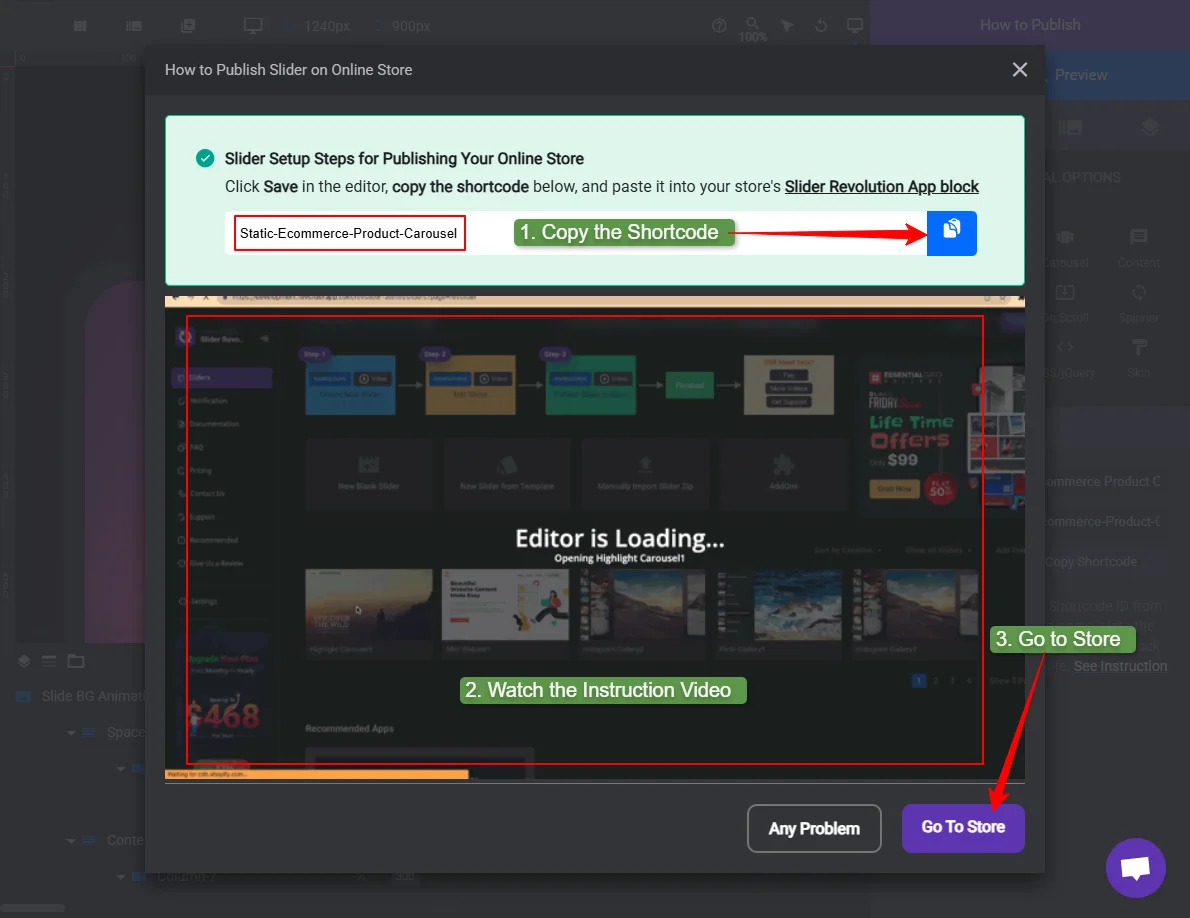
Step 6: Go to Online Store > Themes > Customize
- Access your Shopify admin panel from the publishing dashboard. Or manually navigate to Online Store > Themes > Customize to access the theme editor.
Step 7: Activate Slider Revolution
- Look for App embeds, then enable the Slider Revolution & Section app to activate it.
- Then go back to the sections where you want to add the sale banner.
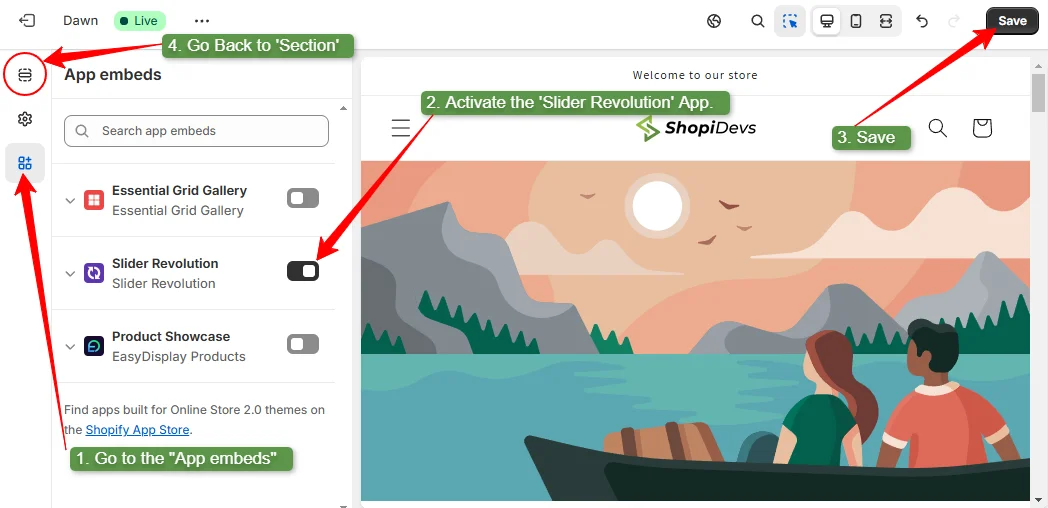
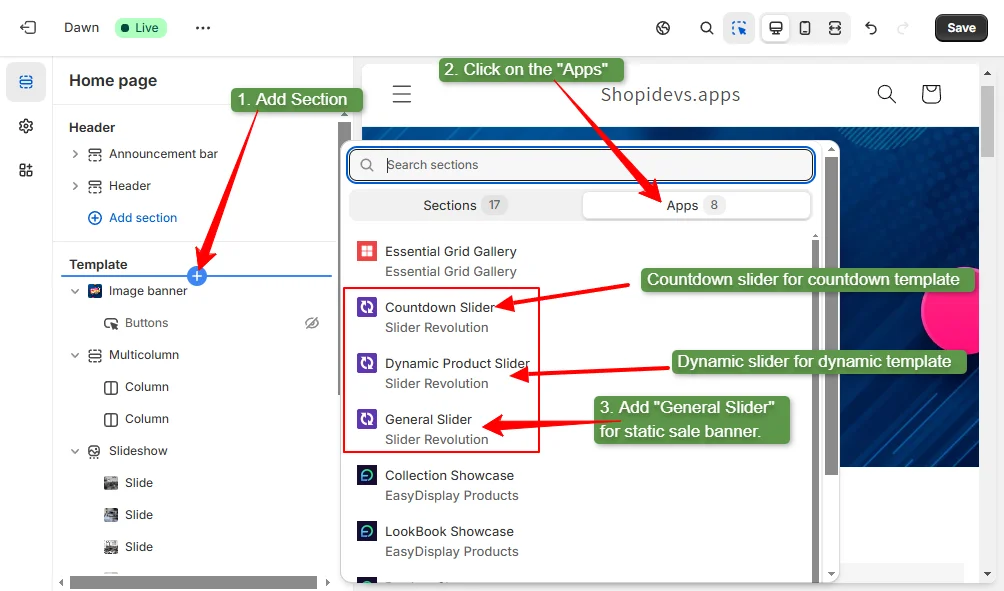
Step 8: Add a General Slider section
- Go back to the page sections. Click Add section where you want the sale banner to appear. Select Apps and then choose General Slider (or Countdown Slider if your banner has a timer).
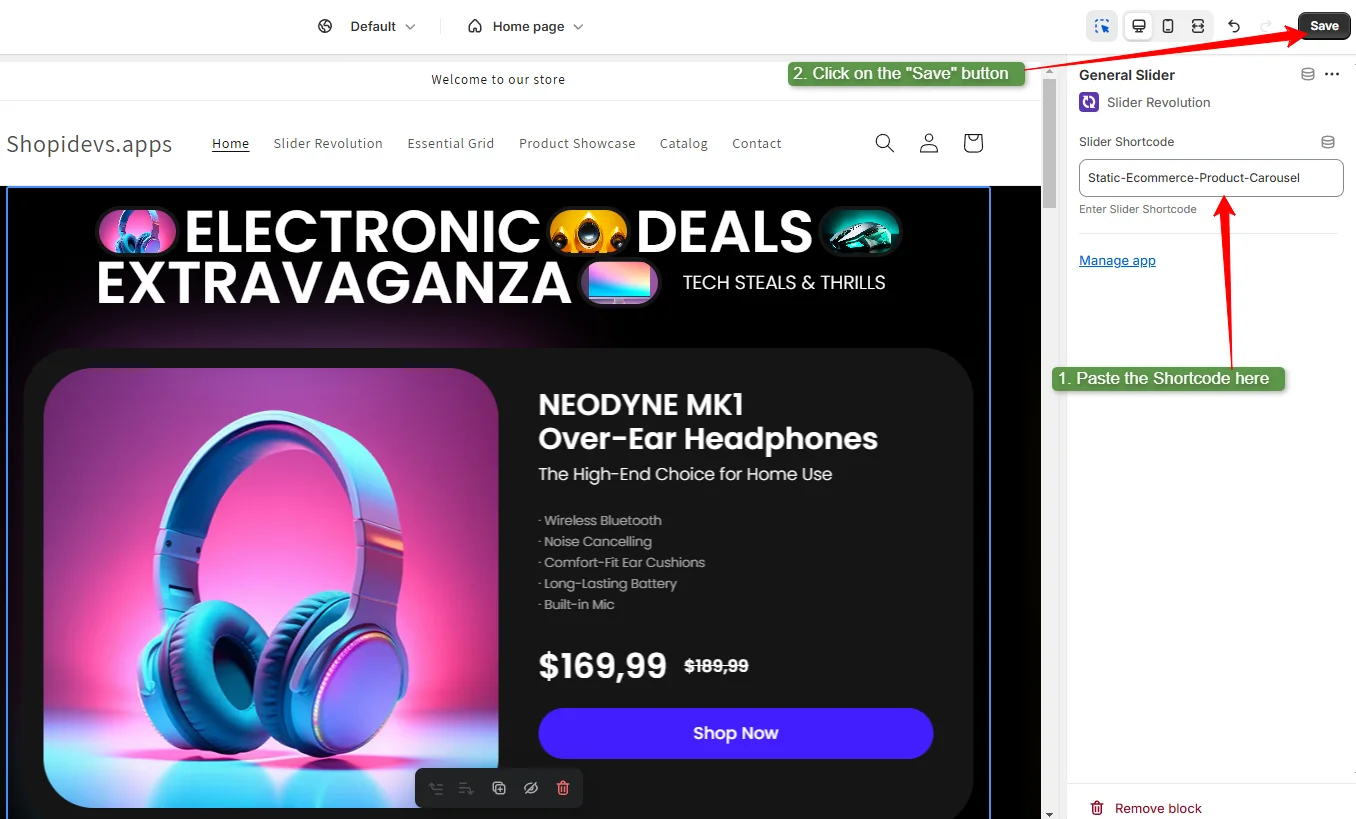
Step 9: Paste the shortcode and save
- Click the General Slider block to open its settings. Paste the shortcode you copied in Step 5 into the shortcode field. Click Save
Step 10: Preview and publish
Open your storefront and check the banner on desktop and mobile. Adjust sizing in the Slider Revolution editor if needed (set width to 100% and height to your target px). Save again to publish.
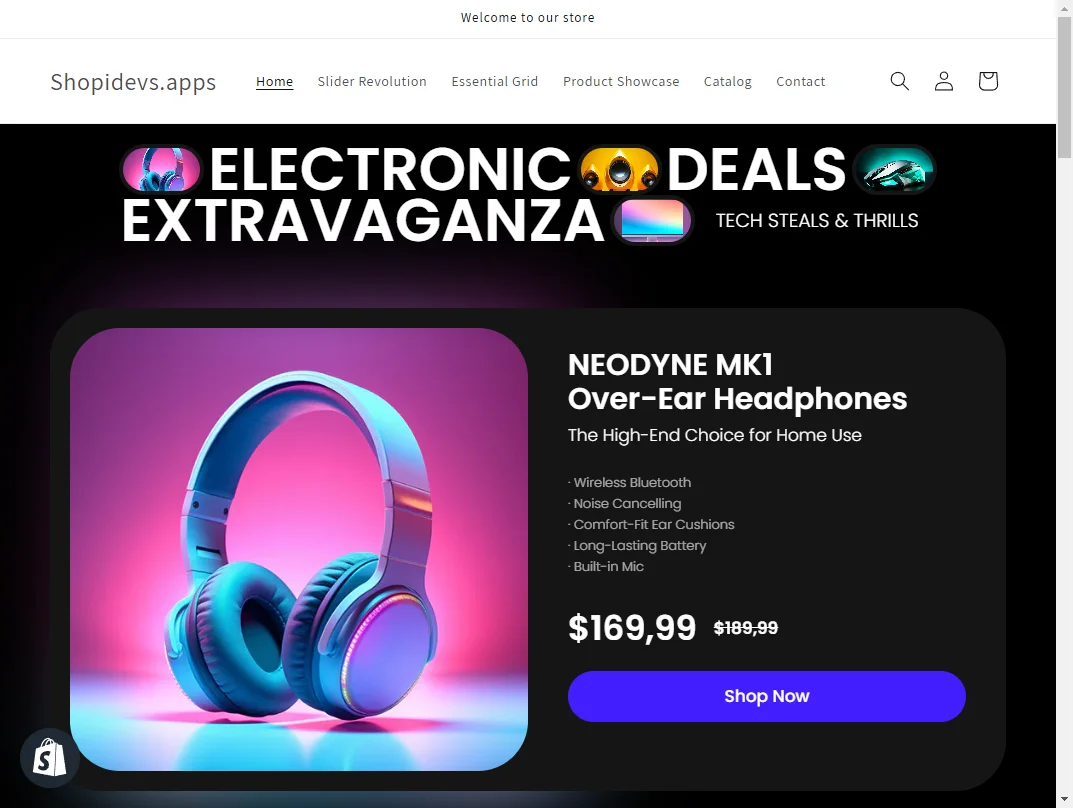
Method 3: Custom HTML
Custom HTML gives you full design control, but it requires Liquid/HTML/CSS knowledge and access to the Shopify theme code editor. Design your banner in a tool like Figma, export it as HTML/CSS, then upload the HTML file to Shopify and embed it in the section where you want it to appear.
This method is not recommended for non-developers. If you need custom layouts beyond what Slider Revolution supports, hiring a Shopify developer is the safer path. Check the Shopify hero slider guide for advanced slider customization options.
5 Best Shopify Sale Banner Templates Slider Revolution to Boost Sales
These are the top-performing sale banner templates available in the Slider Revolution app. All are mobile-responsive, fully customizable, and installable in one click.
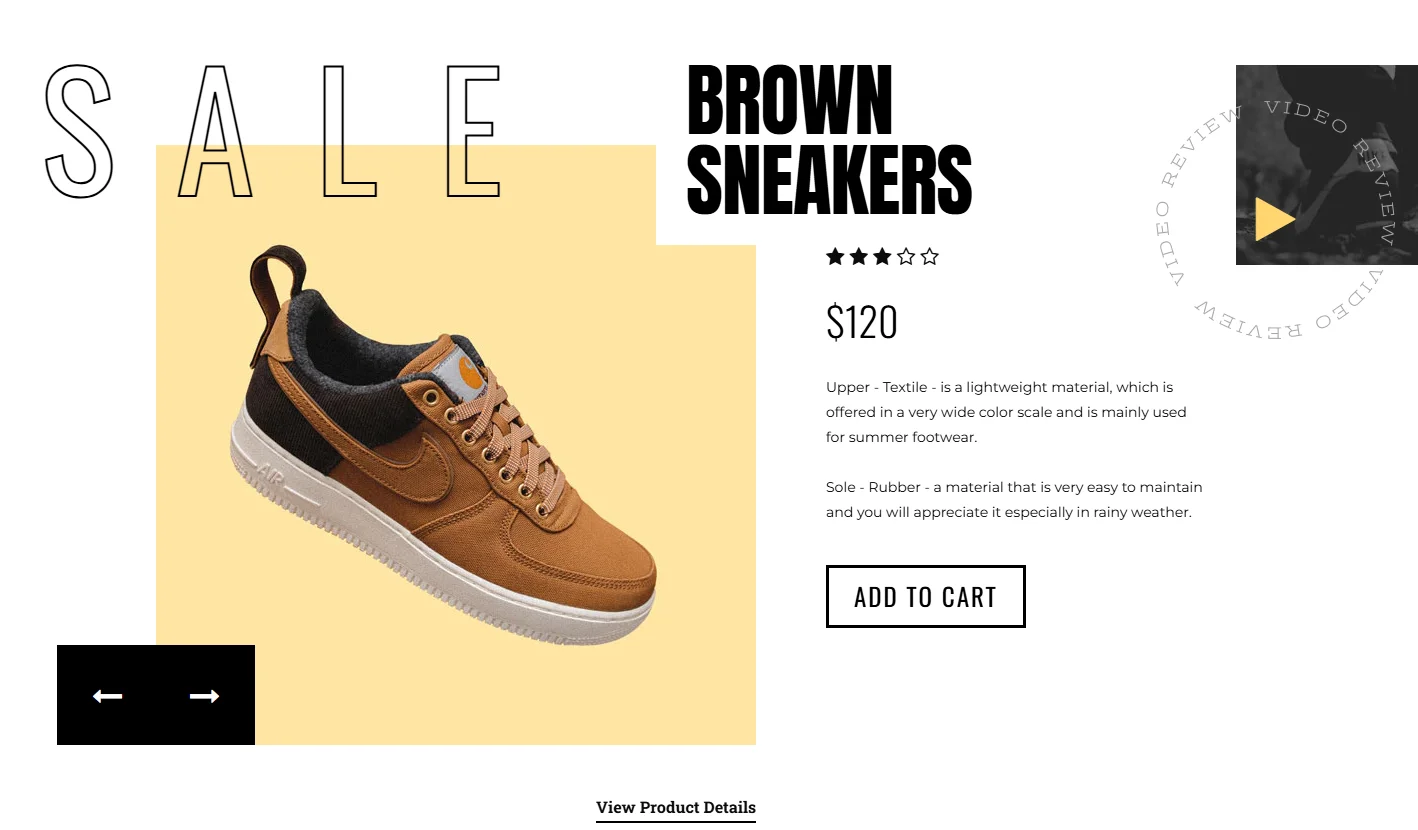
1. Seasonal Offer Sale Banner Template
This template is ideal for promoting holiday or seasonal discounts. Its elegant design highlights your offers while keeping the focus on your brand.

2. Product Slider Dynamic Sale Banner Template
Showcase multiple products with this interactive and dynamic slider. It’s perfect for displaying a variety of deals in a seamless format.
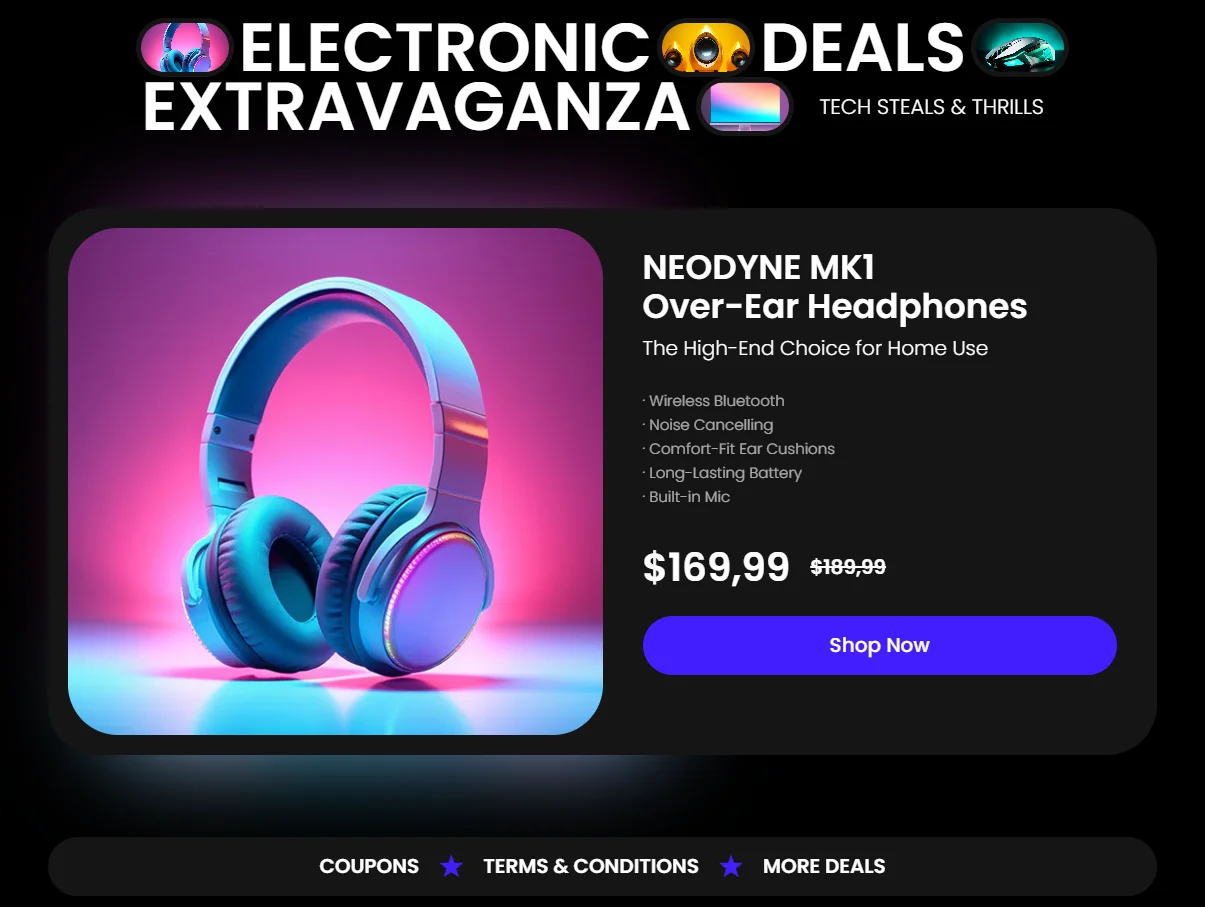
3. Extravaganza Carousel Sale Banner Template
Highlight your best-selling/discounted products in a clean, professional carousel. It’s a great way to grab attention and boost sales.
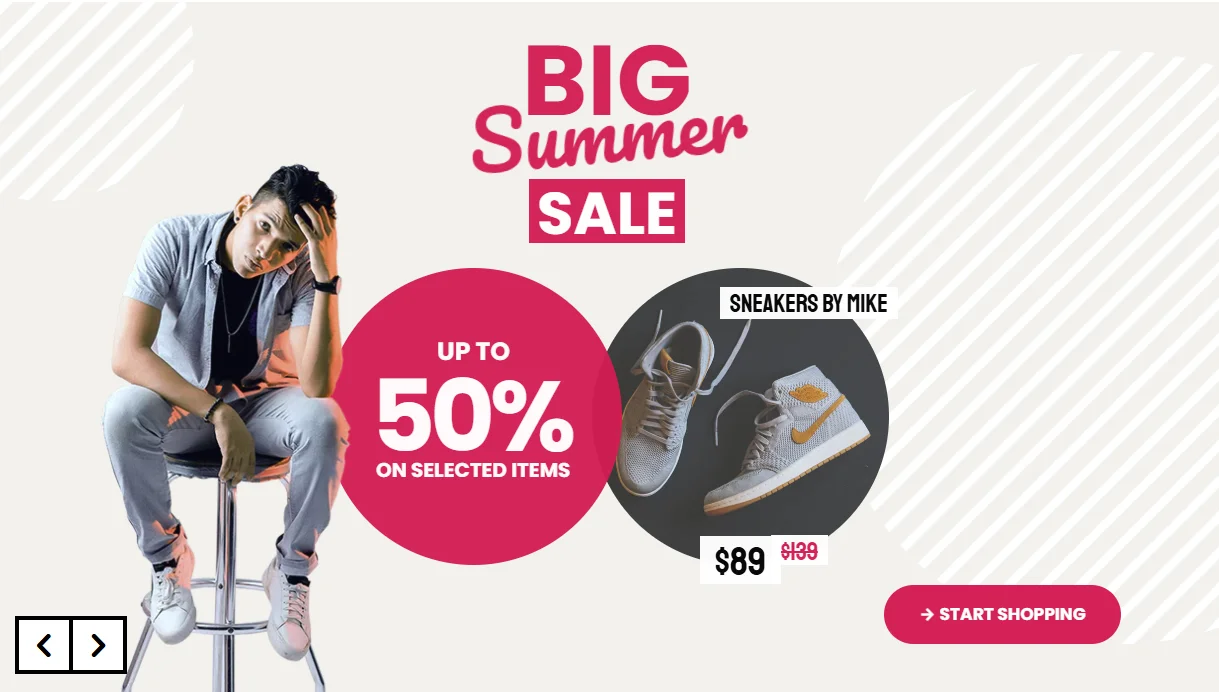
4. Big Summer Sale Banner Template for Shopify
This bold and colorful template is perfect for summer promotions. Its vibrant design is sure to capture your customer’s attention.
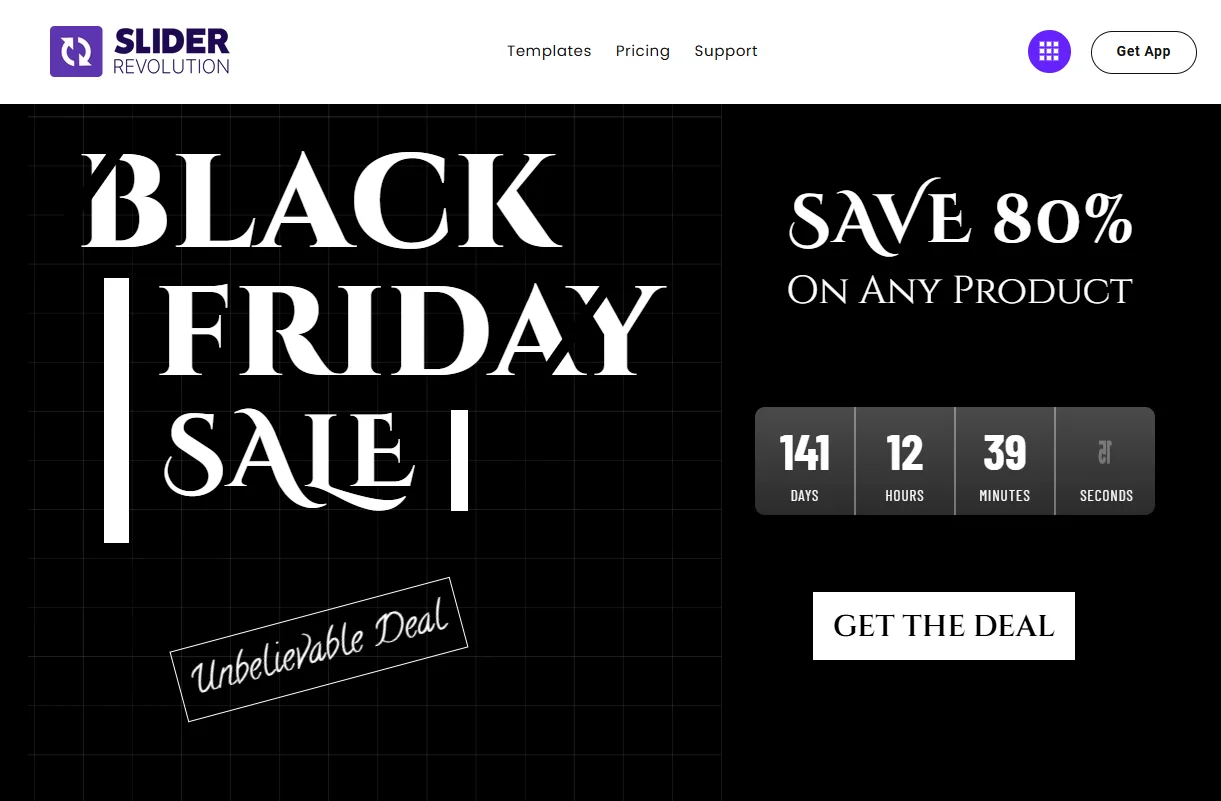
5. Black Friday Countdown Sale Banner Template
Create urgency with this countdown-themed Shopify sale banner. It’s specifically designed for Black Friday deals to drive quick conversions. But you can customize this template for any event or seasonal sale.
For more slider styles, see the Shopify hero slider gallery and the product slider guide.
Our Design Tips for High-Converting Sale Banners
Creating high-converting sale banners requires the right combination of visuals, messaging, and functionality. Here are 5 tips that will help you to design sale banners that grab attention and drive sales effectively.
Meet Snazzy — the theme that sells the look
A conversion-focused Shopify theme for modern fashion stores. Bundle builder, lookbook and mega menu built in — one-time payment, lifetime updates.

- Lead with the discount number: Put “30% Off”, “Buy 2 Get 1 Free”, or “Up to 50% Off” as the first thing a visitor reads. Do not bury the offer below a brand tagline. The discount is the hook.⏱
- Add a countdown timer for flash sales: Time pressure works. A countdown to when a sale ends increases conversions by creating urgency. Slider Revolution has countdown timer templates built in. See the full countdown banner guide for implementation details.
- Upload a separate mobile banner: A 1920 x 1080 px landscape image cropped on a 375 px screen looks bad. Upload a portrait version (800 x 1200 px) specifically for mobile. In the Dawn theme, this is the “Mobile image” field under the Image Banner section.
- Link directly to the sale collection: Do not link your sale banner to the homepage. Link it to the specific sale collection or product. Every extra click between the banner and the product loses conversions. Use the clickable image banner method to add the link.
- Match banner colors to your brand, not the season: Generic red and green for Christmas, or orange for Halloween, can look off-brand and cheap. Use your store’s color palette as the base and layer seasonal accents on top. Consistent branding builds trust even during sale events.
- Keep file size under 500 KB: A slow-loading banner defeats its own purpose. Compress images before uploading. Shopify automatically converts to WebP for supported browsers, but you still need to upload a clean JPEG or PNG under 500 KB. Large banners are one of the top causes of slow homepage load times.
For a deeper dive into product image best practices, see the complete Shopify image size guide. For comparison-style promotional banners, the before/after slider guide covers another high-converting banner format.
Most Common Queries
What size should a Shopify sale banner be?
The recommended Shopify sale banner size is 1920 x 1080 px for a full-width hero banner (16:9 ratio). For a slideshow-style banner, use 1600 x 500 px (3:1 ratio). For mobile, upload a separate portrait image at 800 x 1200 px. Always keep file size under 500 KB. See the Shopify banner size guide for all specifications.
Can I add a countdown timer to my Shopify sale banner?
Yes. The Dawn theme editor does not support countdown timers natively. To add a countdown, use the Slider Revolution app which has countdown slider templates built in, or follow the dedicated Shopify countdown banner guide for other methods.
How do I make my Shopify sale banner clickable?
In the Dawn theme editor, open the Image Banner section settings, scroll down to the button or link field, and add your sale collection URL. If there is no link field visible, you may need to add a button layer or use the clickable image banner method with custom Liquid code.
How do I create a sale collection on Shopify?
Go to Products > Collections > Create Collection. Name it (e.g., “Summer Sale 2026”). Under Conditions, set rules like “Compare at price is greater than price” to automatically pull discounted items into the collection. This keeps the collection updated automatically without manual product assignment. Learn more about how to organize products on Shopify for a collection strategy.
How do I add a before/after comparison banner for sale pricing?
You can show the original vs. sale price visually using a before/after slider format. This works well for showing the value of your discount. See the full before/after slider guide for implementation. For displaying compare-at pricing in product listings, see the Shopify compare-at price guide.
Build a High-Converting Sale Banner in Minutes
Browse 200+ animated sale banner templates in Slider Revolution. No coding required. Start free, customize visually, and launch promotional banners in minutes.

Jakaria is an SEO Content Writer in Shopify, Ecommerce, WordPress, and Tech Industry with 5+ years of experience. He specialises in developing engaging, helpful content by simplifying complex topics into an amazing story for B2B, SaaS, and Shopify businesses. He’s also passionate about staying updated on growth marketing strategies and Shopify trends.