
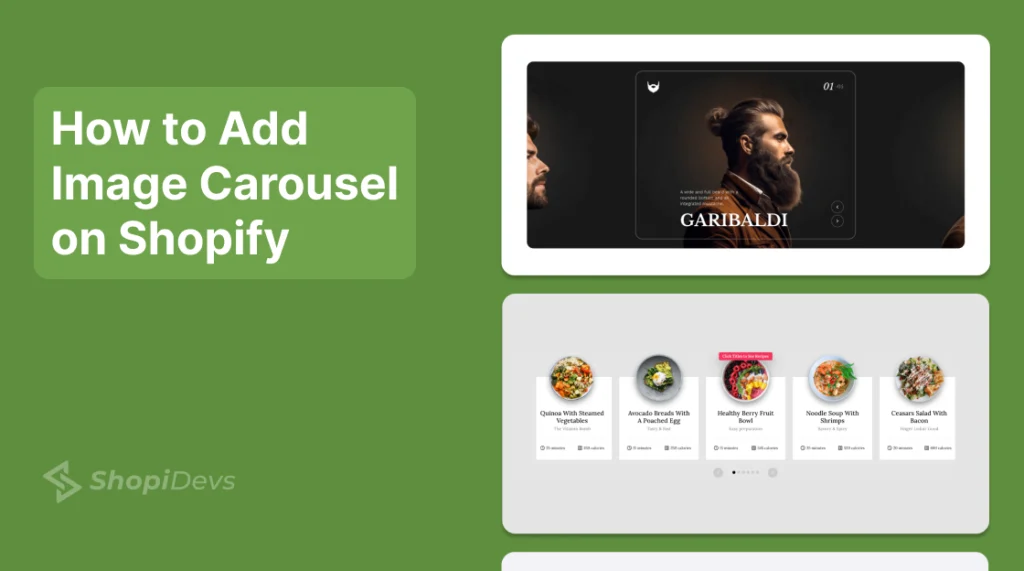
Your homepage loads. The hero image sits there: static, flat, completely forgettable. Shopify’s built-in Slideshow section gives you basic slides but no animations, no transition effects, and limited control over how it looks on mobile.
Most store owners leave it at that. In 2026, a static Shopify image carousel is just ad spend wasted on every visit.
There are 3 ways that you can add an image carousel to your Shopify store.
- The Dawn theme editor takes 5 minutes with zero code.
- A custom Liquid section gives you full control without paying for an app.
- Slider Revolution gives you 300+ professional templates with animations, autoplay, and mobile-responsive behavior out of the box.
This guide covers all three with every step and every screenshot.
How to add an image carousel on Shopify: Open Online Store → Themes → Customize, click Add Section, choose Slideshow, upload your images, enable Auto-rotate slides, and click Save. This is the fastest built-in method and takes less than five minutes without installing an app or writing code.
For animated image carousels with advanced effects, install
Slider Revolution, choose an Image Carousel template,
replace the demo images, copy the shortcode, and embed it using a
General Slider section. If you need complete design control, create an
image-carousel.liquid
section in your Shopify theme and paste your custom carousel code.
Key Takeaways
- The Dawn Slideshow section is the fastest option. It takes about five minutes, requires no coding, but offers limited animations and customization.
- A custom Liquid carousel gives you full control over navigation arrows, pagination dots, autoplay, lazy loading, and responsive layouts without relying on a third-party app.
- Slider Revolution includes more than 300 professionally designed image carousel templates with 3D effects, Ken Burns animation, autoplay, and advanced transitions.
- Use WebP images at approximately 2000 × 800 pixels for the best balance of image quality and loading speed.
- Limit your carousel to three to five slides and set autoplay between four and seven seconds to keep visitors engaged without hurting click-through rates.
Why Image Carousels Matter on Shopify
A well-placed image carousel is one of the most interactive elements on a Shopify homepage. It grabs the initial attention of users before they perform any activities on a site.
Here’s what a properly built Shopify image carousel does for your store:
- Showcases multiple offers in one slot: new arrivals, seasonal promos, and best-sellers without stacking sections or cluttering the layout.
- Reduces bounce rate: animated elements keep visitors engaged longer than static images. Dwell time is a soft ranking signal for Shopify SEO.
- Works across devices: a good carousel adjusts gracefully between desktop and mobile without layout breaks or distorted images.
- Drives conversions when paired with CTAs: adding “Shop Now” or “View Collection” buttons directly inside carousel slides can lift add-to-cart rates on promotional slides.
Caution: Image carousels can reduce engagement when configured poorly. Slides that rotate too quickly (under three seconds) make content harder to read and can lower click-through rates on featured products. Large, uncompressed images also hurt page speed. Always optimize images as WebP files and preload the first slide for the best performance and user experience.
Method Comparison: Which One Should You Use?
Method 1: Dawn Theme Slideshow (No Code, 5 Minutes)
Shopify’s Dawn theme includes a built-in Slideshow section that works out of the box: no apps, no code. It supports multiple image slides, auto-rotation, and full-width layout. It won’t give you animations or advanced effects, but it’s the fastest way to get a Shopify image carousel live.
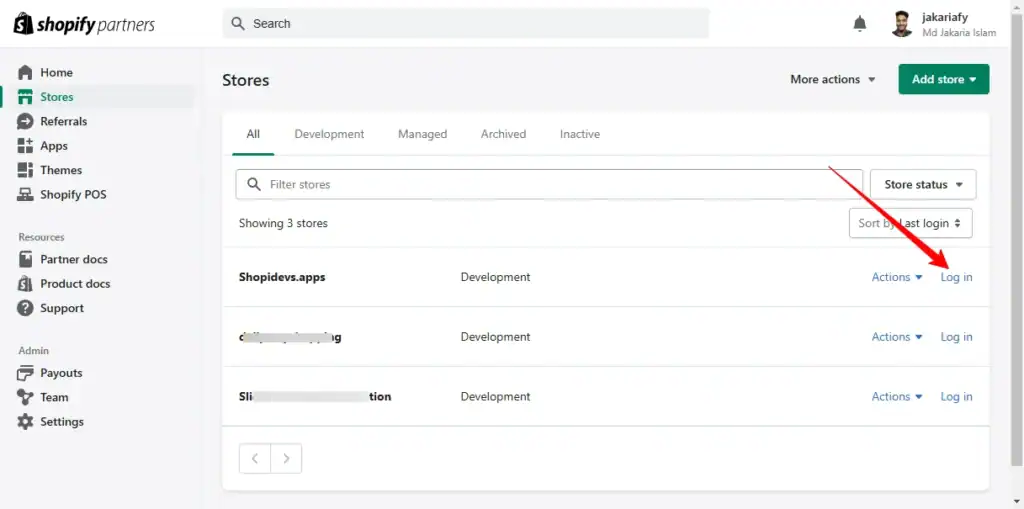
1: Log In to your Shopify admin
- Go to yourstorename.myshopify.com/admin
- Enter your email and password
- Click Log in
2. Open the theme customizer
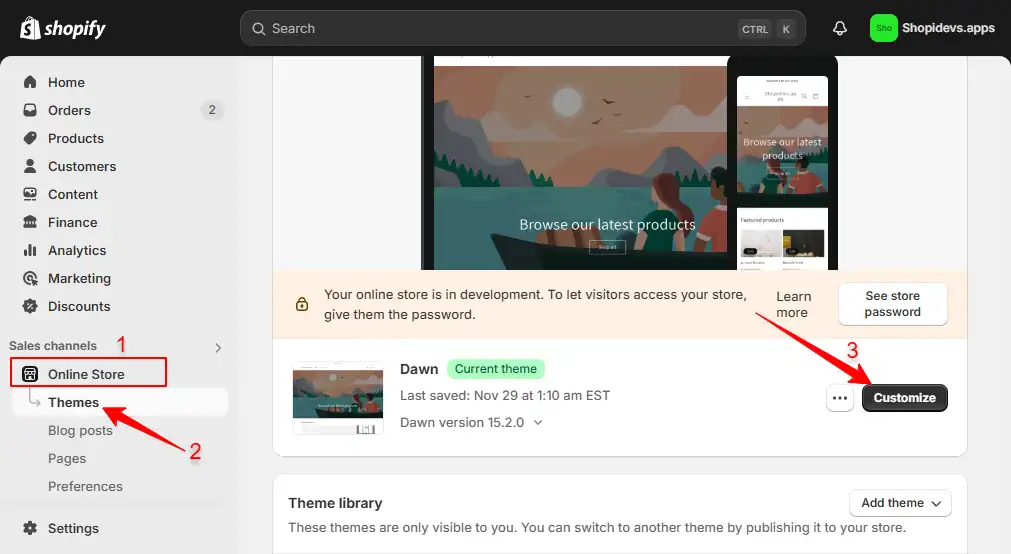
- From your Shopify admin, go to Online Store > Themes
- Click the Customize button on your active theme
3. Navigate to the page where you want the carousel
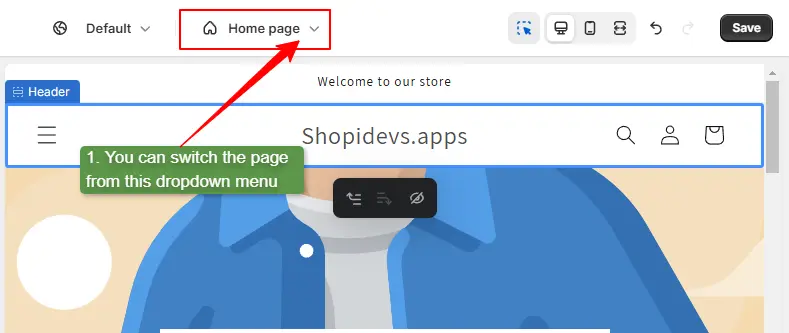
- Use the top dropdown menu to select the page (Homepage, Product Page, or Custom Page)
- Make sure you are editing the correct page before adding sections
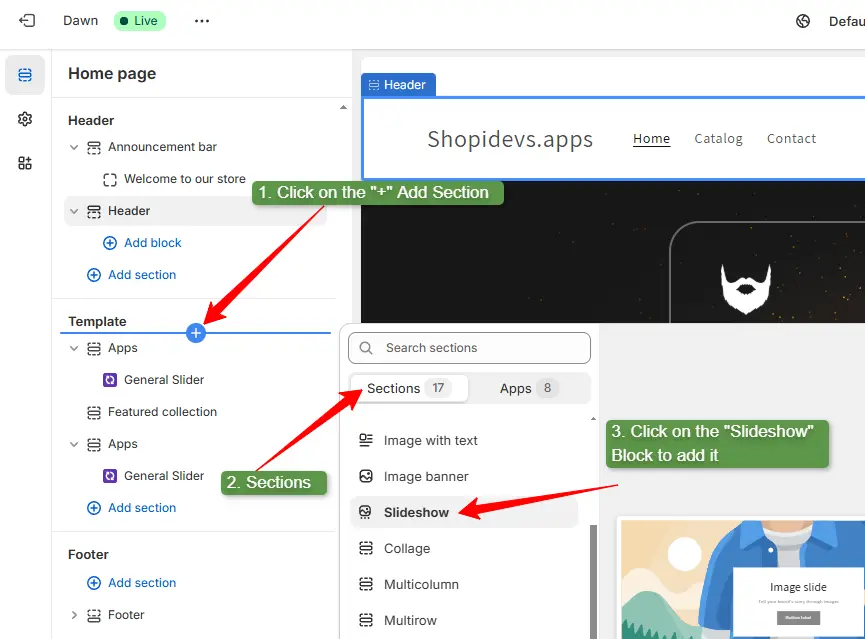
4. Add the Slideshow section
- Click Add section in the left sidebar
- Scroll through the list to find Slideshow
- Click it to add it to your page
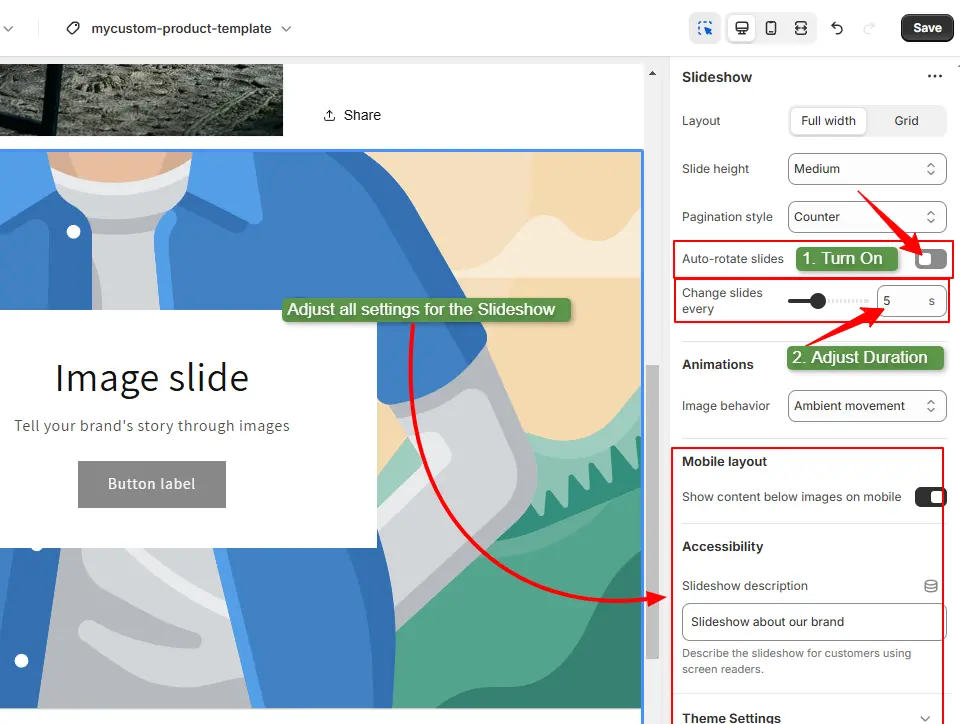
5: Customize the Slideshow Settings
- Click the Slideshow section to open its settings panel
- Select layout (Full width or Grid)
- Turn on Auto-rotate slides
- Set the slide duration (3-7 seconds recommended)
- Adjust mobile layout settings as needed
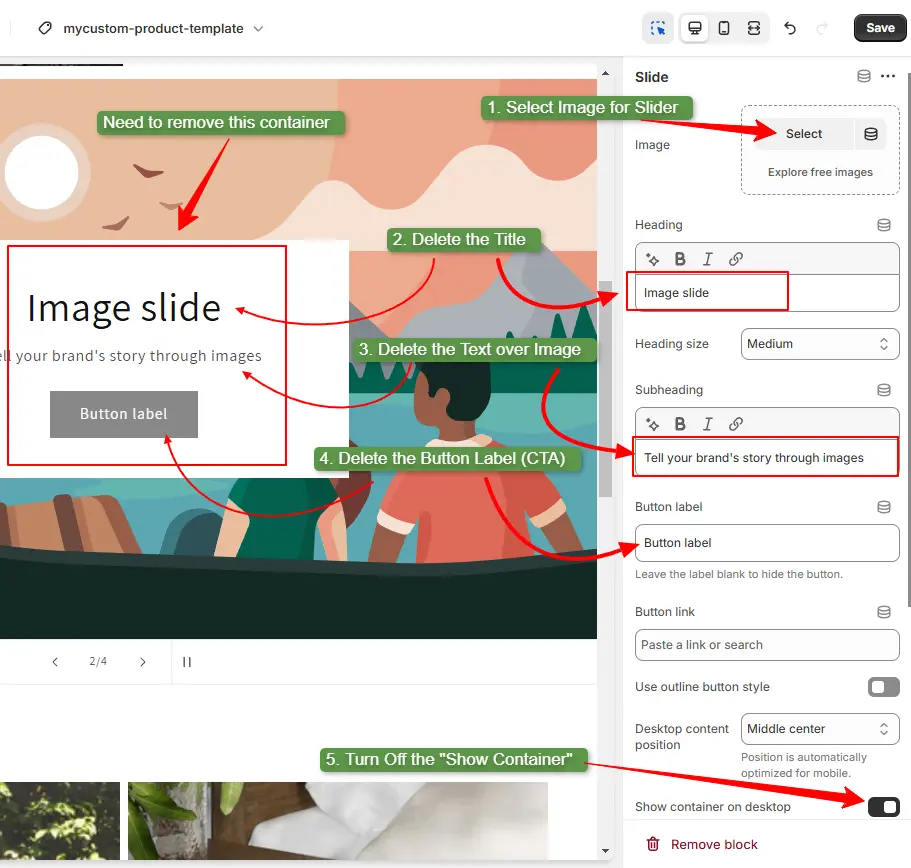
6: Upload Your Images
- Click each Image Slide block under the Slideshow section
- Upload and select your image for each slide
- Remove heading, subheading, and button text if you only want a pure image carousel
- Turn off Show container on desktop to remove the text overlay box
- Repeat for each image slide
Step 7: Save and preview
- Click the Save button. Visit your storefront to confirm the carousel is working and auto-rotating correctly.
Method 2: Custom Liquid Section (Free Code, Full Control)
If you want control over slide transitions, arrow styles, dot navigation, autoplay speed, and lazy loading without relying on an app, a custom Liquid section is the right move.
This approach creates a reusable Shopify section that you can add to any page and manage entirely through the Theme Customizer: no hardcoded images, no code edits every time you change a slide. The structure below works on Dawn and most other Shopify themes.
1. Open your theme code editor
In your Shopify admin, go to Online Store > Themes, click the three-dot menu on your active theme, then select Edit Code.
2. Create a new section file
- In the left sidebar, find the Sections folder
- Click Add a new section
- Name it image-carousel (Shopify adds
.liquidautomatically) - Click Done
3. Paste the full carousel code
Delete any default content in the new file and paste the code below. It includes the HTML structure, CSS styles, vanilla JavaScript, and full Shopify schema: everything in one file.
{% comment %} Image Carousel Section for Shopify {% endcomment %}
<div class="sd-carousel"
     data-autoplay="{{ section.settings.autoplay }}"
     data-speed="{{ section.settings.speed | times: 1000 }}">

  <div class="sd-carousel__track">
    {% for block in section.blocks %}
      <div class="sd-carousel__slide" {{ block.shopify_attributes }}>
        {% if block.settings.image != blank %}
          {% if block.settings.link != blank %}<a href="{{ block.settings.link }}">{% endif %}
          {% if forloop.first %}
            {{ block.settings.image | image_url: width: 1200
               | image_tag: alt: block.settings.alt_text, loading: 'eager', class: 'sd-carousel__img' }}
          {% else %}
            {{ block.settings.image | image_url: width: 1200
               | image_tag: alt: block.settings.alt_text, loading: 'lazy', class: 'sd-carousel__img' }}
          {% endif %}
          {% if block.settings.link != blank %}</a>{% endif %}
        {% else %}
          {{ 'image' | placeholder_svg_tag: 'sd-carousel__img' }}
        {% endif %}
      </div>
    {% endfor %}
  </div>

  <button class="sd-carousel__btn sd-carousel__btn--prev" aria-label="Previous">❮</button>
  <button class="sd-carousel__btn sd-carousel__btn--next" aria-label="Next">❯</button>

  <div class="sd-carousel__dots">
    {% for block in section.blocks %}
      <button class="sd-carousel__dot {% if forloop.first %}active{% endif %}"
              aria-label="Slide {{ forloop.index }}"></button>
    {% endfor %}
  </div>
</div>

{% stylesheet %}
  .sd-carousel { position: relative; overflow: hidden; width: 100%; }
  .sd-carousel__track { display: flex; transition: transform 0.5s ease; }
  .sd-carousel__slide { min-width: 100%; flex-shrink: 0; }
  .sd-carousel__img { width: 100%; height: auto; display: block; object-fit: cover; }
  .sd-carousel__btn {
    position: absolute; top: 50%; transform: translateY(-50%);
    background: rgba(0,0,0,0.45); color: #fff; border: none;
    width: 44px; height: 44px; border-radius: 50%;
    cursor: pointer; font-size: 18px; z-index: 5; transition: background 0.2s;
  }
  .sd-carousel__btn:hover { background: rgba(0,0,0,0.75); }
  .sd-carousel__btn--prev { left: 12px; }
  .sd-carousel__btn--next { right: 12px; }
  .sd-carousel__dots {
    position: absolute; bottom: 14px;
    left: 50%; transform: translateX(-50%);
    display: flex; gap: 8px;
  }
  .sd-carousel__dot {
    width: 10px; height: 10px; border-radius: 50%;
    border: 2px solid rgba(255,255,255,0.8); background: transparent;
    cursor: pointer; padding: 0; transition: background 0.2s;
  }
  .sd-carousel__dot.active { background: #fff; }
{% endstylesheet %}

{% javascript %}
  (function () {
    document.querySelectorAll('.sd-carousel').forEach(function (el) {
      var track  = el.querySelector('.sd-carousel__track');
      var slides = el.querySelectorAll('.sd-carousel__slide');
      var dots   = el.querySelectorAll('.sd-carousel__dot');
      var idx    = 0;
      var autoplay = el.dataset.autoplay === 'true';
      var speed    = parseInt(el.dataset.speed) || 4000;

      function go(n) {
        idx = (n + slides.length) % slides.length;
        track.style.transform = 'translateX(-' + (idx * 100) + '%)';
        dots.forEach(function (d, i) { d.classList.toggle('active', i === idx); });
      }

      el.querySelector('.sd-carousel__btn--prev').addEventListener('click', function () { go(idx - 1); });
      el.querySelector('.sd-carousel__btn--next').addEventListener('click', function () { go(idx + 1); });
      dots.forEach(function (d, i) { d.addEventListener('click', function () { go(i); }); });
      if (autoplay) { setInterval(function () { go(idx + 1); }, speed); }
    });
  })();
{% endjavascript %}

{% schema %}
{
  "name": "Image Carousel",
  "tag": "section",
  "class": "sd-image-carousel",
  "max_blocks": 10,
  "blocks": [
    {
      "type": "slide",
      "name": "Slide",
      "settings": [
        { "type": "image_picker", "id": "image", "label": "Image" },
        { "type": "text", "id": "alt_text", "label": "Alt text", "default": "Carousel slide" },
        { "type": "url", "id": "link", "label": "Link (optional)" }
      ]
    }
  ],
  "settings": [
    { "type": "checkbox", "id": "autoplay", "label": "Auto-rotate slides", "default": true },
    {
      "type": "range", "id": "speed", "label": "Slide duration (seconds)",
      "min": 2, "max": 10, "step": 1, "default": 4
    }
  ],
  "presets": [{ "name": "Image Carousel" }]
}
{% endschema %}4. Save the file
Click Save in the top-right corner of the code editor. Shopify will validate the schema. If there are no errors, the section is ready to use.
5. Add the section to your page
- Go to Online Store > Themes > Customize
- Navigate to the page where you want the carousel
- Click Add section and find Image Carousel (it will appear in your sections list)
- Click Add Slide for each image, upload your images, and set optional links
- Toggle Auto-rotate slides and set your slide duration
- Click Save
Method 3: Slider Revolution App (Animated Templates, No Code)
The Slider Revolution & Sections App is built specifically for Shopify. It gives you 300+ professional templates, including dedicated image carousel layouts with animations such as 3D transitions, Ken Burns parallax, and layered slide effects. You don’t write any code. You pick a template, swap your images, and publish.
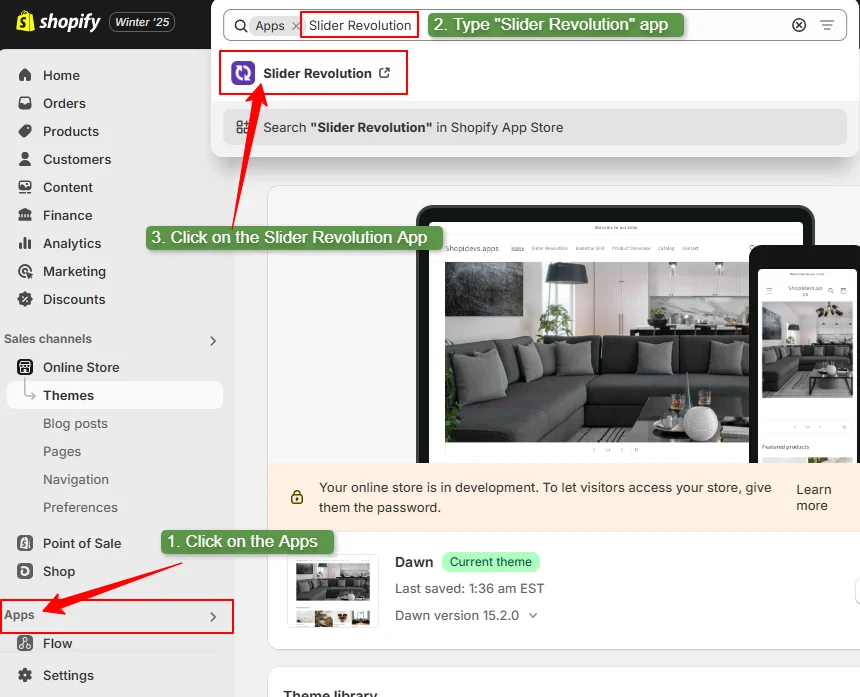
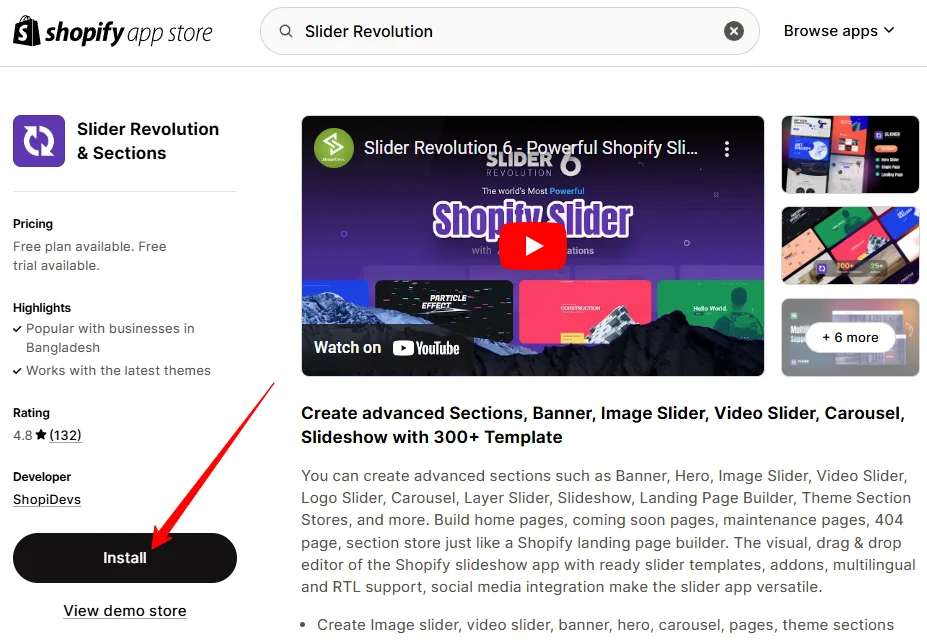
1. Find Slider Revolution in the Shopify App Store
- Log in to your Shopify admin and click Apps in the left sidebar
- Search for “Slider Revolution & Sections” in the App Store
2: Install the Slider Revolution App
- Click on the “Install“ button to add the app to your store.
- It will redirect you to the ‘Slider Revolution’ app dashboard.
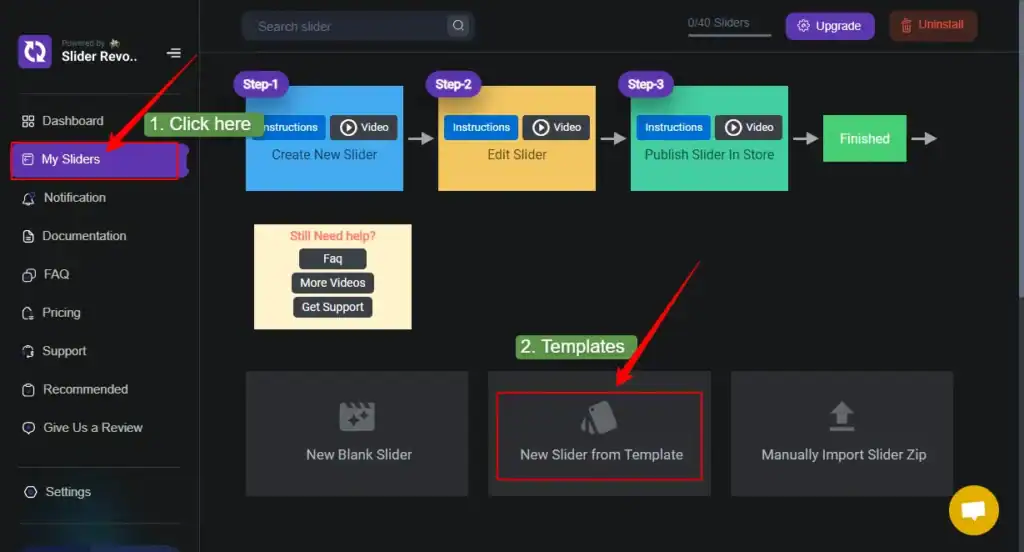
3. Go to my slider > new slider from templates
- In the app dashboard left sidebar, click My Slider
- Select New Slider from Templates
- Browse over 300 professional templates across all Shopify store sections
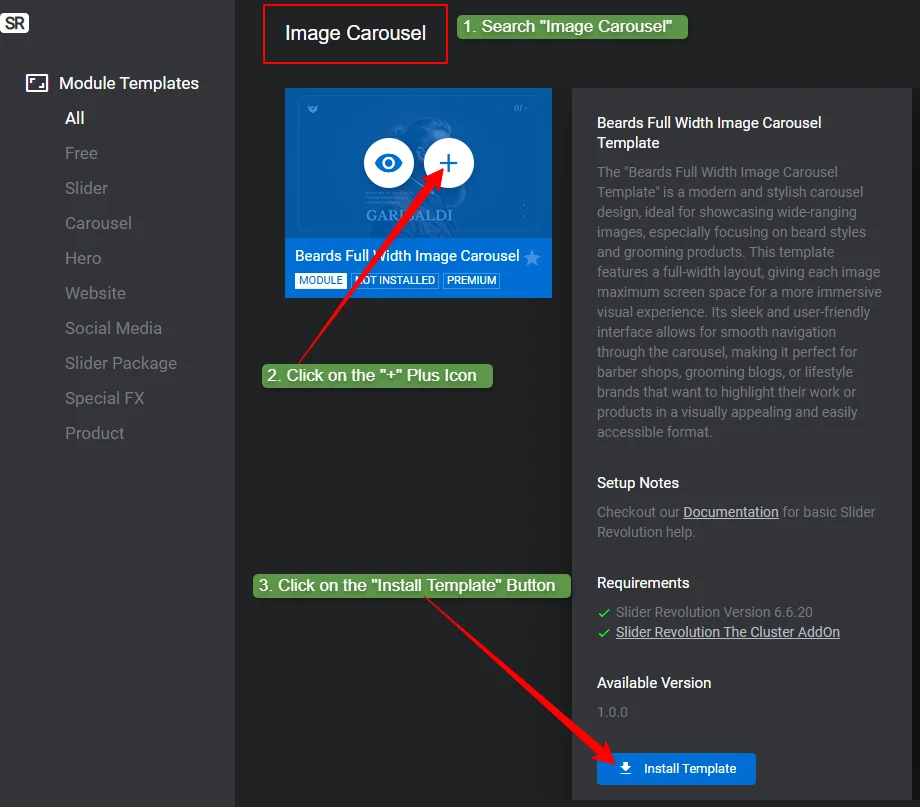
4: Choose and install an image carousel template
- Search “Image Carousel” in the template search bar to filter relevant designs
- Click the + icon on your preferred template
- Click Install Template to import it into your dashboard
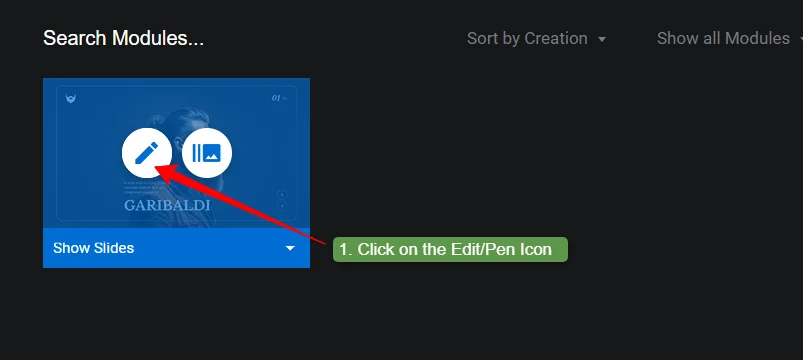
Step 5: Open the template editor
- Click the pencil/edit icon on the installed template
- This opens the full Slider Revolution visual editor
Step 6: Customize the Image Carousel
This step has a few sub-actions:
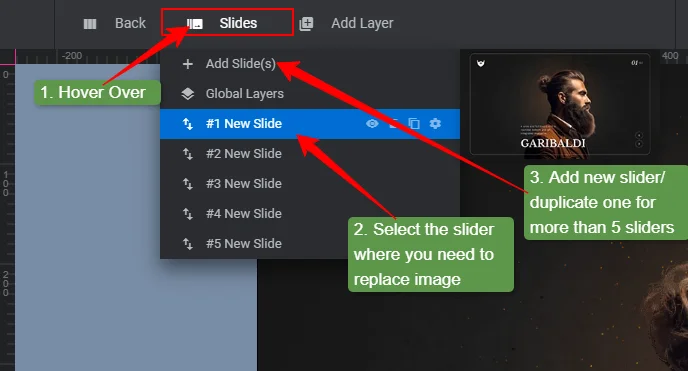
- In the upper-left panel, hover over each slide in the slider list to select it
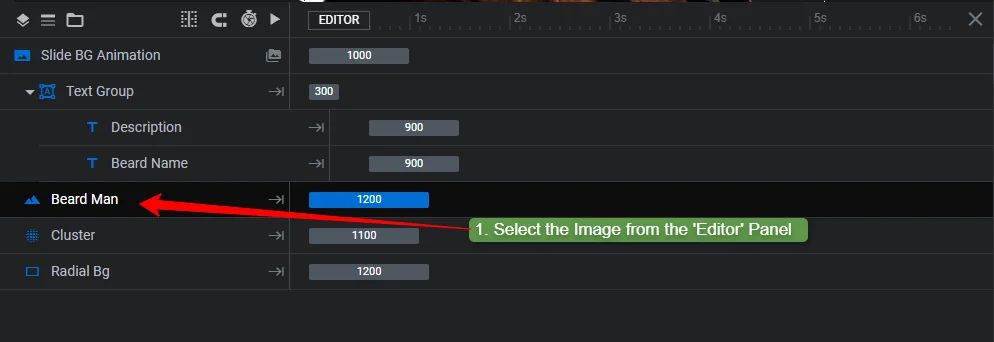
- In the Editing Panel at the bottom, select the image layer
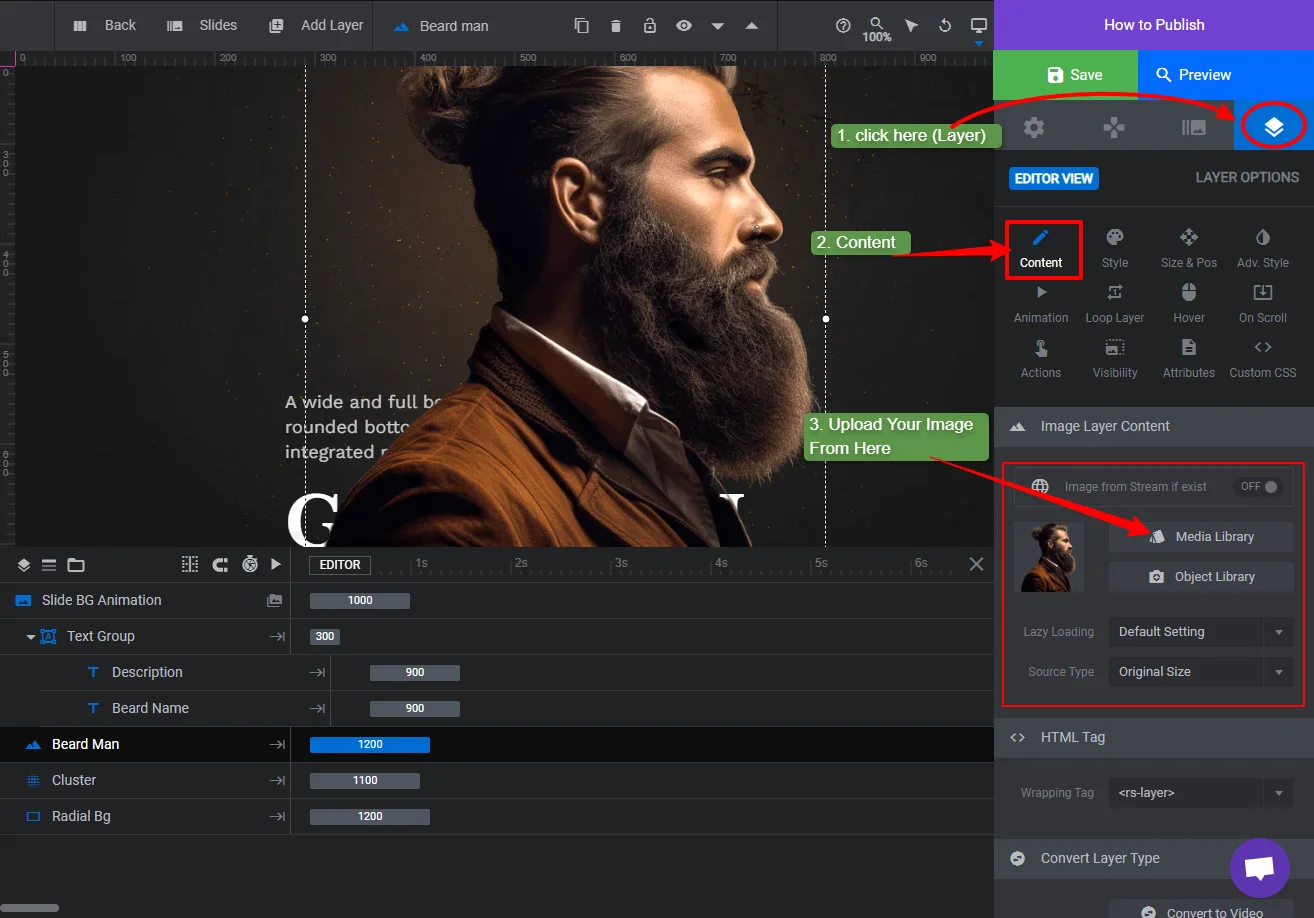
- Go to Layer Options > Content > Media Library, upload your image, and select it to replace the demo image
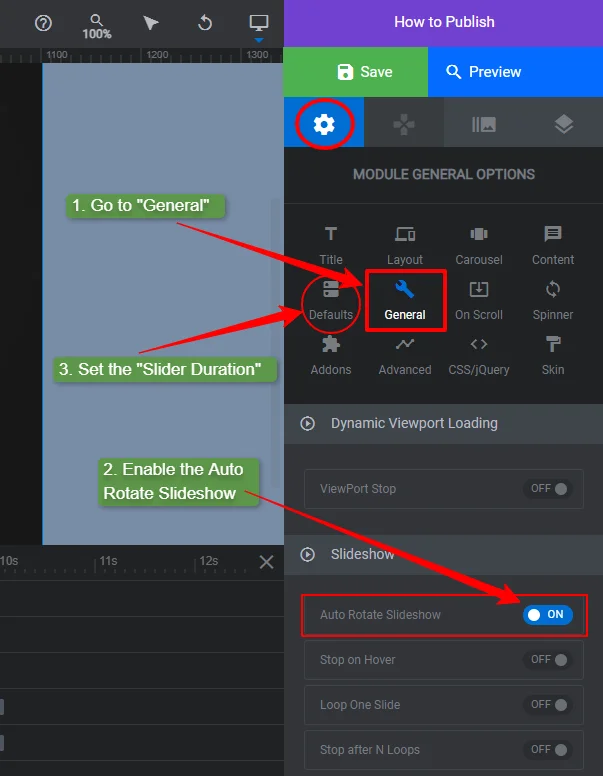
- Go to Module General Options > General and turn on Auto Rotate Slideshow
- Under Defaults, adjust the Slider Duration (default is 9000ms, about 9 seconds, which is too long for most stores; try 4000-5000ms)
Additionally, you can utilize the “Carousel customization”, animations, and other customization features.
Repeat this process for each slide in the carousel.
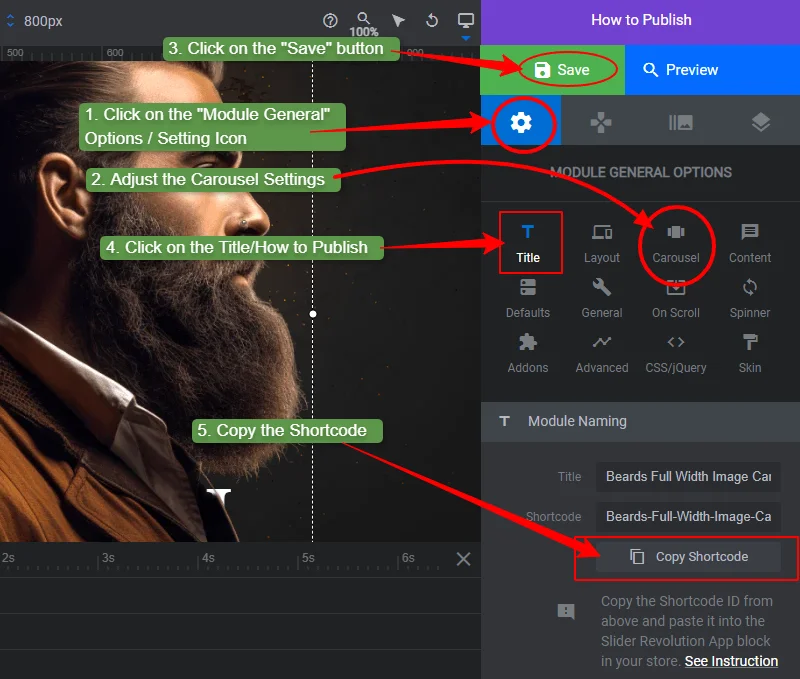
Step 7: Preview, save, and copy the shortcode
- Click Preview to check the carousel before publishing
- Click Save
- Copy the shortcode from How to Publish, or from Module General > Title > Module Naming > Shortcode
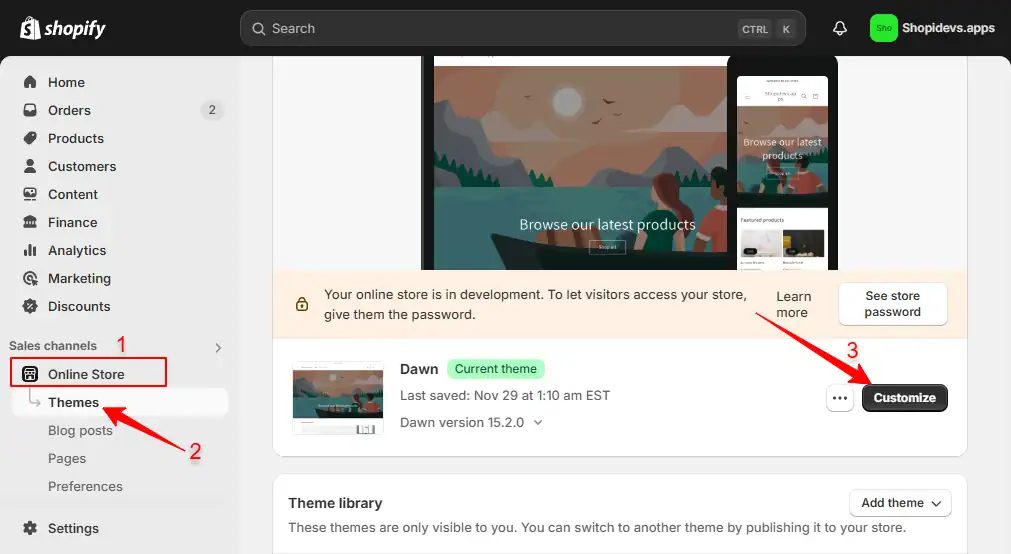
Step 8: Return to the shopify theme editor
- Log in to your Shopify store.
- Go to “Online Store > Themes > Customize”.
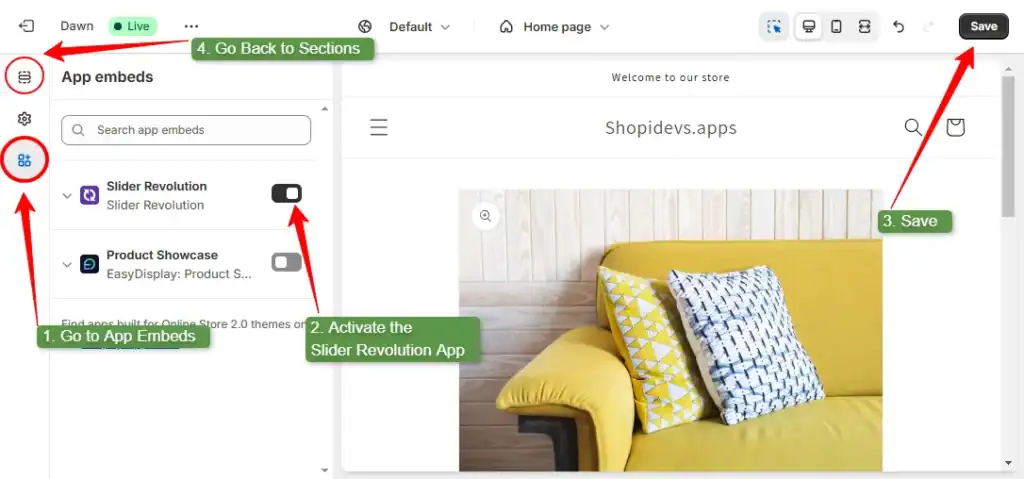
Step 9: Activate the slider revolution App embed
- Click the App Embeds icon (puzzle piece) in the left sidebar
- Toggle on Slider Revolution & Sections
- Click Save
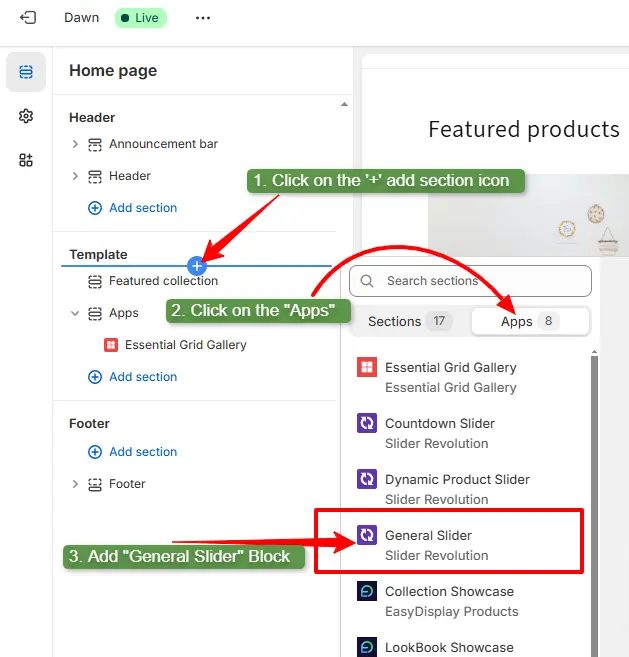
Step 10: Add a “General Slider” Section
- Navigate to the page where you want to add the carousel
- Click the + icon to add a new section
- Go to Apps and click General Slider
Step 11: Paste the shortcode and save
- In the right sidebar panel, paste your copied shortcode into the shortcode field
- Click Save
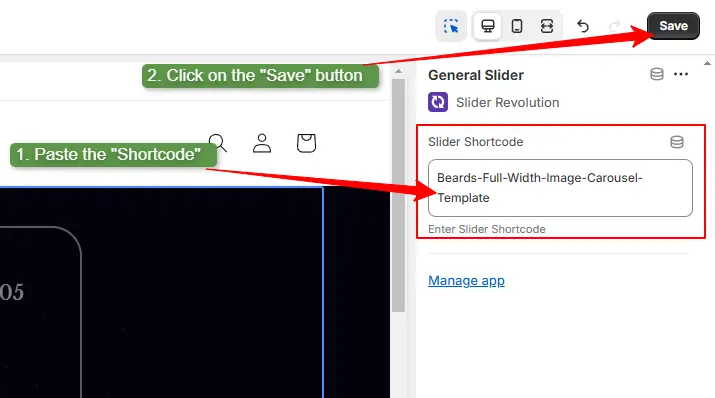
You can add one or multiple image carousels on Shopify using the Slider Revolution app by following the same process.
Step 12: Preview the Live Store
Visit your storefront to see the image carousel live. You can add multiple carousels on the same page by repeating the shortcode process for each one.
5 Expert Tips for Maximum Carousel Engagement
Getting a carousel live is step one. Getting it to convert is the actual job. Here are the five things that separate high-performing Shopify image carousels from the ones that quietly hurt your store.
Lead With Your Best Slide
Put your highest-converting offer on the first slide. Most visitors never view the rest.
Keep It to 3-5 Slides
Limit your carousel to 3-5 slides and use a 4-7 second autoplay delay.
Design for Mobile
Test on a real phone and keep buttons large enough for easy tapping.
Optimize Page Speed
Lazy load every slide except the first and compress images to WebP for faster loading.
Everything built in. No apps to install.
Bundles, promos, a shoppable lookbook and a mega menu ship with the theme. Five EU languages, one-time payment, lifetime updates — and no monthly app fees eating your margin.
Get Snazzy →
Frequently asked questions
How do I add an image carousel in Shopify?
Go to Online Store > Themes > Customize, click Add Section, choose Slideshow, upload your images, and enable Auto-rotate slides. This uses Shopify’s built-in Dawn Slideshow section and requires no code. For animated carousels, use the Slider Revolution app or create a custom Liquid section file.
Does Shopify have a built-in image carousel?
Yes. The Dawn theme (Shopify’s default) includes a Slideshow section that functions as a basic image carousel with auto-rotate and multiple slides. It does not support animation effects or partial-width layouts. For those, you need a custom section or an app like Slider Revolution.
How do I add an auto slider in Shopify?
In the Shopify Theme Customizer, add a Slideshow section, then enable the Auto-rotate slides toggle and set your slide duration. If you’re using Slider Revolution, go to Module General Options > General and turn on Auto Rotate Slideshow, then set your preferred duration under Defaults.
What is the best image size for a Shopify carousel?
Use 2000x800px for full-width carousels. Save images in WebP format for the best balance of quality and file size. Avoid going below 1200px wide. On large displays, small images will appear blurry or pixelated. Check our Shopify image size guide for all format recommendations.
Can I add a carousel on any Shopify page, not just the homepage?
Yes. Both the built-in Slideshow section and Slider Revolution can be added to any page: Homepage, Collection pages, Product pages, or custom pages built with Online Store > Pages. In the Theme Customizer, use the top dropdown to switch between pages and add your carousel section to any of them.
Is Slider Revolution free on Shopify?
Slider Revolution has a free plan that gives you access to templates and core features. Paid plans unlock additional templates, premium animations, and priority support. You can start with the free plan to test the image carousel templates before upgrading.
What is the difference between a Shopify image carousel and a product slider?
An image carousel typically displays hero or banner images (usually full-width, used for brand messaging and promotions). A product slider displays product cards with images, titles, and prices in a scrollable row. Both use similar slide mechanics, but the content and placement differ. For product sliders, see the Shopify product slider guide.
Get Professional Shopify Carousels Without Touching Code
Slider Revolution includes 300+ responsive carousel templates with animations, autoplay, videos, and advanced effects. Launch a professional carousel in minutes without coding.
Try Slider Revolution for Free →
Jakaria is an SEO Content Writer in Shopify, Ecommerce, WordPress, and Tech Industry with 5+ years of experience. He specialises in developing engaging, helpful content by simplifying complex topics into an amazing story for B2B, SaaS, and Shopify businesses. He’s also passionate about staying updated on growth marketing strategies and Shopify trends.