
Every Shopify store starts with the same default templates. The same product page layout. The same collection grid. The same checkout experience. If your competitor is on Dawn or Craft, your store looks like theirs out of the box.
Custom templates fix that by giving you separate layouts for different product types, collections, landing pages, and content types, without touching what is already working.
In 2026, Shopify custom templates go beyond simple layout changes. Metaobject templates let you define entirely new content types (team profiles, testimonials, ingredient lists, store locations) and connect them to your theme without any coding.
This guide covers all three methods to create custom templates, the new metaobject approach, and shows what each looks like in practice.
A Shopify custom template is a separate page layout within your theme that you assign to specific products, collections, or pages. It lets you display those pages differently from the default without changing the rest of your store. Shopify supports up to 25 custom templates per template type (product, page, collection, etc.).
There are 3 ways to create custom templates: (1) Shopify Theme Editor (no code, OS 2.0 themes only), (2) Theme Code Editor using JSON or Liquid files (full control, requires coding knowledge), and (3) Slider Revolution (300+ pre-built templates, drag-and-drop, no code). Metabject templates add a fourth layer: defining and displaying entirely custom content types directly in the theme editor.
- Shopify custom templates are reusable page layouts assigned to specific products, collections, or pages. One product can use a “hero-product” template while others use the default.
- Online Store 2.0 themes use JSON templates, which enable drag-and-drop section editing for every page type. Legacy Liquid templates are still supported but do not benefit from the Sections Everywhere feature.
- Shopify allows a maximum of 25 custom templates per template type. This applies separately to products, pages, collections, blogs, and articles.
- Metabject templates are the most powerful addition. They let you create reusable structured content such as Team Members, Testimonials, FAQ Sets, Store Locations, and more without duplicating content.
- Slider Revolution provides 300+ pre-built Shopify templates for homepages, product pages, landing pages, collections, blogs, and promotional sections with animations and visual effects built in.
What Are Shopify Custom Templates?
A Shopify custom template is an alternative page layout within your active theme. Every theme includes default templates for products, collections, pages, and blogs. Custom templates are additional layouts you create alongside the defaults and assign to specific pages or products.
For example, a skincare brand might have three product templates: the default template for standard items, a “hero-product” template for bestsellers with video, expanded ingredient lists, and an FAQ block, and a “bundle” template for kit pages with a different pricing and comparison layout. All three templates live inside the same theme. Each product is assigned to one of them.
Custom templates give you full control over rich content for ecommerce without duplicating your theme or creating separate pages from scratch. They are the most scalable way to differentiate page layouts inside a single Shopify store.
JSON Templates vs Liquid Templates (2026)
Every Shopify template is one of two file types: JSON or Liquid. This distinction matters because it determines whether you can use the drag-and-drop theme editor and the Sections Everywhere feature.
| Feature | JSON Template (.json) | Liquid Template (.liquid) |
|---|---|---|
| Shopify version | Online Store 2.0 (standard since 2021) | Legacy themes pre-OS 2.0 |
| Sections Everywhere | Yes, add and reorder sections on any page from the theme editor | No, sections only work on the homepage |
| Theme editor editing | Full drag-and-drop editing in theme editor | Limited, mostly code-only |
| File content | A configuration file listing which sections appear and their settings | HTML + Liquid code defining the full page layout |
| Metabject templates | Supported | Not supported |
| Recommended in 2026 | Yes, standard for all new templates | Only for legacy themes without OS 2.0 |
2026 status:
JSON templates are the standard for all modern Shopify themes including
Dawn, Craft, Sense, Crave, and Pesto.
The only built-in exceptions are
gift_card.liquid
and
robots.txt.liquid,
which remain as Liquid files.
If you are using any Online Store 2.0 theme,
you are already using JSON templates.
How Many Custom Templates Can You Create on Shopify?
Shopify allows a maximum of 25 custom templates per template type. This limit applies independently to each type. So you can have up to 25 custom product templates, 25 custom page templates, 25 custom collection templates, and 25 custom blog and article templates, all active simultaneously within a single theme.
For most stores, 25 templates per type is more than enough. A store typically needs 2 to 5 product template variations. If you reach the limit, you can delete unused templates from the theme code editor to free up slots. Shopify does not delete any assigned products or pages when you remove a template, but those pages revert to the default template.
10 Types of Shopify Page Templates
Shopify lets you create custom templates for every major page type. Each type serves a distinct purpose. Understanding them helps you decide which ones to customize first.
Homepage Template
The main storefront. Usually not multiplied, but customized with branded hero sections, featured products, and announcements.
Product Page Template
The most commonly customized. Different product types (bundles, hero products, simple items) each benefit from unique layouts. See the full guide to creating Shopify product page templates.
Collection Template
Controls how groups of products are displayed. Useful for organizing products on Shopify by season, category, or promotion type with distinct filtering and sorting layouts.
Page Template
For static pages: About Us, Contact, Store Policies, FAQ. Each page type can have its own layout with specific content sections.
Landing Page Template
Focused conversion pages for campaigns, product launches, or ads. See the full walkthrough for creating landing pages in Shopify.
Blog Template
Controls the blog listing page layout, including how posts are displayed, how many appear per row, and what metadata is shown.
Article Template
Controls individual blog post layout. You can create different article templates for tutorials, case studies, and product announcements.
Cart Template
The shopping cart page layout including upsells, cross-sells, cart notes, and checkout button placement.
Customer Account Templates
Login, registration, order history, and account settings pages. Limited customization in standard Shopify, more control with Shopify Plus.
404 Template
The page-not-found error page. A custom 404 with navigation, search, and featured products keeps lost visitors on your site.
Metaobject Templates in Shopify 2026 New in 2025
Metaobject templates are the most significant Shopify template feature added in recent years. They let you define entirely custom content structures, fill them with entries, and display them through dedicated templates in your theme, all without writing code.
A metaobject is a custom content type you define. For example, “Team Member” is a metaobject with fields for Name, Job Title, Photo, Bio, and LinkedIn URL. Once defined, you create individual entries for each team member. Then you create a metaobject template in the theme editor to control how each entry is displayed on the storefront.
Common Metaobject Template Use Cases
Team Member Profiles
Fields: Name, Job Title, Photo, Bio, LinkedIn. Used on /pages/team/ to display staff cards dynamically.
Customer Testimonials
Fields: Quote, Customer Name, Company, Star Rating, Photo. Pull into any section as dynamic content.
Product Ingredients / Materials
Fields: Ingredient Name, Description, Source, Benefit, Icon. Used on product pages for brands with complex ingredient lists.
Store Locations
Fields: Store Name, Address, Phone, Hours, Map Link, Photo. Displays all retail locations on a single page from one definition.
FAQ Sets
Fields: Question, Answer, Category. Reusable FAQ content that can be pulled into product pages and standalone FAQ pages.
Press Mentions
Fields: Publication Name, Logo, Quote, Date, Article URL. Display press coverage on About Us or dedicated Press pages.
How to Create a Metaobject Template in Shopify
1. Define the Metaobject in Shopify Admin: In your Shopify admin, go to Settings > Custom Data > Metaobjects and click Add definition. Give your metaobject a name (e.g., “Team Member”) and add the fields you need. Each field has a type: single-line text, multi-line text, image, URL, rating, or date. Save the definition.
2. Add Metaobject Entries: Once the definition is saved, go to Content > Metaobjects in your Shopify admin. Select your metaobject type and click Add entry. Fill in the fields for each item (each team member, each testimonial, each location). Shopify allows thousands of entries per metaobject type.
3. Create a Metaobject Template in the Theme Editor: Open your theme editor (Online Store > Themes > Customize). Click the page-type dropdown at the top and select Metaobjects. Click Create metaobject template, select your metaobject definition, and name the template. Now add sections to the template and use Dynamic Sources to connect each section’s fields to your metaobject fields. Save the template. Each metaobject entry now has its own dedicated storefront URL.
Metabject template requirement: Metabject templates only work on Online Store 2.0 themes with JSON template support. If your theme predates OS 2.0, you need to upgrade to a modern theme before using this feature. Check the best free Shopify themes that support OS 2.0 if you need to upgrade.
Which Method Should You Use?
Decision Framework
3 Ways to Create Shopify Custom Templates
Here is a quick comparison before you dive into the steps:
| Feature | Theme Editor | Custom Code | Slider Revolution |
|---|---|---|---|
| Skill level | Beginner | Advanced | Intermediate |
| Coding required | None | Liquid, JSON, HTML | None |
| OS 2.0 required | Yes | JSON: yes / Liquid: no | No |
| Time to create | 30 to 60 min | 2 to 8+ hours | 1 to 2 hours |
| Pre-built templates | No | No | 300+ |
| Animations & effects | Theme dependent | Manual coding | Built in |
| Mobile responsive | Theme dependent | Manual coding | Built in |
| Cost | Free | Free (or developer cost) | Free plan available |
Method 1: Customize Shopify Templates Using the Theme Editor
The Shopify Theme Editor is the built-in no-code tool for creating and customizing templates. It works exclusively with Online Store 2.0 themes. If you are on a legacy theme, use Method 2 or upgrade to an OS 2.0 theme first.
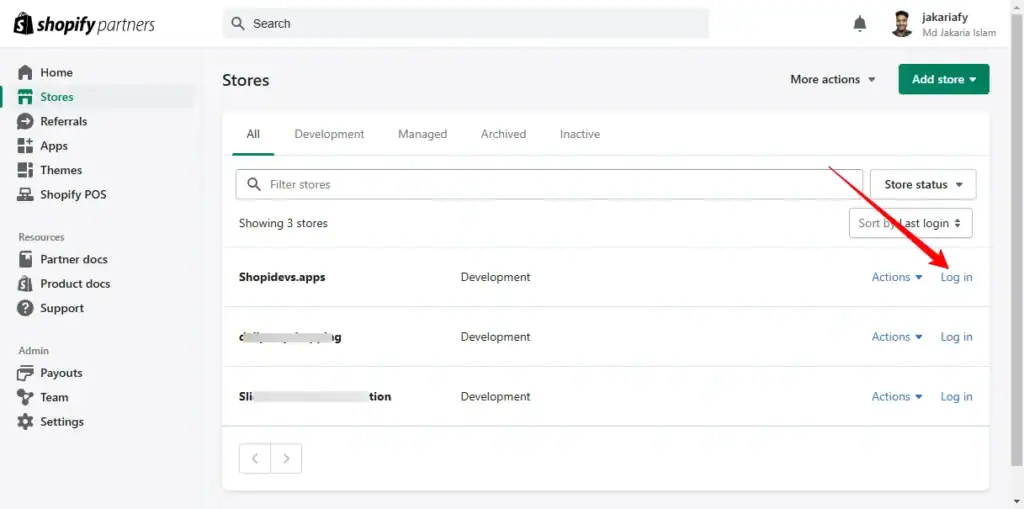
Step 1: Log In to Your Shopify Admin
Visit your Shopify admin and log in with your store credentials. If you are a developer accessing a client store, use your Shopify Partner Dashboard to log in via collaborator access.
Step 2: Open the Theme Editor
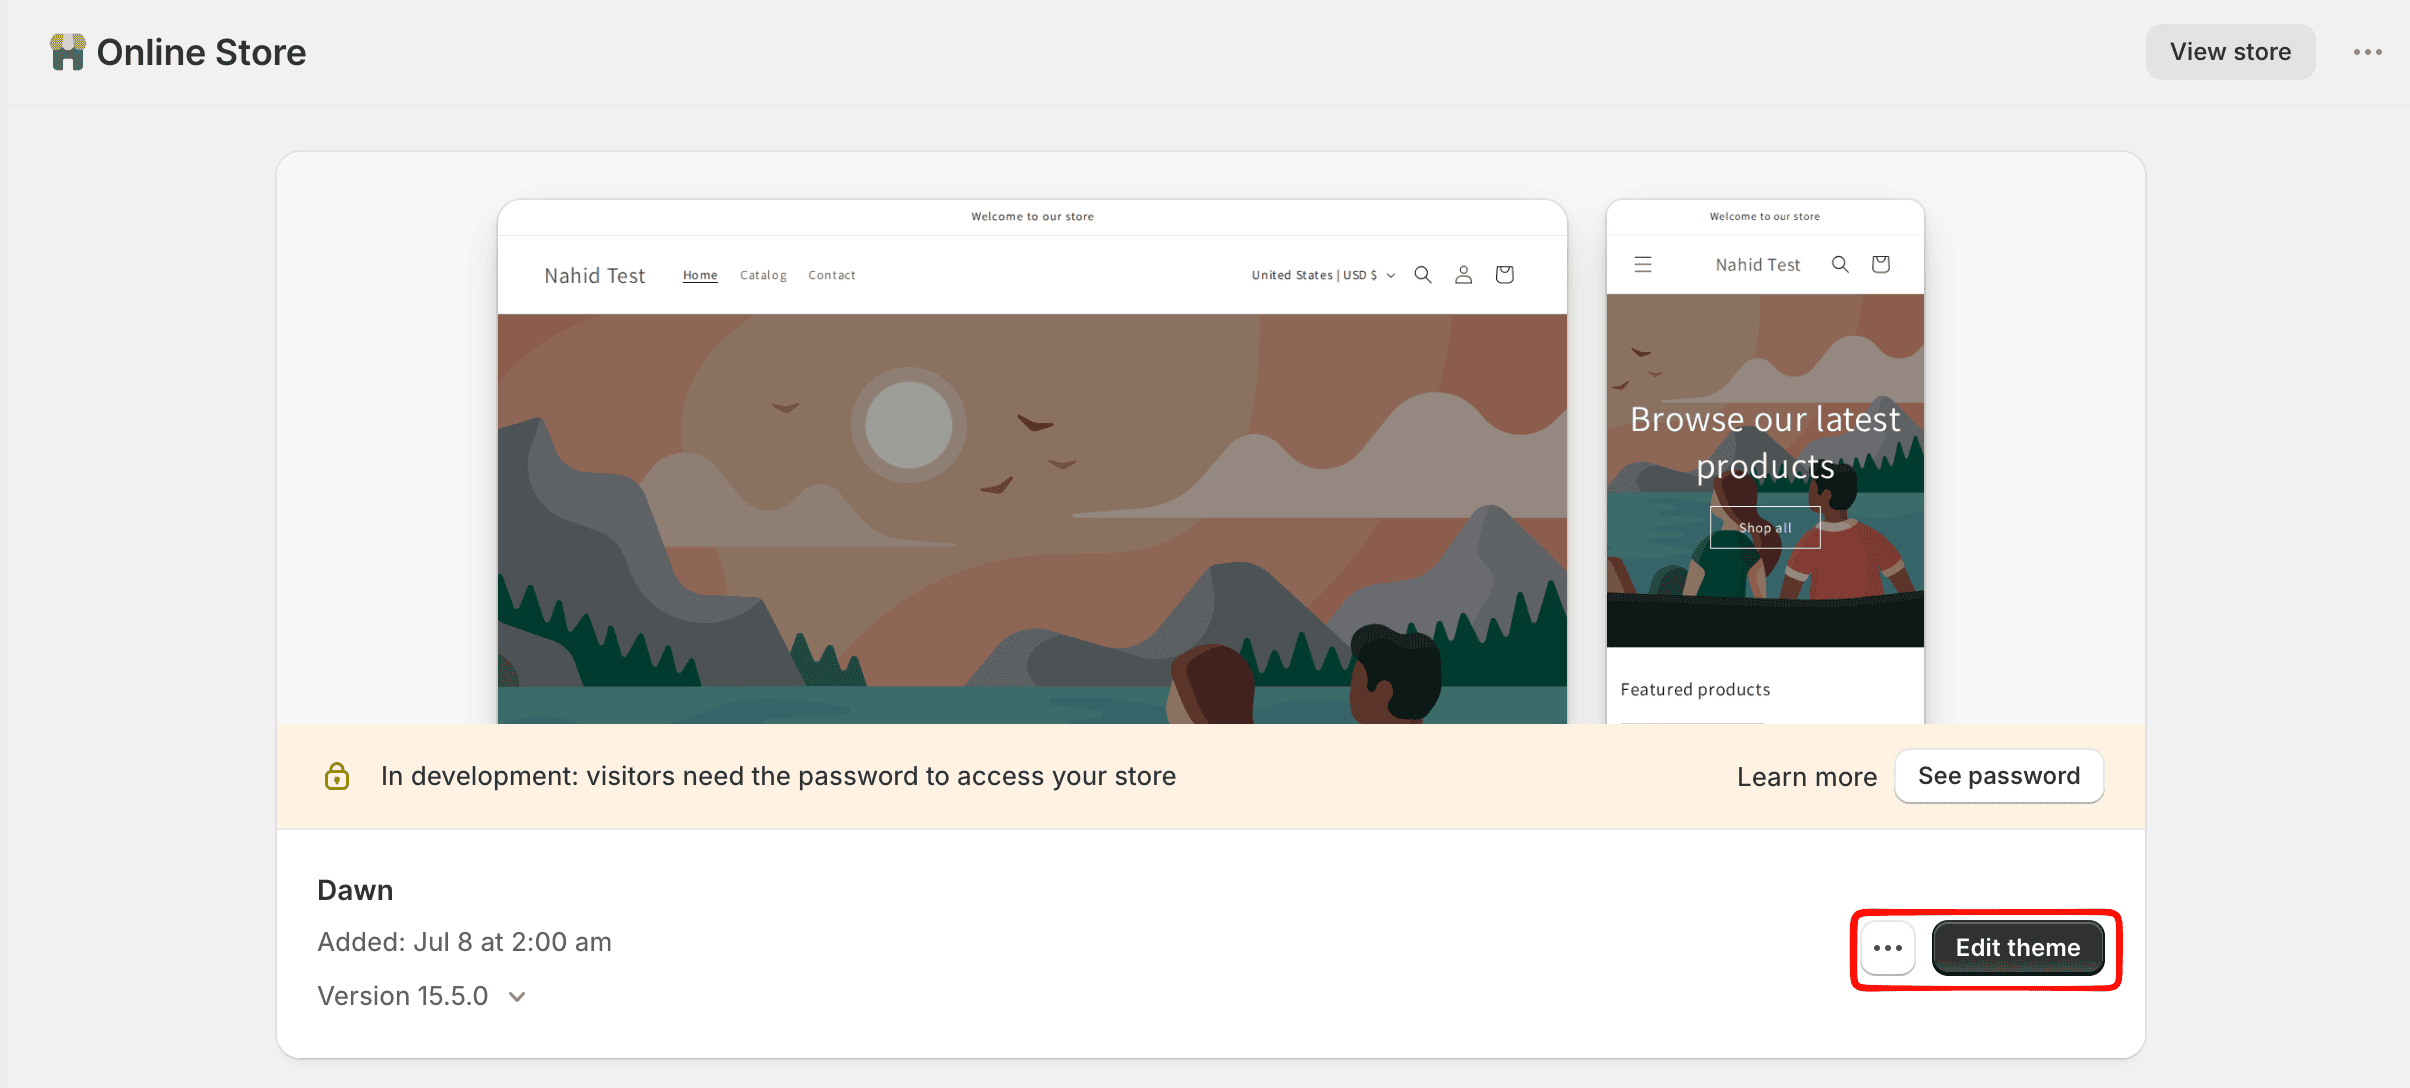
In the admin sidebar, go to Online Store > Themes. Find your active theme and click Customize to open the Theme Editor.
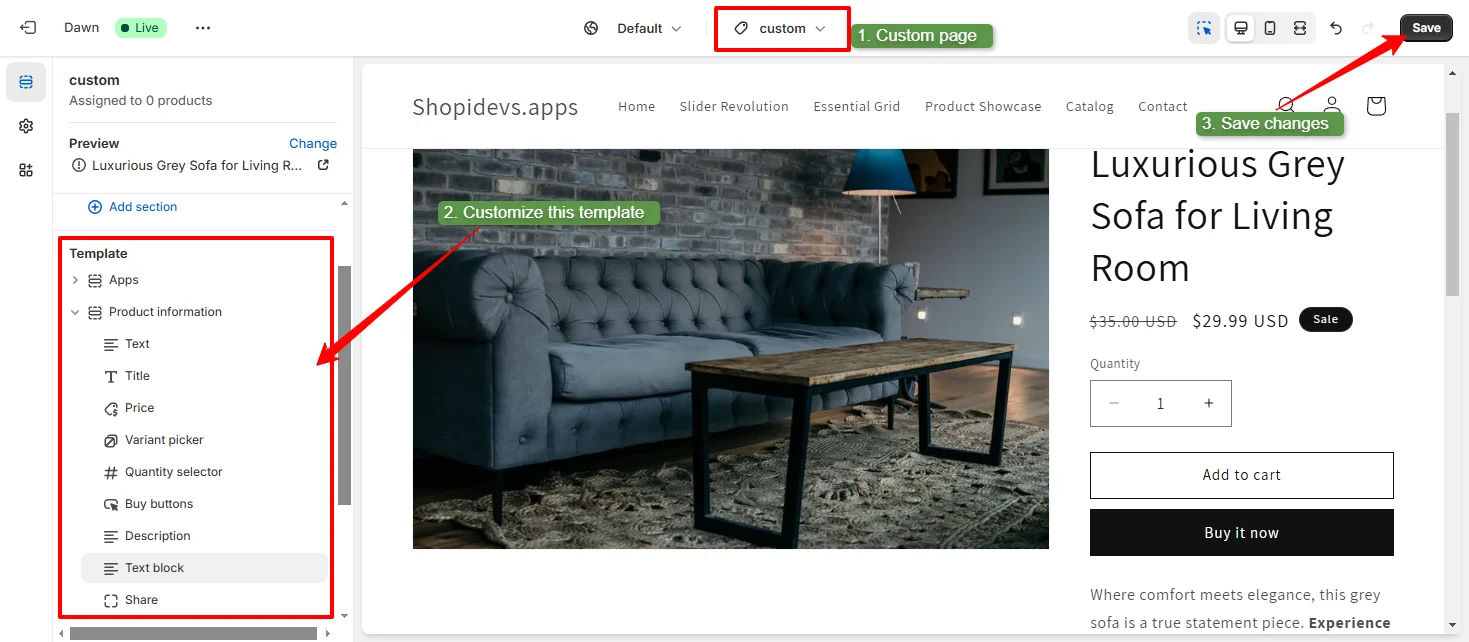
Step 3: Create a New Template
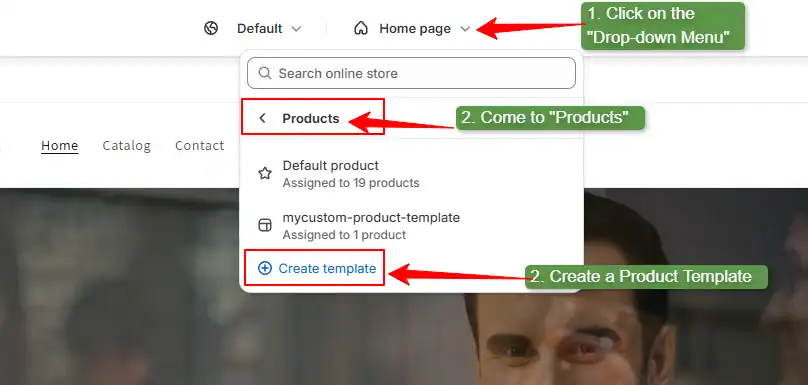
Click the page-type dropdown at the top of the theme editor (it shows the current page type, e.g., “Home” or “Products”). Select the page type you want to create a custom template for (e.g., Products, Collections, Pages). Click Create template, give it a unique name (e.g., hero-product or bundle-page), and click Create template to confirm.
Step 4: Edit the Template Layout
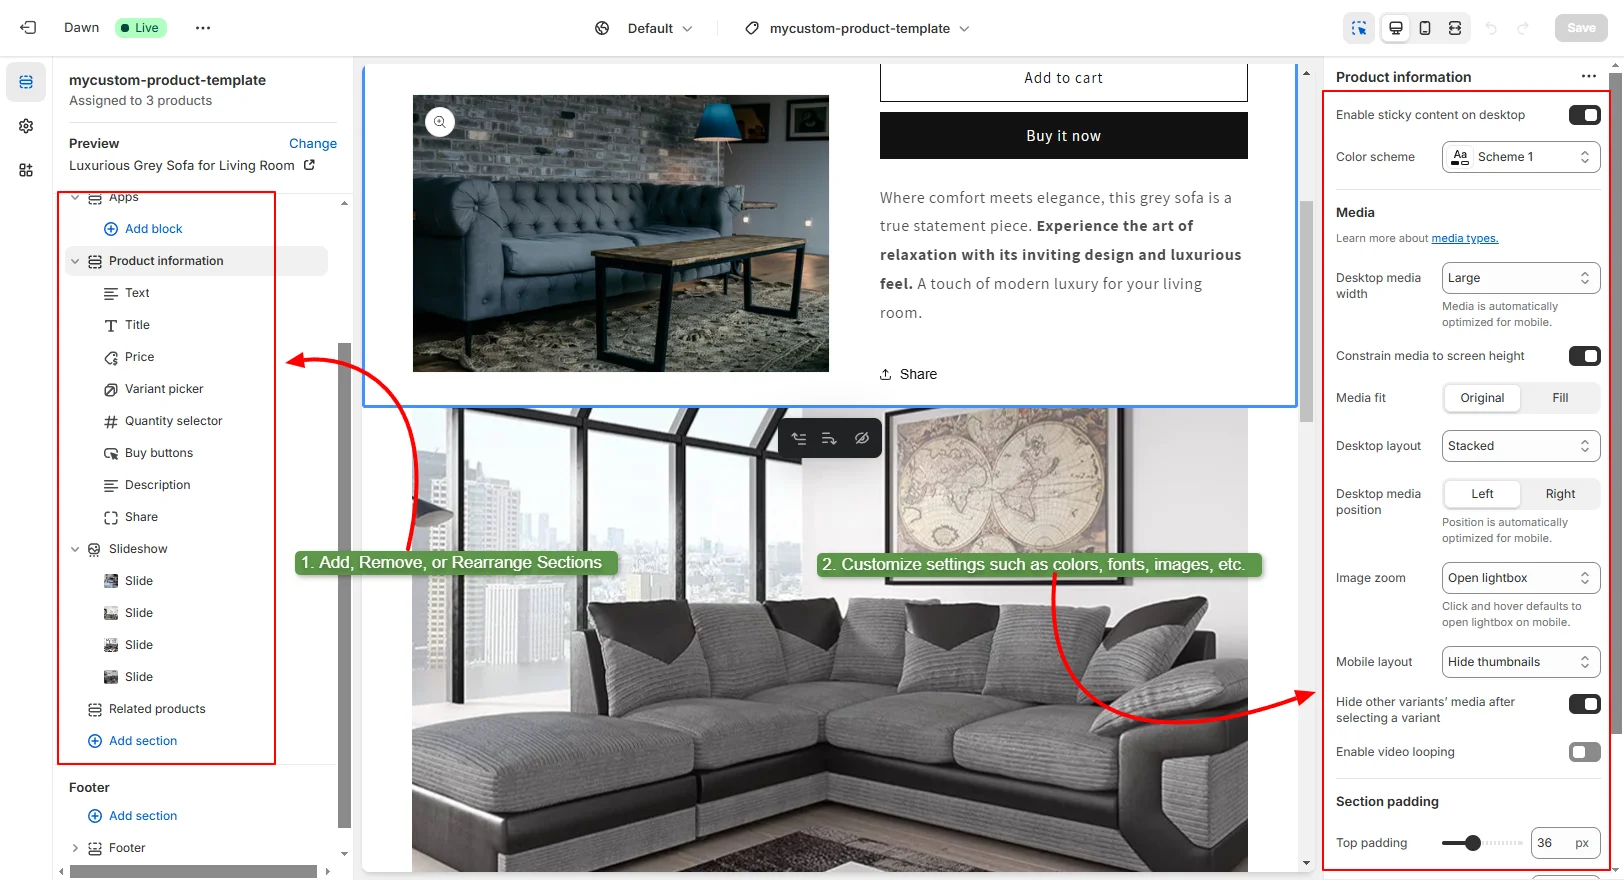
The new template opens in the editor. Use the left sidebar to add, remove, or reorder sections. Customize settings such as colors, fonts, images, and content blocks in the right sidebar. You can add any section your theme supports, including custom Shopify sections and animation sections.
Click Save when done.
Step 5: Assign the Template to a Product, Collection, or Page
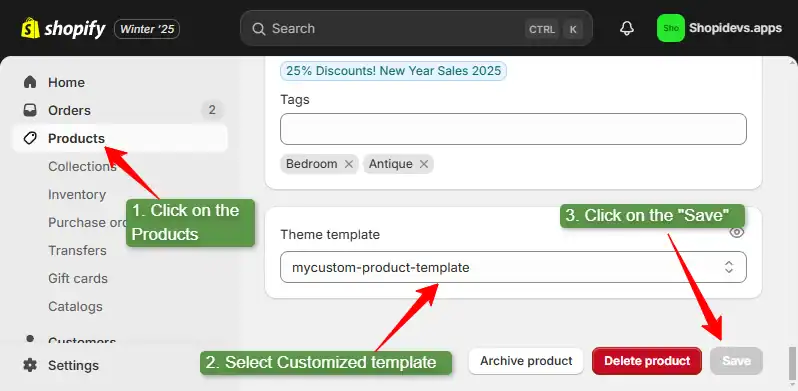
Exit the Theme Editor. In your Shopify admin, go to the product, collection, or page you want to use this template. Scroll to the Theme Template section in the right sidebar, select your new custom template from the dropdown, and click Save.
Method 2: Create Custom Templates Using the Theme Code Editor
The code editor method gives you complete control over the template file. You can create JSON templates (for OS 2.0 themes) or Liquid templates (for legacy themes). Always duplicate your theme before making code changes to avoid irreversible data loss.
Step 1: Open the Theme Code Editor
In your Shopify admin, go to Online Store > Themes. Click the 3-dot menu next to your active theme and select Edit code. Before making any changes, duplicate the theme using the same menu to create a backup.
Step 2: Create a New Template File
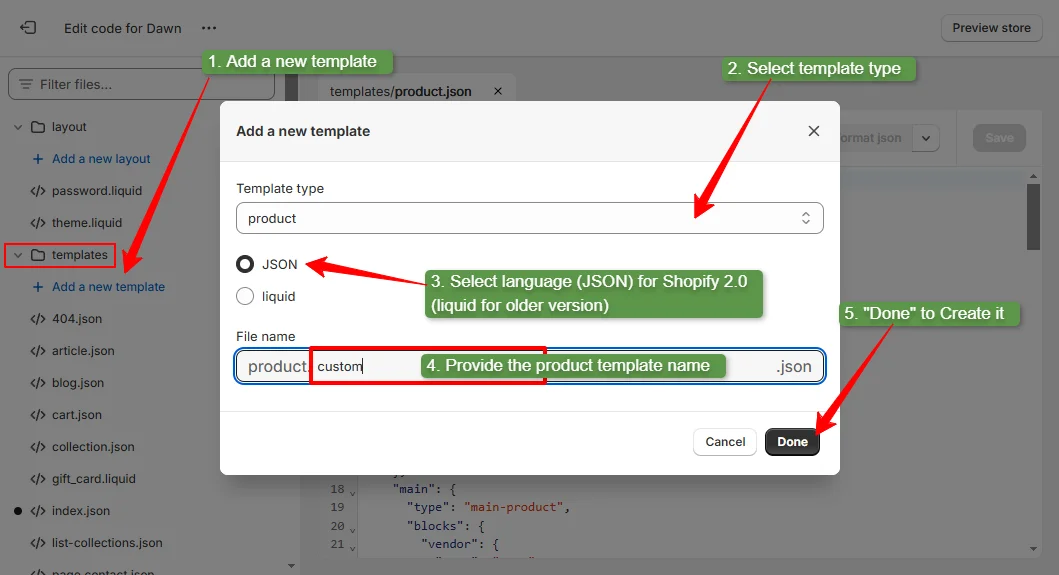
In the left sidebar of the code editor, find the Templates directory and click Add a new template. Select the template type (product, collection, page, etc.). Choose JSON for OS 2.0 themes or Liquid for legacy themes. Enter a name for the template (e.g., hero-product creates product.hero-product.json). Click Done.
Step 3: Add and Customize the Template Code
For a JSON template, the file starts with the default section configuration from your theme’s main product template. Modify the sections array to add, remove, or reorder sections. For a Liquid template, the file contains HTML and Liquid markup. Add your custom layout code here. If you need a custom section that does not exist yet, create a new .liquid section file in the Sections directory first. Once you have customized the product page structure to your needs, click Save.
Step 4: Assign Products to the Custom Template
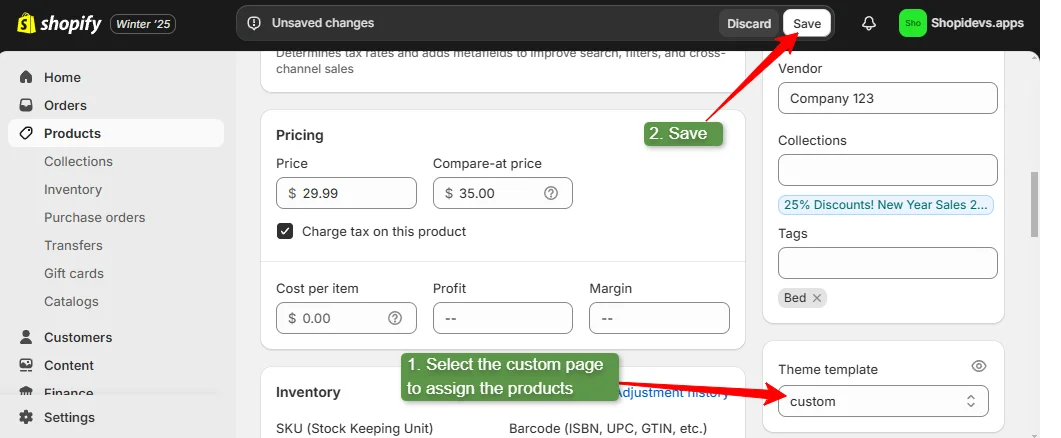
In your Shopify admin, go to Products (or Collections or Pages), open the specific item, scroll to Theme Template in the right sidebar, select your new custom template, and click Save.
Step 5: Finalize in the Theme Editor
Return to Online Store > Themes > Customize. Select your new custom template from the dropdown. Make any additional visual adjustments using the theme editor, confirm the layout looks correct across devices, and click Save.
Method 3: Create Custom Templates with Slider Revolution
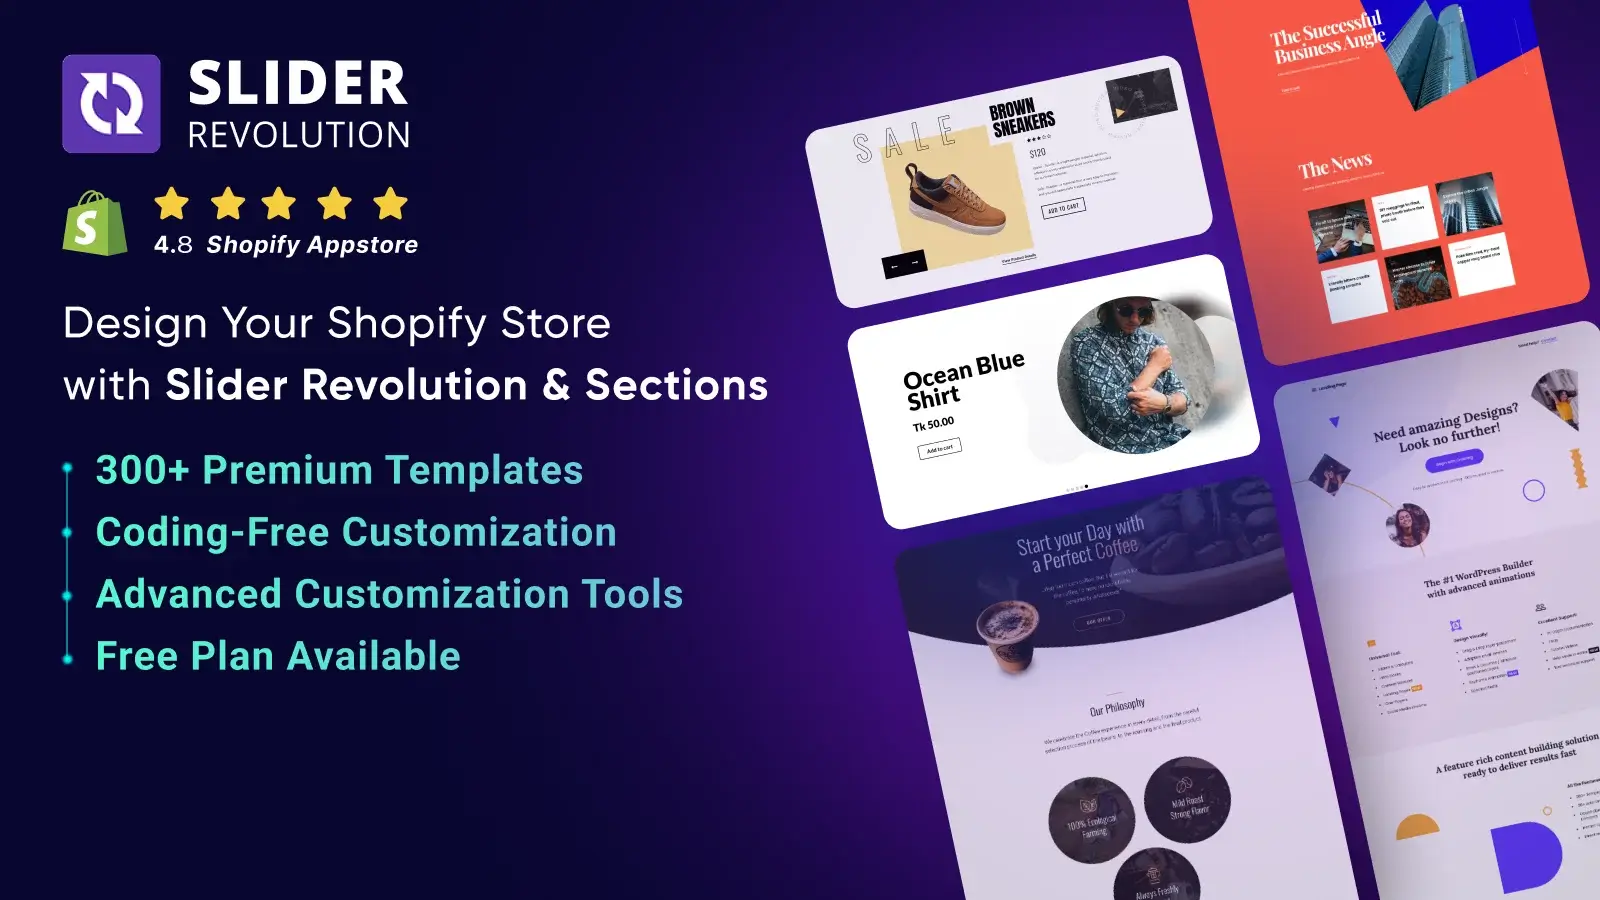
Slider Revolution for Shopify gives you 300+ pre-built custom templates for homepage hero sections, promotional banners, product showcases, landing pages, and more. Templates include animations, video backgrounds, parallax effects, and countdown timers built in. No coding is required.
Over 5,000 active Shopify merchants use Slider Revolution templates. The Shopify product banners and hero sliders it creates perform significantly better than static image sections for visual-heavy product categories. You can also combine Slider Revolution templates with the theme animation settings in your OS 2.0 theme for a layered visual effect.
To use Slider Revolution templates: install the app from the Shopify App Store, open the app from your admin, browse the template library, click Import on any template, and then add the Slider Revolution section to any page through the theme editor. Edit content (text, images, links, colors) directly in the drag-and-drop editor. No section code or JSON editing is required.
5 Real Shopify Stores Using Custom Templates
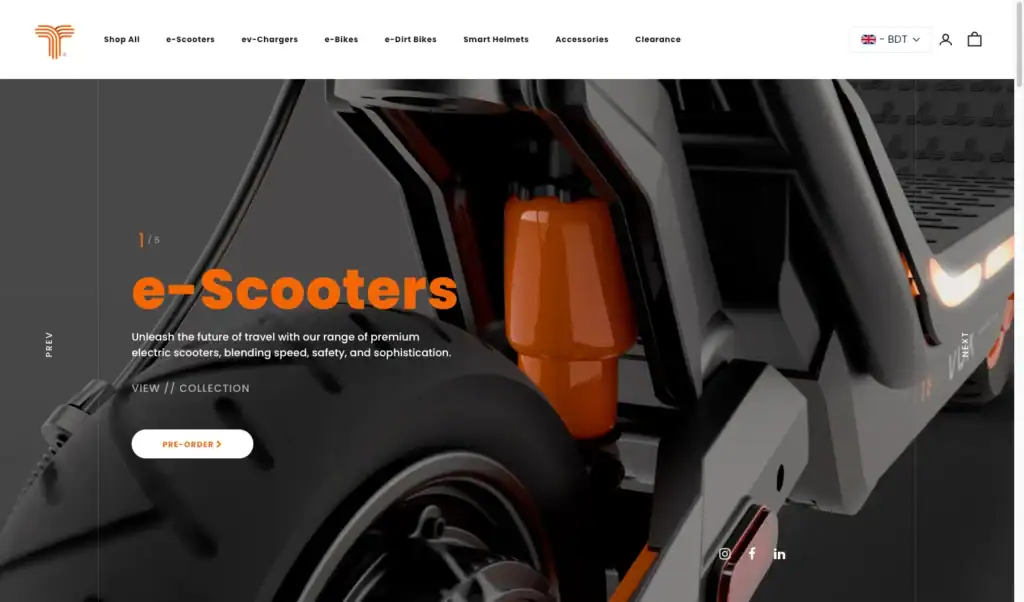
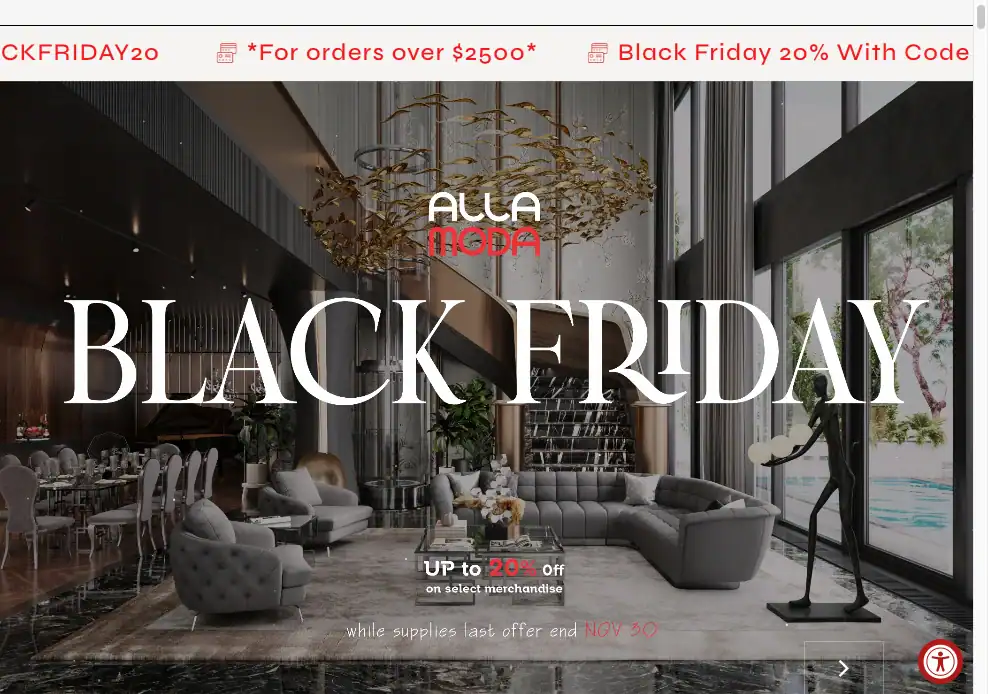
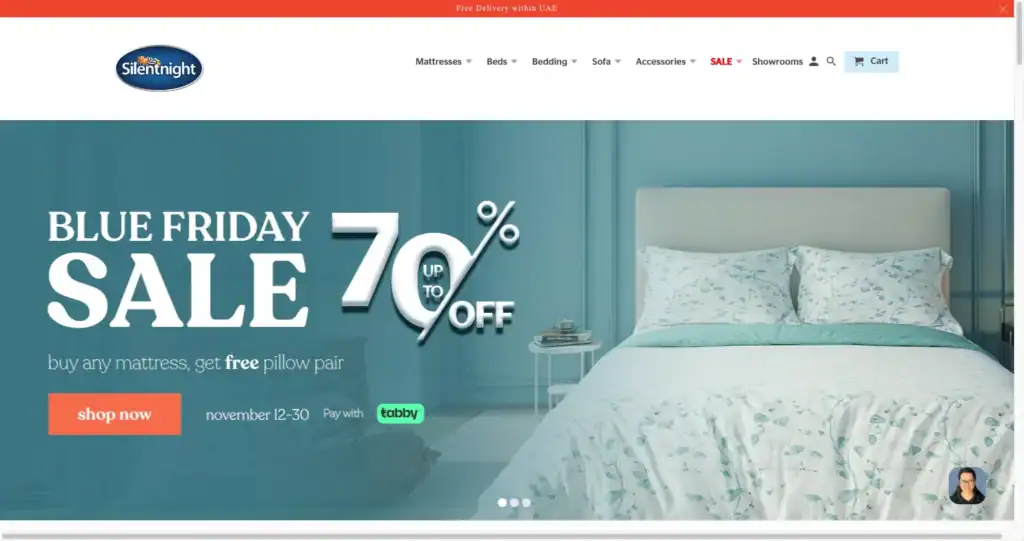
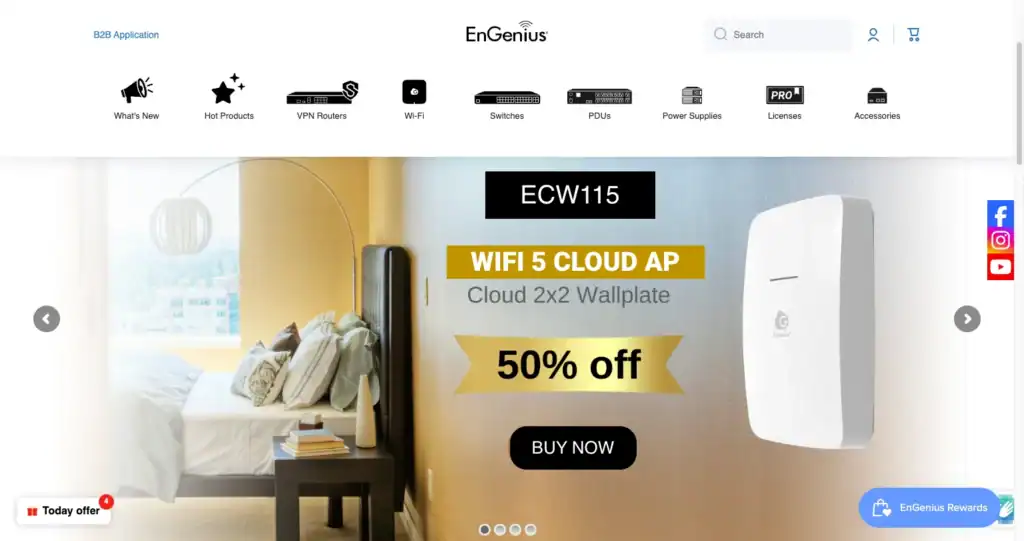
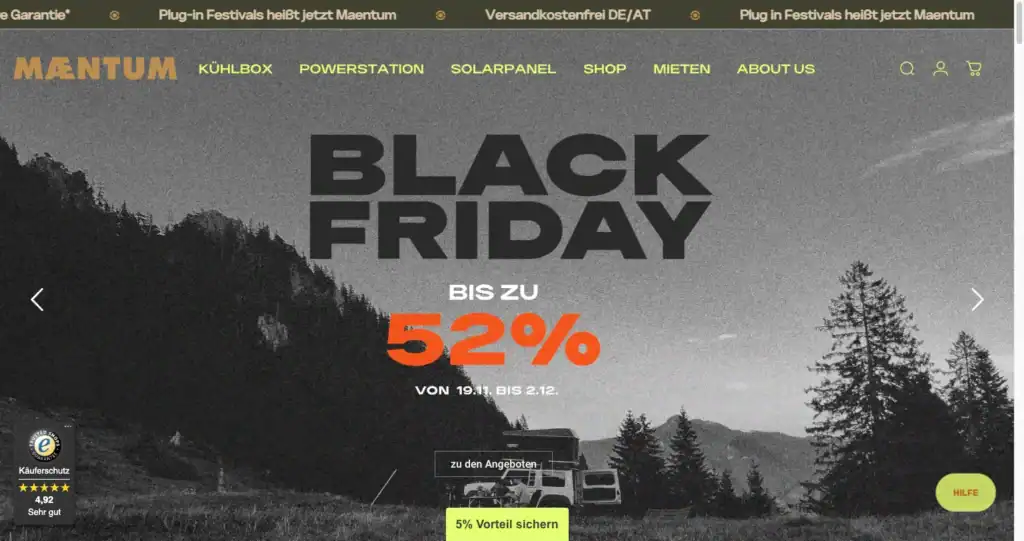
These 5 merchants built their hero sections and custom layouts using Slider Revolution templates. Each represents a different industry and layout style.
TechTron
Alla Moda Furniture
Silent Night
EnGenius Store Europe
Maentum
5 Tips for Creating Winning Shopify Custom Templates
- Start with your highest-traffic page type
Do not customize all template types at once. Check your Shopify Analytics to find which page type drives the most traffic and conversions. That is where a custom template will have the biggest impact. For most stores, the product page is the right starting point. Read the full guide to product page templates to understand what elements drive conversion on those pages.
- Name templates descriptively, not generically
Template names like “custom-1” or “new-template” create confusion when you have 10 templates active. Use names that describe the use case: “product-bundle,” “hero-bestseller,” “seasonal-landing,” or “ingredient-focus.” This matters especially when assigning templates in bulk across hundreds of products.
- Use dynamic sources and metafields to avoid duplicating content
Instead of hardcoding content into each template, use Shopify metafields to store extra product data (ingredients, specifications, sizing charts) and connect them to your template sections via dynamic sources. This means one template handles 50 different products, each showing their own unique content. Learn more about rich content strategies for ecommerce to understand how metafields and templates work together.
- Test on mobile before assigning to live products
75% of Shopify traffic is mobile. Before assigning a custom template to any live product, preview it on a mobile viewport in the theme editor (click the device toggle at the top). Check that sections stack correctly, text is readable without pinching, and all CTAs are within thumb reach. A template that looks great on desktop but breaks on mobile will hurt conversion rates.
- Treat templates as a conversion experiment, not a design project
The goal of a custom template is not to look different. It is to convert better. When creating a new product template, define the hypothesis first: “This template will increase add-to-cart rate on bundles by showing savings more prominently.” After running it for 30 days, compare conversion rates against the default. This turns template creation into a repeatable revenue optimization process rather than a one-time aesthetic change. Pair this with Shopify SEO best practices to ensure custom templates are also optimized for organic traffic.
Frequently Asked Questions
What is a Shopify custom template?
A Shopify custom template is an alternative page layout within your theme that you create and assign to specific products, collections, or pages. It lets you display those pages differently from the default template without modifying your theme globally. For example, you can create a “hero-product” template with video, expanded features, and an FAQ block, and assign it only to your bestselling products while all other products use the standard layout.
How many custom templates can you have on Shopify?
Shopify allows a maximum of 25 custom templates per template type. This limit applies independently, so you can have 25 product templates, 25 collection templates, 25 page templates, and 25 article templates active at the same time. If you reach the limit, delete unused templates from the theme code editor to free up slots. Deleting a template does not delete the products or pages assigned to it; they revert to the default template.
What is the difference between a JSON template and a Liquid template in Shopify?
JSON templates are the modern standard introduced with Online Store 2.0. They store a configuration of which sections appear on a page and in what order, enabling drag-and-drop editing in the theme editor and the Sections Everywhere feature. Liquid templates are the legacy format. They contain HTML and Liquid code directly and do not support drag-and-drop section editing. All new Shopify themes use JSON templates. If you are building or customizing templates in 2026, use JSON unless you are maintaining a pre-OS 2.0 theme.
Can I create a custom template without coding?
Yes. There are two no-code methods. The first is the Shopify Theme Editor, which works on Online Store 2.0 themes and lets you create, customize, and assign templates through the visual drag-and-drop interface. The second is Slider Revolution, a Shopify app with 300+ pre-built templates for hero sections, product showcases, and landing pages that you customize through a visual editor. Both methods require zero code knowledge.
Does Shopify require OS 2.0 to create custom templates?
The Theme Editor method for creating custom templates requires an Online Store 2.0 theme. If you are on a legacy theme, you can still create custom templates using the Theme Code Editor by adding new Liquid template files, but you will not have access to drag-and-drop section editing or the Sections Everywhere feature. The Slider Revolution app works on both OS 2.0 and legacy themes.
How do I assign a custom template to a product in Shopify?
In your Shopify admin, go to Products and open the product you want to update. Scroll down to the Theme Template section in the right sidebar. Click the dropdown and select your custom template from the list. Click Save. The product now displays using the custom template instead of the default. Repeat this process for each product you want to assign. You can also bulk-assign templates using Shopify’s CSV product import or via the Shopify API for large catalogs.
Build Your Store with 300+ Custom Templates
Slider Revolution gives you professional, animated Shopify templates for hero sections, landing pages, product showcases, and more. Used by 5,000+ active Shopify merchants.

Jakaria is an SEO Content Writer in Shopify, Ecommerce, WordPress, and Tech Industry with 5+ years of experience. He specialises in developing engaging, helpful content by simplifying complex topics into an amazing story for B2B, SaaS, and Shopify businesses. He’s also passionate about staying updated on growth marketing strategies and Shopify trends.