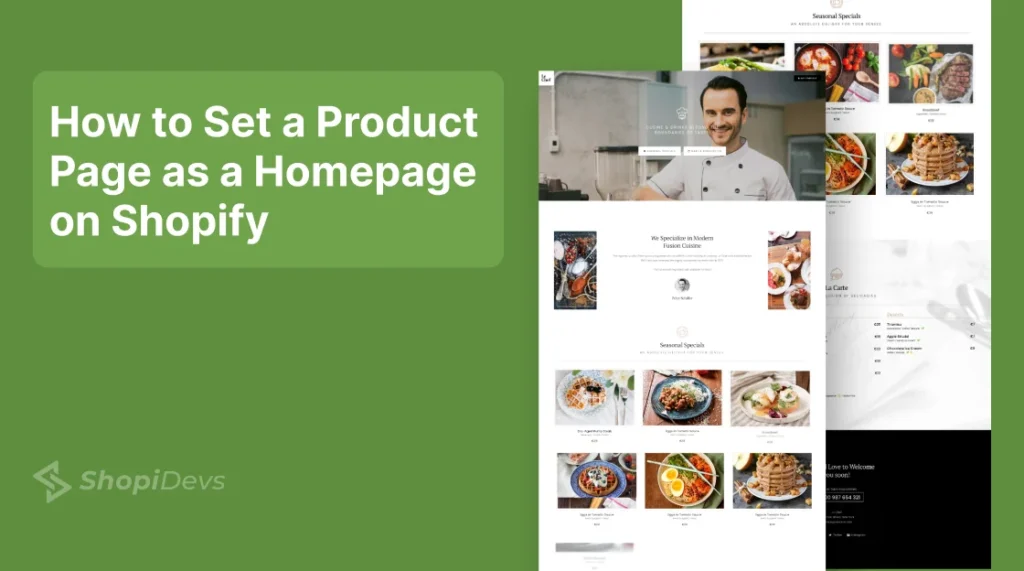
A product-focused homepage on Shopify can highlight flagship products and increase seasonal sales. This is a great feature to showcase your products at the user’s first impression. But how to make a product page as a homepage on Shopify?
In this article, I will provide 3 different methods for transforming a product page into a homepage. First, you need to delete existing content from the homepage and add a “Featured product” here. Second, add a custom liquid code at ‘theme.liquid‘ (you will get it for free). Third, use the Slider Revolution app to make a product page as a homepage with an advanced level of customization by using free templates.
Let’s walk through the step-by-step process to make a product page to the homepage!
Why You Need to Use a Product Page as the Homepage on Shopify
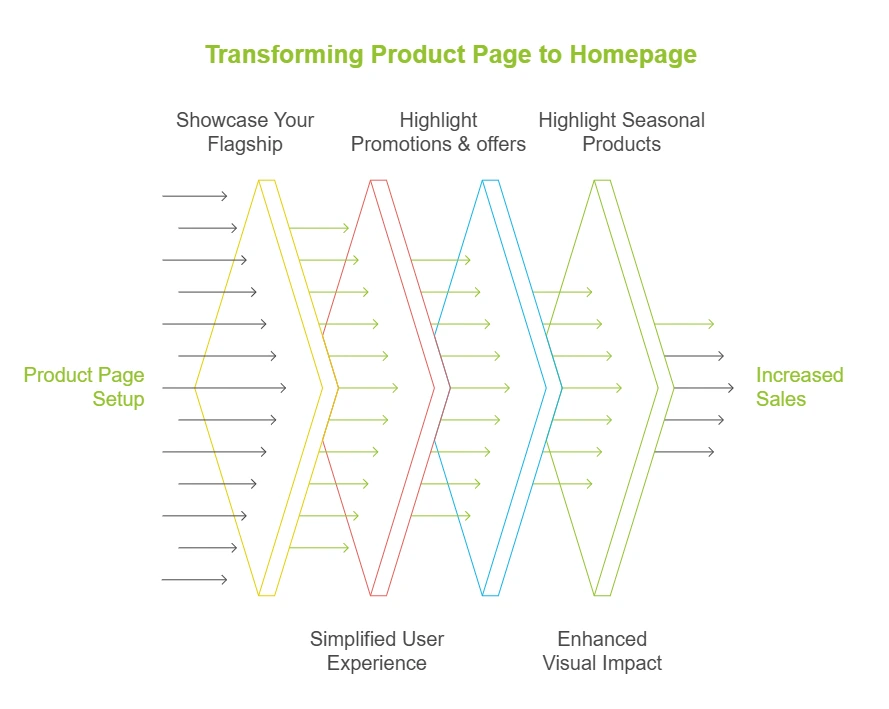
Changing your product page into a Shopify home page can significantly improve your conversion potential. It allows you to showcase a flagship product, streamline user experience, and increase sales. Here are 5 reasons why using a product page as the homepage can be beneficial for your store:
- Direct Customer Focus: Immediately showcase your flagship or seasonal product that saves users time.
- Simplified User Experience: Reduce navigation steps by presenting the primary selling item upfront.
- Increased Conversion Rates: Simplifies the buying process which encourages quicker decisions to buy immediately.
- Highlight Best-Sellers or Promotions: Perfect for seasonal campaigns or promoting high-demand items.
- Enhanced Visual Impact: It can create a strong, targeted visual narrative that speaks directly to your ideal customer.
How to Make Product Page Home Page Shopify – 3 Methods
Directly Shopify doesn’t allow you to make your product page as a homepage. But, it allows you to add products on the homepage. However, I have unlocked 3 different ways to make your product page homepage. Here is a quick comparison of them:
| Features/Methods | Theme Editor | Custom Liquid Code | Slider Revolution App |
| Ease of Use | Beginner-friendly | Complex (coding skill) | Easy with Free Support |
| Design Flexibility | Very limited (not for professionals) | Depends on your coding knowledge | Drag-and-drop highly customizable sliders |
| Technical Skill | Basic | Advanced | Basic (Get Support) |
| Customization Level | Besic | Based on Experience | Advanced customization easily (template-based) |
| Setup Time | 15-20 minutes | – | 20-30 minutes |
| Pros | Easy & Quick | Fully customizable | Dynamic & high-converting pages |
| Cons | Limited customization | Need coding skill | Learning required or Get Free Support |
Method 1: Using Shopify Themes Customization
The basic and easiest method to make your product page homepage is adding a ‘featured products’ section to the homepage. Then delete everything rest of the products from the homepage. Here are 6 steps to turn your product page into a homepage:
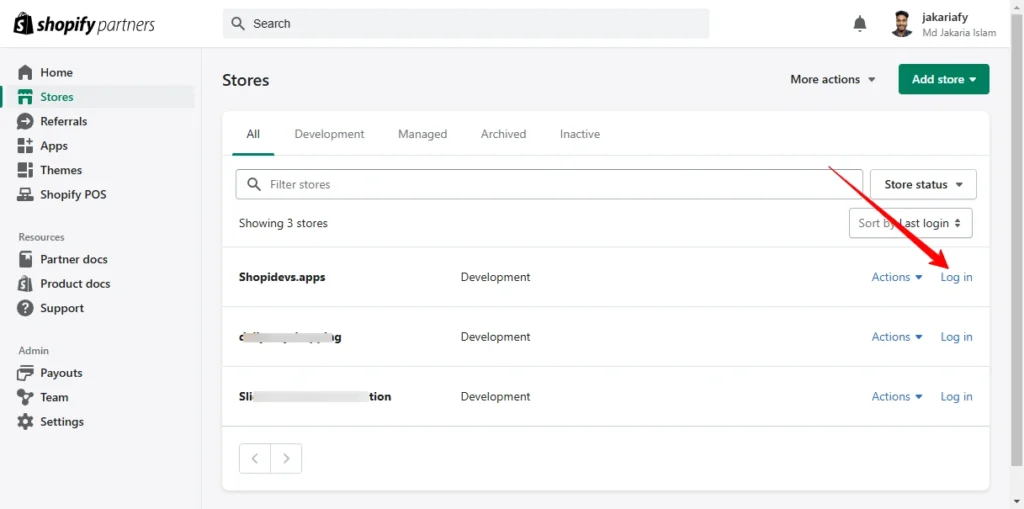
Step 1: Log in to Shopify Store
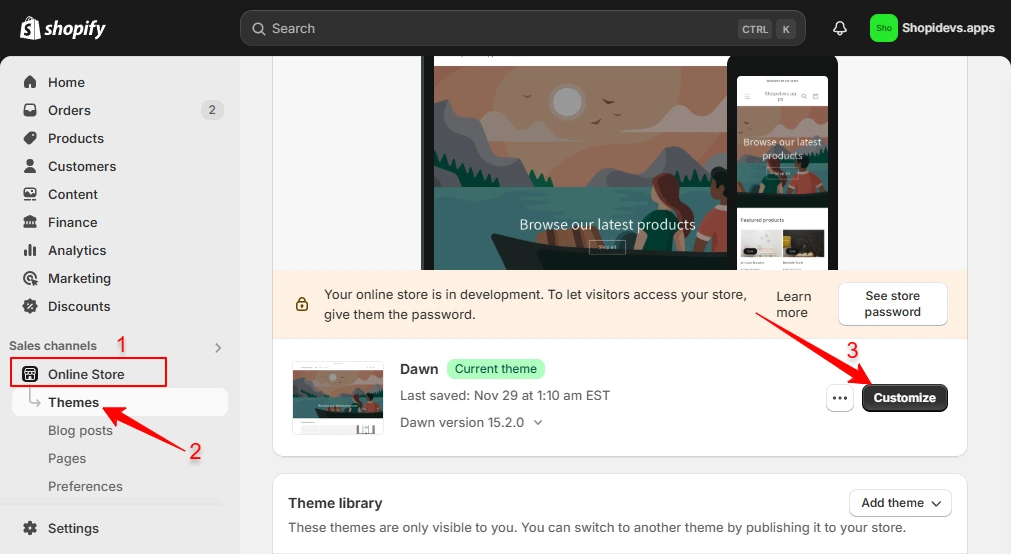
Step 2: Go to Online Store > Theme > Customize
- Navigate to the “Online Store”.
- Click on the “Themes”.
- Then look at the right side “Customize”.
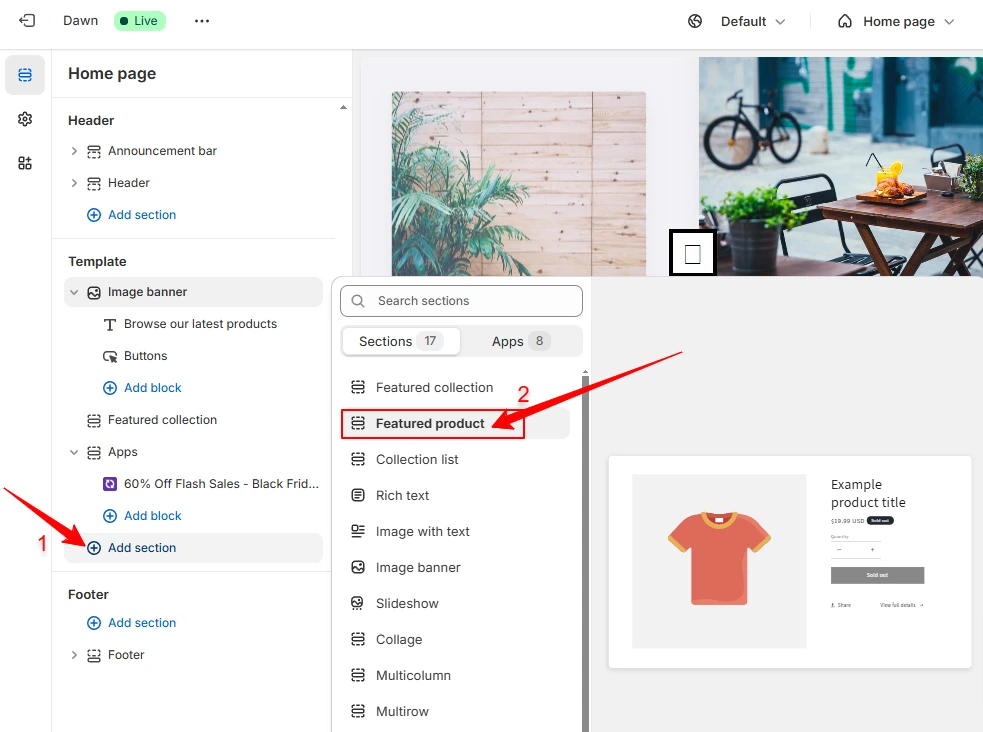
Step 3: Add ‘Featured Products’ Section
- Click on the “Add Section”.
- Select the “Featured Products” section to add the product(s) you want to showcase on the homepage.
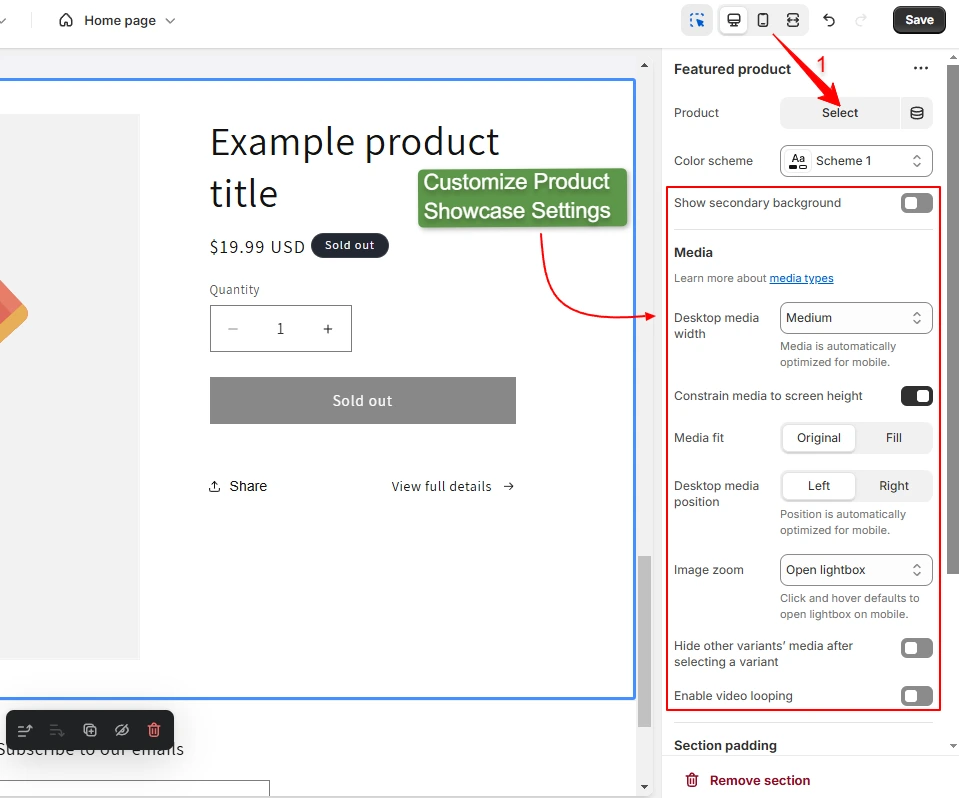
Step 4: Select the Product and Customize Settings
- Select the product that you want to add to the “Featured Products” section on the homepage.
- Then customize the settings of the products as per your store.
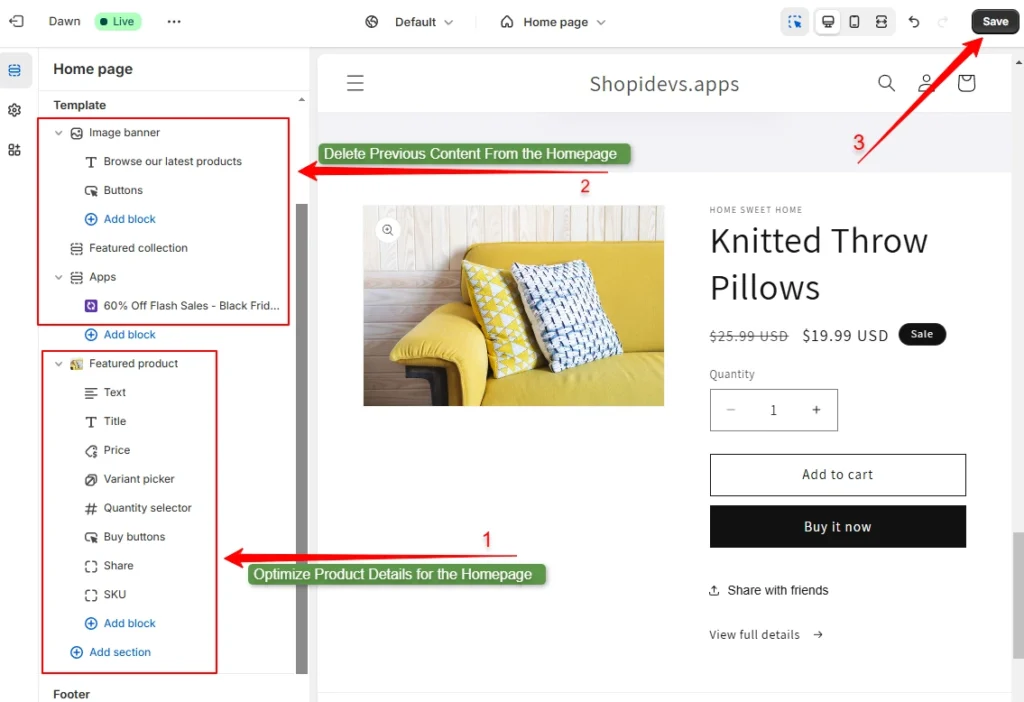
Step 5: Optimize Product Details and Delete Existing Sections & Blocks
- Customize all blocks of the ‘Featured Product’ section like product title, button text, price, SKU, share text, etc.
- Add Visuals: Now you can add videos to Shopify, reviews, product photography, product details, etc. These visuals will impress can easily attract your potential customers. Remember to add these visuals from “Add a New Section” from the left sidebar.
- After setting up your product(s), delete previously used blocks and sections that you don’t need on this product page.
- Now click on the “Save” button.
Step 6: Preview the Product Page as a Homepage on the Shopify Store
Let’s preview how the product page looks. Wow! That’s great, your homepage has transformed into the product page.
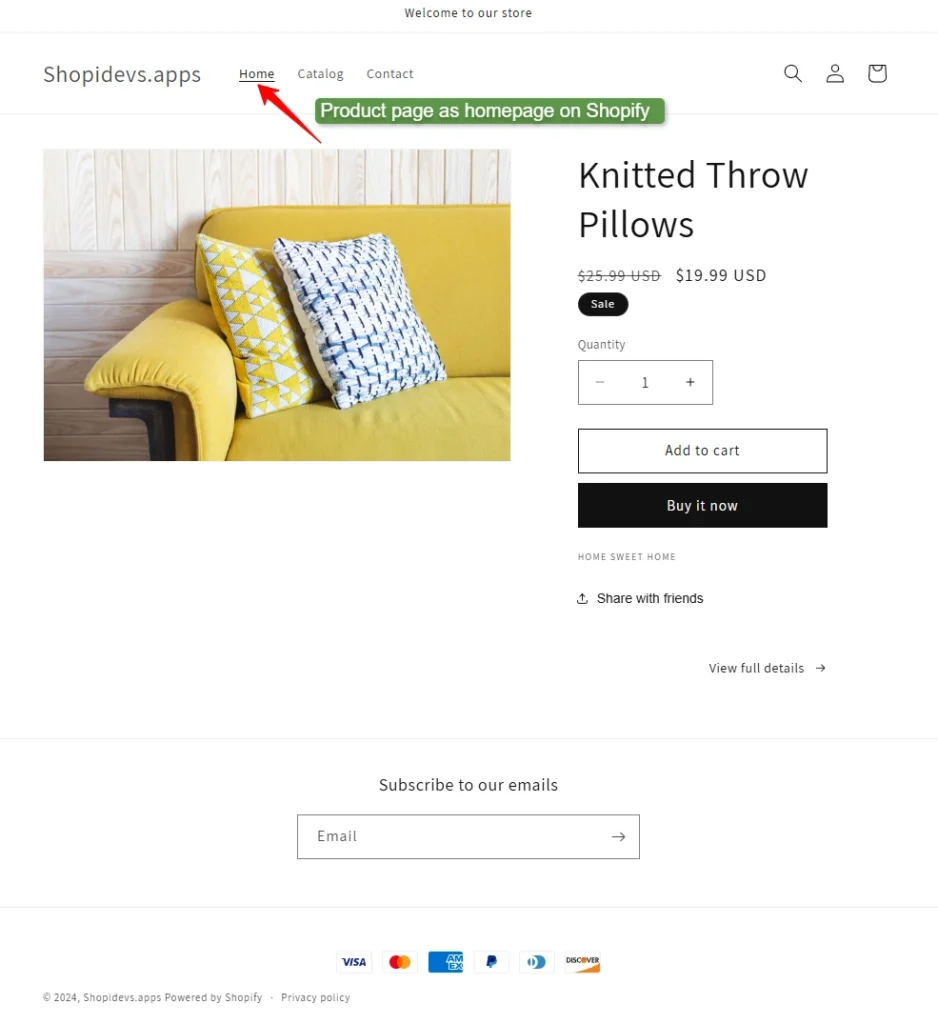
Note: I have not added images, videos, product reviews, FAQs, and descriptions (text) to this test page. If you want to make a great landing page for the Shopify store, don’t forget to add these elements.
Method 2: Use Custom Liquid Code to Make Product Page as a Homepage
In this method, I will use a redirect URL from the homepage to the product page. Wait, Shopify doesn’t allow redirecting from the homepage to another page. That’s why we need to customize the ‘theme.liquid’ file to do it. Here is the step-by-step process:
Step 1: Login to Shopify Store Dashboard
- As per the previous method, first of all you need to Log in the Shopify Store.

Step 2: Access the Liquid Code Editor
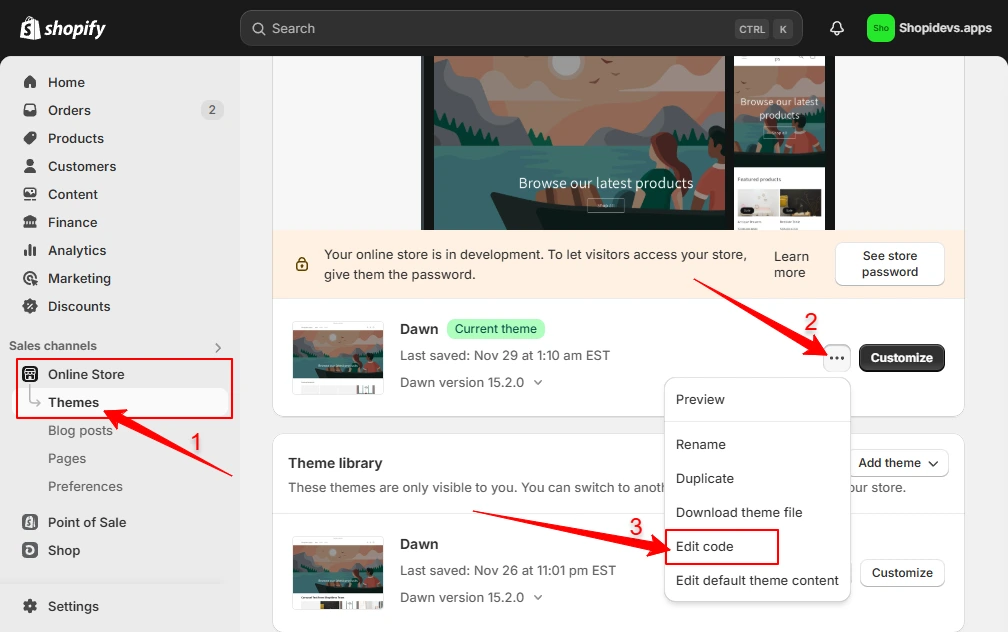
- Click on the Online Store > Themes.
- Then click on the (…) 3 dots left side of the ‘Customize’.
- Now click on the “Edit Code” option to access the theme code editor.
Step 3: Copy the Custom Code with the Product Page Link
- Copy the liquid code below. ShopiDevs support team has helped me to generate this custom code for free.
{% if template == 'index' %}

<script>

window.location.href = "PRODUCT_PAGE_LINK_HERE";

</script>

{% endif %}
Step 4: Add the Product Page Liquid Code to the Homepage
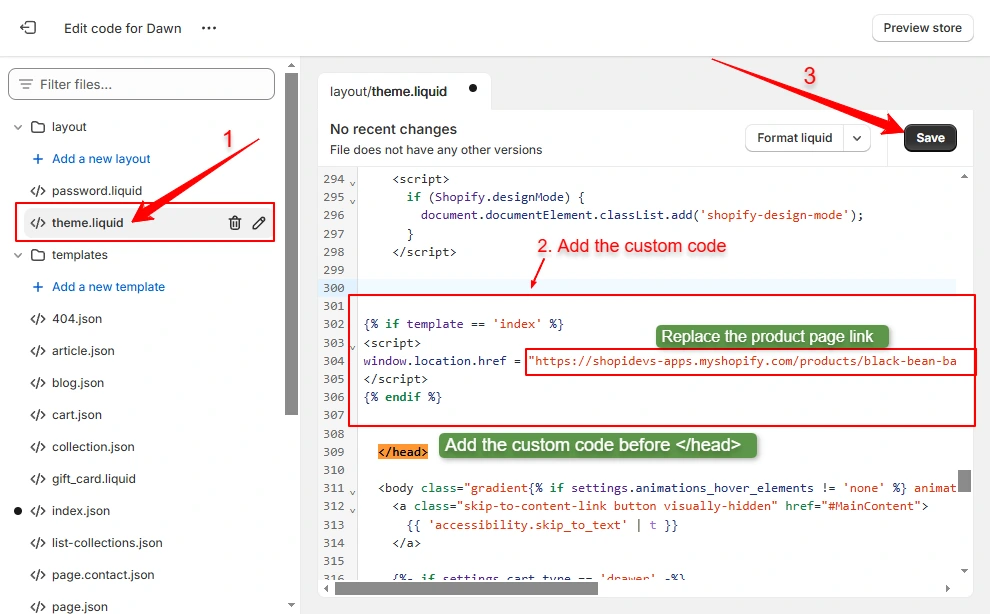
- Click on the </>theme.liquid file.
- Find out the </head> header close.
- Paste the code you have copied in the previous step.
- Replace the product page link: Look at the code after the window.location.href= “PRODUCT_PAGE_LINK_HERE”. Here provide your real product page URL to make it homepage.
- Finally, click on the “Save” button.
Step 5: Preview the Storefront
Let’s check the storefront and how the product page looks on the homepage. That’s great!
Note: In this method, you can’t make your product page as the homepage. But you can redirect your homepage to the specific product page. So, if anyone visits your homepage, they will land on your product page and this page will work as your homepage.
Method 3: Make the Product Page a Homepage with the Slider Revolution App (Template-Based)
This is the best way to make a product page as a homepage using different templates from Slider Revolution. It offers to design stunning and stylish product pages that can increase conversion rates on your store. Here is why Slider Revolution:

Here I will make a product page for the homepage of a Restaurant using ‘Le Chef’ templates. Let’s explore how to make a product page home page Shopify using the “Slider Revolution and Section” app:
Step 1: Install the Slider Revolution App
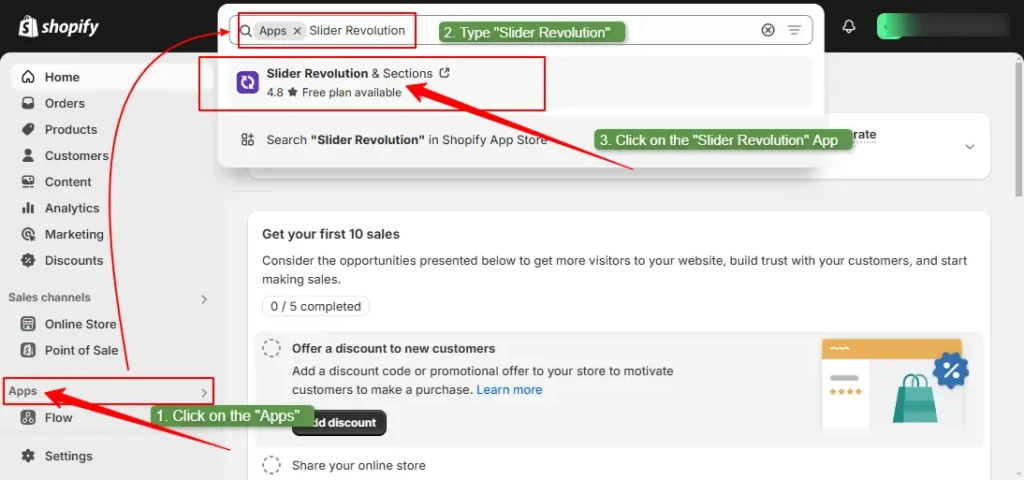
- Log in to your Shopify store dashboard.
- Click on “Apps” > Search for “Slider Revolution”.
- Now click on the “Install” button of the ‘Slider Revolution & Sections’ app.
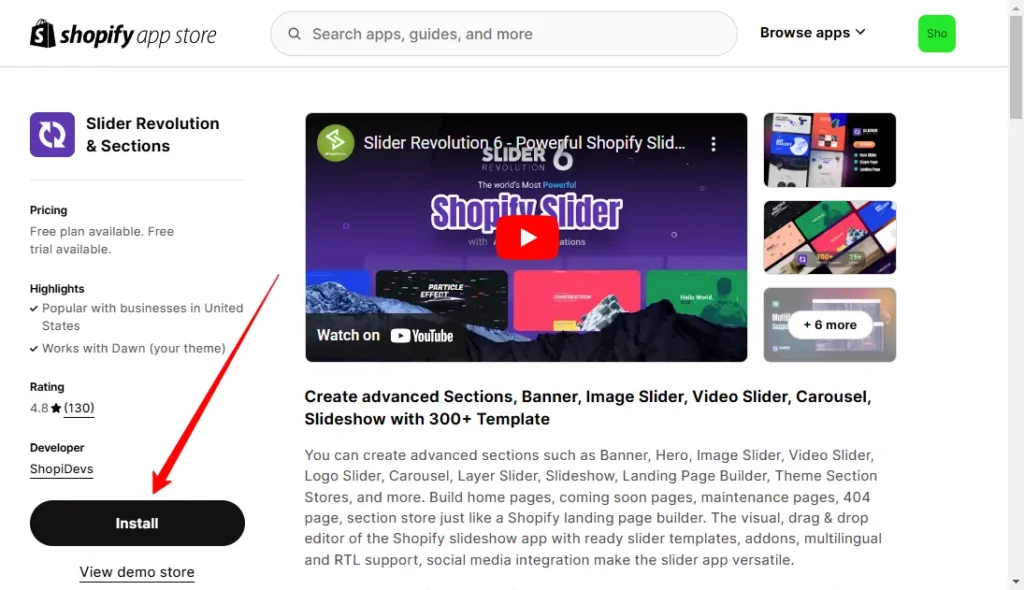
- Then it will be redirected to the Slider Revolution App’s dashboard.
Step 2: Click on “My Sliders” > “New Sliders from Templates”
- Click on the “My Slider” option from the Slider Revolution dashboard.
- Then you will have 3 options to create a slider for the product page.
1. New Blank Slider.
2. New Slider From Templates.
3. Manually Import Slider Zip.
We don’t have any zip slider files, and creating a new blank slider is complex and requires design and technical skills. So, we have to avoid those, now I will explore Slider Revolution and Sections templates.
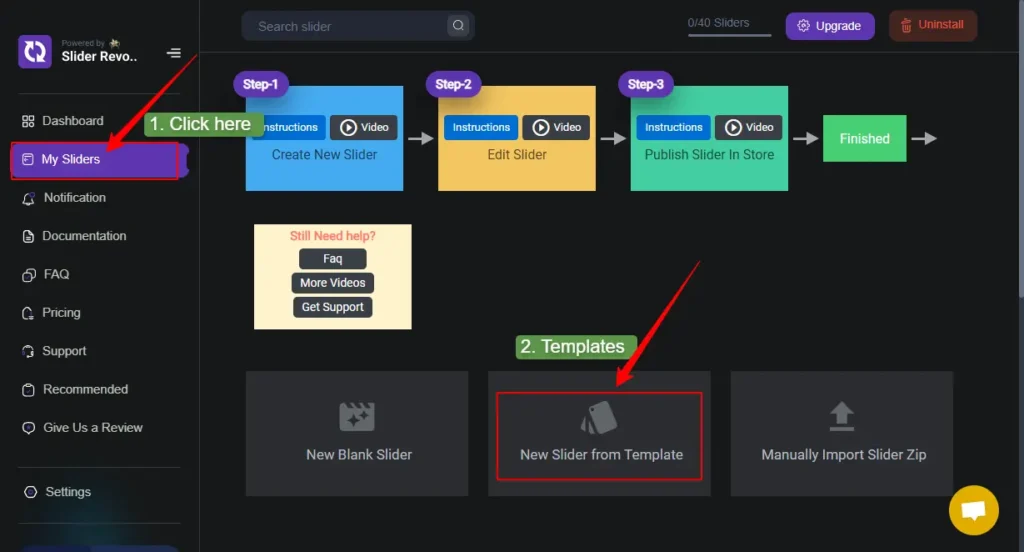
Step 3: Install Necessary Templates for the Product Page on the Homepage
In this step, I have installed 2 templates (Static and dynamic) to design a professional and high-converting product page for the homepage. Following the same process, you can add more section templates depending on your products and store.
- Install a Shopify Hero Slider template from 300+ templates of Slider Revolution.
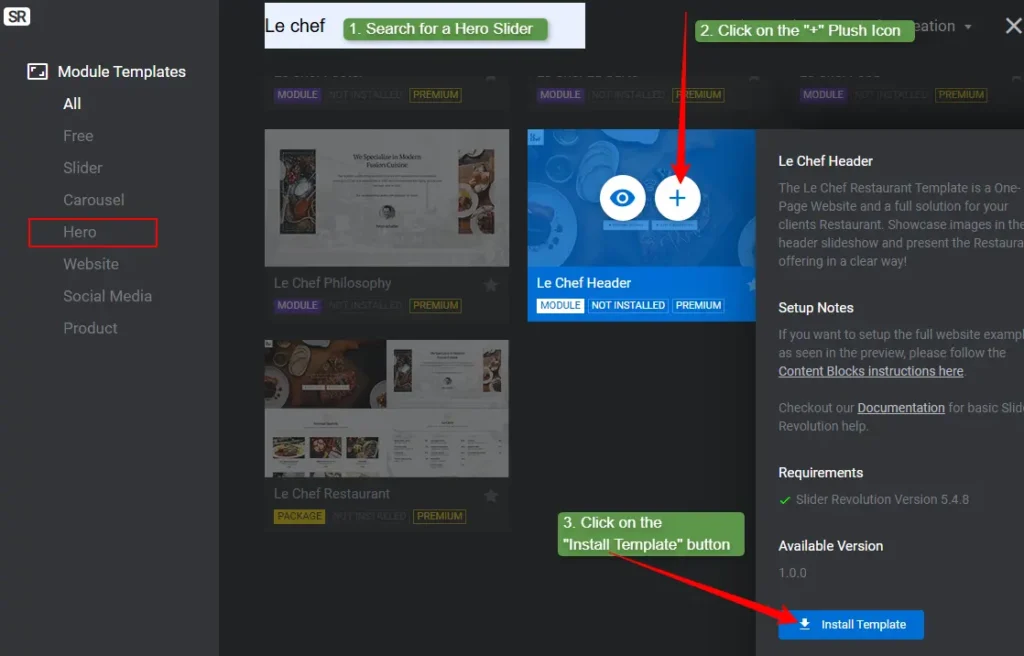
Here I have used the “Le Chef Header” template. You can choose any one hero template from a wide range of templates.
- Install a product carousel template to make your product page a homepage.
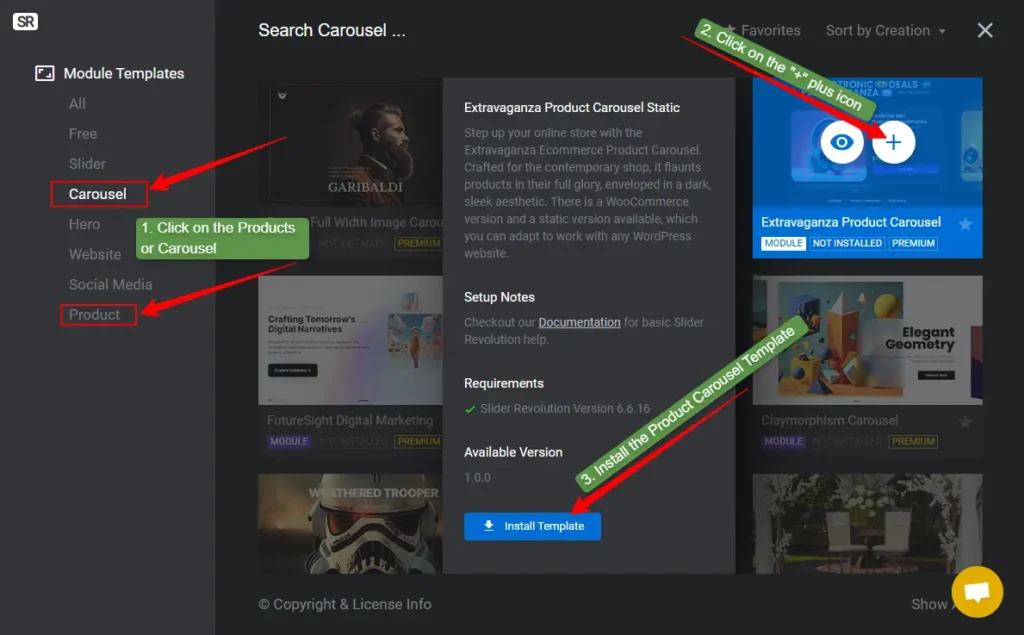
Here you can see two different categories of ‘Carousel’ and ‘Product’. You will find a lot of templates in those sections that you can use in organizing and showcasing your products.
Moreover: If you want to add more videos, banners, and other sliders to the product page, then install templates for them. Now, after installing all the necessary templates, now you need to customize these templates.
Step 4: Click on the Pen Icon to Customize Sliders
- Here I have installed 3 sliders that you can see in the “My Slider” options on the Slider Revolution dashboard.
- Hover over the slider and click on the “Pen” icon to customize sliders.
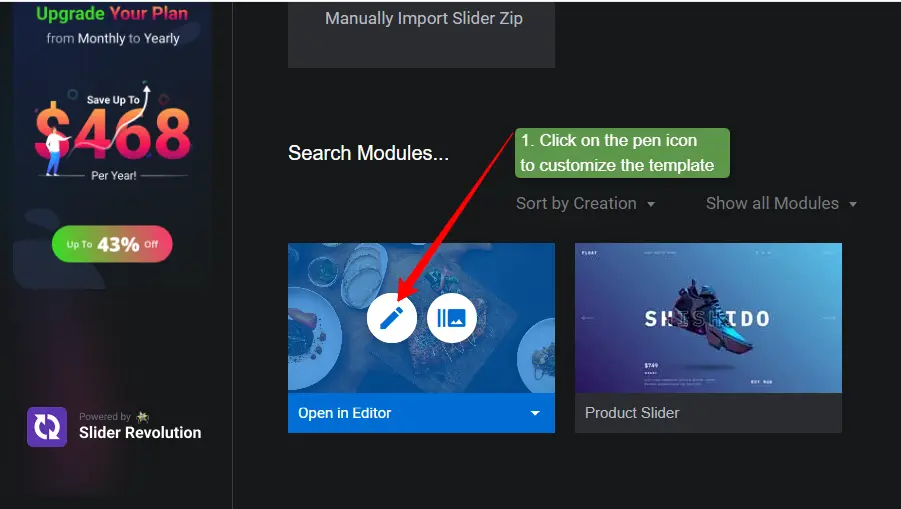
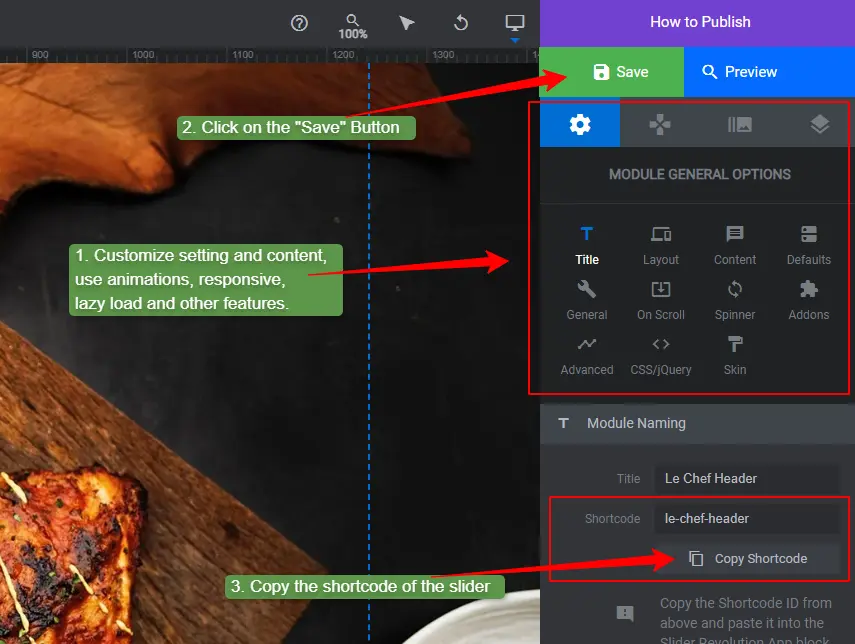
Step 5: Customize the ‘Hero Slider Templates’ and Copy the Shortcode
You have a wide range of options to modify and customize your slider templates. Layout, content, background, text, animation, responsive, and more advanced options are available here.
- Click on the “Save” button to save it.
- Copy the shortcode from the Module General Options > Title.
Step 6: Activate the Slider Revolution App on the Shopify Store
- Login to the Shopify store > Online Store > Themes > Customize.
- Click on the App embeds icon.
- Turn on the Slider Revolution & Section app to activate it.
- Click on the “Save” button to activate the Slider Revolution app.
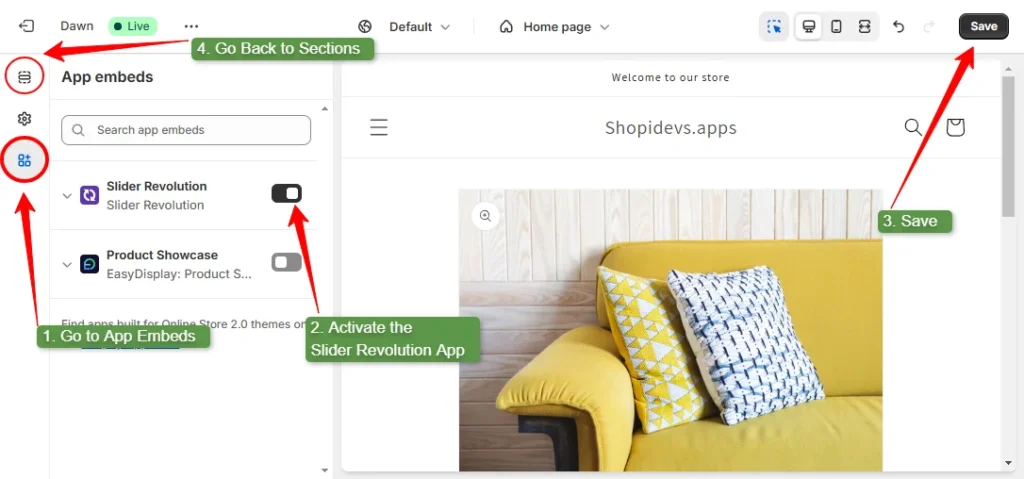
- Click on the ‘Sections’ icon to go back to the Sections dashboard.
Step 7: Add a General Slider Block to Add Hero Slider on the Homepage
- Click on the “Add Section” > “Apps” > “General Slider” block.
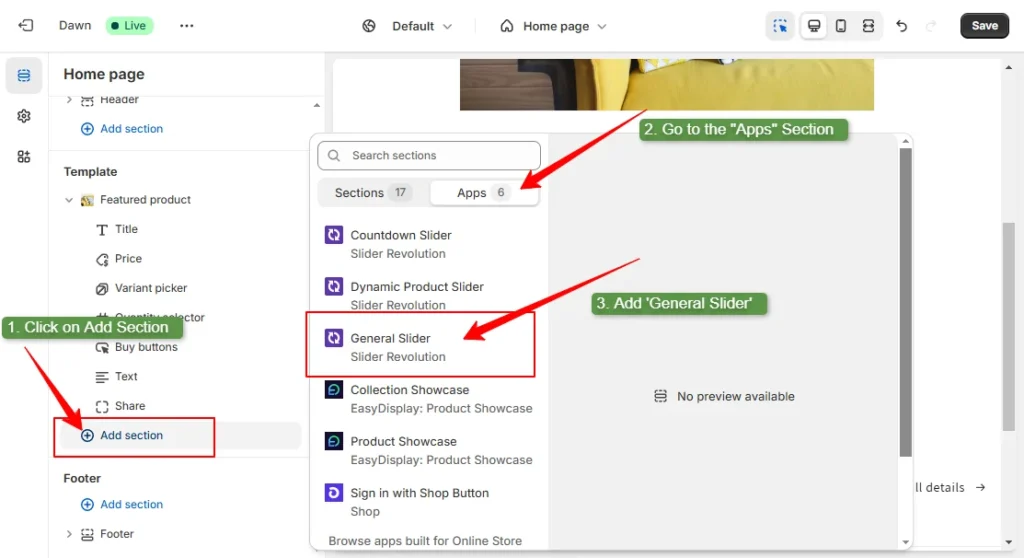
Now you will have a “General Slider” block.
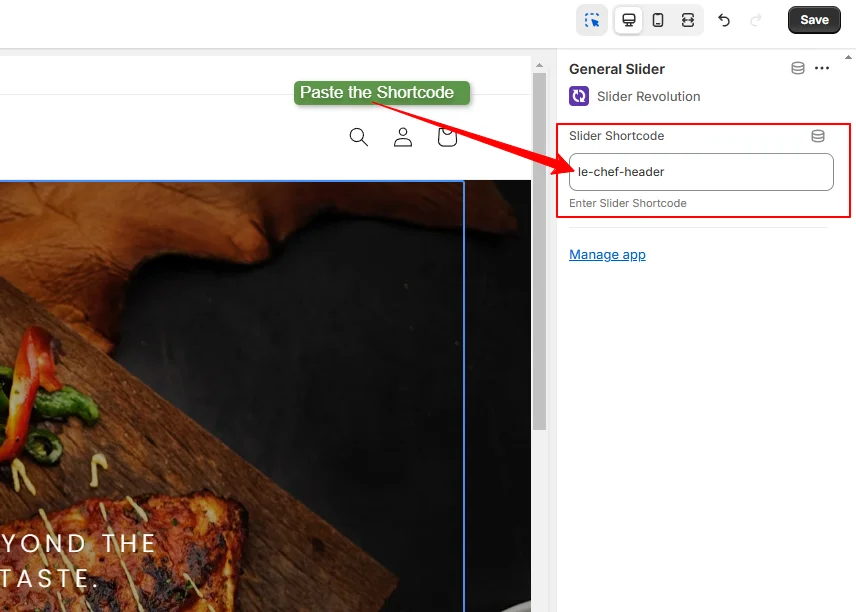
Step 8: Paste the Hero Slider Shortcode on the General Slider on the Homepage
- Click on the “General Slider” block.
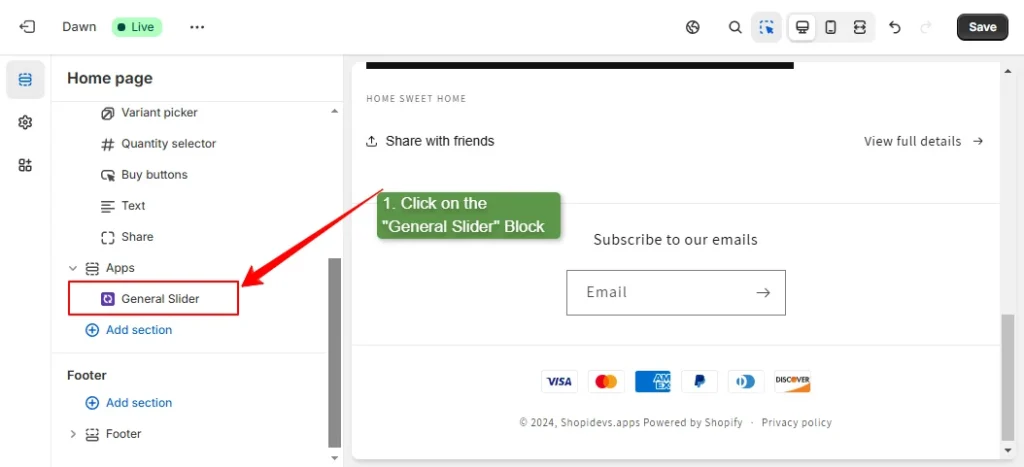
- You can see the option to connect the static slider on the store.
- Paste the shortcode you have copied in “Step 5”.
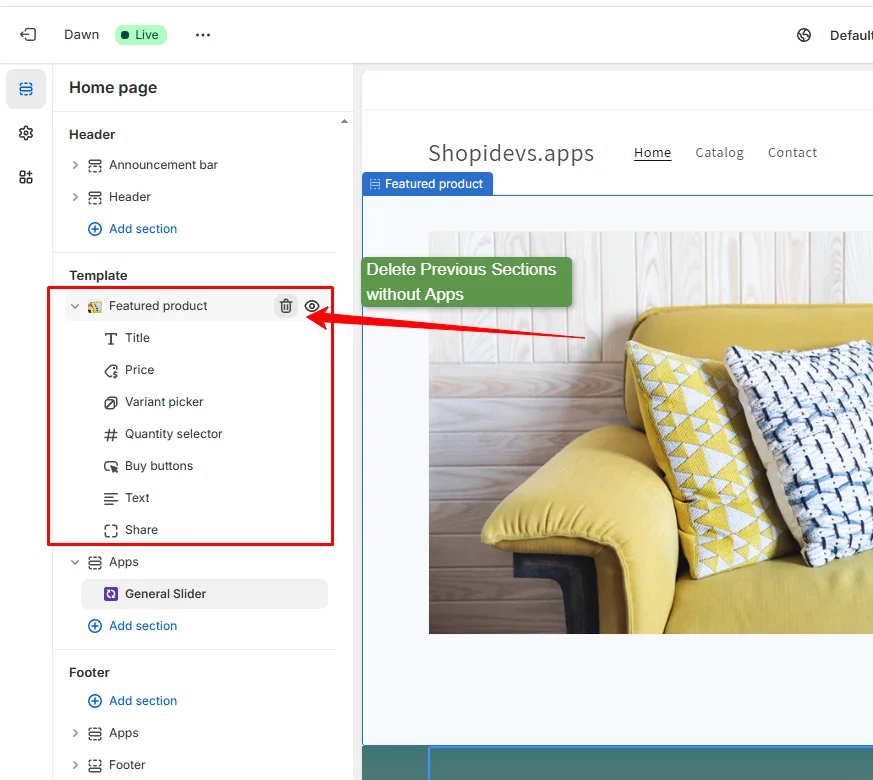
Step 9: Delete Previous Sections & Blocks Rest ‘Apps’ Sections
- Hover over the previously used sections on the homepage to delete them. Because we need to create a product page on the homepage.
- Click on the delete icon to remove all sections without ‘Apps’ sections
Note: If you want to reuse the homepage elements later, then keep a theme backup file before editing your product page on the homepage.
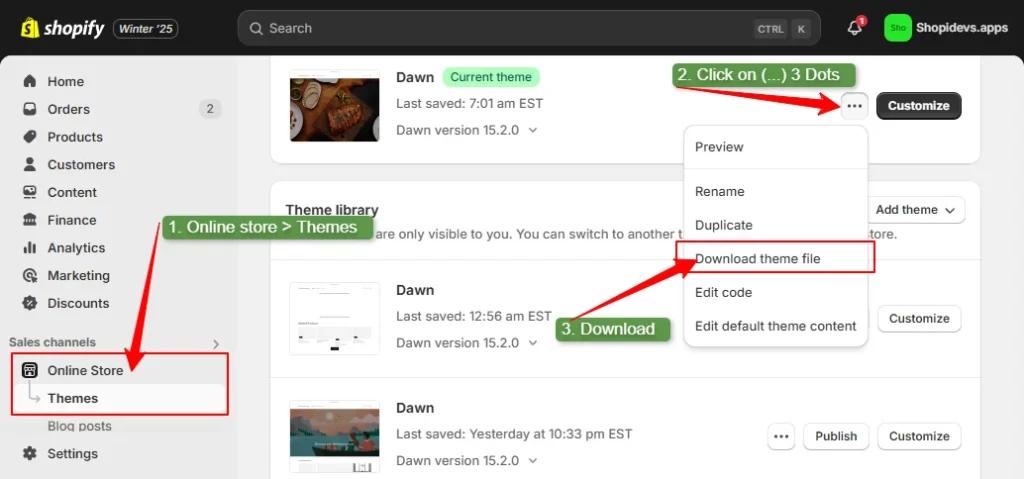
If you won’t need to use these elements later on your Shopify store, then you can skip it.
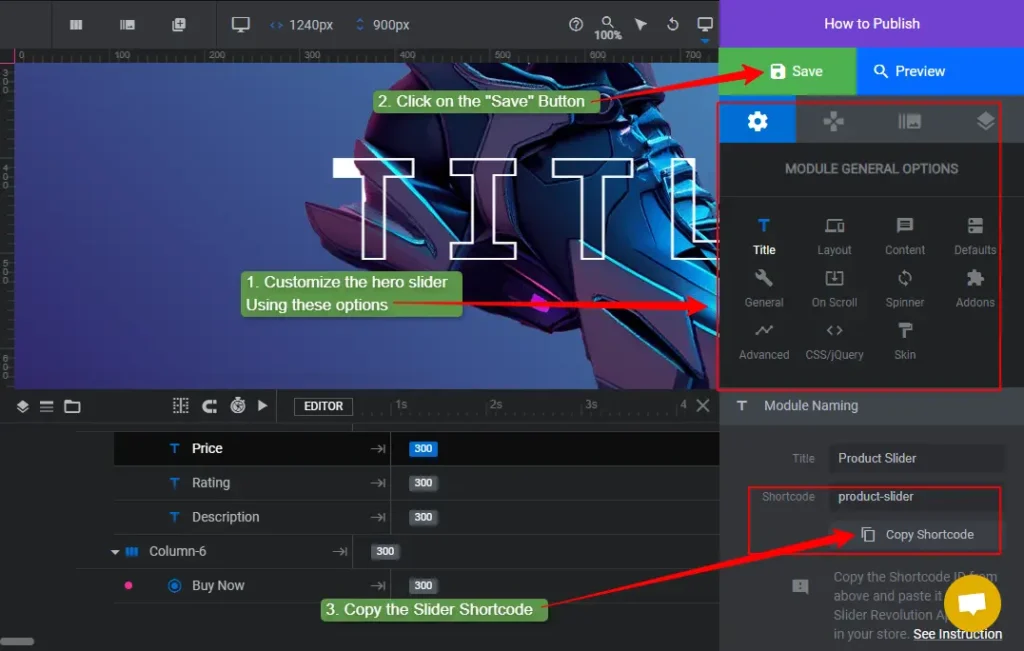
Step 10: Customize and Copy the ‘Dynamic Product Slider’ at Slider Revolution
I have already shown you how to create and publish “General Slider” on your Shopify store. Now you are going to learn how to add “Dynamic Products Slider” templates.
- I have installed the ‘Dynamic Product Slider’ in ‘Step 3’.
- Customize the product slider template by using these wide range of options.
- Save the slider.
- Copy the Shortcode of the dynamic product slider.
Step 11: Add a ‘Dynamic Product Slider’ Block to Add Products on the Homepage
Go back to the Shopify store theme editor.
- Click on the ‘+’ plus icon to add a new block, or you can add a new section.
- Click on the “Apps” section.
- Then click on the “Dynamic Product Slider” option to add it.
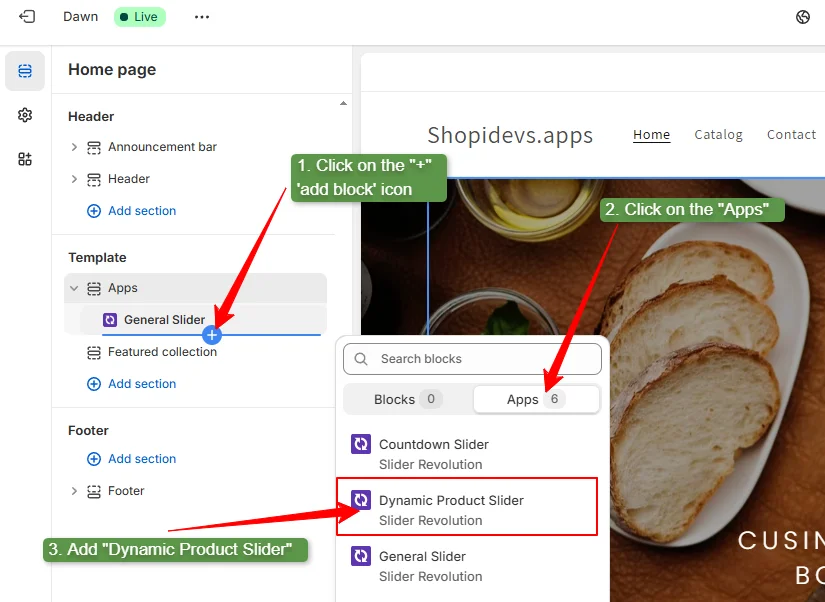
Step 12: Paste the Add the Product Slider Shortcode and Paste to the Store
- Click on the “Dynamic Product Slider” block, the same as you have done for ‘General Slider’ in Step 8.
- Paste the shortcode at the right side above the corner.
- Select the product collection and set how many products you want to show.
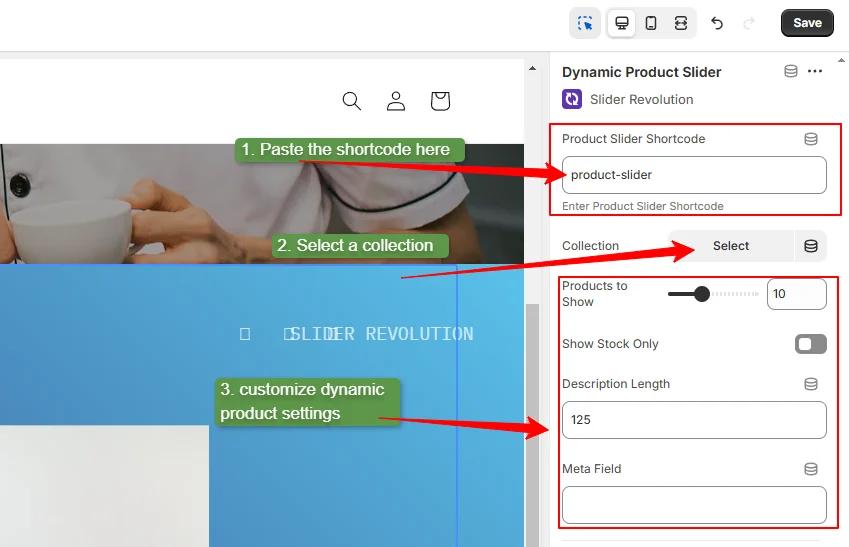
Note: Add more sliders by following the same processes like adding ‘general slider’ and ‘Dynamic Sliders’. You can add product reviews, videos, images, and other information by using the slider revolution app.
Also, you can “Countdown Slider” for any seasonal sales or discounts for a limited time.
Step 13: Add More Sections Like “Featured Collections” (Optional)
Now you can add more sections from the Slider Revolution App or without any app. You can follow the screenshot below to add more sections that highlight your products.
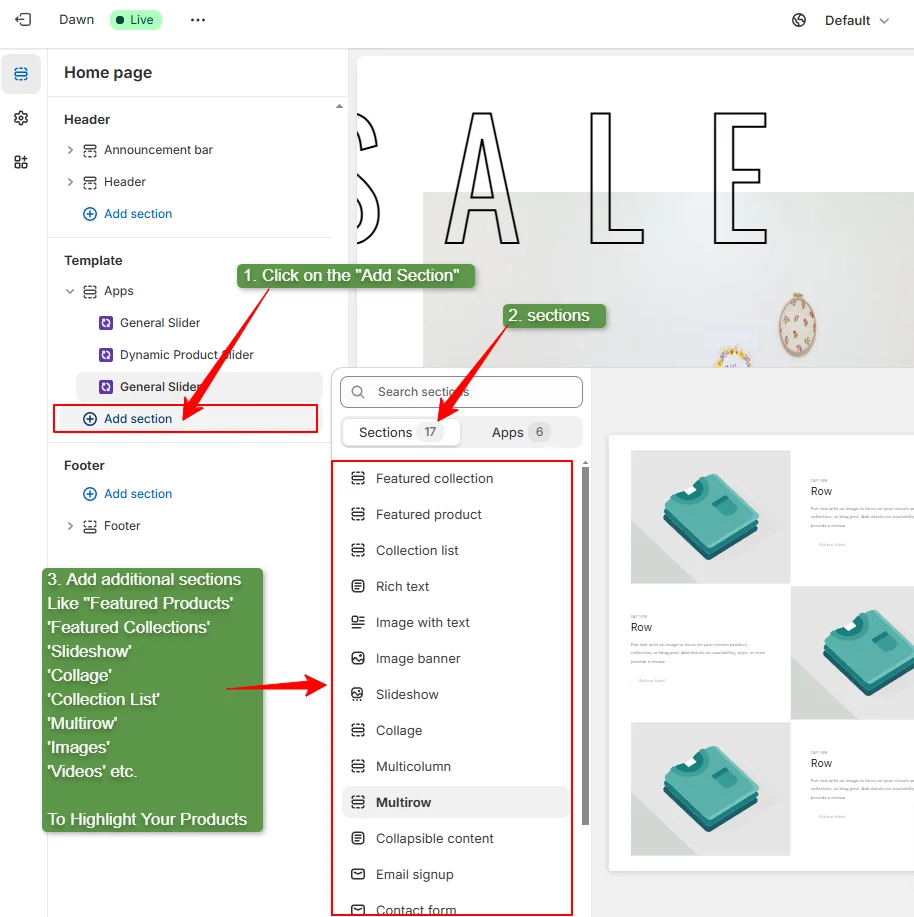
Step 14: Save the New Product Page on Your Homepage
After adding and customizing all sections of the product page on the homepage, Click on the “Save” button.
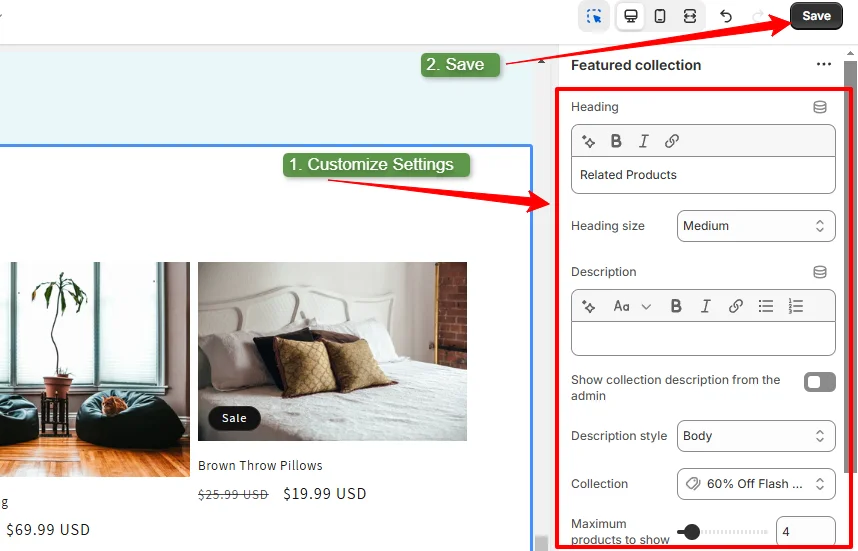
Step 15: Test the Hompage that Working as a Product Page
Let’s check the final result of the homepage as a product page using Slider Revolution slider templates.
Note: Here I have transformed a products page into a homepage for a restaurant and food items. However, you can add more sliders for a wide range of options to design your product pages on the homepage. If you haven’t understood any steps or found any issues, contact our support team.
Conclusion
So, you have reached the end of the “how to make product page home page Shopify” blog. Hope you have found this blog helpful to achieve your Shopify goal.
I have provided 3 different methods, you can choose anyone from these based on your requirements. If you want to showcase a basic product page on the homepage, then go with the built-in theme editor on Shopify.
But when you want to optimize conversion rates and increase sales through this product page, then consider the Slider Revolution app.
FAQs:
How to Set a Product Page as a Homepage in Shopify?
There are different ways to set your product page as a homepage in Shopify. According to my experience, the easiest way is ‘add the product and relevant information about the brands and products on the homepage’. Then delete previously used sections from the homepage that don’t go with the product page.
If you want to create a high-converting and professional product page on the homepage, then using the Slider Revolution app is the best solution. It offers a wide range of templates for different sections like dynamic products, videos, testimonials, and more.
What is the Difference Between a Landing Page and a Product Page?
A landing page focuses on a specific goal, like promoting an offer or collecting leads. Often it could be a campaign that influences customers to buy. On the flip side, the product page provides detailed information about a specific product. This helps customers to make informed decisions.
How Do I Redirect My Homepage to My Product Page on Shopify?
Ahh! Shopify doesn’t allow you to redirect your homepage to any product page. Don’t worry, I have unlocked the secret of redirecting the homepage to a product page by using a custom liquid code. Follow Simple 5 Steps on the Method – 2.
However, if you want to redirect any other page on Shopify, then follow these steps here:
- Log in to the Shopify store.
- Go to “Content” > “Menus” > “URL Redirects”.
- Click on the “Create Redirects”.
- Provide the URL you want to redirect and the destination URL.
- Then click on the “Save” button.
Jakaria is an SEO Content Writer in Shopify, Ecommerce, WordPress, and Tech Industry with 4+ years of experience. He specialises in developing engaging, helpful content by simplifying complex topics into an amazing story for B2B, SaaS, and Shopify businesses. He’s also passionate about staying updated on SEO strategies and Shopify trends.
