

Shopify does not ship with a built-in icon library. There is no icon button in the theme editor. The path to adding icons depends entirely on where you want them and how much control you need. Most guides stop at one method. There are actually four, each suited to a different situation.
This guide covers all four ways to add icons to a Shopify page: the theme editor’s built-in icon block (no code), Font Awesome CDN (fastest for developers), custom SVG via Liquid assets (best for brand-specific icons), and third-party apps (easiest for trust badges and payment icons). It also covers the specific question of how to add icon images to the Shopify footer, since that behaves differently from page-level icon placement.
To add icons to a Shopify page without code: go to Online Store > Themes > Customize, select a section, click the plus (+) button to add a block, and choose Text with icon. Pick from Shopify’s built-in icon set and add your heading. For custom icons (SVG files), upload the SVG to Theme Assets via Edit Code, then use a Custom Liquid block with {{ 'your-icon.svg' | inline_asset_content }}. For Font Awesome icons across the whole store, paste the Font Awesome CDN <link> tag into the <head> of theme.liquid, then use <i class="fa-solid fa-cart-shopping"></i> anywhere in your Liquid files. For footer icon images such as payment icons and trust badges, upload SVG or PNG files to Theme Assets and reference them with asset_url in your footer section file.
To add icons to a Shopify page without code: go to Online Store > Themes > Customize, select a section, click the plus (+) button to add a block, and choose Text with icon. Pick from Shopify’s built-in icon set and add your heading. For custom icons (SVG files), upload the SVG to Theme Assets via Edit Code, then use a Custom Liquid block with {{ 'your-icon.svg' | inline_asset_content }}. For Font Awesome icons across the whole store, paste the Font Awesome CDN <link> tag into the <head> of theme.liquid, then use <i class="fa-solid fa-cart-shopping"></i> anywhere in your Liquid files. For footer icon images such as payment icons and trust badges, upload SVG or PNG files to Theme Assets and reference them with asset_url in your footer section file.
Key Takeaways
- The theme editor’s “Text with icon” block works on any OS 2.0 theme. No code is needed, but you are limited to Shopify’s built-in icon set.
- Font Awesome CDN is the fastest way to add icons globally across your store. One line in
theme.liquidgives you access to 2,000+ free icons. - For custom SVG icons, such as your own brand icons, upload the file to Theme Assets and use
inline_asset_contentin a Custom Liquid block. The SVG file must be under 15 KB. - Footer icon images, such as payment icons and trust badges, work differently from page icons. Add them through the footer section file or a Custom Liquid block in the footer.
- Use SVG instead of PNG for icons whenever possible. SVG files scale to any size without losing quality and typically load faster.
- Standard icon sizes: 16px for inline and navigation icons, 24px for feature icons, 32px for trust badges, and 48px for category icons.
- To remove an icon from Shopify, such as the search icon in Dawn, use CSS
display: nonetargeting the theme’s specific class name.
Where You Can Add Icons in Shopify
Shopify has four distinct areas where icons can be placed, and each one uses a different approach. This is also relevant if you are thinking about how to organize products on Shopify using category icons, or if you want to add a recognizable icon next to your Shopify logo link in the header.
| Location | Best Method | Notes |
|---|---|---|
| Page content sections | Theme editor block or Custom Liquid | Works per section on any page template |
| Header | Theme settings or code edit | Social icons in Dawn header need an Announcement Bar toggle |
| Footer | Theme settings (social) or asset_url (custom images) |
Payment and trust badge icons need asset_url or a file URL |
| Product / collection pages | Custom Liquid block or Font Awesome | Feature icons for USPs go here (free shipping, eco, etc.) |
| Global (all pages) | Font Awesome CDN in theme.liquid |
One setup, available everywhere in your theme |
Method Comparison: Which One to Use
Method 1: Theme Editor Icon Block (No Code)
The fastest option for non-developers. Works on Dawn and all Shopify OS 2.0 themes. You can add a row of icons with labels, perfect for feature sections like “Free Shipping / Easy Returns / Secure Checkout.”
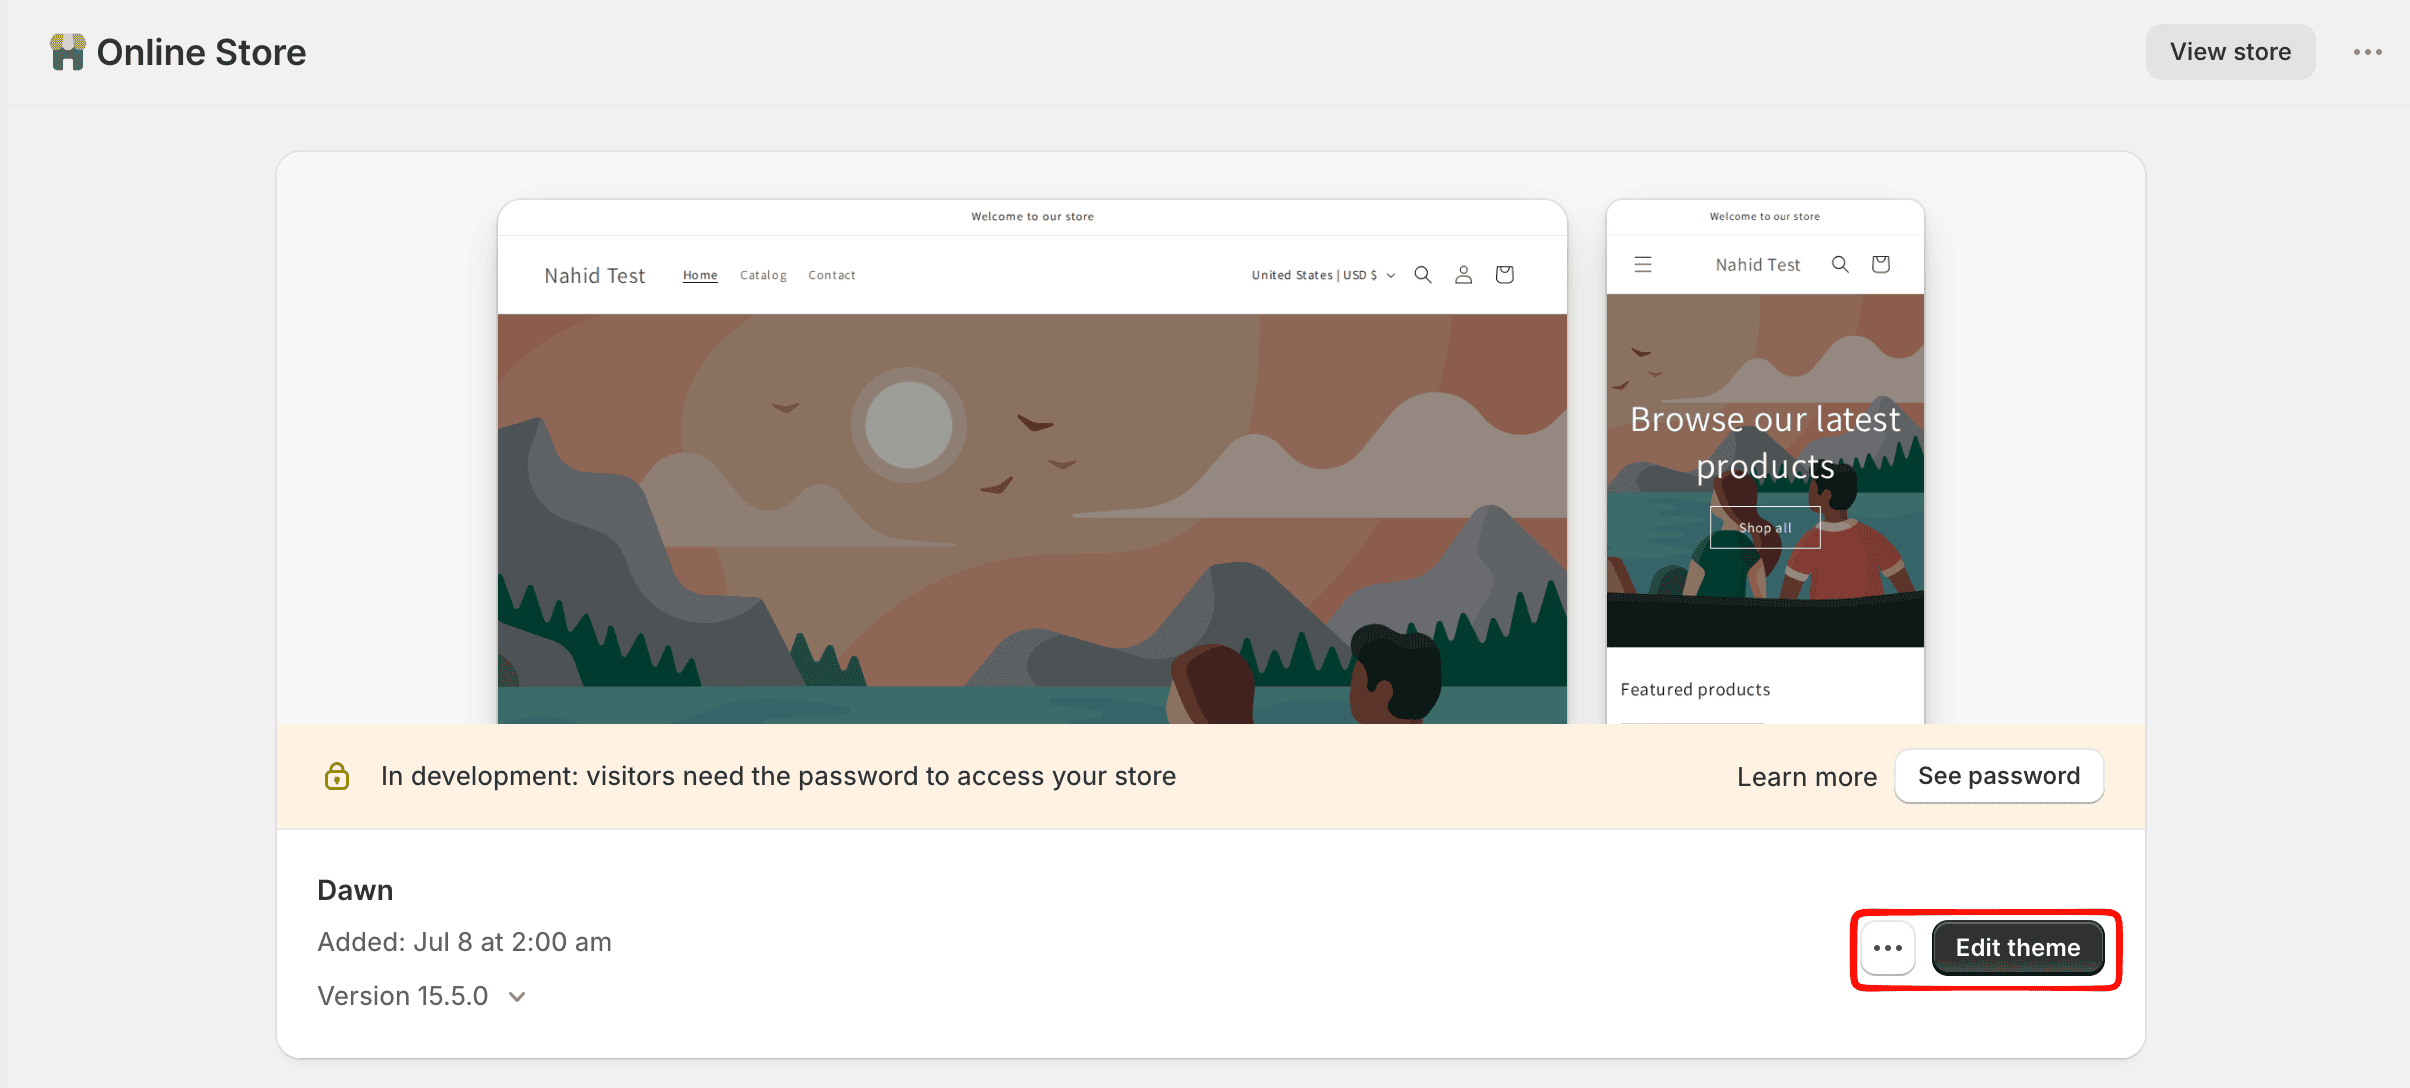
Step 1: Open Theme Customizer
Go to Online Store > Themes > Edit Theme
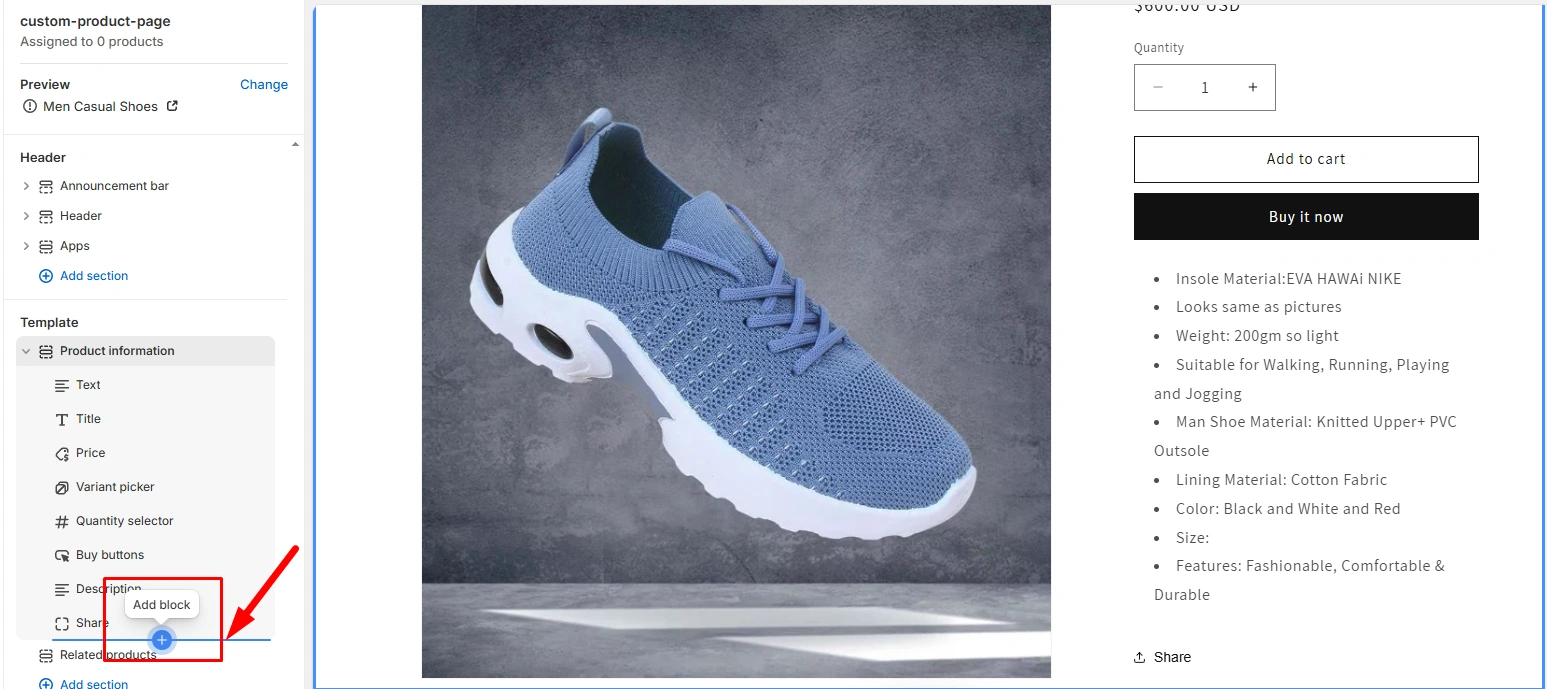
Step 2: Select a Section and Add a Block
Navigate to the page and section where you want the icons. Click the + button to add a new block inside that section.
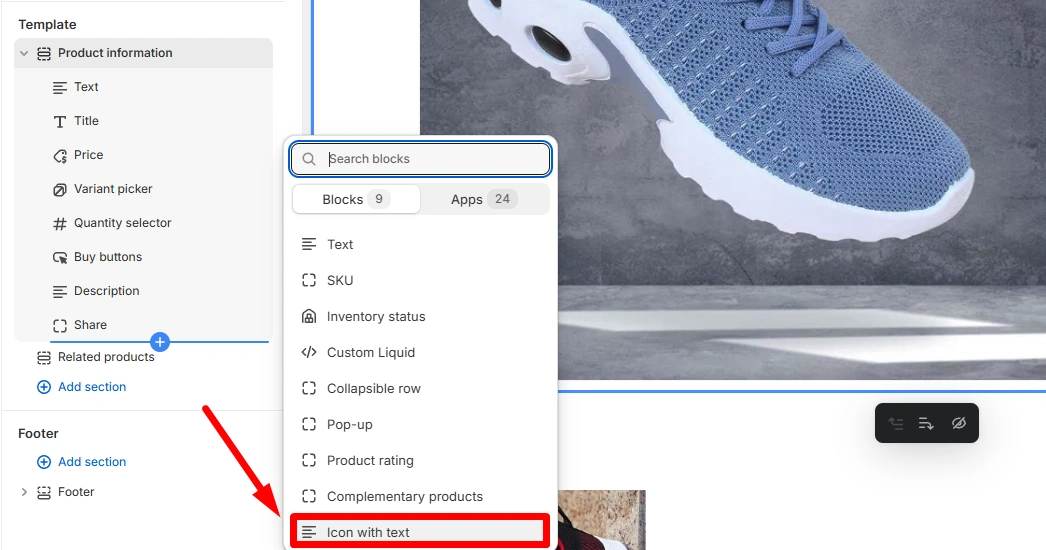
Step 3: Choose “Text with Icon”
From the block type menu, select Text with icon.
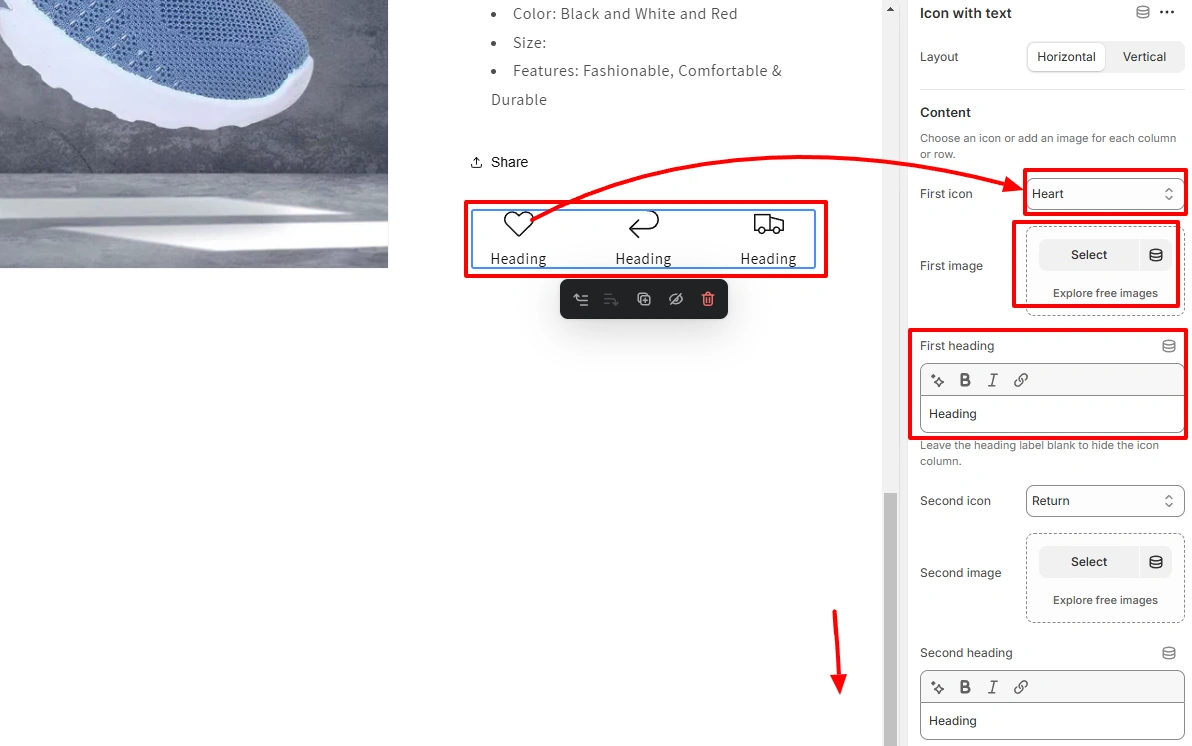
Step 4: Pick an Icon and Add a Label
Click on the icon thumbnail to open the icon picker. Choose from Shopify’s built-in set. Add a heading label in the right sidebar (e.g., “Free Shipping”, “Secure Payment”).
Step 5: Repeat and Save
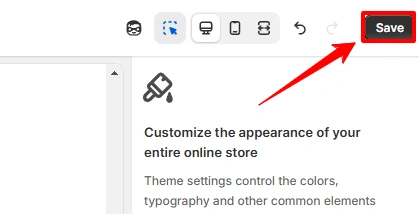
Add as many icon blocks as needed. Click Save when done.
Limitation: The theme editor icon set contains around 20 generic icons. If you need a specific icon (a custom logo, a niche-specific symbol, or a Font Awesome icon), use Method 2 or 3 instead.
Method 2: Font Awesome CDN (Global Icons, Developer Method)
Font Awesome is the most widely used icon library on the web. Adding it to Shopify takes one line of code in theme.liquid. After that, any Font Awesome icon is available in every Liquid file, snippet, section, and Custom Liquid block in your store without uploading any files.
Step 1: Get the Font Awesome CDN Link
Go to fontawesome.com and copy the free CDN kit link, or use the standard CDN URL directly:
<link rel="stylesheet" href="https://cdnjs.cloudflare.com/ajax/libs/font-awesome/6.5.0/css/all.min.css" integrity="sha512-Avb2QiuDEEvB4bZJYdft2mNjVShBftLdPG8FJ0V7irTLQ8Uo0qcPxh4Plh7eqjlqBSrd3DkPlPiH0DSl2fXg==" crossorigin="anonymous" referrerpolicy="no-referrer" />Step 2: Open theme.liquid
Go to Online Store > Themes > Edit code. In the Layout folder, open theme.liquid.
Step 3: Paste the CDN Link in the <head>
Find the closing </head> tag and paste the Font Awesome CDN link directly above it:
<!-- Font Awesome Icons -->
<link rel="stylesheet" href="https://cdnjs.cloudflare.com/ajax/libs/font-awesome/6.5.0/css/all.min.css" crossorigin="anonymous" />

</head>Step 4: Save theme.liquid
Click Save. Font Awesome is now available on every page of your store.
Step 5: Use Icons Anywhere With the i Tag
You can now use any Font Awesome icon anywhere in your Liquid files or Custom Liquid blocks. Examples:
<!-- Shopping cart icon -->
<i class="fa-solid fa-cart-shopping"></i>

<!-- Star rating icon -->
<i class="fa-solid fa-star"></i>

<!-- Truck (free shipping) icon -->
<i class="fa-solid fa-truck"></i>

<!-- Lock (secure payment) icon -->
<i class="fa-solid fa-lock"></i>

<!-- Instagram icon -->
<i class="fa-brands fa-instagram"></i>Find any icon: Browse the full free icon set at fontawesome.com/icons. Filter by “Free” to see icons you can use without a paid plan.
Step 6: Style Icons With CSS
Control the size and color of Font Awesome icons with standard CSS:
<style>
  .shop-icon {
    font-size: 24px;
    color: #0070f3;
    margin-right: 8px;
  }
</style>

<i class="fa-solid fa-truck shop-icon"></i> Free Shippingasset_url.
Method 3: Custom SVG via Liquid Assets
This method is for when you have your own icon files (brand icons, custom symbols, icons from a design system). Upload the SVG to your theme’s Assets folder, then reference it in any Liquid file or Custom Liquid block using inline_asset_content. The SVG renders inline in the HTML, making it fully stylable with CSS.
inline_asset_content
only works with assets under 15 KB. Most SVG icons are well under this limit. If your SVG is larger, optimize it first using a tool like SVGO or
SVGOMG.
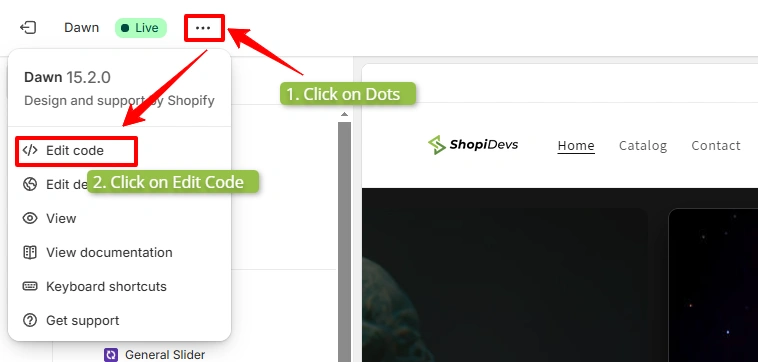
Step 1: Open Theme Code Editor
Go to Online Store > Themes > Edit code.
Step 2: Upload the SVG to Theme Assets
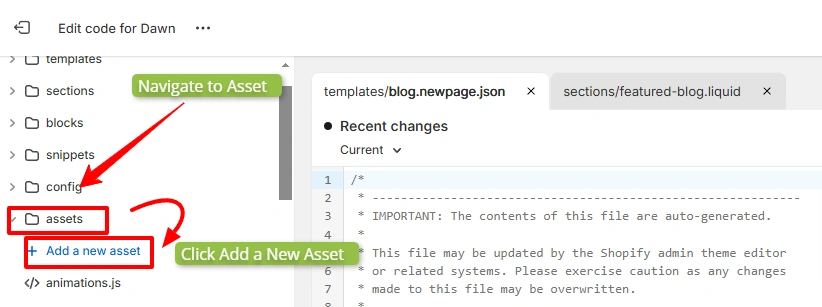
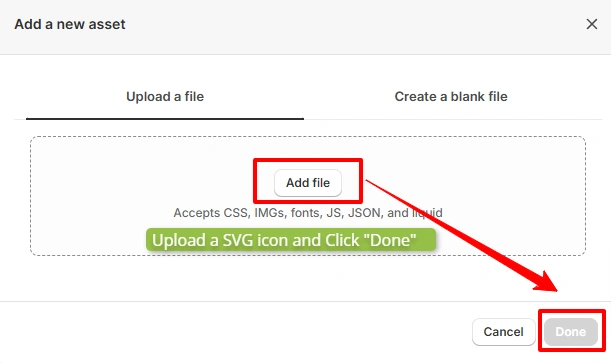
In the left sidebar, open the Assets folder. Click Add a new asset, then upload your SVG file. Click Done.
inline_asset_content
must be in Theme Assets (Edit Code > Assets). Files uploaded to Content > Files are not compatible with this Liquid filter. Use
asset_url
for files in Theme Assets, and direct URLs for files in Shopify Files.
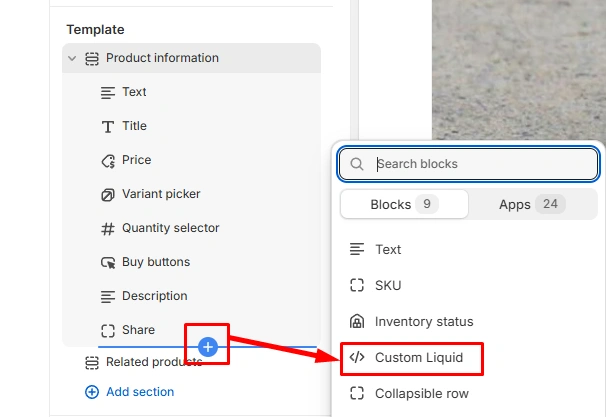
Step 3: Add a Custom Liquid Block
In the theme customizer, navigate to the section where you want the icon. Click Add block and choose Custom Liquid.
Step 4: Paste the Liquid Code
Paste the following code into the Custom Liquid box. Replace your-icon.svg with the exact filename of your uploaded SVG:
<style>
  .shopi-icon-inline svg {
    width: 32px;
    height: 32px;
    fill: currentColor;
    display: block;
  }
</style>

<span class="shopi-icon-inline" aria-hidden="true">
  {{ 'your-icon.svg' | inline_asset_content }}
</span>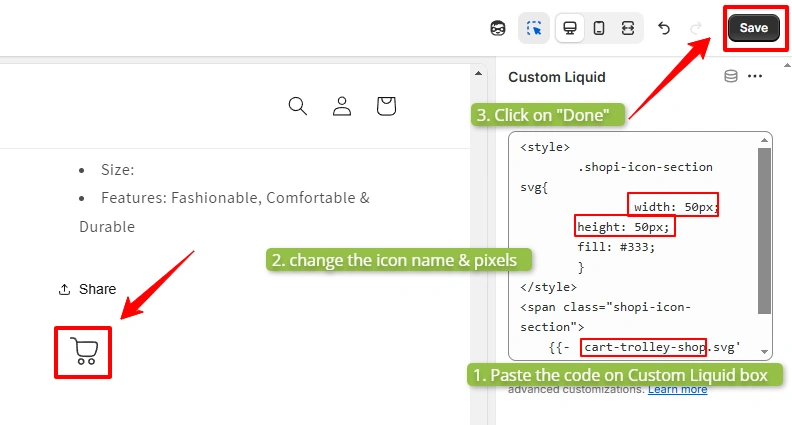
Step 5: Save
Click Save. The SVG icon now renders inline in the section. You can control its color, size, and hover state with CSS using the .shopi-icon-inline class.
fill: currentColor
instead of a fixed hex value means the icon inherits the text color of its parent element. This makes it easy to apply your brand color by setting
color
on the parent container rather than editing the SVG each time.
Method 4: Shopify Apps
Apps are the right choice when you need pre-designed icon sets for specific use cases: trust badge packs, payment method icon sets, or social proof icons. They handle the placement and styling without requiring any code or file uploads.
When choosing an icon app from the Shopify App Store, check whether it supports SVG icons (not just PNG), whether icons can be placed in the footer and product pages (not just a single fixed location), and whether it adds significant JavaScript to your page (which can affect load speed).
Popular categories of icon apps include trust badges, payment, and social media apps. Search for “trust badges” or “payment icons” in the Shopify App Store, then filter by rating before installing.
How to Add Icon Images to the Shopify Footer
The Shopify footer behaves differently from page sections. You cannot add a standard section block to the footer in the same way you would on a content page. Icon images in the footer (payment icons, trust badge images, custom logo icons) require one of three approaches depending on what you are adding.
Option A: Social Icons in Footer (Theme Settings)
Dawn and most OS 2.0 themes automatically display social media icons in the footer when you add social profile URLs in the theme settings. Go to Customize > Theme settings > Social media (or “Social accounts”) and add your profile URLs. The icons appear in the footer automatically.

Option B: Custom Image Icons in Footer (asset_url Method)
For custom payment icons, trust badges, or any image-based icons in the footer, upload the files to Theme Assets and reference them with asset_url in the footer section file:
<!-- In your footer section Liquid file -->
<div class="footer-payment-icons">
  <img src="{{ 'visa.svg' | asset_url }}" alt="Visa" width="40" height="24" loading="lazy">
  <img src="{{ 'mastercard.svg' | asset_url }}" alt="Mastercard" width="40" height="24" loading="lazy">
  <img src="{{ 'paypal.svg' | asset_url }}" alt="PayPal" width="40" height="24" loading="lazy">
  <img src="{{ 'apple-pay.svg' | asset_url }}" alt="Apple Pay" width="40" height="24" loading="lazy">
</div>

<style>
  .footer-payment-icons {
    display: flex;
    gap: 8px;
    align-items: center;
    flex-wrap: wrap;
  }
  .footer-payment-icons img {
    height: 24px;
    width: auto;
  }
</style>Option C: Shopify Files URL Method
If you have uploaded icon images via Content > Files (rather than Theme Assets), use the direct hosted URL instead of asset_url:
<img src="YOUR_SHOPIFY_FILES_URL_HERE" alt="Visa" width="40" height="24" loading="lazy">asset_url
filter only works with files in Theme Assets (Edit Code > Assets). Files uploaded to Content > Files are accessed via their direct URL only. Using
asset_url
on a Shopify Files URL will return an error.
For a complete reference on Shopify image sizing for icons and banners in the footer area, see our guide on best image sizes for Shopify.
How to Add Social Media Icons to Shopify
Social media icons in Shopify can be added to the footer, the announcement bar/topbar, or inline within page content. Each location uses a different method.
Footer Social Icons (Dawn Theme)
Already covered above. Add social profile URLs in Theme settings > Social accounts. Icons appear in the footer automatically. See the full guide on how to add social media to Shopify for all placement options.
Topbar / Announcement Bar Social Icons (Dawn Theme)
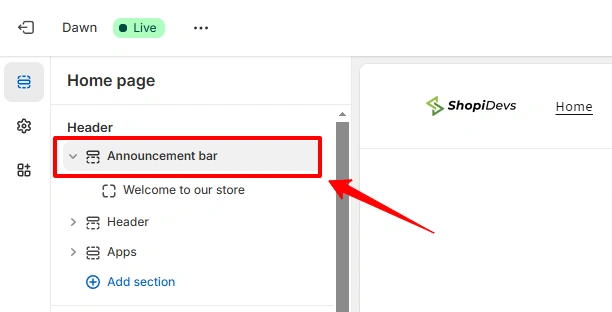
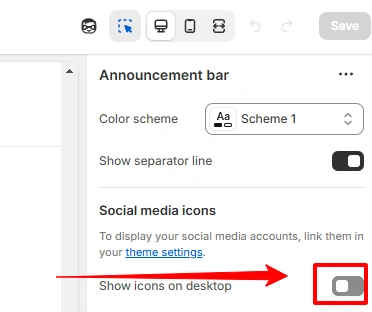
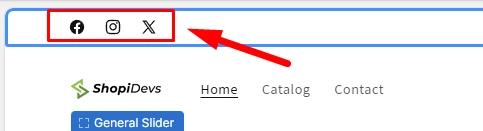
In the theme customizer, navigate to the Header section and click Announcement bar. Enable the Social media icons toggle. This adds the same icons from your theme settings to the announcement bar at the top of the page.
Inline Social Icons in Page Content
To add social icons inside a page section (not in the header or footer), use Font Awesome brand icons in a Custom Liquid block. This is the most flexible approach for placing social icons anywhere:
<div class="social-icons-row">
  <a href="https://instagram.com/yourbrand" target="_blank" rel="noopener" aria-label="Instagram">
    <i class="fa-brands fa-instagram"></i>
  </a>
  <a href="https://facebook.com/yourbrand" target="_blank" rel="noopener" aria-label="Facebook">
    <i class="fa-brands fa-facebook"></i>
  </a>
  <a href="https://tiktok.com/@yourbrand" target="_blank" rel="noopener" aria-label="TikTok">
    <i class="fa-brands fa-tiktok"></i>
  </a>
</div>

<style>
  .social-icons-row {
    display: flex;
    gap: 16px;
    font-size: 24px;
    color: #374151;
  }
  .social-icons-row a { color: inherit; }
  .social-icons-row a:hover { color: #0070f3; }
</style>How to Add Custom Payment Icons to Shopify
Shopify’s checkout page automatically displays payment method icons based on what payment methods you have enabled. For the storefront (product pages, footer, cart page), you need to add payment icons manually.
Use Option A if your icons are in Theme Assets, or Option B if they are in Shopify Files:
<!-- Option A: Theme Assets (use asset_url) -->
<img src="{{ 'visa.svg' | asset_url }}" alt="Visa" width="40" height="24" loading="lazy">

<!-- Option B: Shopify Files (use direct URL) -->
<img src="PASTE_YOUR_FILE_URL_HERE" alt="Visa" width="40" height="24" loading="lazy">Free payment icon SVG sets are available from sources like payment-icons on GitHub or the Iconfinder payment icons set. Download the SVG files, upload them to Theme Assets, and reference them with asset_url.
For a full guide on adding PayPal specifically, see how to add PayPal to Shopify. If you are also adding a FAQ section to your page with icons, see how to create a FAQ page in Shopify for the complete walkthrough.
Icon Size Guide for Shopify
Using consistent icon sizes keeps your store looking professional and ensures icons are accessible on mobile. These are the standard sizes used in ecommerce design:
When adding icons to banners or image sections, follow the Shopify banner size guide for the surrounding image dimensions. Icons placed over banners should be sized relative to the banner height to maintain visual balance. If you are adding icons inside a video banner section, see the guide on adding video to a Shopify banner section for how icons and video layers interact.
To make a banner with icons clickable, see how to make a Shopify image banner clickable. For general image size recommendations across all Shopify sections, see best image sizes for Shopify.
Troubleshooting Common Icon Issues
SVG icon not showing after using inline_asset_content
Fix: The SVG must be uploaded to Theme Assets (Edit Code > Assets), not to Shopify Files (Content > Files). Check the file size. It must be under 15 KB. Also verify the filename in your Liquid code exactly matches the uploaded file, including uppercase/lowercase letters.
Font Awesome icons show as empty boxes or question marks
Fix: The CDN link was not saved correctly in theme.liquid, or you are using the wrong icon class prefix. Font Awesome 6 uses fa-solid, fa-regular, and fa-brands. The older fa fa-* syntax from version 4 does not work with version 6. Check the class name at fontawesome.com/icons for the correct prefix.
Icons not aligning properly in a row
Fix: Add display: flex; align-items: center; gap: 12px; to the container wrapping your icons. This aligns icons and text vertically and spaces them evenly regardless of icon size differences.
Icons not showing on mobile
Fix: Check if a CSS media query in your theme is hiding the icon container at small screen sizes. Open browser DevTools on mobile view and inspect the icon element. Look for display: none being applied by a media query targeting the icon’s class or its parent.
Payment icon not appearing in correct size in footer
Fix: Set a fixed height (e.g., height: 24px) and width: auto on the icon <img> tag. Do not set both width and height to fixed values unless the icon is exactly that ratio. Using width: auto lets the SVG scale proportionally to the specified height.
Smart quotes breaking Liquid code after copy-pasting
Fix: Word processors and some note apps replace straight quotes (") with curly smart quotes (“ ”). Shopify’s code editor will not accept smart quotes. Always paste code into the Shopify editor directly and check for curly quote characters if you see syntax errors.
For the specific case of removing the search icon from the Dawn theme, see our guide on how to remove the search icon in Shopify. Removal uses CSS display: none Targeting the theme’s specific icon class.
Most Common Queries
How do I add icons to a Shopify page without code?
Go to Online Store > Themes > Customize. Select a section on your page, click the plus (+) button to add a block, and choose “Text with icon.” Select from Shopify’s built-in icon set, add a label, and save. This works on all OS 2.0 themes including Dawn, Craft, Sense, and Refresh. If you need icons not in Shopify’s built-in set, use a Shopify app from the App Store instead.
How do I add icon images to the Shopify footer?
For social media icons in the footer, add your social profile URLs in Theme settings > Social accounts. The icons appear automatically. For custom image icons (payment icons, trust badges), upload SVG or PNG files to Theme Assets via Edit Code, then add them in your footer section Liquid file using <img src="{{ 'icon.svg' | asset_url }}">. Do not use Shopify Files for this. The asset_url filter only works with Theme Assets.
What is the best icon format for Shopify?
SVG is the best format for all Shopify icons. SVG files scale to any size without losing quality, load faster than PNG equivalents, and can be styled with CSS (color, size, hover effects). For icons used with inline_asset_content, keep the SVG under 15 KB. For image-based icons in the footer or product pages, SVG also works with asset_url and <img> tags.
How do I add payment icons to my Shopify store?
Upload payment icon SVG files (Visa, Mastercard, PayPal, Apple Pay, etc.) to your Theme Assets via Edit Code. Then add them in your footer section file or a Custom Liquid block using <img src="{{ 'visa.svg' | asset_url }}" alt="Visa" width="40" height="24" loading="lazy">. Free payment icon SVG sets are available on GitHub and Iconfinder. See the full guide on adding PayPal to Shopify for payment-specific setup.
What size should icons be on Shopify?
Use 16px for inline and navigation icons, 24px for feature icons in USP rows (free shipping, returns), 32px for trust badges and payment icons, and 48px for larger category or collection icons. Always set a fixed height and width: auto on icon images to let them scale proportionally. For SVG icons used with Font Awesome or inline_asset_content, control size via CSS font-size or width/height properties.

I’m a digital marketing expert with a deep understanding of Shopify App Store optimization. I contribute insightful articles on Shopify to help businesses thrive online.