The right Shopify image banner size is crucial for your store to provide visitors fast and best experience. Too big images can slow down your site, making customers wait and possibly leave. On the other hand, too small may look blurry or unprofessional.
So, you need to identify the ideal size for the banner image to load faster and look more professional on all devices, especially on mobile. Ideally, a 16:9 aspect ratio with 400-800 px width and 1200-2000 px height is the best size for Shopify banner image size.
Let’s explore secret tips and different banner image sizes of a Shopify store according to Shopify guidelines.
What is the Best Shopify Image Banner Size?
Generally, 1200 to 2000 px width and 400 to 800 px height with a 16:9 aspect ratio is the best Shopify image banner size for a responsive and sharp display. 2000 x 800 is the best size for a larger banner like a hero banner. And 1200 x 400 px (3:1 or 4:1 aspect ratio) is recommended for smaller banners like collection pages.
Keep in mind, that the best Shopify banner image size depends on your theme and the type of banner where you will use it. So, always check your theme’s specifications, as some may require specific sizes, and prioritize the best look of the store.
Why Shopify Image Banner Size is Important?
Images are very important when it comes to the Shopify banner. It always creates value for any site. There is given the importance of Shopify Image Banner Size:
- User Experience: Using images of the right size helps to ensure that your website loads quickly, providing a seamless and enjoyable experience for users. Slow-loading images can cause frustration and lead to high bounce rates, which can negatively impact your conversion rates.
- Mobile Optimization: In today’s mobile-first world, it’s important to make sure that your images are optimized for all devices, including mobile phones and tablets.
- Brand Image: High-quality, well-sized images help to create a professional and polished look for your store. Poorly sized or low-quality images can detract from your site’s overall aesthetic and negatively impact your brand’s perception.
- Search Engine Optimization (SEO): Images play a role in SEO for Shopify. Optimizing your images for size, quality, and format can help to improve your website’s overall visibility and ranking in search engines.
Guidelines for Banner Image Sizes from Shopify
When you are working on the Shopify platform, it is very crucial to know and maintain the guidelines of Shopify. Here are a few key guidelines for the size of banner image on Shopify:
- 1280 x 720 pixels sizes of banner images with a 16:9 aspect ratio are recommended by Shopify.
- Max image dimension can be 4472 x 4472 pixels.
- Max file size 20 MB for banner image.
- Use a 2000 x 800 pixels size for a full-width banner to maintain high quality.
- Keep files under 1 MB for faster loading and better user experience. (Shopidevs recommend under 150 kb)
Though Shopify offers a bit of flexibility on your banner image size like adding an image of 20 MB, it is not recommended to use it which can slow down your website.
Shopify Image Banner Size for Different Types of Banner
| Banner Type | Image Size in Pixels | Aspect Ratio |
| Homepage Hero Banner | 1920 x 1080 | 16:9 |
| Collection Page Banner | 2800 x 1000 | 3:1 or 4:1 |
| Product Page Banner | 1800 x 900 | 2:1 |
| Slideshow banner | 1600 x 500 | 3:1 |
| Checkout Page Banner | 1800 x 300 | 6:1 |
| Blog Page Banner | 1800 x 1000 | 1.8:1 |
| Contact Page Banner | 1800 x 1000 | 1.8:1 |
| Footer Banner | 1200 x 150 | 8:1 |
Though these are the most popular image banner sizes on Shopify, they might not be perfect for your theme. Let’s discuss more details about different banner image sizes for Shopify:
Shopify Homepage Hero Banner Image Size
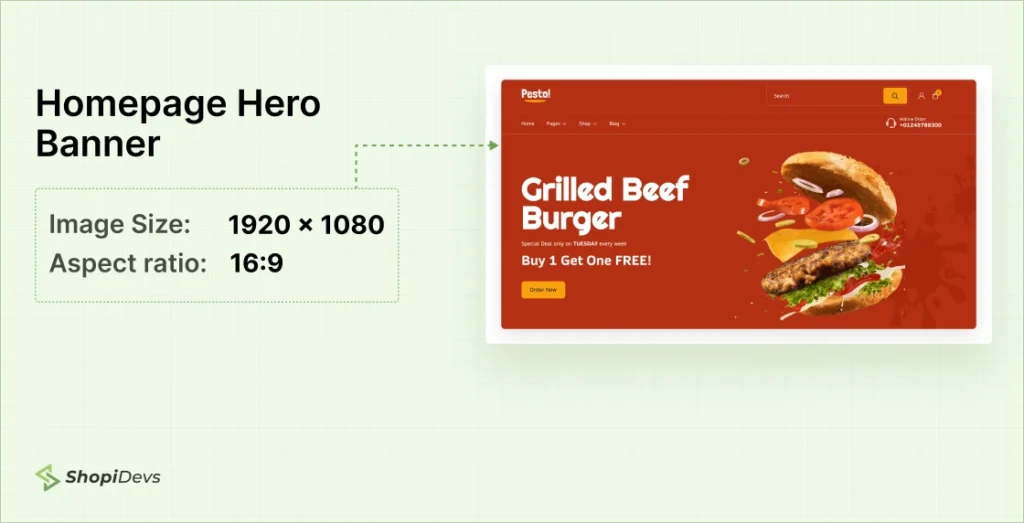
The most popular and acceptable Shopify hero banner image size is 1920 x 1080 pixels or 16:9 aspect ratio. This is the perfect size to showcase your banner image perfectly for desktop and tablet users. A clear and impactful hero banner is very important for a Shopify store. Because it is the visual magnet for your store to grab visitor’s attention quickly and help your brand or product stand out.
Shopify Collection Page Banner Image Size
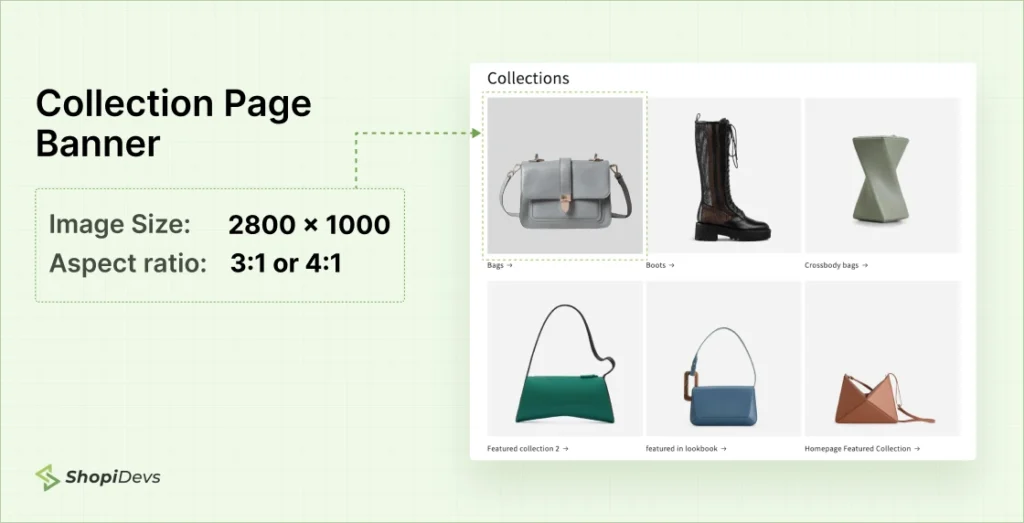
2800 x 1000 pixels size for the collection page banner gives a panoramic look. It’s perfect for setting a theme across collections and works well in 3:1 or 4:1 ratios. Collection banners display product categories in a large, horizontal format.
Shopify Slideshow Page Banner Image Size
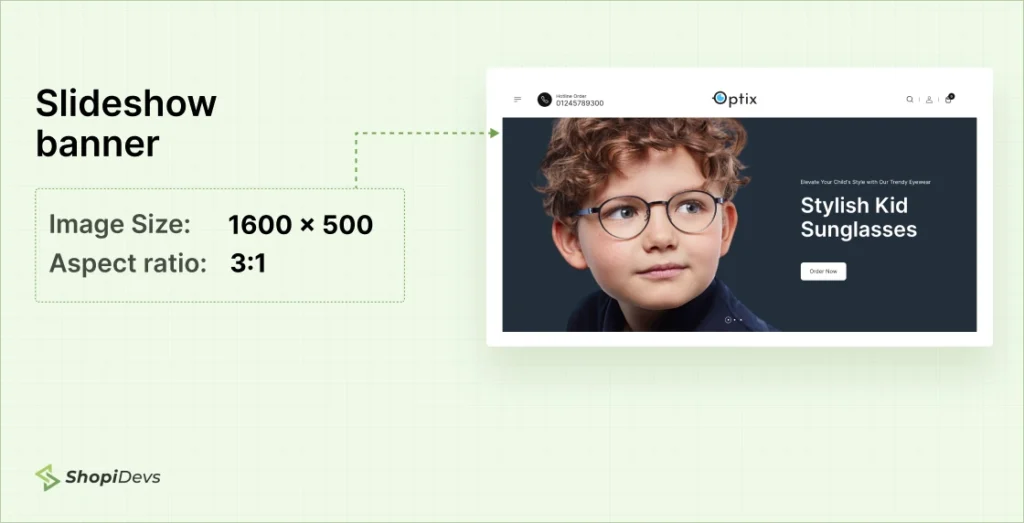
1600 x 500-pixel size with a 3:1 ratio can be a good choice for your Slideshow page banner image on Shopify. This standard size works perfectly on various devices and offers to show several products or deals in one space.
Shopify Product Page Banner Image Size
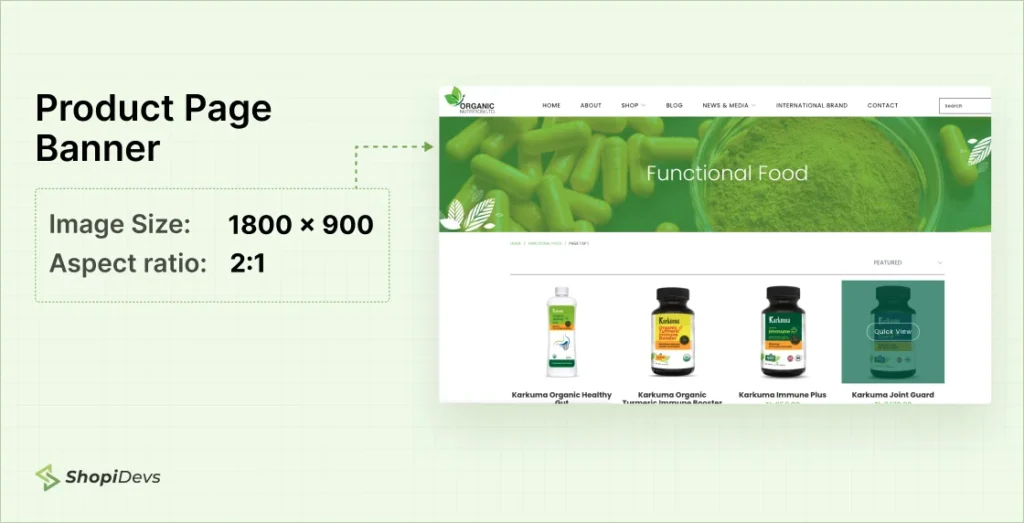
The Shopify product page banner image size should be 1800 x 900 pixels and 2:1 aspect ratio. It balances quality with speed and provides a clear view of each product, making details easy to see while keeping a clean banner.
Shopify Checkout Page Banner Image Size
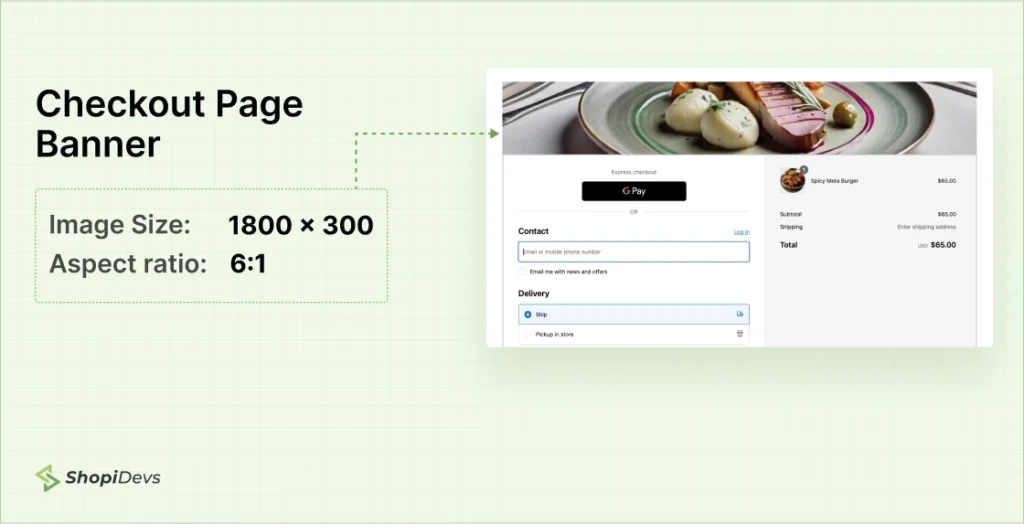
1800 x 300 pixels can be a standard size for your Shopify store to reinforce the purchase process without distractions. The 6:1 ratio fits neatly, adding a branded touch, which keeps customers the process focused. Get more Shopify checkout page hacks to increase your sales.
Shopify Blog Page Banner Image Size
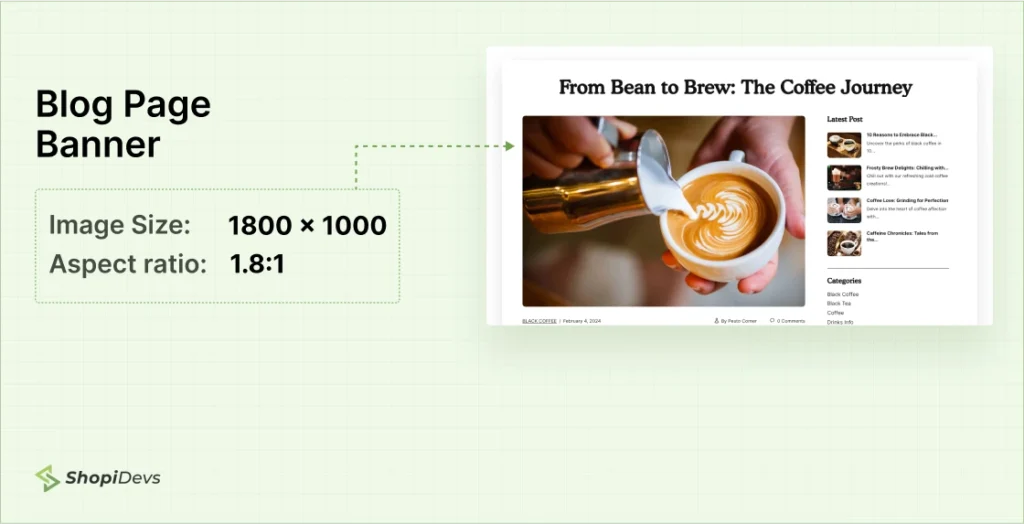
The 1800 x 1000 pixels with a 1.8:1 aspect ratio size can be a good fit for the blog page banner image on Shopify. A blog page banner helps to introduce readers to your blog content. So, create an engaging banner image for a blog post to connect with your readers and build a community of the brand.
Shopify Contact Page Banner Image Size
The contact page banner provides a friendly visual for your contact info. You can use 1800 x 1000 pixels, for the blog banner to make a simple and professional image. The 1.8:1 ratio keeps it responsive and adds a polished touch to the page.
Shopify Footer Page Banner Image Size
This banner sits at the bottom of pages, often used for branding or promotions. At 1200 x 150 pixels, it’s subtle yet effective. The 8:1 ratio fits neatly, reinforcing your brand without taking up much space.
Important Note:
I have provided the standard sizes for your store’s different banner images on Shopify. But remember these image sizes might vary based on the theme you use, screen size, and other design settings. So, follow your theme’s guidelines or consult theme support to confirm the best image sizes for your Shopify store layout for the best results.
Best Image File Format for Shopify Banners
Shopify supports a wide range of image formats to upload to your stores. Such as you can use JPEG, PNG, GIF, WebP, HEIC, and AVIF formats for your banner image. But Shopify recommends using PNG to JPEG images for the best performance of your store.
- JPEG is the best image file format for Shopify banners, slideshows, products, pages, and blog posts. This format supports a wide color palette and efficient compression, so it is perfect for images with complex colors.
- PNG is highly recommended for graphics requiring transparency or flat colors. You can use PNG format for logos, icons, borders, trims, and other transparent images.
- WebP format is widely used in this latest era of SEO and Marketing. Google has introduced this image format to show a clear image to the audience with a small file size. If you are focusing on SEO for your Shopify product marketing then you can use WebP format to reduce image size. It helps to increase the speed of the page, user experience, and website performance.
Note: Shopify will compress your images while displaying them to your customers for a faster loading speed. Also, it will convert the image format based on your customer’s browser compatibility.
5 Best Tools to Create and Optimize Images on Shopify
Here are five excellent tools to create and optimize banner images for your Shopify store:
- Photoshop: a comprehensive photo editing tool for professional designers. It provides advanced features for image manipulation and attractive design.
- Canva: Alternative to Photoshop for non-professional designers to create images for your store (not recommended). It is a user-friendly platform with templates and design elements perfect for creating eye-catching visuals.
- Shopify’s Image Resizer Tool: The official image resizer tool of Shopify offers to resize your image based on your theme for free. Just upload your image on this tool, select what size you need, then convert it and download.
- TinyPNG: An online tool that compresses PNG and JPEG images that reduce file sizes while preserving quality.
- ImageOptim: A tool for Mac users that optimizes images by compressing file sizes without losing quality.
Using these tools can improve your store’s appearance and loading speed. So, your store visitors can browse the store faster with a better experience and boost Shopify website SEO.
5 Best Practices to Optimize Banner Images on Shopify
Now I am going to share a few secret tips to make your banner image stand out. Here are 5 best practices to optimize your banner image to increase the conversion rate on the store:
1. Give Your Images Names
Always use clear, descriptive names for your images. Instead of “image1.jpg,” try “blue-wool-scarf.jpg.” This helps search engines understand your images better, improving SEO. It also makes your website more accessible for users with visual impairments (search image).
2. Compress Your Images
Smaller images load faster, which keeps visitors happy, and can increase sales of your Shopify store. So, you need to use images with smaller file sizes without losing their quality, right? Here you can use tools like TinyPNG or Shopify’s image optimizer to optimize images for Shopify.
3. Use a Consistent Image Style Across Your Online Store
Maintaining a consistent visual style for your banner images creates a professional brand image. Use a consistent color palette, image style, and the best font for your Shopify store. This helps to build brand recognition and create a memorable shopping experience.
4. Include Lifestyle & Product Photography
Show your products in real-life situations so customers can imagine using them. This approach helps create an emotional connection and encourages purchases. A mix of lifestyle and product photography can help you tell a story, and help customers to make informed purchasing decisions.
5. Use A/B Tests to Find the Best Images
Try testing different images to see which ones work best. A/B testing allows you to compare two images to see which gets more clicks or sales. This helps you choose the most effective images for your store.
Easiest Way to Shopify Image Banner Size Customization
Don’t let your banner image size customization process overwhelm you. I’ll guide you to make the process easier by using a free Shopify app ‘Slider Revolution’ provided by Shopidevs. Here is the step-by-step guide to make your banner image perfect:
Step 1: Install the ‘Slider Revolution App’ to the Shopify Store
- Log in to your Shopify store and click on ‘Apps’.
- Search “Slider Revolution” on the search bar.
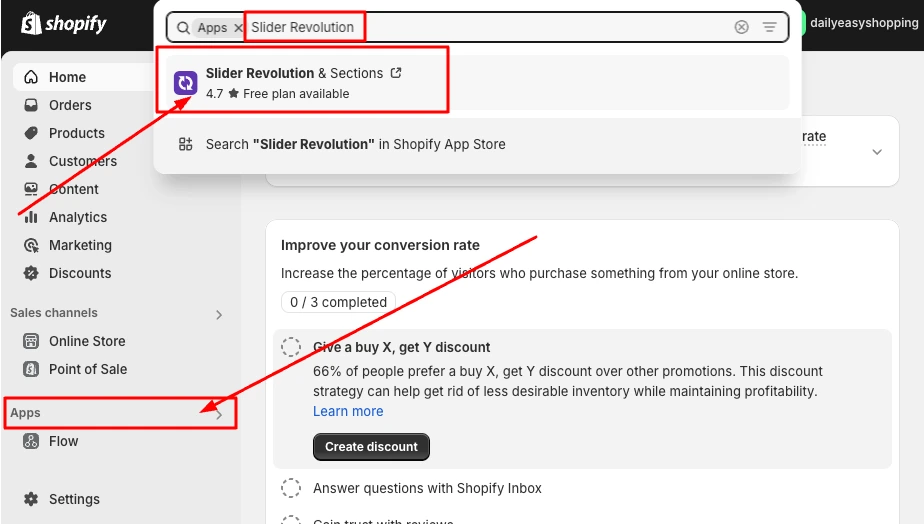
Now Install the App for free on your Shopify store.

Step 2: Create a Blank Slider from Slider Revolutions
Now, you are at the Slider Revolution app’s dashboard.
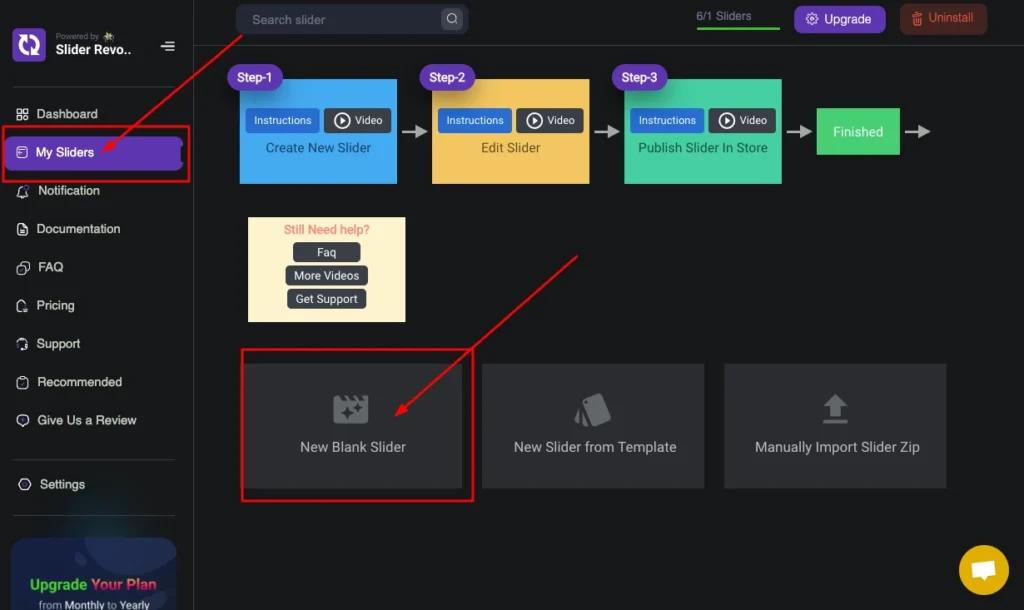
- Click on “My Slider”, here you have 3 options to create a banner image (slider): “New Blank Slider”, “New Slider from Template” and “Manually Import Slider Zip”
- I am starting with “New Blank Slider”, but you can choose a template from 300+ Hero banner templates, or any other sections.
Step 3: Add Image Layer
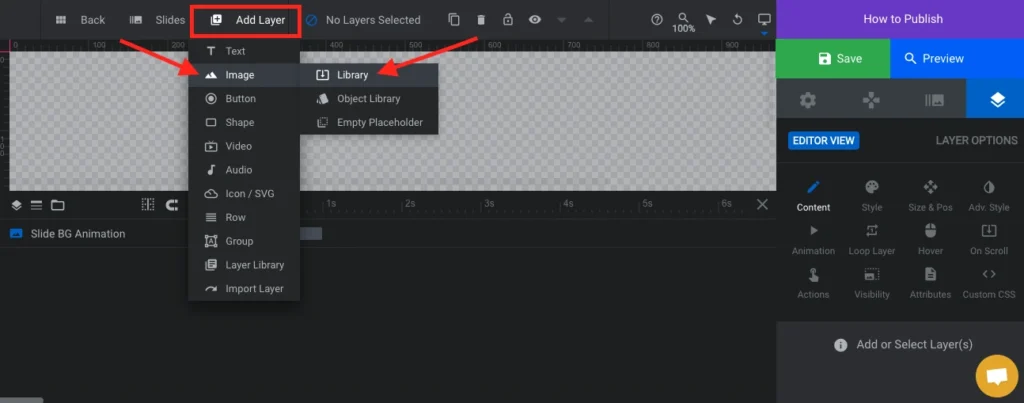
- Hover over to Add Layer > Image > Library from the Slider Revolution App’s dashboard.
Step 4: Upload Banner Image on Slider Revolution App
- Drag and drop, or click on the ‘Image’ to upload your banner image from the computer.
- Now click on the uploaded image and “Select” it.
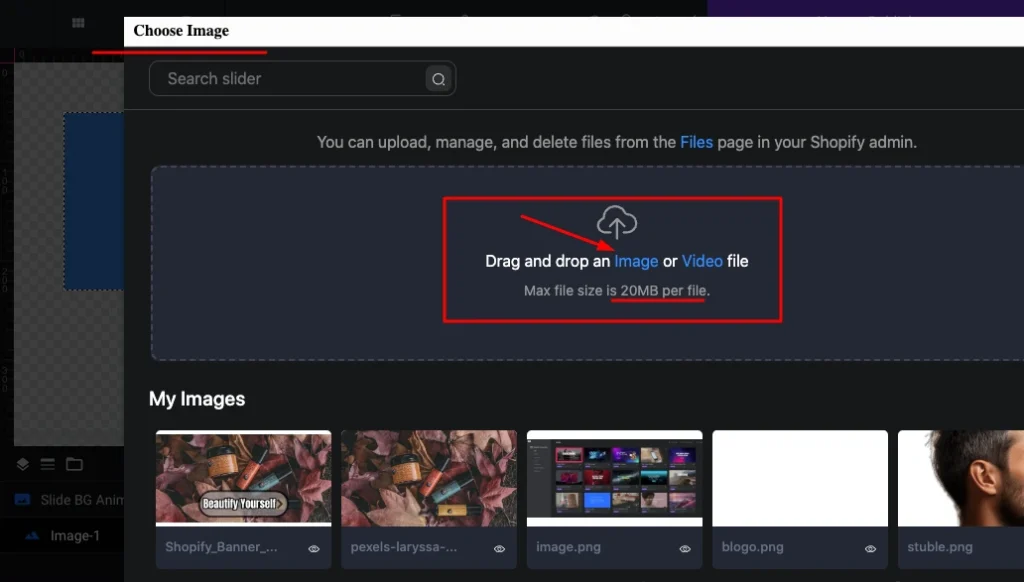
Step 5: Resize and Position the Banner Image
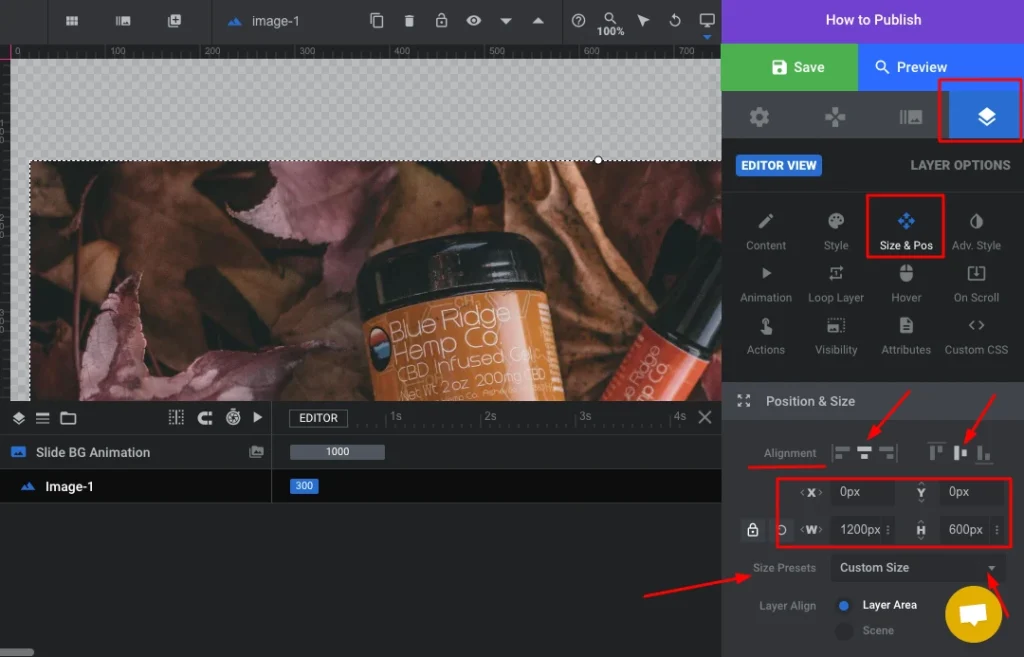
- Click on “Layer Options” > “Size & Pos”
- Now set your customized size or banner width, height, and positions. For example, I have set my banner image size (1200 x 600).
Also, you can explore a lot of custom image settings like alignments, and popular aspect ratios on Shopify from the Slider Revolution App.
Step 6: Save Image Settings and Copy the Shortcode
- Click on the “Module General Options” which looks like the ‘Setting Icon’.
- You can preview the banner image size and then Click on “Save”.
- Copy the Shortcode from the module naming section.
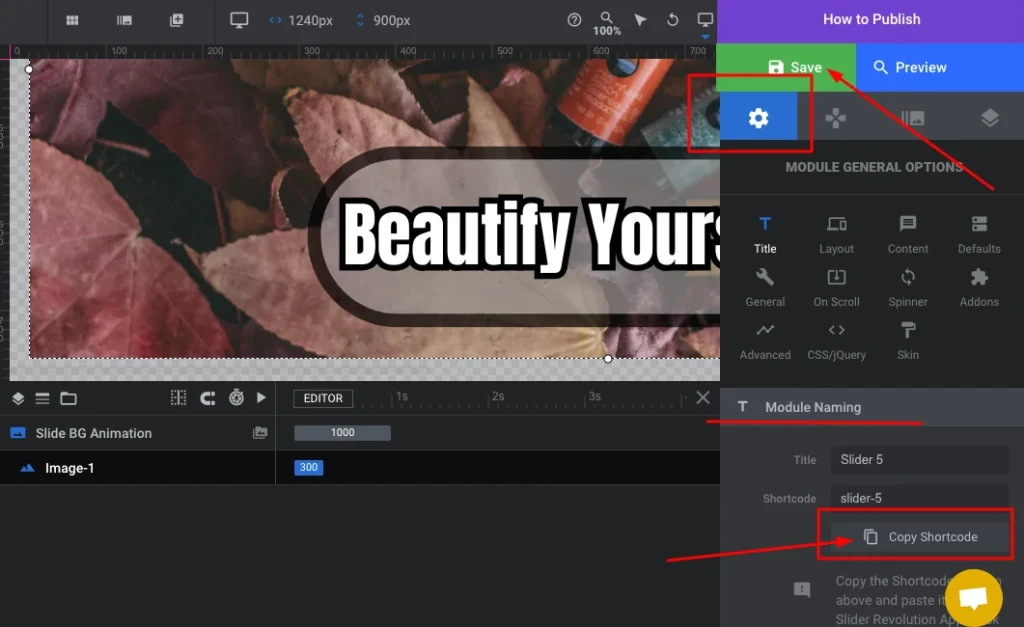
Now you have completed all tasks on the Slider Revolution app to customize the banner image size. But, the App is not activated on the Shopify account and the banner image is not connected to the Shopify dashboard.
Let’s Activate the Slider Revolution App and Connect the Resized Banner Image on the Store.
Step 7: Go to the Shopify Store Dashboard
- Log in to your Shopify store (if logged out).
- Go to “Online Store” from the left sidebar, and go to “Customize”
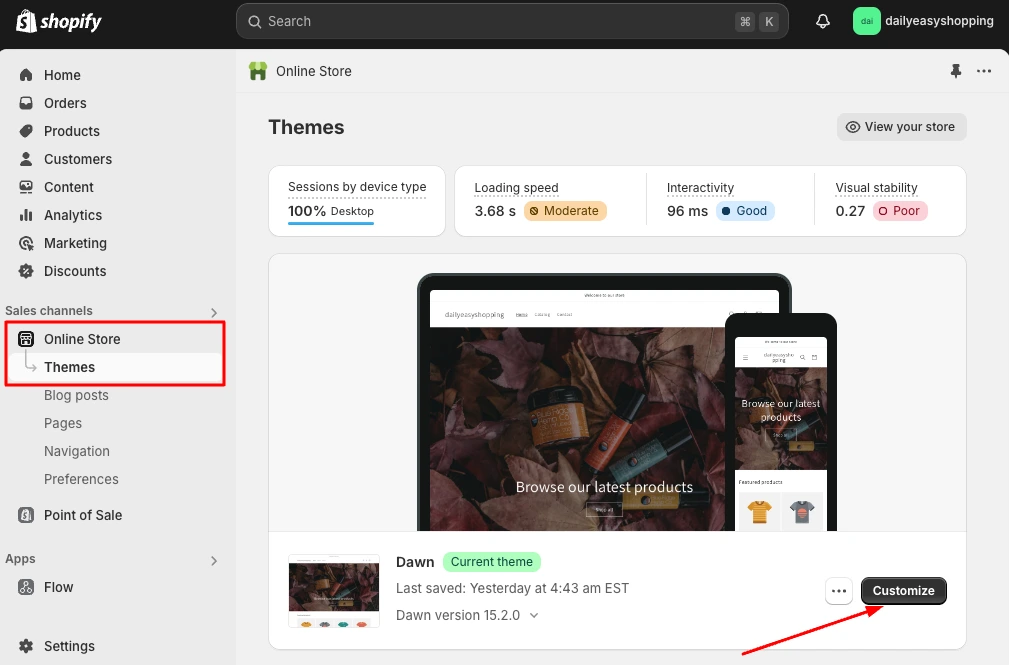
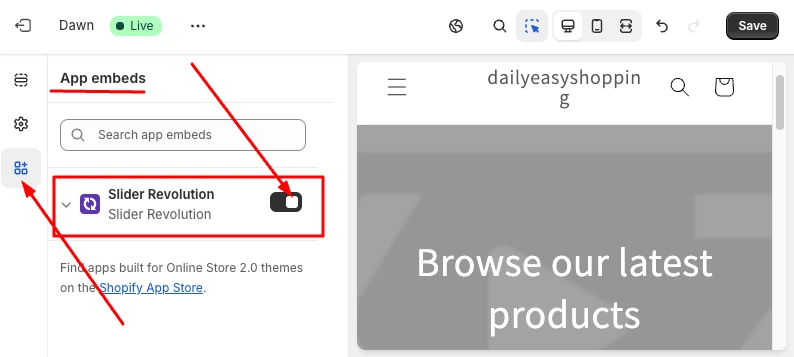
Step 8: Activate the Slider Revolution App on the Store
- Click on the “App embeds” icon at the left upper corner of the dashboard.
- Turn on the toggle of Slider Revolution to activate the app on the store.
- Click on “Save”.
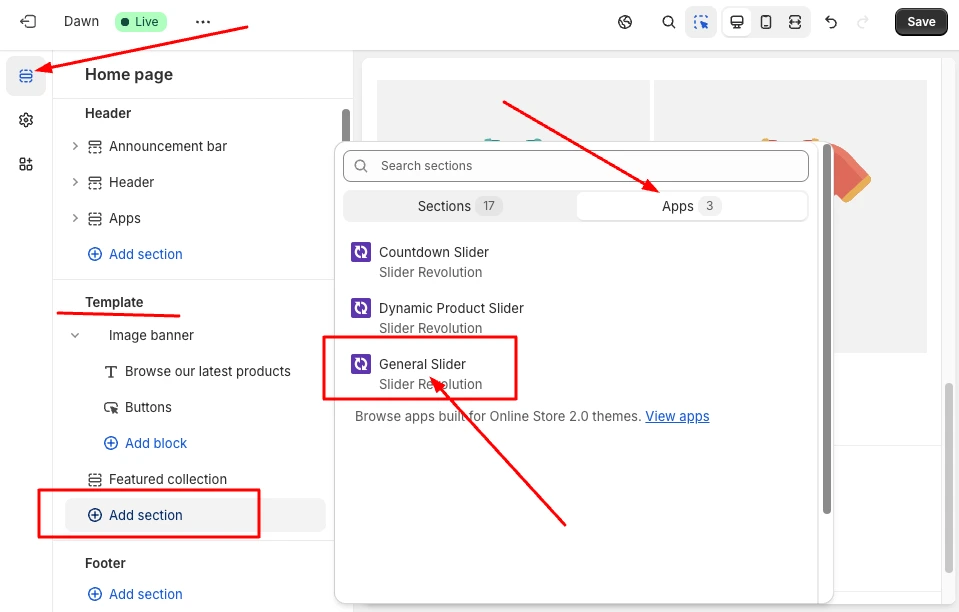
Step 9: Add a General Slider Section from Apps
- Click on the “Section” icon, where you can see your themes sections and positions.
- Navigate to the “Template” Section and Click “Add Section”. Now you can see two tabs ‘Sections’ and ‘Apps’.
- Click on Apps > General Slider.
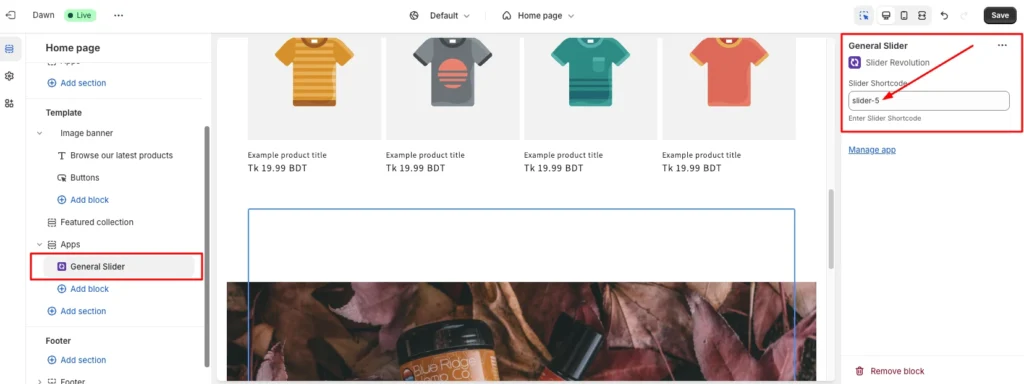
Step 10: Paste the Shortcode of the Custom-Sized Banner Image
- Click on the “General Slider” block under the section ‘apps’.
- Paste the Shortcode (Copied in Step 7), at the right side of the dashboard.
After pasting the shortcode you can see that the custom-sized banner image has been included at the store!
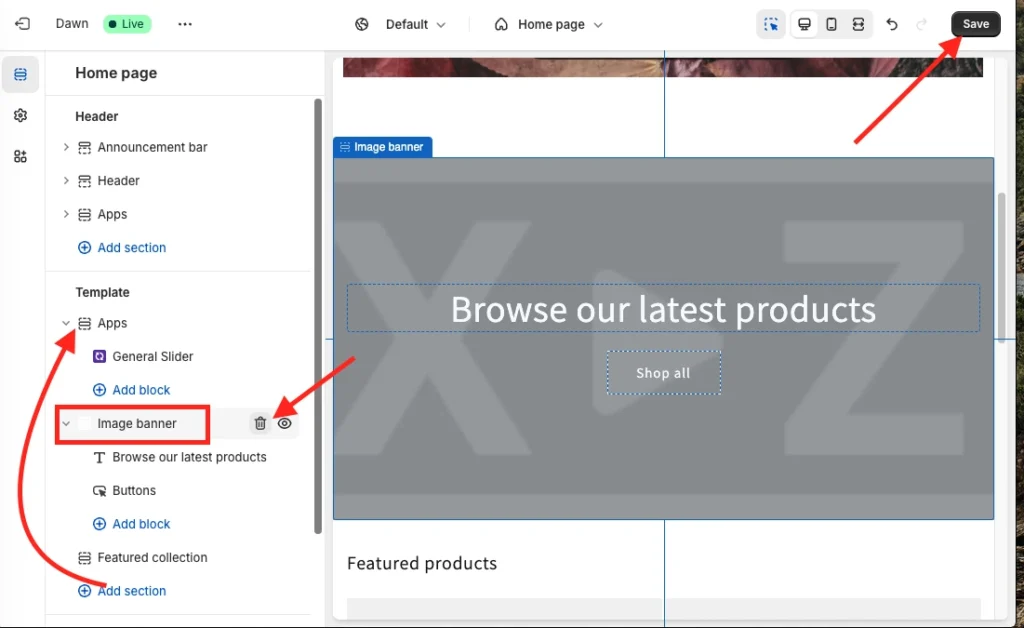
Step 11: Position the New Banner and Delete the Existing One
- Drag the apps block (where banner you have the banner image) at the top of the “template” section.
- Delete the existing banner you have on the store.
- “Save” it.
All done!
Now you can check your custom image banner size on Shopify store-front and it looks awesome!
Conclusion
Now you are at the end of the blog about a comprehensive guide to Shopify banner image size. If you are looking for the homepage banner image size, which is called Hero banner, then the size could be 16:9. It is around 1200-2000 px wide and 400-800 px high for a standard banner image.
Additionally, I have covered different types of banner images on Shopify, and their sizes. Also, you have learned a few expert tips to optimize banner images for your Shopify store. I hope you have found this blog post helpful in creating and optimizing the banner image.
Remember, these standard banner image sizes might not fit properly with your theme. Because the theme’s recommendation does matter for banner image size. Don’t worry, if you use the Slider Revolution App, you can customize the banner image size easily in a professional standard ratio in any theme.
Moreover, the Shopidevs support team will help you in every step to set up your banner image in the Shopify store with a standard size.
FAQs
What Is the Best Banner Size for Mobile Shopify?
1200 x 600 pixels is the best banner size for mobile users on Shopify. This image size maintains quality without slowing load times on mobile devices with a perfect dimension. However, the best banner size for mobile Shopify depends on the banner types of Shopify, and the theme. So, check your theme settings, and the ideal size of your banner image.
Does Shopify Reduce Image Size Automatically?
Yes, Shopify automatically compresses images when you upload banner images or other images to your store. This helps to improve your store’s loading speed and performance. However, it’s still a good idea to optimize your images before uploading them to Shopify. This will help to ensure that your images are as small as possible without losing quality.
Why Does Shopify Reduce Image Quality?
Shopify reduces image quality to improve your store’s loading speed and overall performance. Faster-loading pages with higher visual quality are important for both user experience and SEO. It also reduces bounce rates and can lead to higher conversions by compressing images.
Jakaria is an SEO Content Writer in Shopify, Ecommerce, WordPress, and Tech Industry with 4+ years of experience. He specialises in developing engaging, helpful content by simplifying complex topics into an amazing story for B2B, SaaS, and Shopify businesses. He’s also passionate about staying updated on SEO strategies and Shopify trends.
