Proper product organization on Shopify can improve your customer experience and increase sales significantly. So, you can leverage it by showing relevant and organized products to the visitors. But, do you know how to organize products on Shopify effectively?
You need to log in to Shopify > Products > Collections > Create a “Manual” collection page to organize products static way. Then you can use the “Smart” collection to apply conditions and showcase products automatically. Moreover, you can use apps like Easy Display – Product Showcase app.
Let’s explore 3 different methods to help customers find what they want faster.
Why Shopify Product Organization Matters
A well-organized Shopify store enhances customer experience, simplifies inventory management, and boosts sales. Organized products make it easier to find the products that your customers need. Now check these 5 reasons why Shopify product organization matters:
- Enhanced Customer Experience: A clutter-free store with easy-to-find products leads to satisfied customers.
- Improved Search Functionality: Well-organized products make it easier for customers to find their needs.
- Increases Conversion Rates: Clear organization encourages customers to make faster purchasing decisions.
- Increased Customer Loyalty: Happy customers are more likely to return and recommend your store to others.
- Boosts SEO Performance: Proper categorization helps search engines rank your store better.
Additionally, it will simplify your inventory management by easier tracking and updating product details. And, it can stronger your brand image and credibility by reflecting your store positively.
Understand Basics Before Organize Products on Shopify
Before organizing your Shopify store, it’s important to know the basics of how you can do it. Shopify provides helpful tools like Shopify collections, tags, meta fields, etc. to arrange your products in the store. Let’s get familiar with these options which may required to showcase your product more organized.
Collections
Collections on Shopify are groups of similar products for easy browsing experience on the store. You can create collections based on themes, categories, or customer interests in different ways. Shopify offers different types of collections that help customers browse and find what they need quickly.
Simple Collection
A simple collection is a basic collection, like “New Arrivals” or “Black Friday Sales”. Most of the small stores of Shopify have at least a few of these types of collections to showcase their offer or announcements.
Nested Collections or Sub-Collections
Nested collections means one or multiple collections under a main category or collections. For example, under “Men’s Clothing,” you can have “Shirts” and “Shoes.” This works well for stores with large inventories and adds them to the navigation menu bar.
Discounted Collection
Discounted collections automatically gather items on sale by following conditions. They’re perfect for highlighting deals and attracting buyers who are looking for deals. For example, a fashion store like Zara offers 60% off under “Tops,” “Bottoms,” and “Dresses” until Black Friday. Here, they can use the discounted collection to organize all products with 60% off.
Tags
You can use specific tags or levels for the same types of products. Then you can arrange all products into a collection list by a specific tag. Suppose you have a “Black Friday T-Shirt with Green Color”, Now you should add tags like ‘Green’, ‘Black Friday’, and T-Shirt’. So that anyone can easily find it by their preferred color (green), or seasonal sale (Black Friday) tags.
Metafields
Metafields allows you to add extra information on the store about products that aren’t included in Shopify’s default fields. For example, you are a skincare business owner. Now, you have a product, that is only for “Oily Skin”. Here you can add a section for “Skin Type” using the metafield. So that customers can make informed decisions before buying any products.
Vendor
The “Vendor” field allows you to group products by brands or supplier names. This is a very helpful tool for multi-vendor Shopify stores. Imagine, you have products from ‘Gucci’, ‘Prada’, ‘Armani’, and more brands in your store.
Now a loyal customer of Gucci has clicked on a Gucci belt, he/she might purchase it or might interested in exploring more belts. So, you need to show them more products only from “Gucci” brands. You can do it by using the “Vendor” option of Shopify to organize products.
Also, you can organize products more specifically based on the information, and it will help to increase your sales. Now, we will explore how you can do it for free in different ways from basic to advanced levels of features.
How to Organize Products on Shopify Manually
This is the easiest method to organize your products on the Shopify store. Let’s dive into 5 steps of how to organize products on Shopify manually for a static collection page:
Step 1: Login to Your Shopify Store
- First, log in to your Shopify account and your store dashboard admin panel.
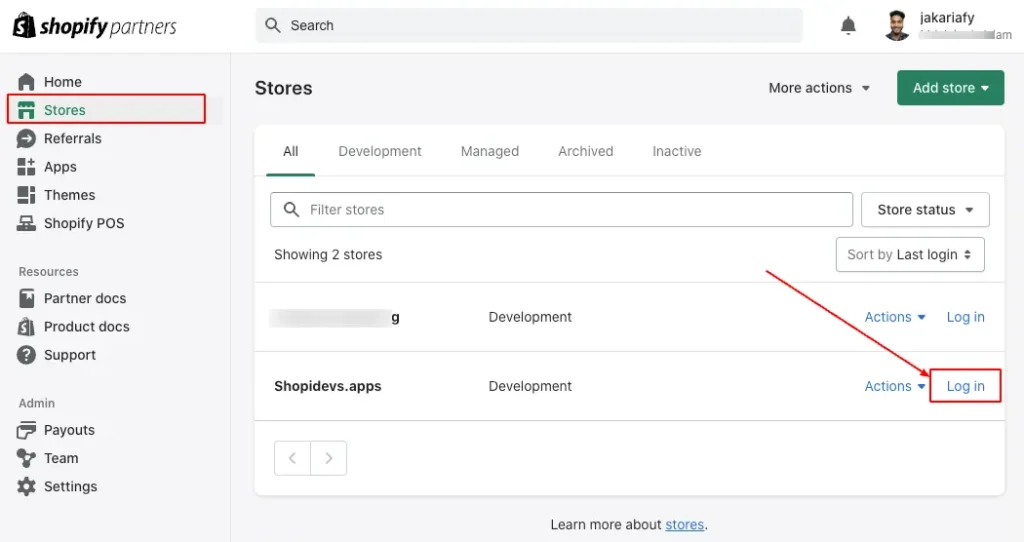
Step 2: Create a Collection to Organize Products Manually
- Go to “Products” from your Shopify store dashboard.
- Click on “Collections”.
- Here you can see the “Create Collection” button, click on it.
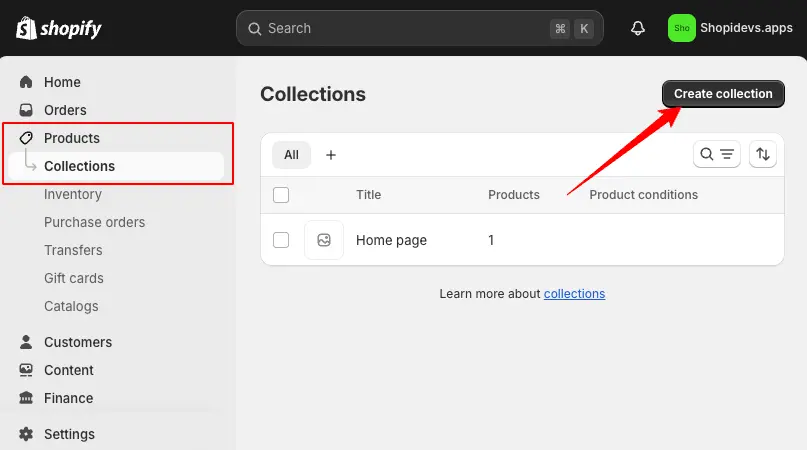
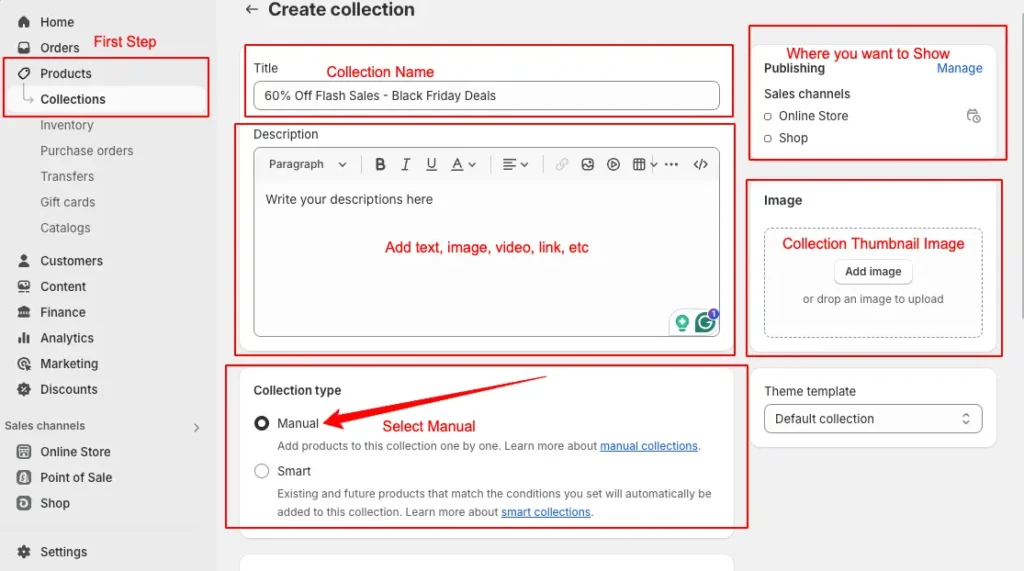
Step 3: Create an Identity for the Manual Type Collection
- Now provide the collection name on the ‘Title’ field.
- Write about your collection in the ‘Description’ field. Here you can add videos to Shopify or add text, images, links, and everything.
- Select the collection type “Manual” to organize products manually in this collection.
- At the right sidebar, you can manage where you want to publish this collection.
- Finally, select an image that will be the collection thumbnail that appears on this collection on the “All Collection” page.
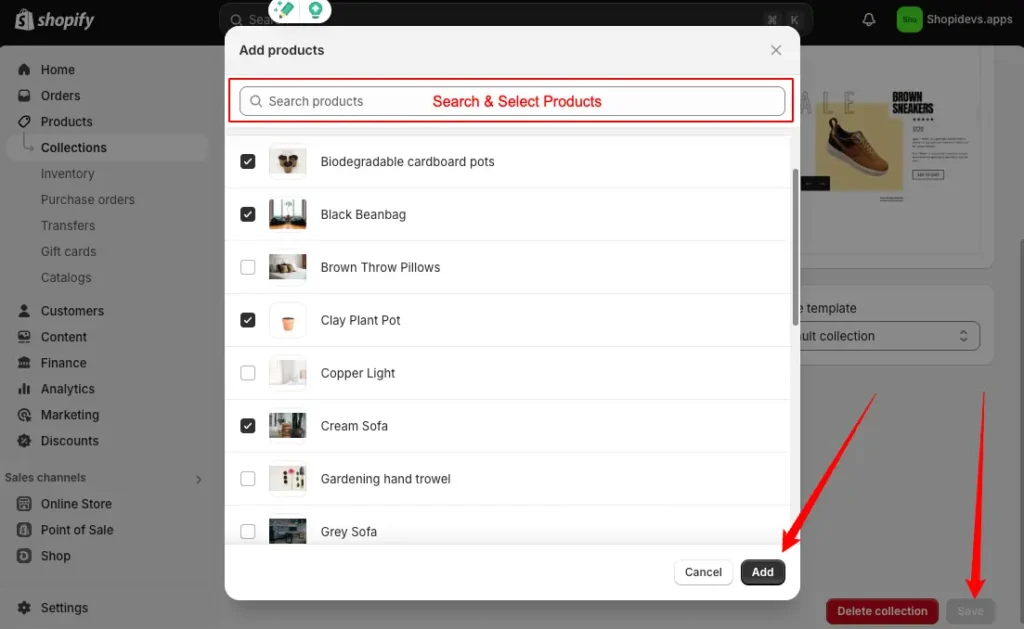
Step 4: Add Products to the Collection and ‘Save’
- Scroll down below, you can see the “Products” section.
- Here you have the option “Browse Products” to add specific products to this collection.
- Now search for products to organize and select all the products that you want to add to this collection.
- Then click on the “Add” button to organize these products on the collection page.
- Now, you can add the “Search Engine Listing” by adding the collection page Title, Meta Description, and custom URL. It will help to increase organic search visibility for your organized products.
- Then “Click on the Save” button to save everything you have done on this page.
Step 5: Final Output of Organized Products on Shopify
- All sets! Now check your storefront, you have successfully organized your products in the store.
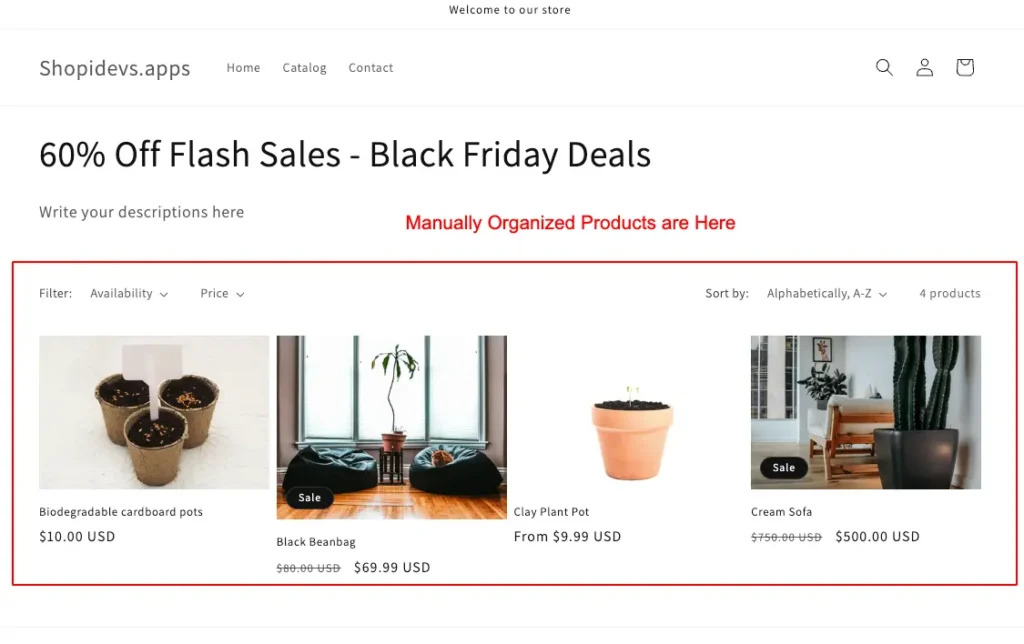
By following these 5 steps, you can manually sort products in Shopify within 15 minutes. So, why late? Let’s rearrange your products and make them more relatable to the audience and boost sales.
But what if you want to organize products based on specific requirements, like products for $50+ or products with deals now? Let’s explore the automatic filter and organize products on Shopify.
How to Organize Products on Shopify Automatically
Suppose, you want to organize products of specific types of products, or products with $70+ price, or arrange products with discounts. Now you can’t do this by selecting products manually, especially when you have a lot of products.
That’s why Shopify offers to organize products automatically by using conditions. Here is the step-by-step guide on automatically filtering and sorting products on Shopify.
Step 1: Login to Shopify Store Dashboard
- First thing first, you need to log in on the Shopify store dashboard in this step

Step 2: Create a New Collection
- Then click on “Products>Collections” then click on the “Create Collection” button.

Step 3: Naming the Collection for Automatic Sorting Products
- Now provide the collection name on the Title field.
- Provide detailed descriptions of the collection, including links, videos, images, etc.
- You can select a thumbnail image for this collection to highlight your collections.
- Then Select the Collection Type “Smart” to sort and organize products automatically.
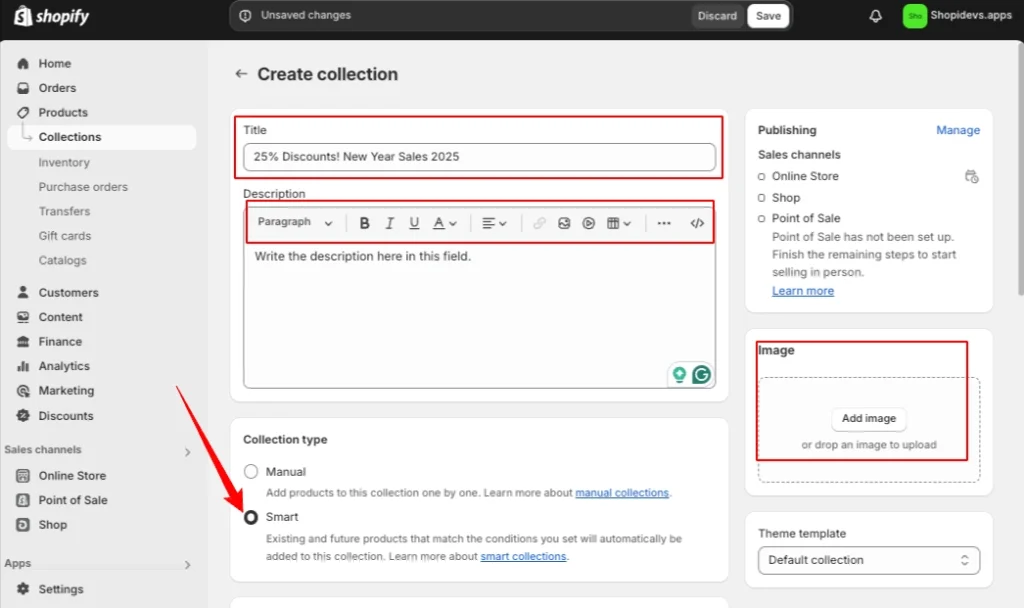
Step 4: Apply Conditions to Organize Products on Shopify
I want to organize products whose prices are greater than $25. So, I have selected the “‘Price’ ‘is greater than’ ‘$25’”.That’s why I have set the condition you can see in the screenshot below.
- Here you can add one or multiple conditions, and organize products by matching all/any conditions.
- You can add different conditions based on your inventory stock, vendor name, product name, category, tags, etc.
So, customize the condition based on your requirements and click on the “Save” button.
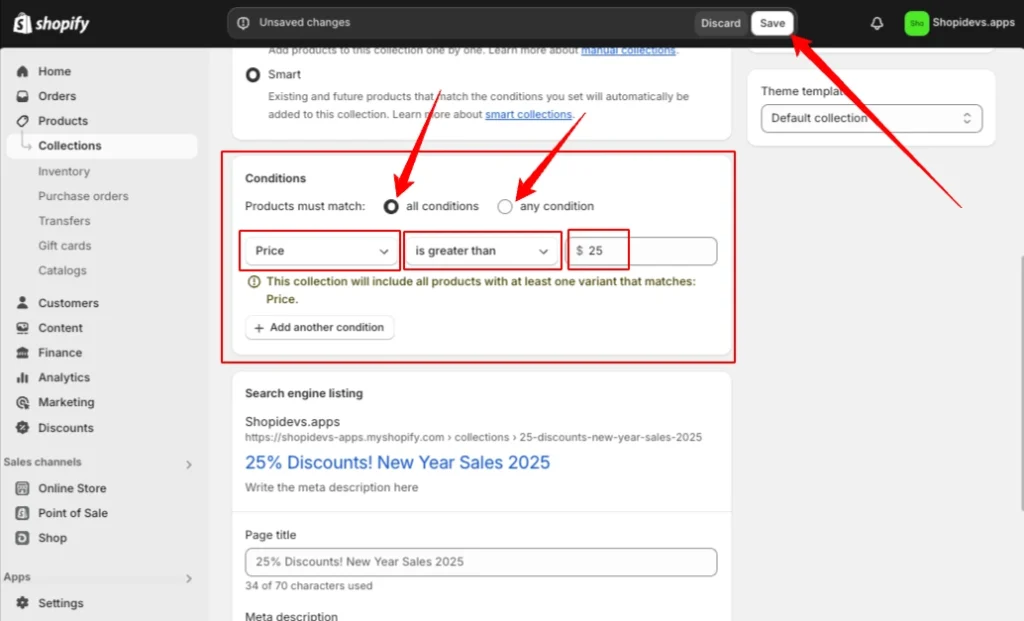
Step 5: View the Storefront of the Filtered Product
- Now check your storefront that, your every condition is working perfectly.
As you can see here, I had set the condition for the price to be greater than $25. Yes, At the storefront, I have filtered the price from “Low to High” and the first product’s price is greater than $25.
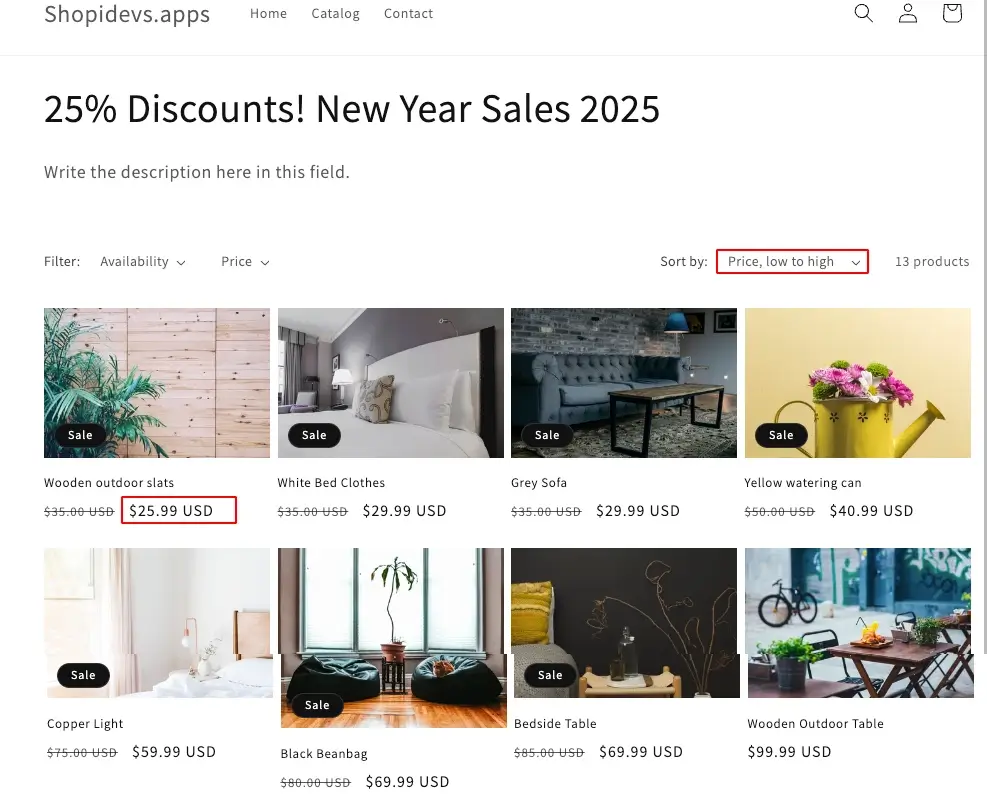
By following these 5 steps, you can automate the product organization on Shopify by applying different conditions. Yes, here you can organize products by using tags, vendors, prices, stocks, etc. But if you want to add best-selling products, recently viewed products, or discounted products, then the next method is only for you.
Advanced Product Organization Techniques Using Apps
With this advanced product organization method, you can re-design your store to the next level. Here you can arrange products by sorting best-selling products, adding hover images and effects on products, video options, recommended products, etc. So, let’s organize products on Shopify using the Easy Display Product Showcase App:
Step 1: Login to Your Shopify Store Dashboard
- Start by logging in to the store dashboard by using your username and password.

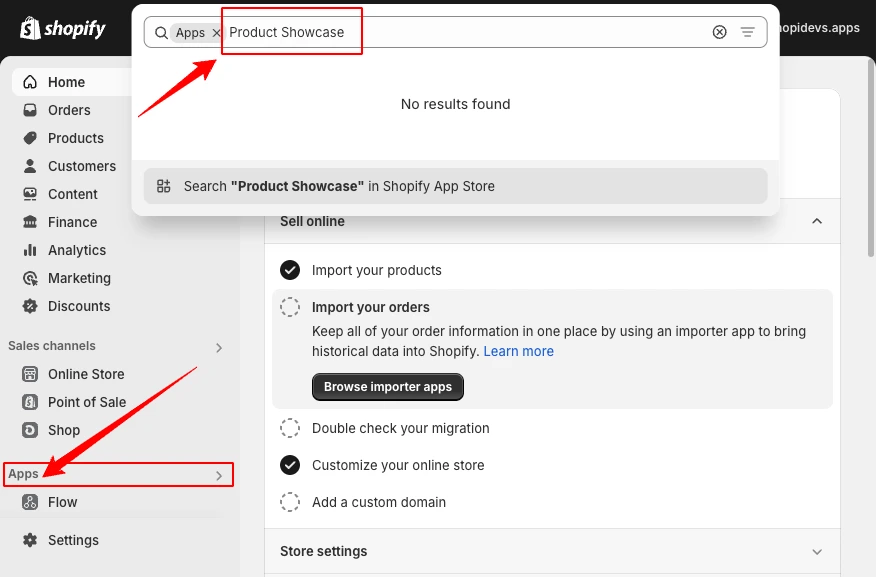
Step 2: Search for “Product Showcase” App
- Click on the ‘Apps’ from the left sidebar of the Shopify dashboard.
- Search for “Easy Display: Product Showcase” or click on this link I have provided.
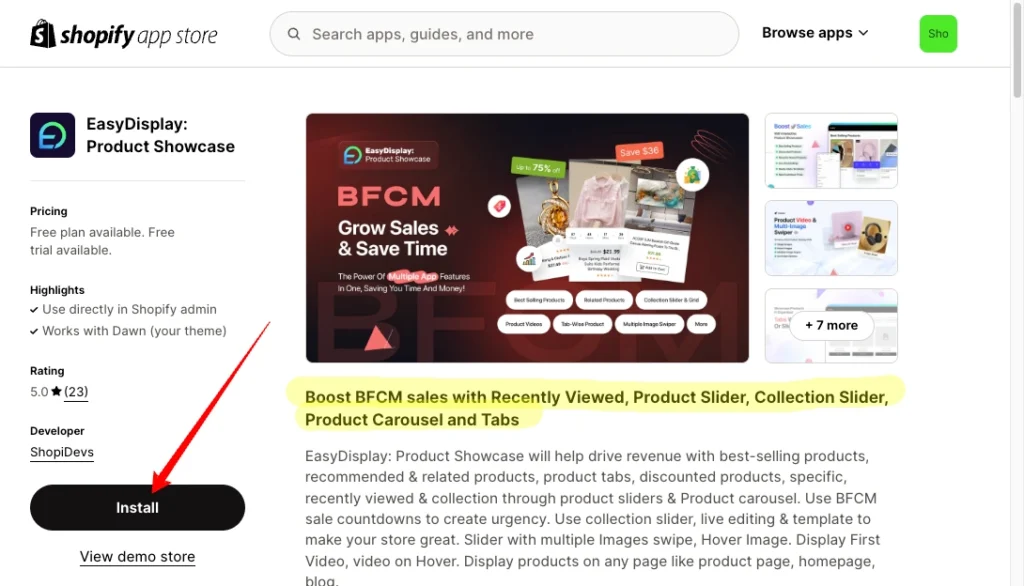
Step 3: Install the “Easy Display: Product Showcase” App
- Click on the “Install” button of the product showcase app. Also, you can check out a lot of advanced features and templates in this app for free.
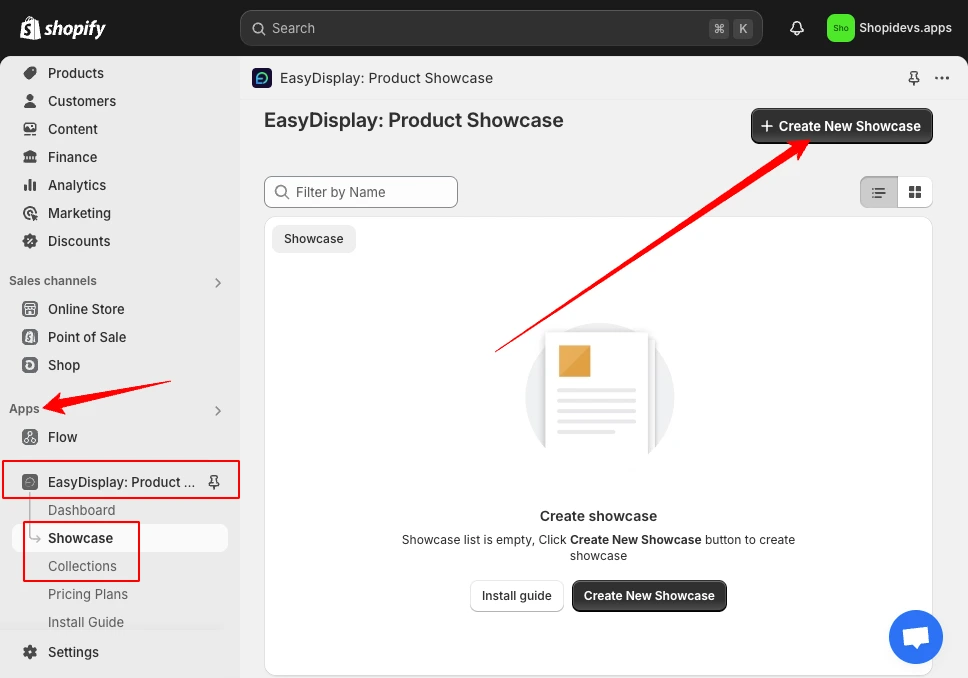
Step 4: Create a New Showcase on the ‘EasyBoost’ App
- Click on the Easy Display Product Showcase App.
- Then click on “Showcase”, under the ‘Dashboard’, here you can see all the showcases you have created. As you have just installed the app, there is no existing showcase.
- So, click on the “Create New Showcase”, button.
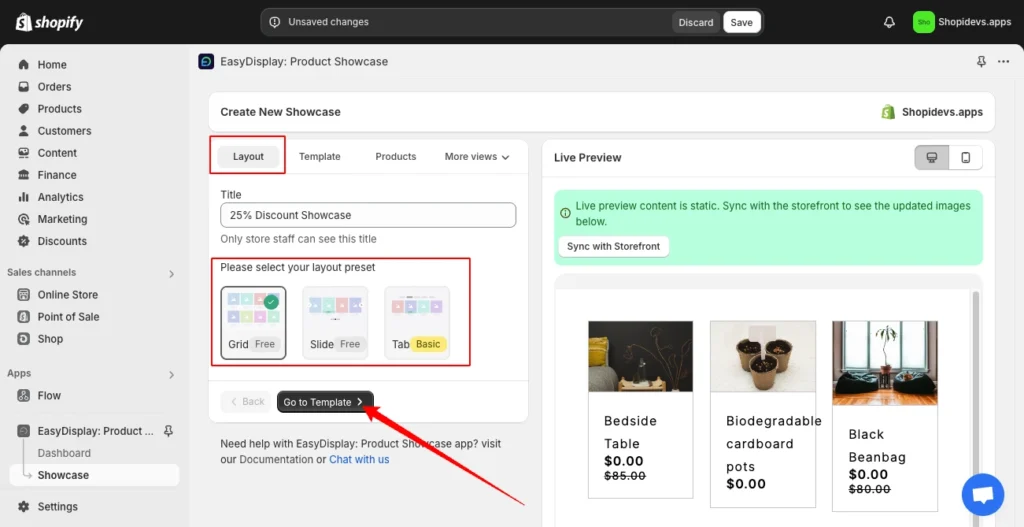
Step 5: Choose a Layout for Organizing Products
Here you will have a different pre-designed layout of how you want to showcase your products on Shopify.
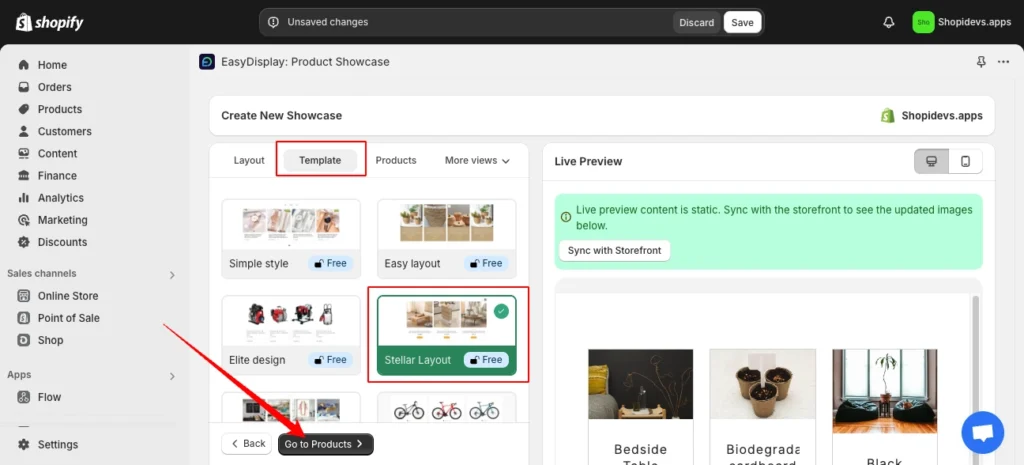
- Select a layout and go to the next ‘Template’ section.
Step 6: Choose a Template to Showcase Image
- Now you have different types of templates, select a template from these. Also, you can modify and customize these templates based on your preference.
- Click on the “Products” section.
Step 7: Organize Products and Customize Them
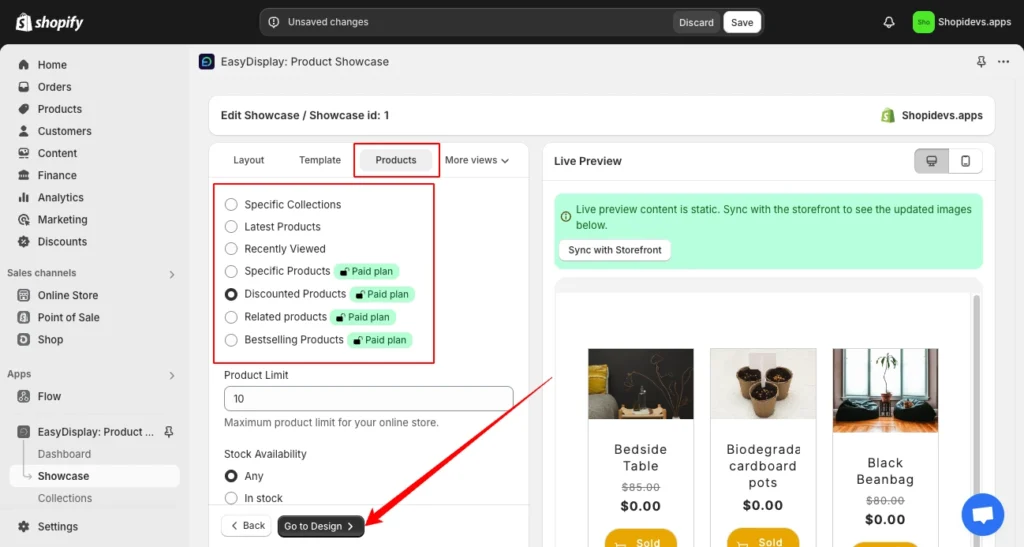
In this section you select the source of your products in this products showcase app.
- If you want to add specific collections, then click on the “Specific Collection” select your collection page.
- Also, you can “Latest Products”, “Recently viewed products”, “Related Products”, “Best-selling Products”, etc.
- Then scroll down below, and sort products based on ‘Price/Title/Date’, ‘In stock, or all products’, etc.
- After setting all products perfectly, you need to click on the “Design” section.
Step 8: Design Product Showcase & Settings
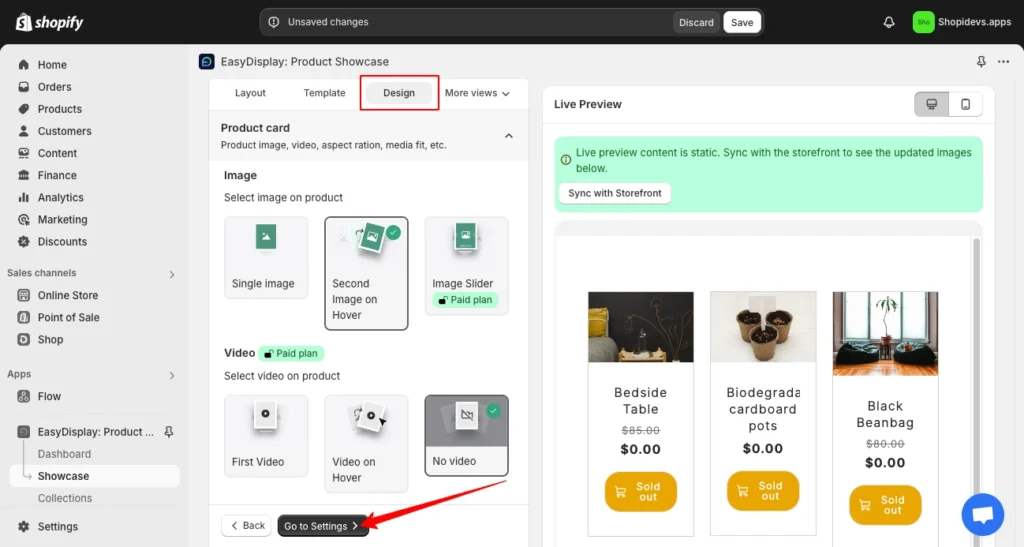
You have a wide range of designs and customization options to organize your products and look attractive.
- Select a static image, a second image on Hover, or an Image Slider on the Paid Plan.
- You can add videos to your products to make them more engaging.
- Then select the best image size for Shopify for your products using the product showcase App.
- Enter the number how much sliders you want to show for products.
- Then you can customize the title color, hover color, button color, countdown option, rating integration, and many more options.
- After that go to the settings section and set how many products you want to show for Mobile, Desktop, and tablet.
Step 9: Copy the Product Showcase ID & “Save”
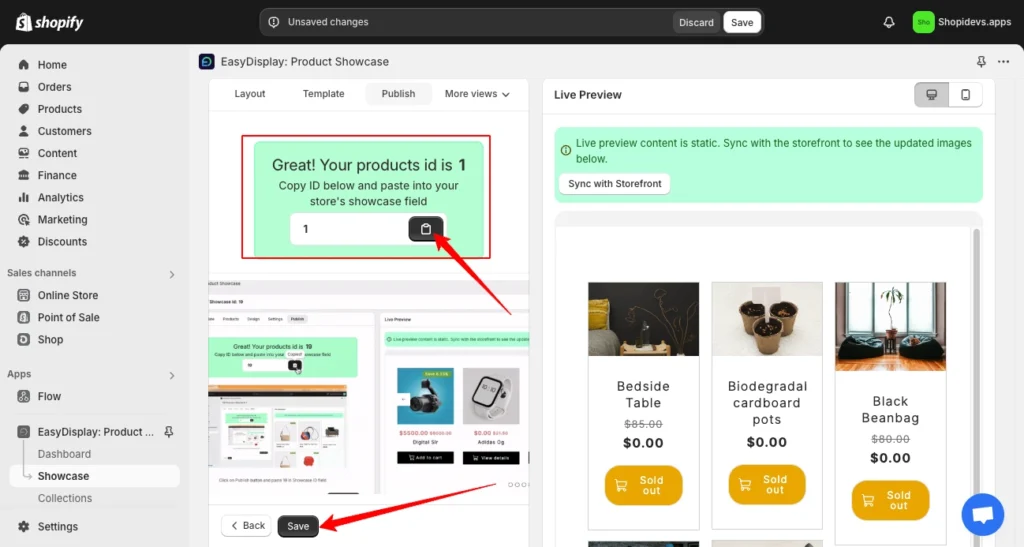
- Click on the “Go to Publish” button.
- Then copy the Product/Showcase ID from this page, for example, my product ID is ‘1’ here.
- Click on the “Save” button.
Step 10: Activate the Easy Display App
- Now go back to the Shopify theme editor option from the “Shopify Dashboard > Online Store > Customize”.
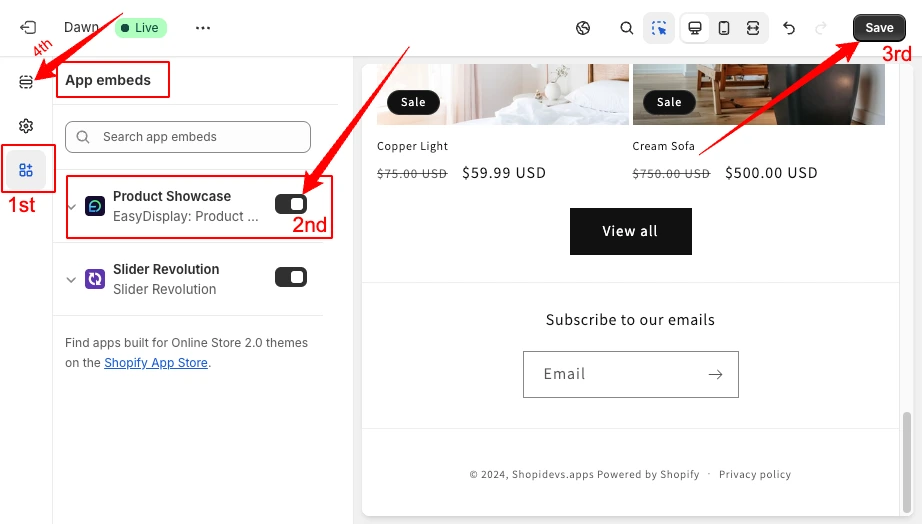
- Click on the “App embeds” icon then Activate the “Products Showcase” App on your store.
- Click on the “Save” button.
- Go back to the section editing option by clicking on the “Section Icon”.
Step 11: Add ‘Product Showcase’ Section
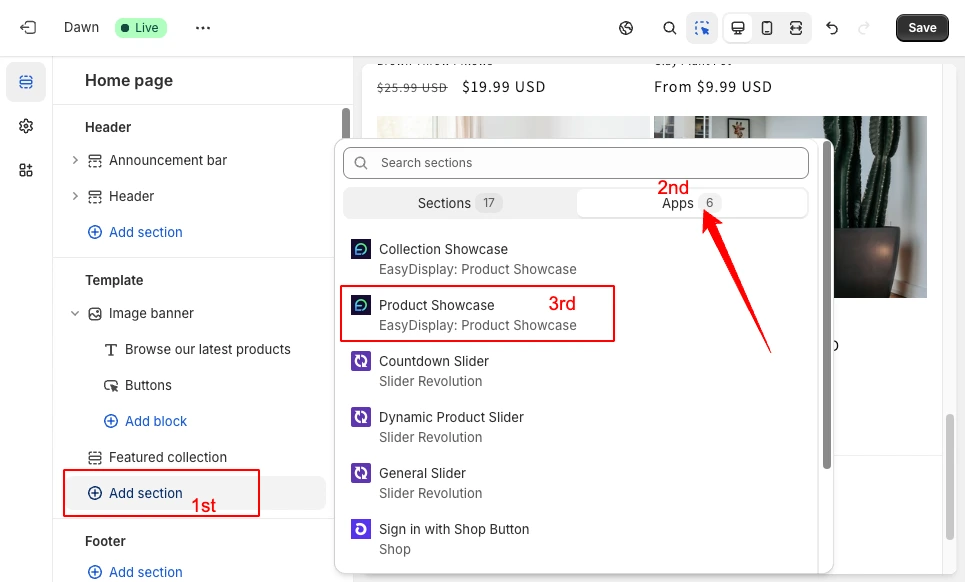
- “Add a new section” where you want to organize your products on the Shopify store.
- Click on the “Apps” section.
- Then “Click on the Product Showcase”, but if you want to show the collection page with this app and set product source ‘collection’ on the showcase creation, then you need to click on “Collection showcase”.
Step 12: Paste the Showcase ID and ‘Save’
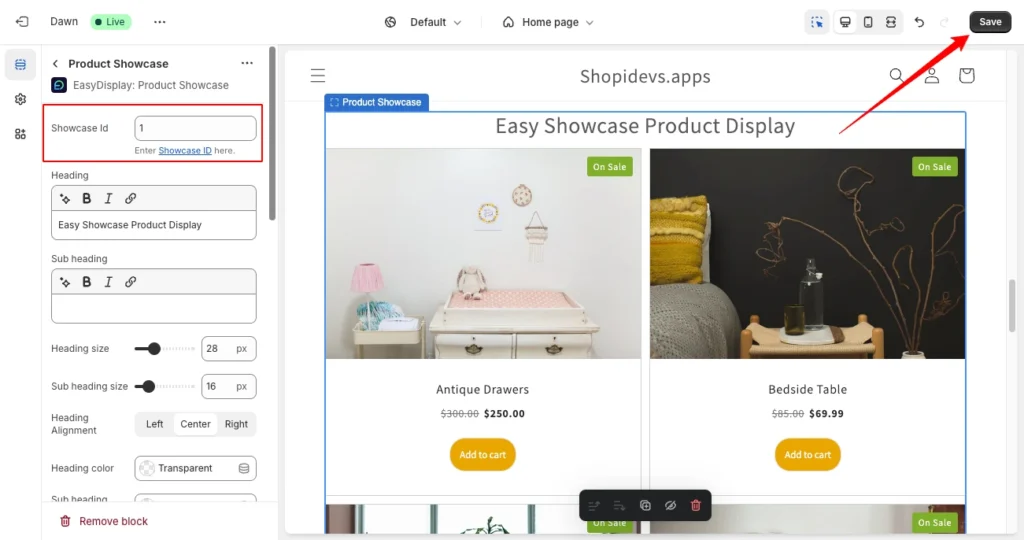
- Paste the “Showcase ID”, that you have copied in ‘Step 9’.
- Then you can add a heading for this organized products section, including a sub-heading. Also, you can customize their size and position.
- Click on the “Save” button.
Step 13: View the Storefront to See Organized Products on Shopify
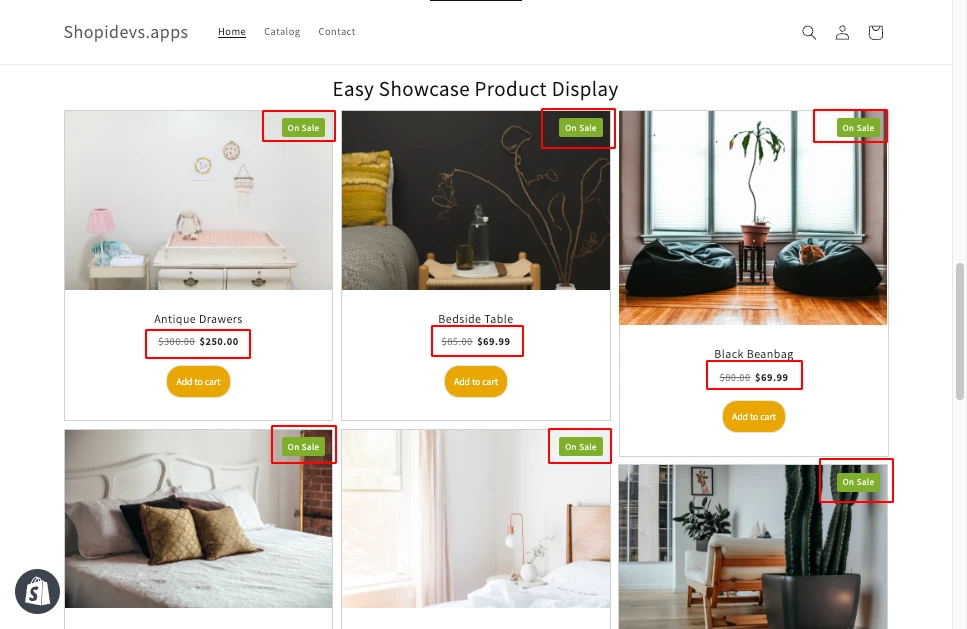
- Visit your store where you have organized products.
- Congratulations! You can see the all discounted products here in this organized products section.
I hope you can also organize by following this step-by-step guide to enhance your user experience of the store and increase sales. If you have any issues organizing products using the Easy Display Products Showcase App, contact our support team.
5 Common Mistakes to Avoid to Organize Products on Shopify
We organize products to enhance the user experience in the store and increase sales. But sometimes, visitors might feel irritated by a few mistakes. Now I will provide a few mistakes that we found commonly in our Shopidev client’s store.
Overloading Collections
Too many products in one collection can overwhelm customers. Suppose, you have 50 products in the “Clothing” collection, the customer will not be interested in exploring 50 products, right? So create sub-collections like “Women’s Tops,” “Men’s Bottoms,” and “Kids’ Wear” to make it more organized.
Poor Tag Management
Adding too many tags can confuse customers and search engines and it looks non-professional. On the other hand, not using tags can limit your customers to search and filter products. So maintain a balance of the number of tags and specific relevant tags.
Ignore Mobile Optimization
Customers often shop on their phones, so a well-organized mobile experience is crucial. That’s why you need to ensure your product organization is mobile-friendly.
Neglecting SEO-Friendly Organizations
SEO optimization for Shopify stores can increase significant visitors and sales to your store. Though there are many things you need to optimize, basic titles, meta, tags, and URLs, are so important. Also, you can use alt text for images and lazy load using Slider Revolution & Section App, which is very effective for your store.
Not Grouping Products Perfectly
You need to group your products logically and intuitively. Here you should understand the intention of your target customers. Then, you can consider actors like product type, brand, color, size, gender, etc to organize products.
If you keep in mind these 5 mistakes that other storeowners make, you will be five steps ahead of them.
Conclusion
Now you’re at the end of the article “How to organize products on Shopify”. You know how important the perfect product organization is to create a smooth shopping experience. Also, it is very important for boosting customer satisfaction and increasing sales.
In this article, I have provided how you can sort, filter, arrange, and organize products on the Shopify store. Here, you have 3 different ways to organize products on the Shopify store.
First, you can add products by creating a collection and selecting products manually. Second, you can create collections and add products automatically by applying conditions like price, name, product types, etc. The final one organizing products by using the Easy Display Product Showcase App.
In this app, you can organize products by using multiple advanced conditions like best-selling products, related products, recently viewed products, etc. Also, there are a lot of design and customization options are there to increase sales.
FAQs
How Do I Group Products Together on Shopify?
You can group your products together on the store by using ‘Collection’ on Shopify. Here is how you can do it:
- Log in to your Shopify admin and go to Products > Collections.
- Click Create Collection and give it a name, description, featured image, and URL.
- Add products manually or set conditions (like product type, tags, or price) to include items automatically.
- Save your collection, and it will appear in your store.
Example: Create a “Winter Sale” collection to group discounted winter items.
How to Rearrange Products on Shopify?
You can easily change the order or Rearrange products on Shopify in a collection:
- Go to Products > Collections in your Shopify admin.
- Open the collection you want to rearrange.
- Use the Sort dropdown menu and select Manual.
- Drag and drop the products into the order you want.
- Save your changes to update the order on your store.
Example: Place your best-selling products at the top to grab attention and boost your sales.
How to Edit Collections on Shopify?
You can edit collections on Shopify very easily:
- In your Shopify admin, go to Products > Collections.
- Select the collection you want to edit.
- Update the name, description, URL, product order, or conditions for adding products automatically.
- You can also upload a new featured image for the collection.
- Save your changes, and the updates will reflect on your store. Example: Change the description of a “Summer Sale” collection to highlight new discounts.
Example: Change the description of a “Summer Sale” collection to highlight new discounts.
Jakaria is an SEO Content Writer in Shopify, Ecommerce, WordPress, and Tech Industry with 4+ years of experience. He specialises in developing engaging, helpful content by simplifying complex topics into an amazing story for B2B, SaaS, and Shopify businesses. He’s also passionate about staying updated on SEO strategies and Shopify trends.


