Static banners may not engage with users, which can reduce potential clicks and sales on your Shopify store. But you can turn your simple static banner into a powerful, clickable hero section that can enhance engagement and boost conversions. Now the question is, ‘How to make image banner clickable on Shopify?
You have two options for making your static banner into a clickable image banner section. First, adding custom code requires advanced Shopify coding knowledge. Second, using Slider apps like Slider Revolution without any technical knowledge.
- Using Custom Code (Recommended for Technical Person or developer).
- Using Slider Revolution Shopify App (Recommended for Everyone).
In this article, I’ll provide step-by-step guides for both methods (custom code & Shopify app). Additionally, you will have access to free resources, such as custom code from the Shopidevs expert team. So, without further delay, let’s dive into the process for adding links to an image banner in Shopify.
13 Steps to Make a Clickable Image Banner on Shopify for Free
While there are several methods to make your Shopify banner image clickable, adding a bit of code can be a good solution. Worry not, here you don’t need to generate code to make it clickable. I will provide everything for free, so let’s dive into the process:
Step 1: Log in to Your Store Dashboard
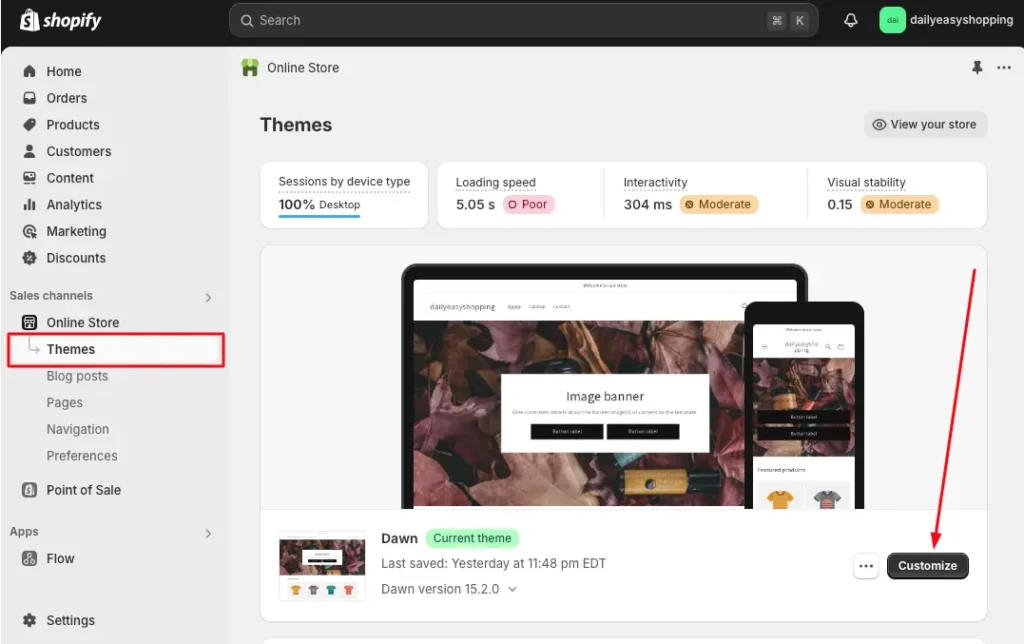
- Log in to your Shopify Store dashboard.
- Go to ‘Online Store’ > Themes > Customize.

Step 2: Delete Existing Links (Button, Heading, or Text)
Now, hover over the image banner heading, text, and buttons to delete the existing button, heading, or text links under the image banner section in the left sidebar. Then “Save” it; be careful, you shouldn’t delete the “Image banner” section.

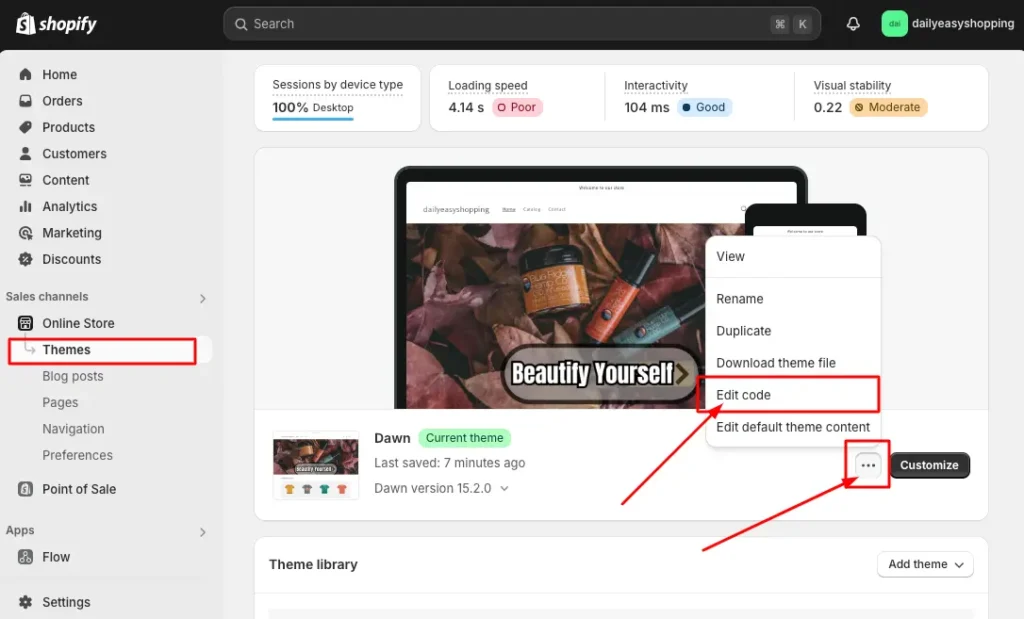
Step 3: Go to ‘Edit Code’ Option
Now exit ‘Customize’ and go back to ‘Theme’
Click on the 3 dots (…) menu, to the left of the “Customize” option.
Go to the “Edit Code” option to add the clickable banner image code. (I recommend downloading the Theme File for backup purposes if something goes wrong.)
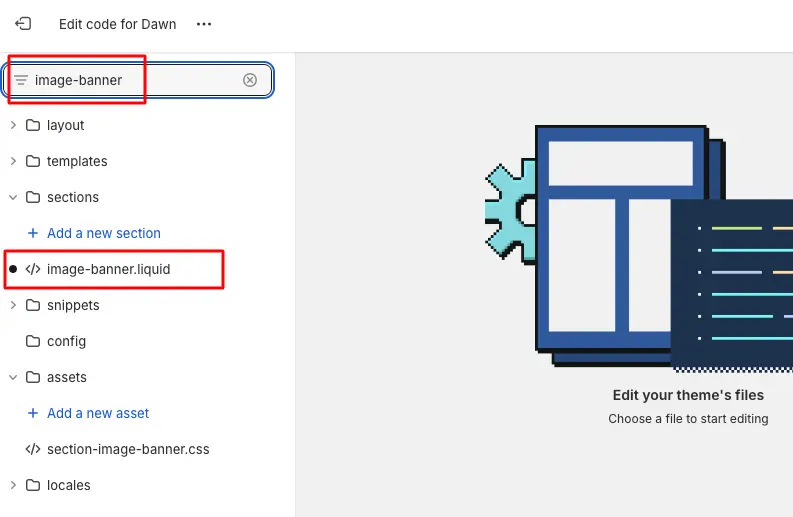
Step 4: Search for ‘Image-banner.liquid’
Most likely, you are on the image-banner page because of the recent edits. If you aren’t on this page,
Search for ‘image-banner’.
Select the ‘image-banner.liquid’ file to edit the file.
Step 5: Copy the CSS Code Below
{% if section.settings.banner_bg_link != blank %}
  {%- style -%}
    .hero-banner-full-link {
      position: absolute;
      left: 0;
      top: 0;
      width: 100%;
      height: 100%;
      z-index: 2;
    }
    .banner .banner__content .banner__box{
      z-index: 9;
    }
    .hero-banner-full-link {
      display: block !important;
    }
  {%- endstyle -%}
{%- endif -%}Step 6: Paste the CSS Code After a Style Tag
Find out a Style tag {%- endstyle -%} and paste the CSS code you have from Step 5 after any one CSS tag.
Step 7: Copy the Liquid Code
{% if section.settings.banner_bg_link != blank %}
  <a class="hero-banner-full-link" {% if section.settings.banner_bg_link_open_new_tab %}target="_blank"{% endif %} href="{{ section.settings.banner_bg_link }}"></a>
{% endif %}Step 8: Paste Liquid Code under
- Search for “banner__box” to find out the content banner section <div>.
- Go to the end of the <div class=”banner__box”> section.
- Paste the liquid code after the closing of the banner box section.

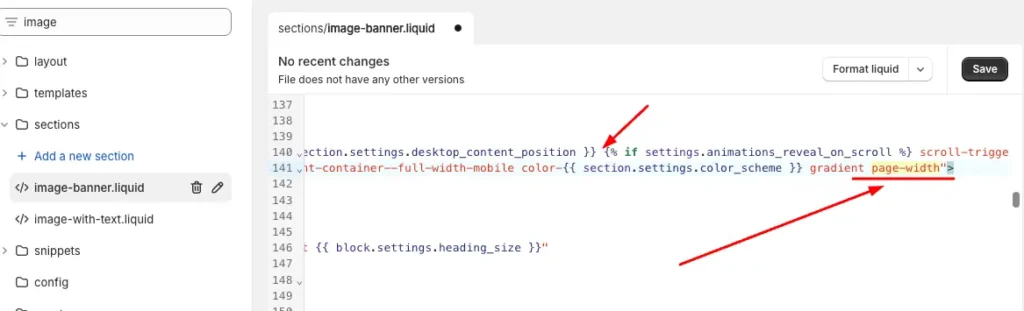
Step 9: Cut the Class Name ‘page-width’ and Paste it to the next <div>
- At the first line of the “banner__box” div, you will find the class “page-width”.
- Cut the “page-width” class from the first div (where it is now).
- Paste it into the next div.
Step 10: Copy the Schema JSON Code
{
  "type": "header",
  "content": "Background link"
},
{
  "type": "url",
  "id": "banner_bg_link",
  "label": "Banner background link"
},
{
  "type": "checkbox",
  "id": "banner_bg_link_open_new_tab",
  "default": false,
  "label": "Banner background open a new tab "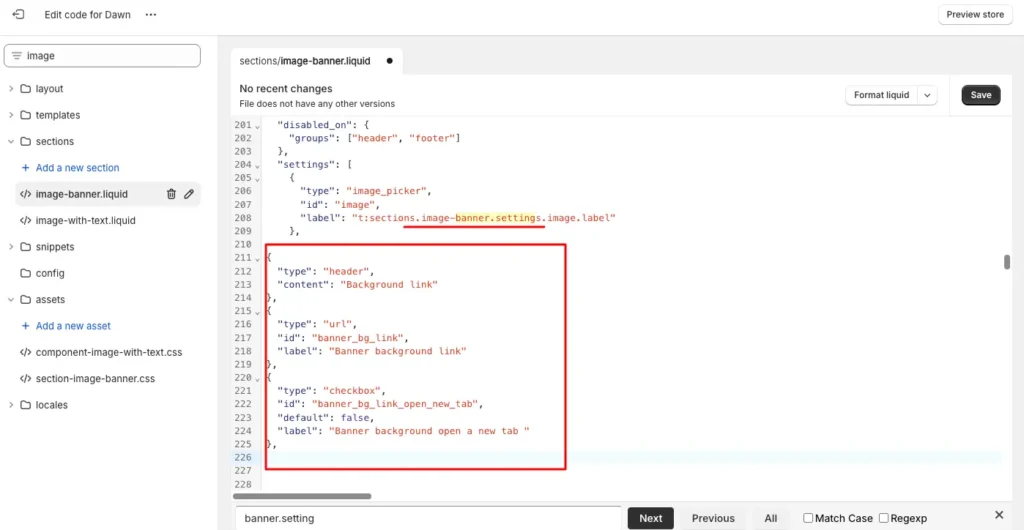
},Step 11: Paste the Schema JSON code after “image-banner.settings”
- Copy the code “image-banner.setting”.
- Paste the JSON Schema code after the end of image-baanner.setting.image.label
- Click on “Save”
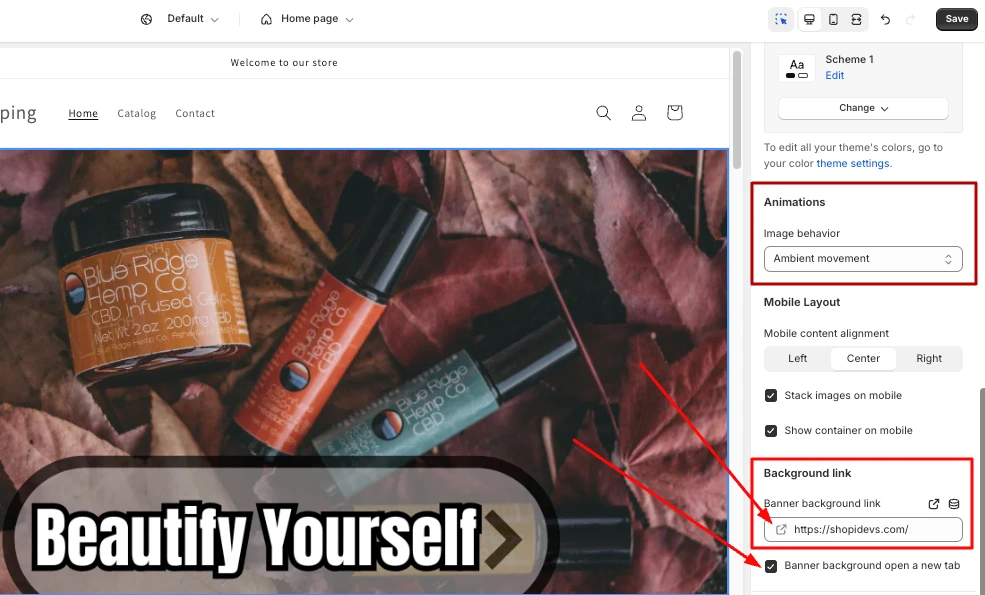
Step 12: Add Link to Shopify Banner Image
From the Dashboard > Online Store > Customize > Banner Image section, click on the image banner, and you will have the option to add the link.
Also, you can open the link in a new tab. Our developers also added a few animations to the banner to enhance the user experience for your store visitors.
Step 13: Test Shopify Image Banner Clickable or Not
Now, click anywhere on the banner image to confirm that your store has a clickable banner. Yes, now your banner image is clickable, as you can see here.
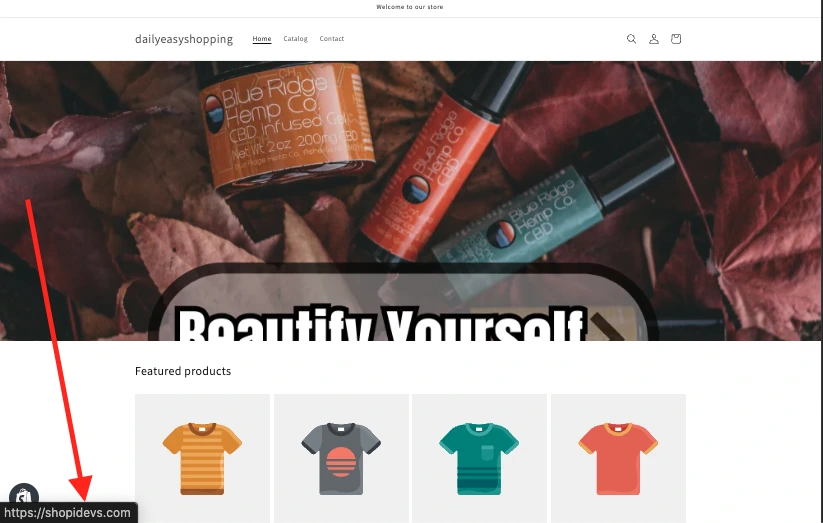
Yes, it is working. Now your banner image is clickable.
How to Add a Link to an Image Banner in Shopify (Without Code)
Now you are getting to know about something special to make your Shopify banner image clickable. Yes, you don’t need to know how to code; this method doesn’t require you to go to the custom theme editor. Let’s explore the easiest process of how to make your Shopify image banner clickable:
Step 1: Log in to the Shopify Store’s Dashboard
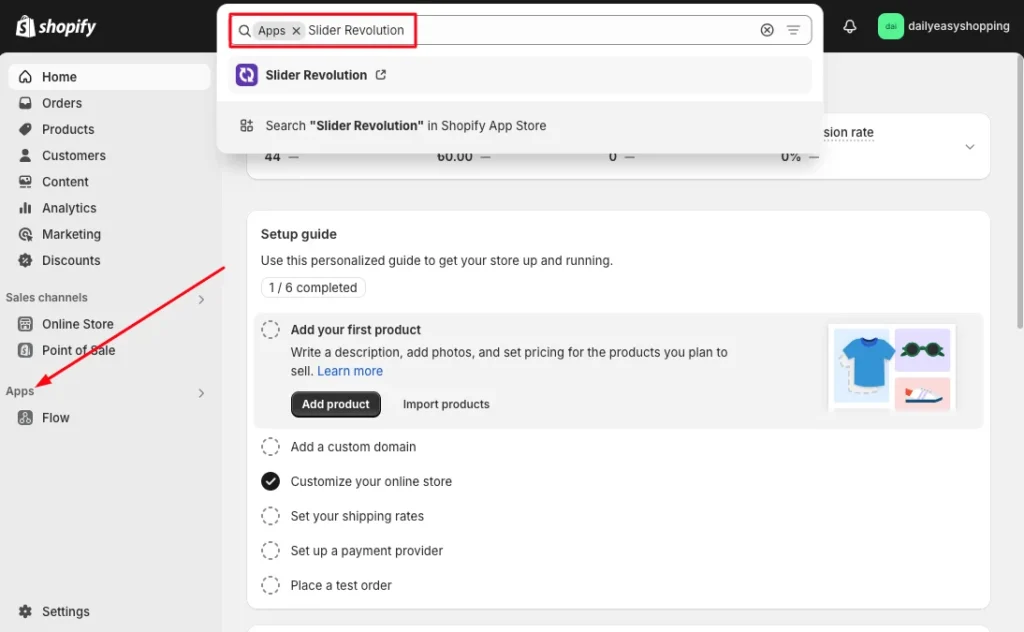
First of all, you need to log in to your Shopify store. Then, from the left sidebar, click on “Apps” and search for “Slider Revolution“ in the Shopify app store.
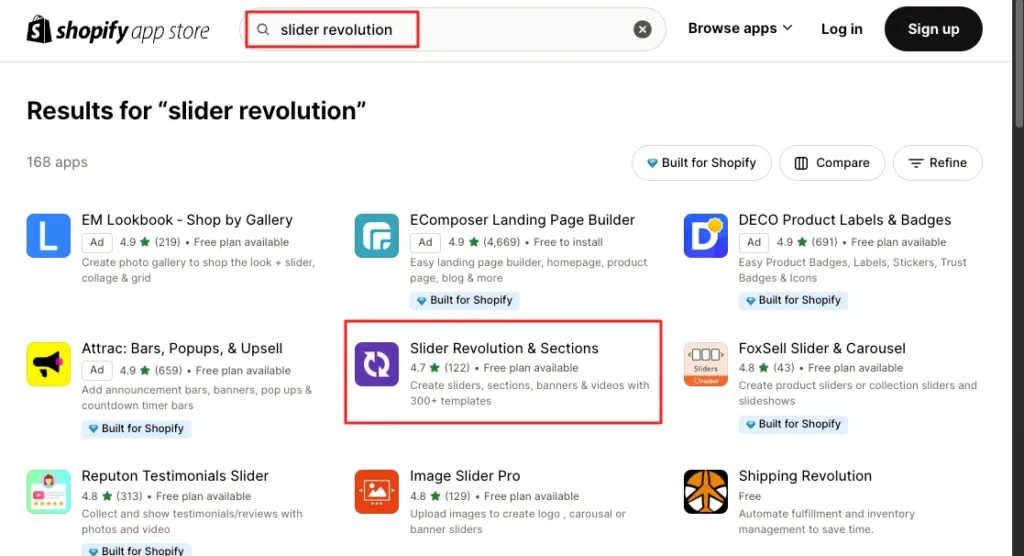
Step 2: Install the Slider Revolution & Section App
Now install the app for free to add a link to your Shopify store’s banner image. In the free plan, you can add one slider, which is more than enough to make your whole banner clickable. Also, it has many amazing animations and advanced features that can make your store more attractive and conversion-friendly.
Here, you can see that I have already installed the app, but you will see the “Install” button. Then click on the app and press the ‘install’ button to install this amazing page builder on your store.
Step 3: Open the App and Create a ‘New Blank Slider’
After completing the installation, open the Slider Revolution app. You are not on the Shopify dashboard; you are on Slider Revolution’s dashboard. Here, you can find the “My Sliders” option below the dashboard; click on “My Sliders”.
Now you can add sliders from 300+ ready-made templates for various sections, proven to increase conversion rates on Shopify. But, as of now, we are not going to add templates because we will make our Shopify banner image clickable. So, click on the “New Blank Slider”. Now, it will provide distractions and a guide to using this app in your store. You can explore the guide to become familiar with the interface.
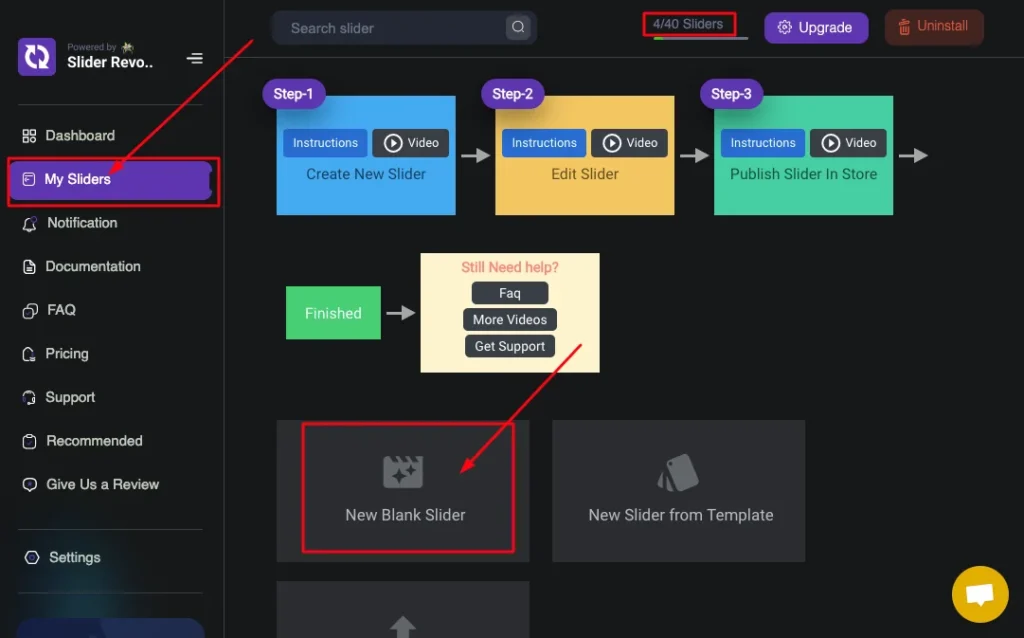
Don’t be confused by seeing this picture; I’m leveraging the premium plan of the Slider Revolution app, which is why I can use 40 sliders (used 4). You can use only one slider for free, and you will see (0/1) in this section. Though the 1 slide is enough to make your Shopify banner image clickable, I recommend exploring their other advanced features.
Step 4: Upload the Banner Image to Slider Revolution
After following the instructions, you can now add your banner image to the Slider Revolution dashboard. To do this, click on the small image icon on the right side of the ‘Slide BG Animation‘.

Now look at the right side under the ‘Source‘ section, here change the file type from ‘Transparent’ to ‘Image’.Then you will have the “Media Library” option to upload the Shopify banner image from your computer.
Step 5: Select the Image and Customize Settings
Now select an image from the library and customize its settings based on your client’s requirements.
I have optimized the image size, and I want to show the image size fixed; that’s why I have selected ‘Auto’, and aligned ‘center’. Also, add image alt text and title to make your image SEO-friendly.

Step 6: Click on the ‘Tags and Link’
After successfully uploading the image and customizing its settings, it’s time to add the link. So, scroll up to the ‘Slide Options’ and click on the “Tags and Link” option.

Step 7: Add URL and Save the Slider
Scroll down and find the “Link & SEO” section, then turn on the “Slide Link” toggle. Then you will have the option to add a link to the image banner on Shopify. So, insert your target URL here, and you can change the target ‘self’ to ‘blank’ if you want.

Step 8: Copy the Shortcode of this Clickable Banner Image
Click on the Settings icon, which is “Module General Options“, and copy the shortcode by clicking on the “Copy Shortcode” button. It will help to connect this clickable banner image to your Shopify store.
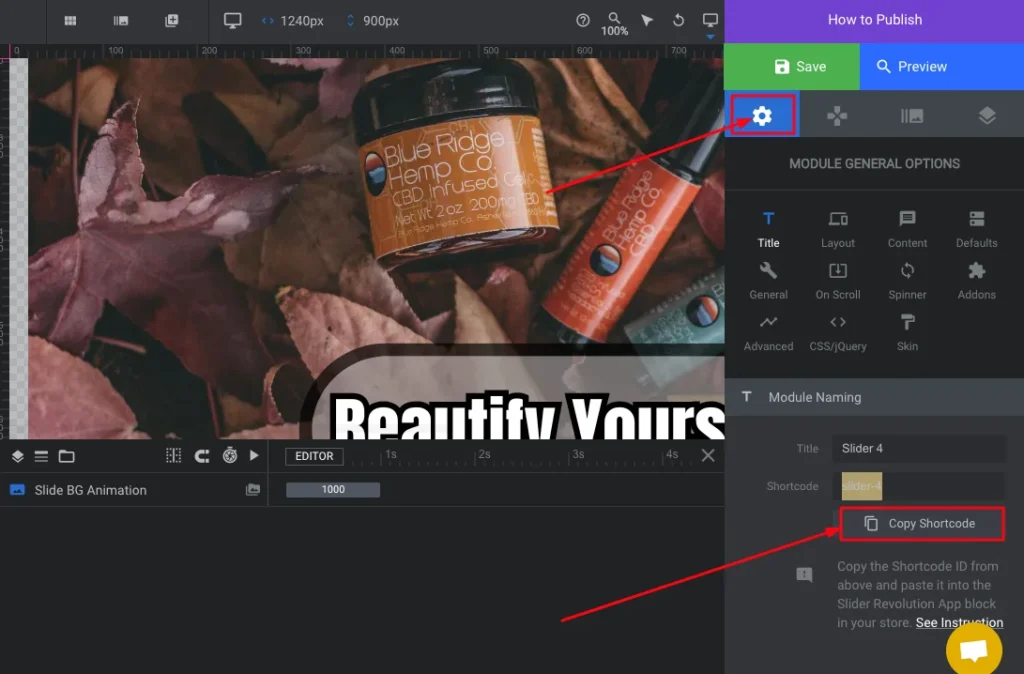
Also, you can check the instructions in “How to Publish” to publish this slide on your Shopify store.
Step 9: Go to Shopify Store > Themes > Customize
We have created a clickable banner image by following the previous 8 steps to maximize sales in Shopify; now we need to publish it on the Shopify store. You don’t have any tasks on the Slider Revolution dashboard. So, go to the‘Shopify store dashboard’, then go to the“Online Store”>”Themes,” then click on the “Customize” button.
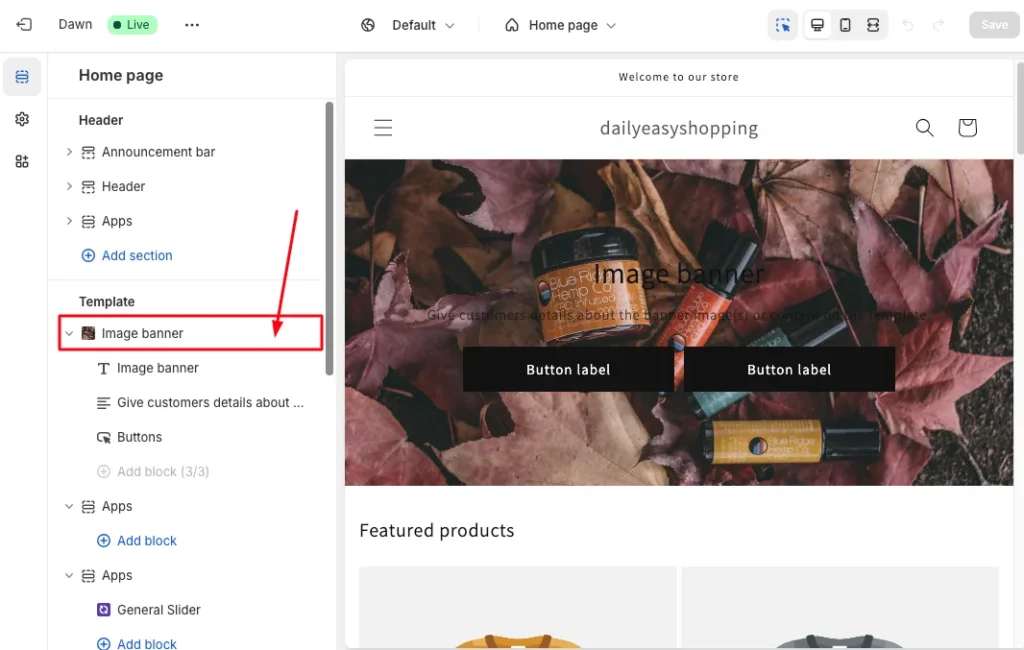
Step 10: Delete the Non-Clickable Banner Image
Find the “Image banner” option, where your existing non-clickable image banner section appears. Then hover over on the image banner section where the arrow is pointing, and you will have the “delete icon.” Click on it to delete it. You have now removed the banner image from your store. Don’t worry!
Step 11: Add a General Slider Block
Hover your mouse cursor under the ‘template’ to view the ‘+’ icon for adding a new block to the theme. Click on the Plus ‘+’ icon, then you can see two columns called ‘Section’, which is the default, and ‘Apps’.
Click on the ‘Apps’, then you can see all the features of your installed apps, including slider revolutions. Here, you need to add the “General Slider” section from the Slider Revolution app.

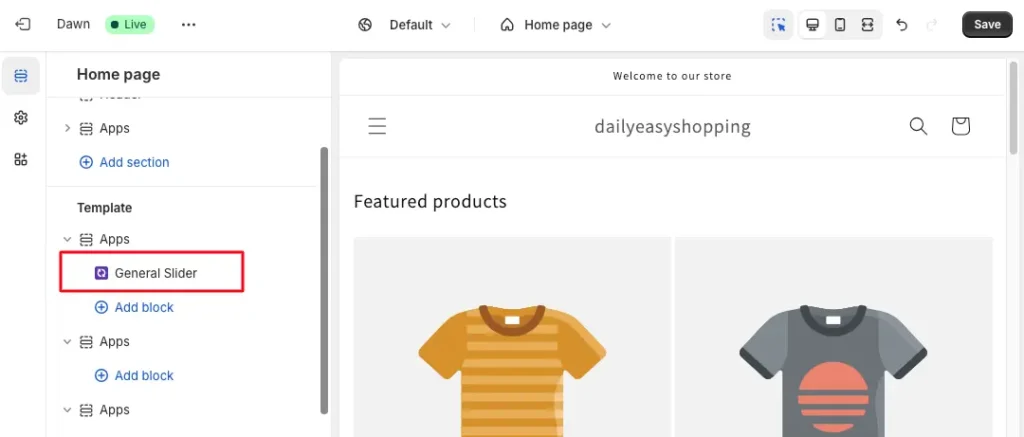
Step 12: Open the General Slider App
Now open the “General Slider” section, where you will have the option to input the shortcode you have copied from Slider Revolution (Step 8th).
Step 13: Paste the Shortcode
Paste the Shopify clickable banner image shortcode into this field. This code you have copied from the Slider Revolution app’s dashboard. You can consider this shortcode as the key to your clickable image (Designed on the App).
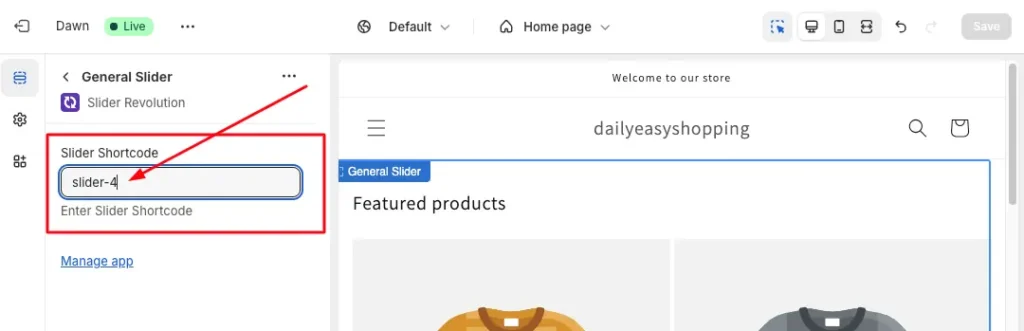
Have you pasted the code, but the banner is not showing? Don’t panic; it will not work until you activate the app. So you can click the “Save” button without seeing anything change on the front end.
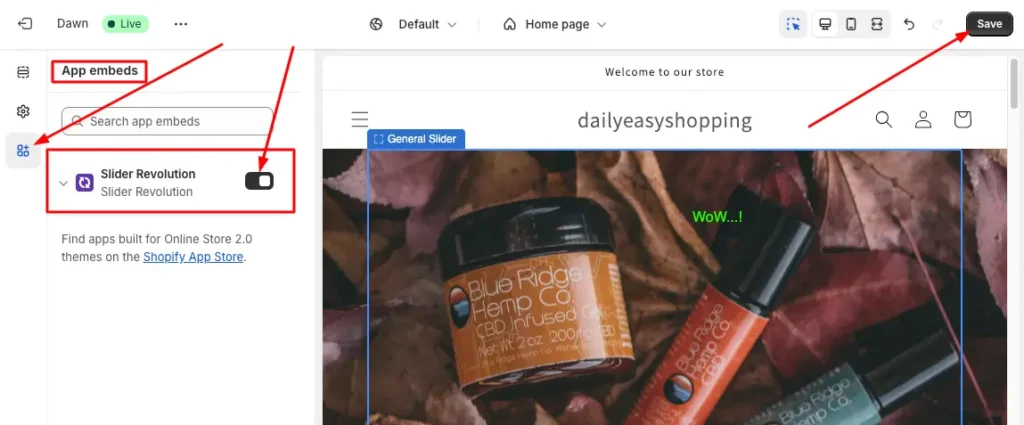
Step 14: Activate the Slider Revolution App and Save
Look at the left sidebar, below the settings icon, where you can see the “App Embeds” icon. Click this icon to see all the apps you have installed in this store. Here, you will have the app deactivated, so click the toggle to activate Slider Revolution. And, “Save” it.
Congratulations!
You have completed all steps successfully and made the image banner clickable on Shopify. If we wrap up these 14 steps for adding a link to the Shopify Store banner image, we can divide them into 3 main parts.
First, we need to create a clickable banner image using the Slide Revolution App. Second, we need to connect a clickable image to the Shopify store using the shortcode. Finally, activate the app on the store and ‘Save’ this. If you are facing any issues making the banner image clickable, feel free to consult our support team.
- You May Also Be Interested in “How to Add Video to Shopify Store – Step-By-Step Guide”
5 Best Practices: Add Link to Image Banner Shopify
Making image banners clickable on Shopify is essential for better navigation and conversions. But only adding a generic image can’t attract your shop visitors. So, check these 5 best practices to make persuasive and effective clickable image banners.
- Use high-quality images to attract attention while maintaining your brand’s theme color.
- Add a clear CTA like “Shop Now,” ensuring strategic placement and action-oriented language to encourage clicks.
- Ensure your store’s banner image is responsive for all devices by using the perfect banner image size for Shopify.
- Optimize images for search engines by using ALT text, captions, file size optimizations, etc.
- Monitor CTR and implement A/B Testing with different banner designs, CTR placement, changing copy, etc.
Conclusion
Adding a link to your store’s banner image can be a bit functional and a hassle for a non-techy person. But this indeed is one of the most important places to convert your first visitors into customers.
That’s why I have shown two different ways of ‘How to Make Image Banner Clickable Shopify’ for free without coding. The first one is by editing the image-banner.liquid code (I have provided the code for free). Also, the second one is by using the Slider Revolution App for free. You can choose any one of these two methods, whichever is more suitable for you.
By following these step-by-step guides, you can easily transform your static banner image into a compelling and clickable banner image.
FAQs
What if My Theme Doesn’t Support Clickable Banners?
You’re right, there are a lot of themes that don’t support clickable banner images on the Shopify store. But don’t worry, you can still make your banner clickable by adding a bit of custom code. If you are afraid of listening to ‘custom code’, then we have another easy option like “Slider Revolution.”
Can I Make Multiple Banners Clickable on Shopify?
Yes! You can make multiple banners clickable on Shopify by following the same steps for each banner section. Whether through the theme editor or custom code, you can make as many banners clickable as you need. But remember to consider the placement of your banners. Because too many banners can clutter your store and distract visitors.
Do Clickable Banners Affect SEO?
No, if you follow the basic rules of SEO, then a clickable banner will not affect SEO. It can even improve your ranking by increasing engagement, CTR, and user experience. But if you don’t maintain SEO rules like optimizing image size, using alt text, etc., then it might slow down your page by increasing FCP and LCP.
Jakaria is an SEO Content Writer in Shopify, Ecommerce, WordPress, and Tech Industry with 5+ years of experience. He specialises in developing engaging, helpful content by simplifying complex topics into an amazing story for B2B, SaaS, and Shopify businesses. He’s also passionate about staying updated on growth marketing strategies and Shopify trends.