In this post, we will review the Shopify preferences in terms of the payment system, taxes, how it charges the service, shipping rules, packaging, legal ones, and the check-out process. When you access your store dashboard in Shopify, look for the “Settings” section on the left-hand side. Let’s go over each of the options, so you get familiar. It is extremely easy! So let’s discuss in detail the Shopify preferences:
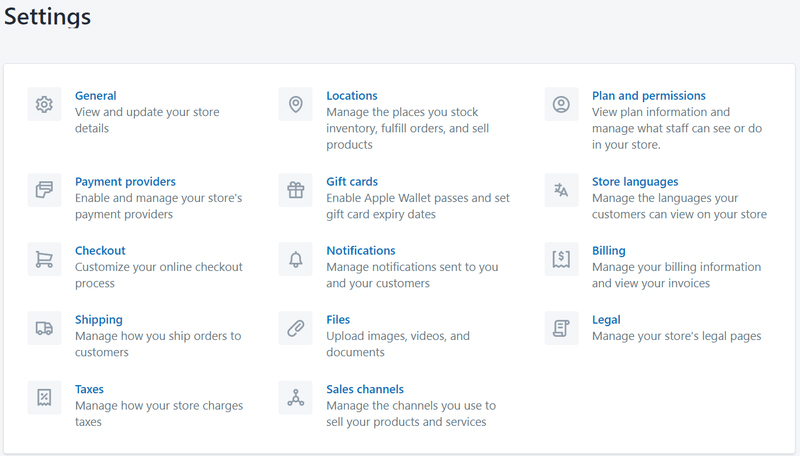
General
Here you can change the name of your store and include your contact information, such as, for example- email (yours and the store’s, which is what your customer will see), and include the time zone and units of measure. It is one of the most important Shopify general settings. You can also choose what type of industry your store belongs to, which is very convenient because, being in one of those categories, when Shopify creates specific tools by the type of industry, you can access it.
In the “Store address” section it is necessary to put a physical address since it is the only way in which the system allows you to finish configuring your page. The business name is the one that the customer will see on their invoices and the phone number is public. It is also mandatory to include it. Take into account that the physical address of your store is the address that the system uses to handle the shipment, therefore, you cannot use a PO Box.
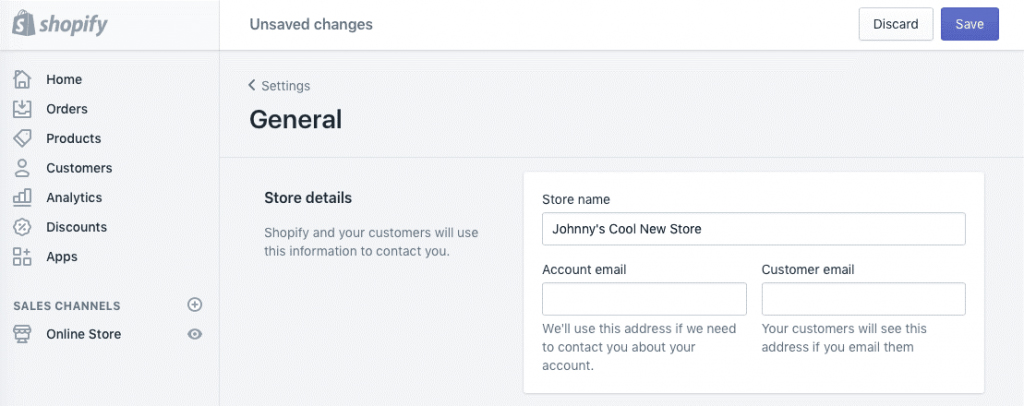
NOTE: If entering your physical address an error appears indicating that it does not exist, contact the post office to help you identify the correct address in their system. If you have several stores, in this area you can add prefixes or suffixes to help you identify them, and, in addition, you can choose the type of currency in which you will charge, which in this case is the US dollar. At the end of adding all this information to set Shopify preferences, don’t forget to press the “Save” button.
Payment Providers
The payment logistics built into Shopify makes the checkout process much easier for your online store. Press the purple “Create account” button located at the bottom right of the page and choose your type of business (“Business type”). If you have a corporate identity and your business is registered with the State Department, including the identity number and business information. Then there are the personal data: name, surname, date of birth, and the last four digits of Social Security. This has to be provided because it is Shopify’s way of linking a person to a legal bank account. Here you must also include the description of the product. It is extremely important that you do so because otherwise, the platform does not allow you to use the payment system. The description must be clear and concise.
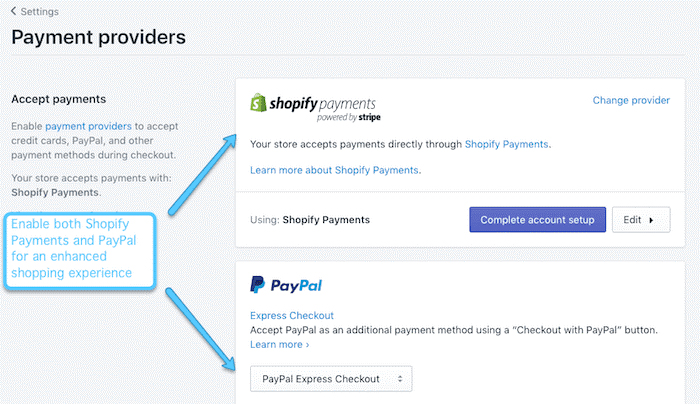
In “Consumer billing statement” you can see how your information, for example, name and phone number, looks on the customer’s bill. Then include your bank information – routing number and account – to receive deposits. Complete the procedure by pressing the purple “Complete account setting” button. Once you do this, you must wait for the platform to approve the account. Meanwhile, it will appear as “pending.” by pressing the purple button “Complete account setting”. Once you do this, you must wait for the platform to approve the account. Meanwhile, it will appear as “pending.” by pressing the purple button “Complete account setting”. Once you do this, you must wait for the platform to approve the account. Meanwhile, it will appear as “pending.”
NOTE: you can choose as payment alternatives credit cards and PayPal (the preferred options), Apple Pay, Google Pay, and others. According to your preferences, once your account is approved, you can manage these Shopify preferences and activate and deactivate the payment alternatives.
You can also choose if you are going to sell in other currencies, round the payment, how often the payment is processed, and fraud protection.
Checkout
This is where the customer sees their purchase process. Some of the most important elements available are the personalization of the page or that the user has to create an account to be able to buy, for example. In this segment, you can configure whether you want customers to receive notifications about new offers through their email or cell phone. Depending on the type of business you have, you can activate the “Tips” line. In this area, you can carry out other procedures such as checking the availability of the product and choosing if you want purchases to be processed automatically. You can also include a marketing email for the person to subscribe to your database. Check the box to activate this option. Likewise, it allows you the option of “Abandoned checkout”. This is, When people leave the shopping cart without completing the purchase, the system generates an email reminding them that they have items in the shopping cart. When you finish entering the information, save all the changes.
Shipping
There is not much to do in that area because when the store address is entered initially, it is automatically configured.
It also offers you the option to configure “local delivery”, when you have locations in different areas, and “local pick up”. When it comes to packaging (“Packages”), you can choose flat rate packaging from the United States Postal Service (USPS) or add custom packaging information. The advantage is that it calculates the shipping cost based on the box you choose. You can choose to generate the “Shipping label”, which, in turn, generates the tracking number that the customer will receive automatically when making the purchase, as well as a “ Packaging slip ”, which is a sheet that includes the order information: product, cost or any promotion.
Taxes
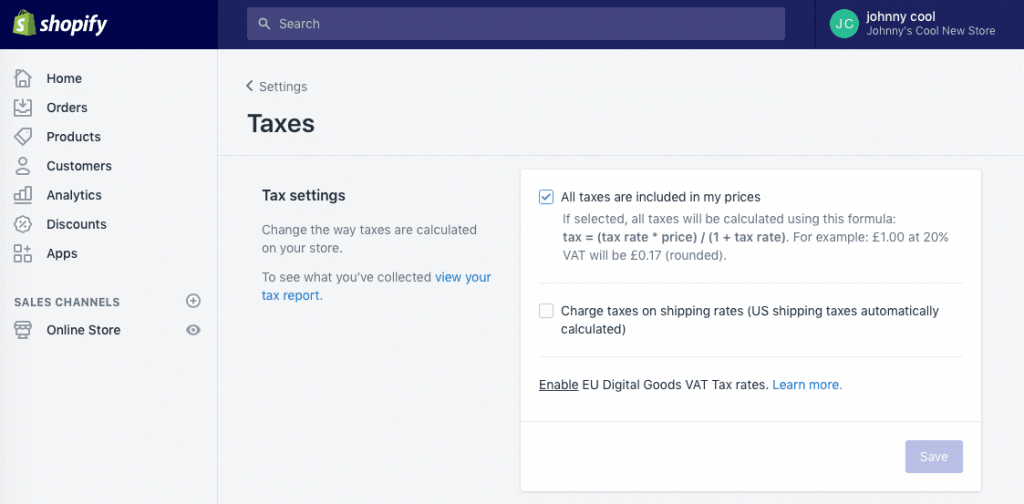
This is another area in which Shopify has made great strides, allowing you to calculate taxes very easily and create exceptions for some products.
Locations
Manage the multiple locations of your store, the places where you store your inventory, service orders, and sell products is also a very important part of Shopify preferences.
You May Also Read: Create Legally Compliant Cookie Banners For The Shopify Online Shop
Gift Cards
It gives you the option to create them within the products section, establishing the expiration and price rules.
Notifications
They are the emails that the customer receives. It is recommended that they be personalized (“Customize”), which allows adding the logo and changing the color of the communication.
Files
Images, videos, and documents of your store are uploaded in this area.
Sales Channels
Manage the channels where you sell your products and services.
Plans and Permissions
Manage your Shopify plan and add other members to work in the store. Here you can also pause the store completely, pause the store while you continue working it, or close it permanently.
Store Languages
Manage the languages in which your customers will see the store.
Billing
Manage your billing information as a Shopify business owner, where you must add a payment method, either a credit card or a debit credit card with a logo. Here you can choose to have the system charge you the monthly payment from the store of the balance of the payments of the customers who have paid you. By setting up one of these Shopify preferences, you will get the payment from customer without any trouble.
Legal
Manage the legal pages of your store. It is made up of four areas: return policy, privacy policies, (if the information will be shared with third parties or not), the terms of service (if a product is returned or not and how long the customer has to do so); and the shipping policy (how long it will take for the product to arrive and similar details). To simplify the creation of such policies, Shopify has a page that helps generate those terms and conditions. Simply, by filling in the information of your store, the tool generates a text that, although it is not reviewed by a lawyer, is very well done. You can generate your store policies in Spanish or English and they also offer you a template of the refund policy.
Conclusion
We know it’s a lot of information about Shopify preferences. But the idea is that you see everything and feel comfortable navigating the page and knowing what needs to be done in each line. From here, all you have to do is launch your store live by Shopify shipping settings.
I’m a digital marketing expert and mobile app developer with a deep understanding of Shopify App Store optimization. I contribute insightful articles on Shopify to help businesses thrive online.