Shopify collections assist store owners in organizing products to make browsing easier. They improve navigation, they increase SEO, and they increase conversions. Whether you’re grouping items by category, season, or promotions, collections simplify shopping.
Are you wondering how to create collections in Shopify? You can do that manually or use automated rules. This guide will explain both methods, including adding products, collections display, and best practices for optimizing them.
Looking to enhance your store’s shopping experience? Keep reading to discover all there’s to know about Shopify collections and how to configure them correctly.
What is a Collection on Shopify?
Within Shopify, a Collection is a grouping of like products that makes it easier for customers to browse and find what they are looking for. Instead of browsing your full store, shoppers can explore collections based on categories, themes, or promotions.
For instance, a fashion store might have collections such as “Summer Dresses” or “Men’s Shoes.” Shopify allows you to create collections manually or automatically, as you see fit, so that the right products show up where they need to. Group them into collections so users can easily navigate, engage, and buy.
8 Components of the Shopify Collection Page
When browsing a Shopify store, understanding the structure of the collection page is essential to providing a smooth, user-friendly shopping experience. Below is a breakdown of the core components that make up the collection page:
1. Category Name
The category name represents the top-level classification of the store’s product offerings. The Shopify store prominently displays categories to guide shoppers to specific sections. For example: Categories like “Premium Collection,” “Fragrances,” and “Grooming” are visible in the navigation menu, helping users quickly find the type of fragrance they’re looking for.
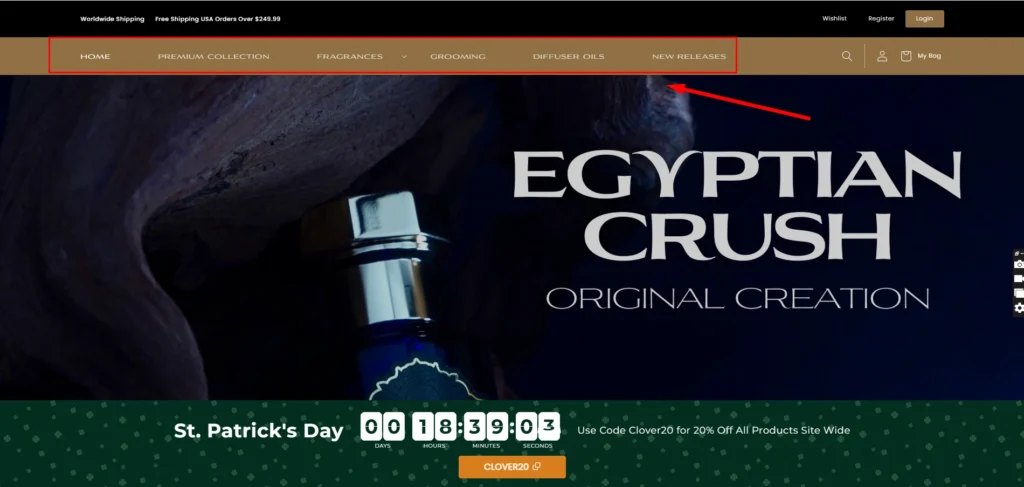
This main navigation menu displays the categories for quick access. This clear, logical categorization helps customers navigate large inventories efficiently. Each category cascades into more detailed subcategories, allowing customers to refine their choices as they continue exploring.
2. Breadcrumbs
Breadcrumbs are a critical navigational tool on a collection page. They act as a map of the user’s journey, showing the sequence of pages they’ve visited to arrive at their current page. This allows customers to easily retrace their steps and explore different parts of the store without feeling lost.

This breadcrumb trail is visible near the top of the page, ensuring users know where they are within the site’s structure and can easily click on any of the previous categories to go back.
3. Sort Menu
A sort menu helps shoppers customize how they view products in a collection. It allows them to sort items according to their preferences, making it easier to find what they are looking for quickly.

This sorting feature enhances the user experience by allowing customers to arrange products according to the criteria that matter most to them.
4. Page Name
The page names are typically found on the left or at the top of the page. These represent sub-collections within a larger category.

These subcategories help break down the products into smaller, more manageable groups.
5. Pages
Pagination is a critical component when a collection contains a large number of products. Rather than displaying all the products on a single page, pagination breaks the collection down into smaller pages, making it easier to browse through a large catalog.

Pagination ensures that the customer isn’t overwhelmed by an endless list of products and can easily jump to a specific page to continue browsing.
6. Browse By
The Browse By menu is another way to help customers narrow their search based on specific attributes or preferences. It allows them to find products in a more targeted manner.

This feature makes it easier for customers to filter through products and find exactly what they’re looking for based on their personal style preferences.
7. Filter Menu
Filters provide additional, more granular options for refining the product selection. They allow customers to sort through product listings based on multiple criteria simultaneously.

This functionality enhances the user experience by allowing them to quickly narrow down their choices to only the products that meet their needs.
8. Product Details

Product details are crucial for informing buyers about each item in the collection. The product details may include:
- Product Name
- Price
- Available Colors
- Size Options
- Customer Ratings
- Promotional Offers
4 Benefits of Shopify Collections
Collections provide a way to organize similar products to create a well-structured and user-friendly browsing experience. No matter if you have a fashion boutique or an electronics or home-decor shop, collections offer a way of helping search engines and customers can easily find their products. Here are some of the benefits of utilizing Shopify collections properly.
1. Improves Store Navigation
Shopify collections are categories where customers can browse and find the products they are looking for. Rather than perusing through an entire product catalog, shoppers can quickly hone in on relevant items by category, listed as “New Arrivals,” “Best Sellers,” “Winter Collection,” or “Under $50.” The reduction in browsing time enhances the shopping experience, as customers face less frustration and are more likely to buy.
2. Boosts SEO
Well-organized collections enhance the search engine optimization (SEO) of a store. (Collection pages, optimized titles, descriptions, and relevant keywords, can yield higher ranking in SERPs.) That means that if customers are searching for specific product categories — like, “men’s running shoes” or “organic skincare sets” — they’re more likely to find your store. However, clear URL structure and internal links across collections also make it easier for search engines to crawl through your site, enhancing visibility.
3. Enables Cross-Selling and Up-Selling
Collections allow customers to browse related or complementary products. So a “Summer Outfits” collection, for example, could contain dresses, sandals, and sunglasses and encourage customers to buy two or three rather than just one. For example, a “Gaming Accessories” collection could include headsets, keyboards, and ergonomic chairs that can open up cross-selling opportunities. Shopify also enables merchants to feature best-selling or premium versions of products in collections, guiding customers toward higher-value purchases (up-selling).
4. Improves Conversions
A well-organized store removes barriers to purchase by directing shoppers straight to what they most want. When customers can find and compare products quickly inside a collection, they will not leave without making a purchase.
Collections can also help merchants draw attention to certain themes, whether to showcase holiday gifts, clearance items, or seasonal fads, making it easier to entice buyers with curated selections. The easier and more seamless the shopping experience, the greater the chance of conversions.
Smart vs Manual: How to Add Products to Collections on Shopify?
In Shopify, collections are used to group products together, and there are two main types: Smart Collections (Automated) and Manual Collections. Each has its use case and advantages.
1. Smart Collections (Automated Collections)
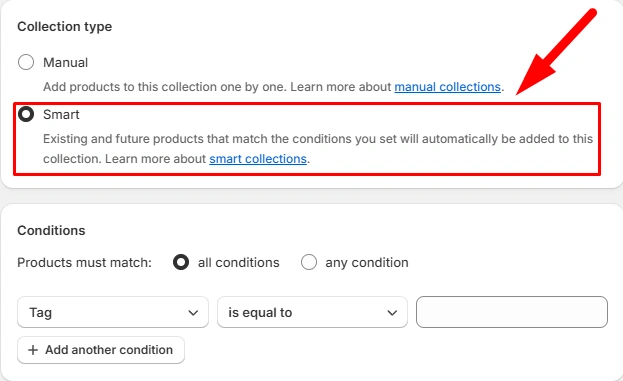
✅ Automatically Includes Products Based on Conditions
Smart Collections use rules (conditions) to automatically include products based on attributes like tags, product types, vendors, price, inventory level, etc.
How They Work
- You set rules (e.g., “Product Tag is ‘Summer'” or “Price is greater than $50”)
- Any product matching the rule is automatically added
- If a product no longer meets the condition, it is removed automatically
Pros
- Saves time, especially for large inventories
- Always up-to-date as products are added/removed dynamically
- Reduces manual effort
Cons
- Less control over individual product placement.
- If a product doesn’t meet any condition, it won’t be included.
2. Manual Collections

✅ Manually Add Products
With Manual Collections, you choose which products to include, one by one.
How They Work
- No conditions are set
- You manually select the products to be included
- The collection does not update automatically—you must add or remove products manually
Pros
- Full control over what appears in the collection
- Best for curated collections, such as “Featured Products” or seasonal picks
Cons
- Time-consuming, especially for large inventories
- Needs constant updating when products change
Which One Should You Use?
- Use Smart Collections for dynamic, rule-based collections like “New Arrivals,” “Sale Items,” or “Products Under $50.”
- Use Manual Collections for curated selections like “Best Sellers” or “Staff Picks.”

Protect Your Store with ”Syncora: Backup & Restore”
Customizing your Shopify store comes with risks. Unexpected changes, accidental deletions, or theme errors can disrupt your business. To ensure your data stays safe, try the Syncora app, a real-time backup app that can restore the Shopify store anytime.
How to Create Collections in Shopify?
Here is a step-by-step guide to creating a collection in Shopify:

Step 1: Log in to the Shopify Store, navigate to Products then click Collections
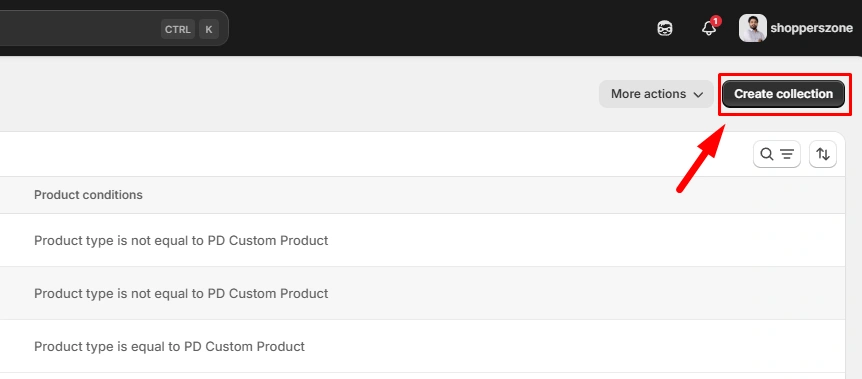
Step 2: Click “Create collection”
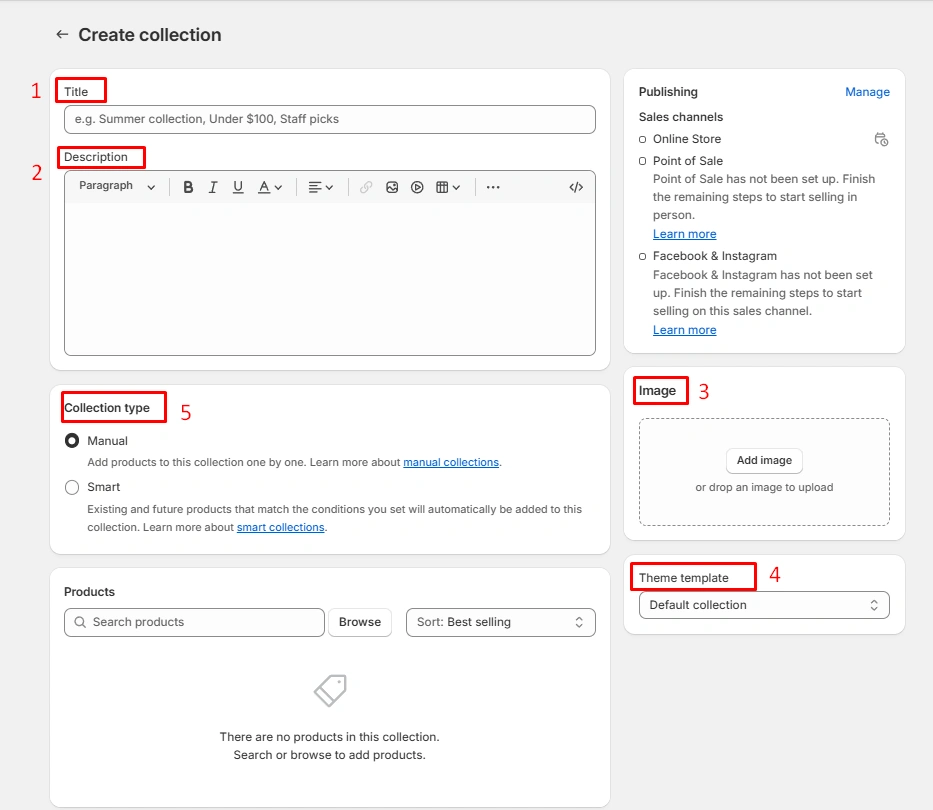
Step 3: Add the Title, Description, and Image of the collection. Also, choose your Collection type (manual or smart)
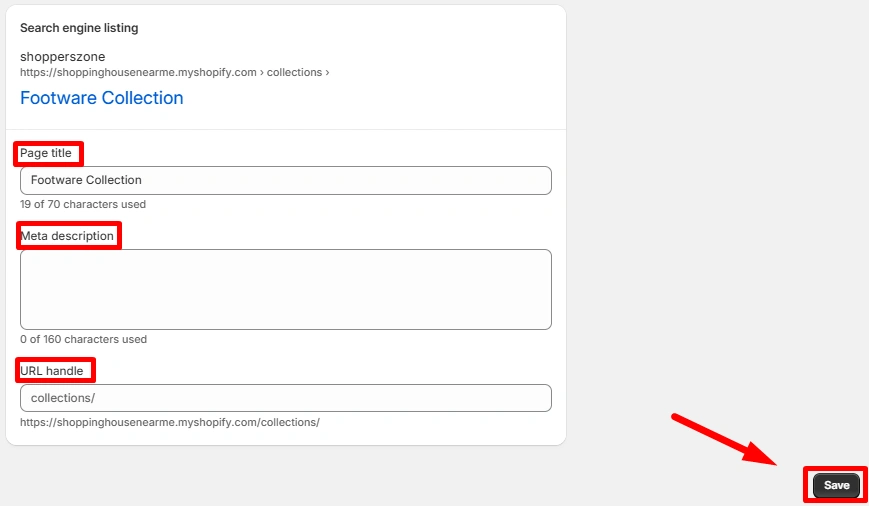
Step 4: Add Search engine listing (Page title, meta description, URL) and click the Save button
How to Add Collections on Shopify Store?
After creating collections, we can show collections in a Shopify store by adding them to your navigation, homepage, or collection page. Here’s how.
1. Add Collection Links to Navigation
Adding collection links to your Shopify store navigation makes it easier for visitors to browse your products. Follow these steps to add a collection link to your store menus:
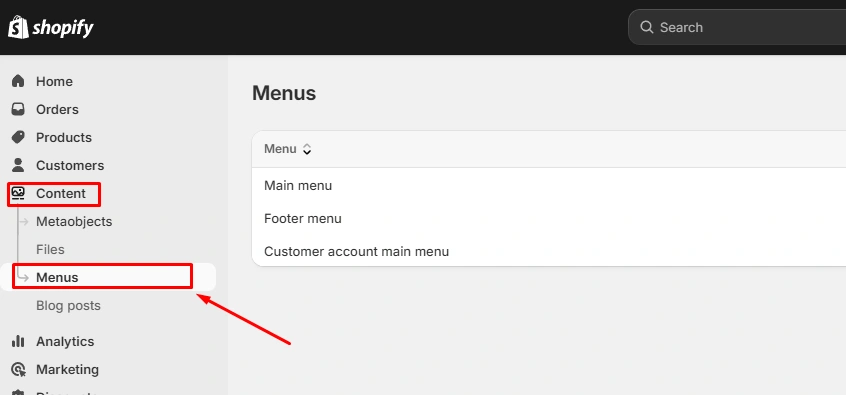
- From your Shopify dashboard, go to Content > Menus.

- Select the menu where you want to add the collection link.

- Click Add menu item
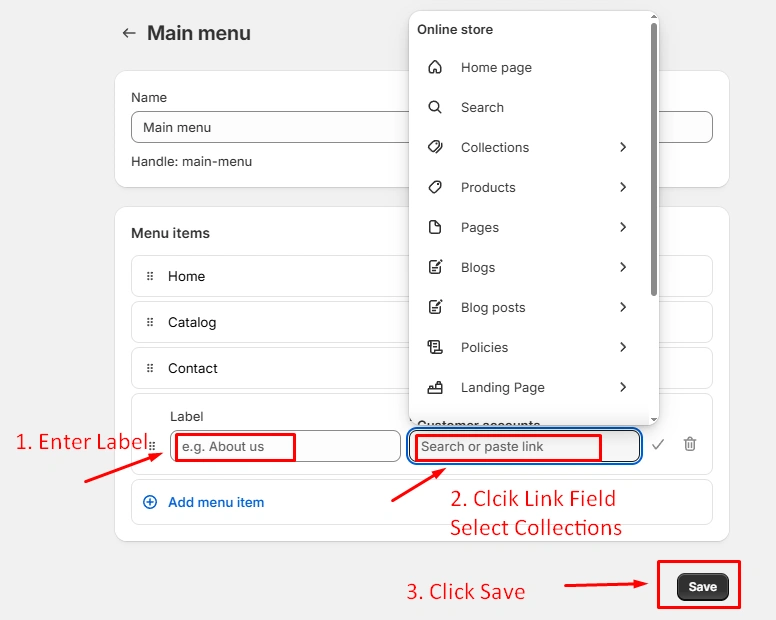
- Enter the Label, click the Link field, select Collections, and click Save to apply the changes.
💡 Tip: You can also create a drop-down menu by adding multiple collection links under a main menu item for better organization.
2. Add Collection to the Store’s Home Page
In Shopify, you can show collections on your homepage in two ways: as a featured collection or a collection list.
★ Adding Featured Collections
If your theme’s product limit isn’t a concern, you can display all your products on your homepage using a single featured collection. Follow these steps:
1. Go to Products > Collections

In your Shopify admin, navigate to Products on the left-hand menu, then click Collections.
2. Create a New Collection
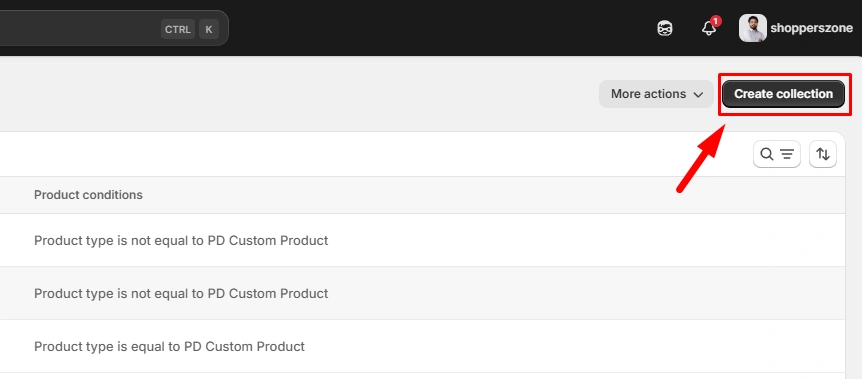
Click the Create collection button. By default, the existing Home page collection is set as the Featured collection on your homepage.
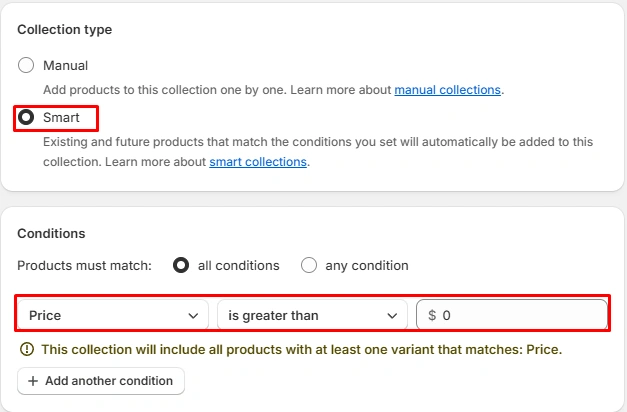
You can add products to the collection manually or automate the process using rules. To automatically include all products, select the Automated option and set the condition to “Product price is greater than $0”—this ensures any product with a price is added. Click Save when finished.
3. Open the Theme Editor
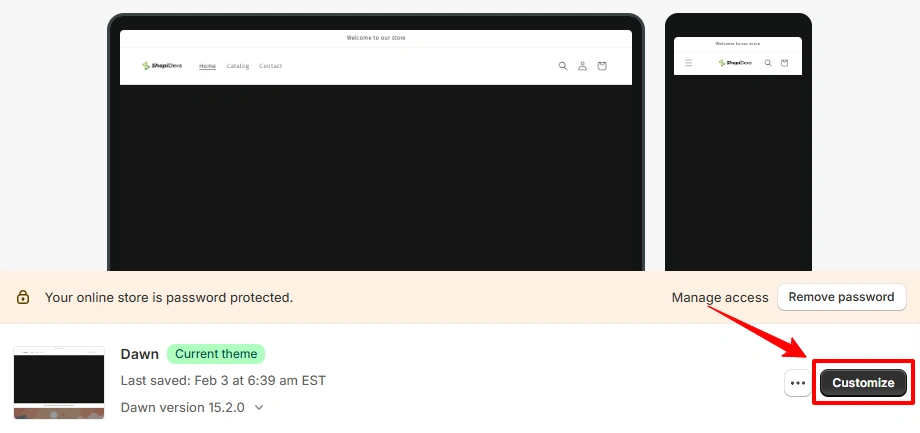
Go to Online Store > Themes, then click Customize on your active theme.
4. Update the Featured Collection

Inside the theme editor, click Add Section on the left. Select Featured collection, then click Select on the right-hand menu.
Navigate the new collection you just created and click on it.
5. Customize the Featured Collection
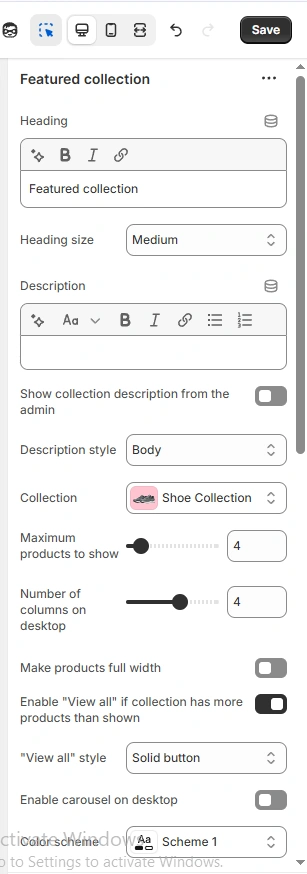
Your customization options depend on your theme. For example, in the Dawn theme, you can adjust:
- Heading text and size
- Collection description and style
- Maximum number of products displayed and column layout
- Enable “View all” for collections exceeding the limit
- Carousel view for desktop users
- Product card details
- Mobile layout adjustments
Note: If your collection contains 25 or fewer products, this method will effectively showcase your items while allowing you to fine-tune the layout.
6. Save and Publish Your Changes

Once satisfied with the setup, click Save in the top-right corner. Preview the live site and make adjustments as needed.
💡 Note: If you're using the Debut theme, only a traditional grid layout is available. You can modify the number of products per row and number of rows to fit the 25-product limit—for example, setting it to 5 products per row across 5 rows.
★ Adding Collection Lists to Shopify
Instead of showcasing individual products, you can add a collection list to your homepage to display links to your collection pages.
Step 1: Access the Theme Customization Editor

From your Shopify dashboard, navigate to Online Store > Themes, then click Customize on your active theme.
Step 2: Add a New Section and Choose “Collection List”
It will automatically open your homepage in theme editor.

On the left-hand menu, scroll down and click the Add section. From the pop-up that appears, select Collection list.
This will insert a new section on your page with a heading and three collection blocks.
Step 3: Assign a Collection to Each Block

Now, select one of the collection blocks to choose a collection to display.

Click Select, then pick collection from your existing collection list. Click Save to confirm your choice.
Step 4: Repeat for the Remaining Collection Blocks
Follow the same process to add collections to the other blocks.

Once completed, your homepage will feature a collection list that directs visitors to your collection pages, which then lead to individual product pages.
Step 5: Customize the Collection List Heading

To change the heading of your collection list, select the section and write the Heading in the right-hand menu.
Then Save your changes, and your collection list is ready!
You May Also Like to Read: Create Shopify Collection Sliders
3. Add Sub-collections to a Collection Page
Organizing products efficiently using sub-collections on a collection page for effective stock management It provides a more organized layout and prevents clutter throughout your store. It also enhances customers’ shopping experience by making navigation easier.
For step-by-step details, read the following guide on on how to add sub-collections in Shopify collection page.
You can add sub-collections in collection page by creating a new template type in your theme. liquid files from scratch. This method is great if you have an HTML person on your team, or if you feel comfortable in HTML yourself.

Protect Your Store with ”Syncora: Backup & Restore”
Customizing your Shopify store comes with risks. Unexpected changes, accidental deletions, or theme errors can disrupt your business. To ensure your data stays safe, try the Syncora app, a real-time backup app that can restore the Shopify store anytime.
How to Make Sub Collections in Shopify?
Once you’ve backed up your store and are ready to proceed, follow these steps to create a new sub-collections template in Shopify:
Step 1: Access the Theme Code Editor

- In your Shopify admin, go to Online Store > Themes.
- Locate your active theme and click Edit Code.
Step 2: Create a New Template

- In the left-hand menu, find the Templates section and click Add a new template.
- In the template creation window, set the parameters:
- Template type: collection
- Template file name: collection.sub-collections.liquid
- Click Done to generate a blank template.
At this stage, you’ll want to customize the template to match your brand’s design, including colors, layout, and other styling considerations.
Code
{{ collection.title }}

{% assign collection_handle = “collection-” | append: collection.handle %}

<ul>

{% for link in linklists[collection_handle].links %}

{% assign sub_collection = link.object %}

<li><a href=”{{ link.url }}”>{{ link.title }}</a></li>

{% endfor %}

</ul>Step 3: Add a Sub-Collections Section (If Required)
Some themes may require you to create a sub-collections.liquid section to code the design and functionality of the sub-collections. Check your theme’s documentation or existing templates to determine if this step is necessary.
Step 4: Replace the Default Collection Template
Once you’ve finalized your sub-collections template, you need to apply it to your collections. This process depends on your theme setup but generally involves:
- Navigating to Collections in your Shopify admin.
- Changing the default collection template to the sub-collections template.
Read More in Detail: Create Shopify Sub Collections to Better Organize Your Store
After setting up your collections and sub-collections, it’s time to organize them into a collection tree. This involves structuring your collections based on a logical hierarchy while considering future store growth. A well-planned collection tree improves navigation, enhances the customer experience, and prevents duplicate pages.
By implementing sub-collections effectively, you create a more streamlined and scalable Shopify store.
You May Also Like to Read: Add Variant Selector in Collection Pages
Add Collections to Any Page Using EasyBoost App
You can effortlessly add collections to any page using a third-party app like EasyBoost: Product Showcase. This app allows you to place collections on any store page with pre-designed templates and flexible customization options. By following a few simple steps—selecting a layout, choosing a template, picking a collection, customizing the design, adjusting settings, and publishing—you can effortlessly add collections to your store using this app.
5 Collection Showcase Templates by Easy Display
1. Regal Box

2. Classic Circle

3. Enclosed Sphere

4. Aligned Circle

5. Prime Capsule

Managing Shopify Collections
Once you’ve created collections in Shopify, you’ll likely need to update them periodically—whether to modify product listings, adjust availability, or schedule a publish date. This guide will walk you through the process of managing your collections effectively.
1. Editing Collection Details
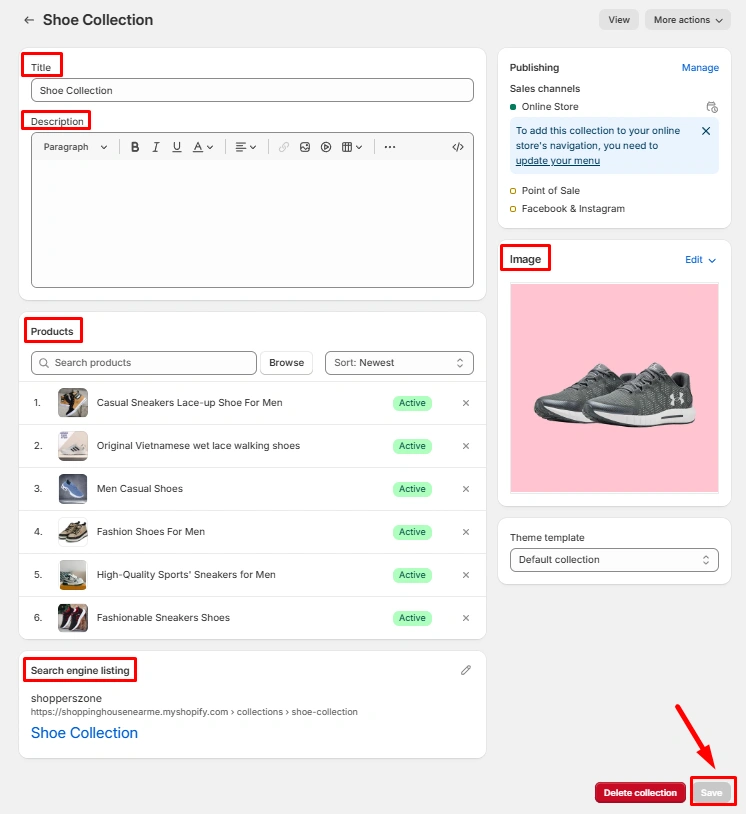
You can modify a collection’s information, including its title, description, image, and associated products, by following these steps:
- In your Shopify admin, go to Products > Collections.
- Select the collection you want to update.
- Within the collection editor, adjust the necessary details such as the title, description, or featured image.
- To update SEO settings—such as the URL handle or metadata—navigate to the Search engine listing section and click Edit.
- To make changes to specific products within the collection, scroll down to the Products section and select the item you want to edit. Here, you can modify product details such as the title, description, and variants.
2. Adjusting Collection Availability
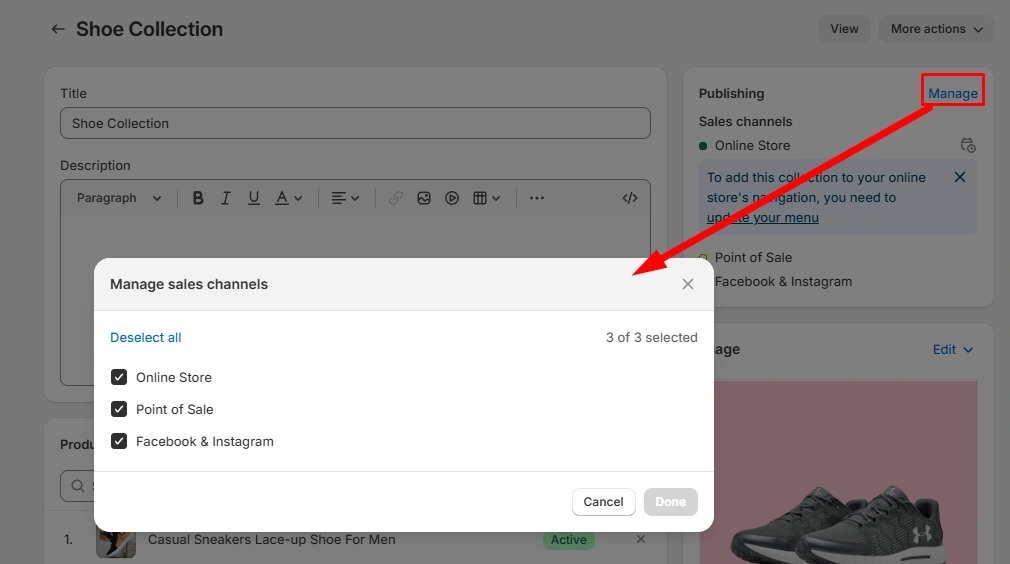
Managing collection availability is useful for seasonal promotions, limiting collections to specific sales channels, or ensuring certain products meet eligibility requirements. To change where a collection is available, follow these steps:
- From your Shopify admin, go to Products > Collections.
- Select the collection you want to adjust.
- Under the Publishing section, click Manage.
- Select the sales channels where you want the collection to be available.
- Click Done.
💡 Note: Changing a collection’s availability affects the entire collection, not individual products within it.
You May Also Like to Read: Add Shopify Product Excerpt in Collection Pages
3. Scheduling a Collection’s Publish Date
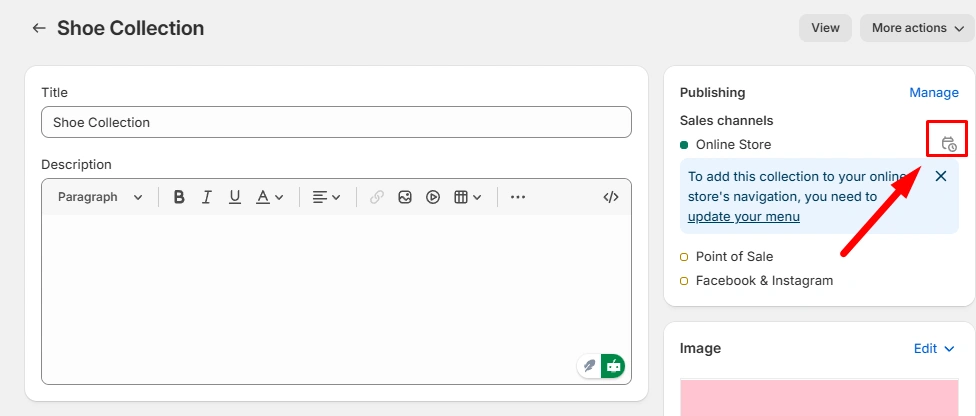
If you want a collection to go live at a specific time, you can schedule its publishing date:
- In your Shopify admin, go to Products > Collections.
- Choose the collection you want to schedule.
- In the Publishing section, click the calendar icon next to the Online Store option.
- Select the date and time for the collection to be published.
- Click Save to confirm.
21 Best Practices for Optimizing Shopify Collections
A well-structured, visually appealing Shopify collection doesn’t just enhance the shopping experience—it also boosts conversions and improves search rankings. Whether you’re fine-tuning your store or building collections from scratch, these 21 best practices will help you optimize them for maximum impact.
- Craft SEO-Friendly Collection Titles: Your collection titles should be clear, relevant, and packed with keywords—but in a way that feels natural. A well-optimized title not only improves search visibility but also increases click-through rates.
- Use a Striking Header Image: A compelling header image instantly sets the tone for your collection, reinforcing your brand and making the page more visually engaging.
- Leverage High-Quality Visuals: Crisp, professional product images enhance engagement and inspire confidence in buyers. Keep the style, size, and backgrounds consistent for a polished look.
- Showcase Customer Reviews: Nothing builds trust like real customer feedback. Displaying reviews and ratings on your collections can provide powerful social proof and boost conversions.
- Highlight Special Promotions: Make the most of discounts, bundle deals, or time-sensitive offers by featuring them prominently in your collections. This encourages bulk purchases and creates urgency.
- Keep Collection Names Clear and Relevant: Avoid vague or overly creative names that might confuse shoppers. Stick to straightforward, descriptive terms that make it immediately clear what the collection is about.
- Ensure Products Complement Each Other: A cohesive collection feels more curated and appealing. Arrange products in a way that makes sense—whether by color, style, or intended use.
- Create Limited-Time Collections: Seasonal, holiday, or flash-sale collections add urgency and exclusivity, enticing shoppers to buy before they’re gone.
- Implement Smart Filtering & Sorting: Help customers find what they need faster by enabling filters for size, color, price, or popularity. An intuitive filtering system makes for a seamless shopping experience.
- Feature Best Sellers at the Top: Lead with your most popular or highest-rated products. Shoppers often look for recommendations, and best sellers serve as a great starting point.
- Add Persuasive Calls-to-Action (CTAs): Use compelling CTAs like “Shop Now,” “Limited Stock Available,” or “Don’t Miss Out!” to drive immediate action.
- Use Attention-Grabbing Headers: Strong, benefit-driven headers make your collections more engaging. Instead of just “Summer Dresses,” try “Breezy Summer Dresses You’ll Love!”
- Optimize Your Product Layout: Whether you use a grid or list format, keep it visually appealing and easy to browse. Proper spacing and alignment make a big difference.
- Prioritize High-Performing Products: Showcase premium or best-converting products in the first few rows to maximize their visibility and impact.
- Use Pricing Strategies That Convert: Clearly display prices and incorporate psychological triggers like “Save 20%,” “Only 3 Left!,” or “Exclusive Online Offer” to encourage purchases.
- Optimize Product Thumbnails: Ensure your thumbnails are clear, properly cropped, and load quickly. A fast, frustration-free browsing experience can significantly improve conversions.
- Simplify Navigation: Use breadcrumbs, logical categorization, and accessible menus so customers can easily explore and find products within your collections.
- Add Quick-Access Shortcuts: Include links to related collections or top-selling products in descriptions to keep customers engaged and encourage further browsing.
- Create Collections for Specific Customer Segments: Curate collections based on different audiences, like “Gifts for Her,” “Budget-Friendly Finds,” or “Newborn Essentials,” to better cater to your shoppers.
- Leverage Seasonal & Trending Collections: Tap into trends and seasonality by offering curated collections aligned with what’s hot—whether it’s holiday must-haves, viral products, or influencer favorites.
- Enhance Collection Navigation with Menus: Make it easy for shoppers to browse collections with well-structured navigation menus. A well-organized store improves the overall user experience and keeps customers coming back.
By implementing these best practices, you’ll not only improve your Shopify collections’ aesthetics but also drive more engagement and sales.
Conclusion
Making sure a Shopify store is organized helps keep customers connected and leads to more sales. With an appropriate collection configuration, you could facilitate browsing and make products more discoverable.
Whether you perform collections manually or automatically, structuring them properly boosts your store performance. Looking for a faster method to render collections? Customization is easy with Easy Display.
Now it’s your turn – organize your collections and improve your store’s shopping experience! Have questions? Find answers in the FAQ section.
FAQs
Why Should You Use Shopify Collection Pages?
Shopify collection pages help organize products efficiently, making it easier for customers to find what they need. This improves user experience and boosts conversions. They also enhance SEO by focusing on specific keywords, increasing search visibility. Collections can showcase bestsellers, seasonal items, or discounted products, simplifying navigation and driving more sales. A well-structured collection reduces friction in the buying process, making shopping smoother for customers.
What’s the Difference Between Collections and Product Catalogs in Shopify?
A product catalog contains every item available in a Shopify store, while collections are curated groups of related products, such as “Summer Sale” or “Best Sellers.” Collections improve navigation and marketing by organizing products in a more user-friendly way. While the catalog serves as the store’s full inventory, collections allow for easier filtering, better organization, and more targeted promotions, enhancing the shopping experience.
What Are Shopify Sub-collections?
Shopify doesn’t natively support sub-collections, but merchants can create them using navigation menus, tags, or metafields. This helps structure large inventories, making browsing more intuitive. For instance, a “Shoes” collection could include sub-collections like “Sneakers” and “Boots.” Using automated collections and filters, store owners can create a layered product organization that improves user experience.
Can a Product Be in Two Collections on Shopify?
Yes! Shopify allows products to be part of multiple collections. Merchants can manually assign products to different collections or use automated rules based on tags, product types, or other criteria. This makes it easy to feature items in various categories—like “New Arrivals” and “Best Sellers”—without duplicating listings, improving visibility and discoverability.
Collection vs. Product Type in Shopify: What’s the Difference?
A collection is a group of products merchants create to enhance organization and marketing, such as “Winter Jackets.” A product type, on the other hand, is a Shopify attribute that categorizes items (e.g., “Jacket,” “Sneaker”). Collections are used for storefront display and promotions, while product types help with backend organization and automated collection setups. Using both effectively improves store structure and product discoverability.
I am an SEO-friendly content and copywriter with 7 years of experience. I am confident in making and managing valuable digital content. My experience also includes executing successful SEO projects, managing teams, and staying up-to-date with the latest digital marketing trends and SEO updates.
