Shopify page templates allow store owners to set up their stores easily without technical skill. But many stores (competitors) are using the same templates as you, so what is your specialty that can attract customers?
Here you can use Shopify custom templates to personalize your store in 3 different ways. Shopify theme editor, adding custom code, and Shopify apps offer template customization and functionality.
Let’s customize templates for different types of pages on your Shopify store to reflect your brand identity!
What Are Shopify Custom Templates?
Shopify custom templates are special page layouts that allow store owners to design unique and branded pages. These templates work as reusable blueprints to ensure a consistent look across your store while saving time on design.
You know, there are limited customization options over default templates. Where custom templates give you full control over page design and content placement. You can create layouts for specific needs like product launches, seasonal sales, or unique collections.
5 Benefits of Using Shopify Custom Templates
Before diving into the steps of creating a custom template, you must know why it is important for your store. Here’s how these powerful templates can transform your e-commerce business:
- Improved Store Branding: A unique and personalized page template can improve the brand identity. This will help to make your store memorable to your audience and beat your competitors.
- Enhanced User Experience: Custom layout and functionalities provide an engaging shopping experience. It will help visitors to find what they are looking for. So, it will significantly increase sales and customer retention.
- Cost-effective Design: Once you design a custom template, you can use it many times. Even you can assign specific types of products to the template automatically. So, you don’t need to pay designers or developers for different pages or small changes.
- Save Time: Launch new pages or products in minutes, not hours. Just copy the successful layout to other pages instantly to save your valuable time.
- SEO Optimization: Search-friendly custom layouts help to rank higher on Google and other search engines.
By leveraging these benefits, Shopify custom templates can play a pivotal role in the success of your e-commerce venture.
Different Types of Shopify Page Templates
Now you should determine what type of template you need to use and customize for your e-commerce store. Because there are several types of Shopify templates for different purposes. Let’s get familiar with a few types of custom templates on Shopify:
Now you should determine what type of template you need to use and customize for your e-commerce store. Because there are many types of Shopify custom templates. Let’s get familiar with a few types of custom templates on Shopify:
- Homepage Templates: Define the layout and design of your store’s main page to create a strong first impression for visitors.
- Product Page Templates: Customize individual product pages to highlight features, images, videos, and descriptions effectively.
- Collection Templates: Organize and display groups of products to make it easier for customers to find related items.
- Static Page Templates: Design pages with fixed content, such as ‘About Us‘ or ‘Contact‘ pages, to provide essential information.
- Blog Templates: Manage the layout of your blog posts and articles to enhance readability and engagement.
- Landing Page Templates: Create focused pages for marketing campaigns or promotions to drive conversions.
- Cart Templates: Define the appearance and functionality of the shopping cart page for a smooth checkout process.
- Customer Templates: Design a template for customer account pages, such as registration, login, or order history pages.
- Gift Card Templates: Customize the presentation of gift card pages to improve the gifting experience.
- 404 Templates: Design the ‘Page Not Found’ error page to guide users back to active pages of your site.
Each template type serves a specific purpose for your Shopify stores. Additionally, Shopify offers multiple templates like search templates, password templates, etc.
3 Ways to Create and Customize Shopify Page Templates
You can customize a Shopify page template using 3 different methods. Pick one of them based on your requirements, skills, and budgets. Here is a quick comparison between three methods:
| Features/Methods | Theme Editor | Custom Code | Slider Revolution App |
| Skill Level | Beginner-friendly | Advanced | Intermediate |
| Customization | Limited options | Full control | Fully customizable |
| Learning Curve | Low | High | Medium |
| Cost | Free | Requires coding knowledge or Costly | Free plan available |
| Features | Basic layout changes | Depends on skill | Advanced animations, effects, and templates |
| Flexibility | Limited to theme settings | Complete flexibility | Pre-built customizable templates |
| Time | 30 min – 1 hour | Time-consuming | 1-2 Hours |
| Maintenance | Easy to updates | Requires manual maintenance | Auto-updates available |
| SEO Control | Basic SEO | Depends on skill | Advanced SEO |
| Responsiveness | Theme dependent | Manual coding needed | Built-in responsive design |
| Support | Shopify support available | Self-managed | A dedicated support team is available 24/7 |
Method 1: Customize Shopify Page Template Using Shopify Theme Editor
Shopify custom templates allow you to reflect your brand better and meet specific needs. Creating and customizing templates using the Shopify theme editor is easy and beginner-friendly. Here is a step-by-step guide for beginners to creating a custom template:
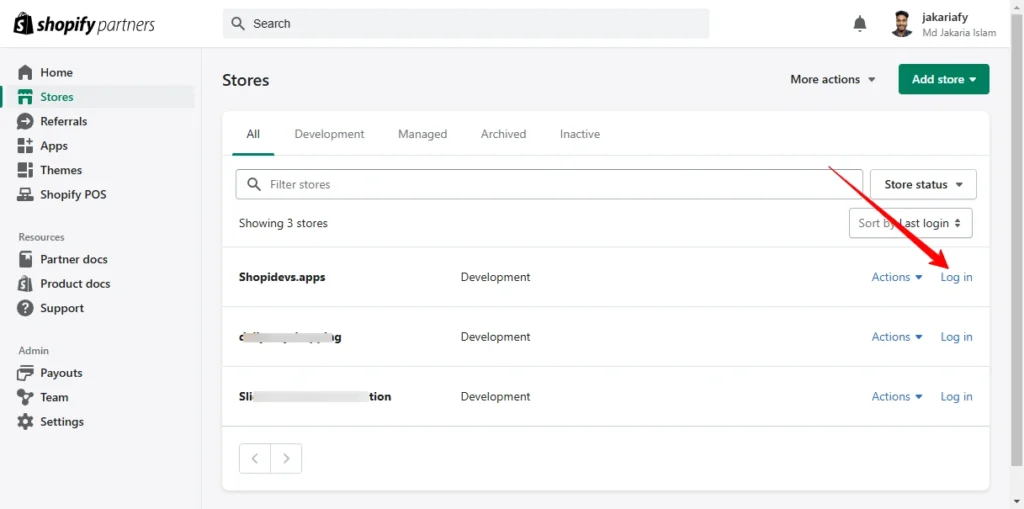
Step 1: Log into Your Shopify Store
- Visit the login page of Shopify to access your store.
- Enter your store’s credentials to access the admin dashboard.
Step 2: Access the Theme Editor
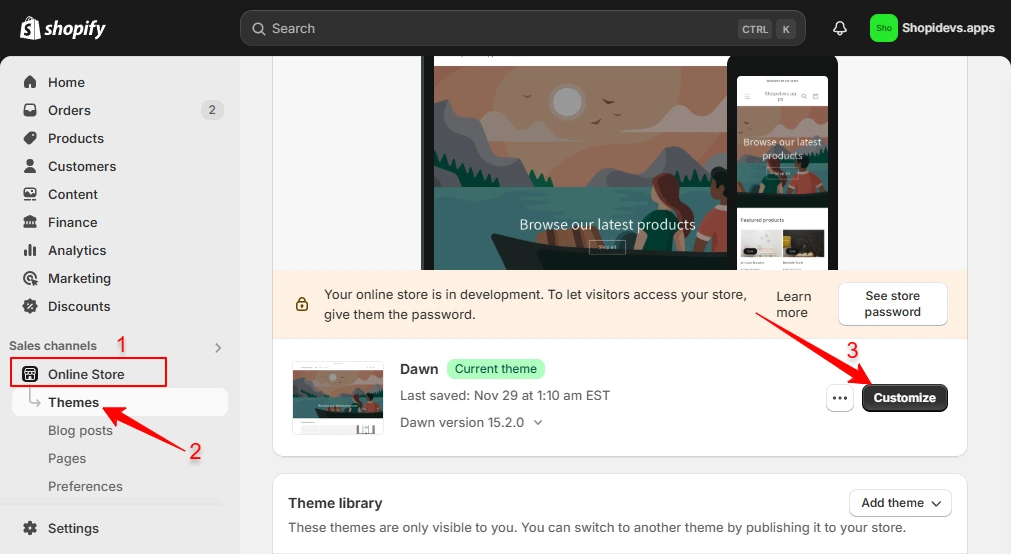
- In the admin dashboard, go to Online Store > Themes > Customize to open the ‘Theme Editor’.
Step 3: Create a New Template
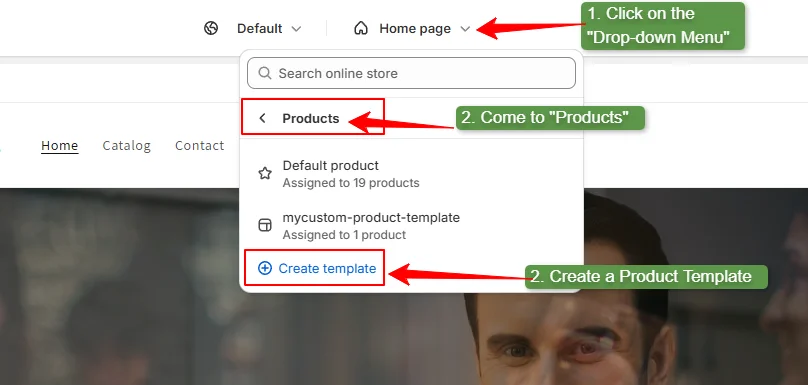
- In the Theme Editor, click the drop-down menu at the top (e.g., it might display the Home page, product page, etc).
- Select Pages where you want to create the custom template, then click Create Template. For example, I have created a custom product page here.
- Click Create a Template to proceed.
- Provide a unique name for your new custom template. (e.g. ‘mycustom-product-template’).
- Then click on the “Create template” button.
Step 4: Edit the Custom Template Layout
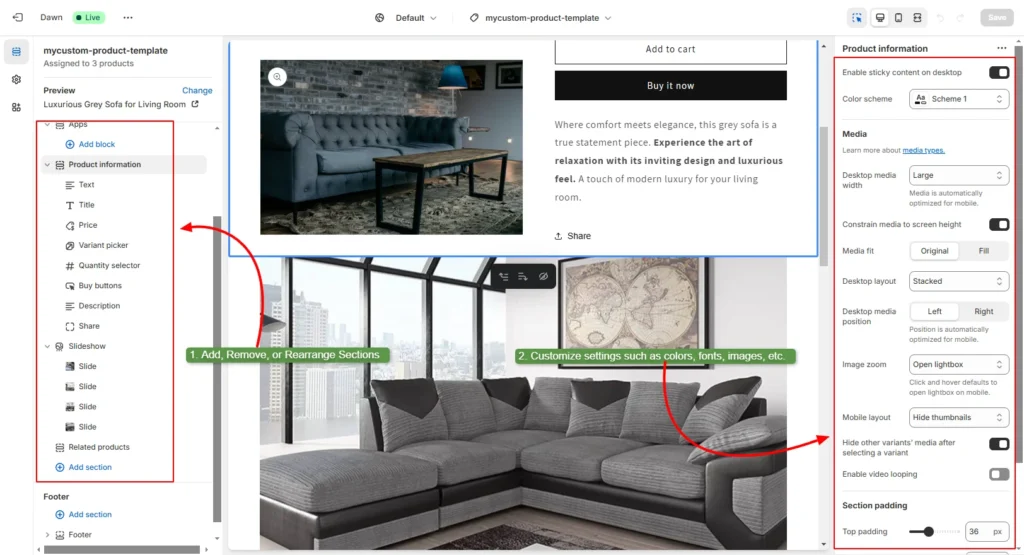
- Use the left sidebar to add, remove, or rearrange sections as desired.
- Customize settings such as colors, fonts, and images to align with your brand identity from the right sidebar.
- Preview your changes to ensure the layout meets your expectations.
- Then click on the “Save” button.
Step 5: Assign the Template and Save
- Exit the Theme Editor and return to the admin dashboard.
- Navigate to Online Store > Pages.
- Select the page you wish to apply the new template. Here, I have selected a collection of products.
- In the Theme Template section, choose your custom template from the drop-down menu.
- Click Save to apply the changes.
You can create and assign custom templates to your Shopify store’s pages by following these simple steps. It will enhance your store’s overall design and functionality to better suit your business needs.
Note: The first method (Shopify theme editor) only works on Shopify 2.0 themes. So, if you don’t have a 2.0 theme, then you can follow the next method.
Method 2: Edit Shopify Page Template Using Custom Code
Creating a custom page template on Shopify using custom liquid or JSON offers full control over the template. But it requires a high level of technical and coding knowledge. So, if you aren’t a technical person, please avoid this method.
Additionally, always create a duplicate of your theme or download it to prevent accidental loss of data. Then follow the step-by-step guide to create a custom template through custom coding:
Step 1: Access the Shopify Theme Code Editor
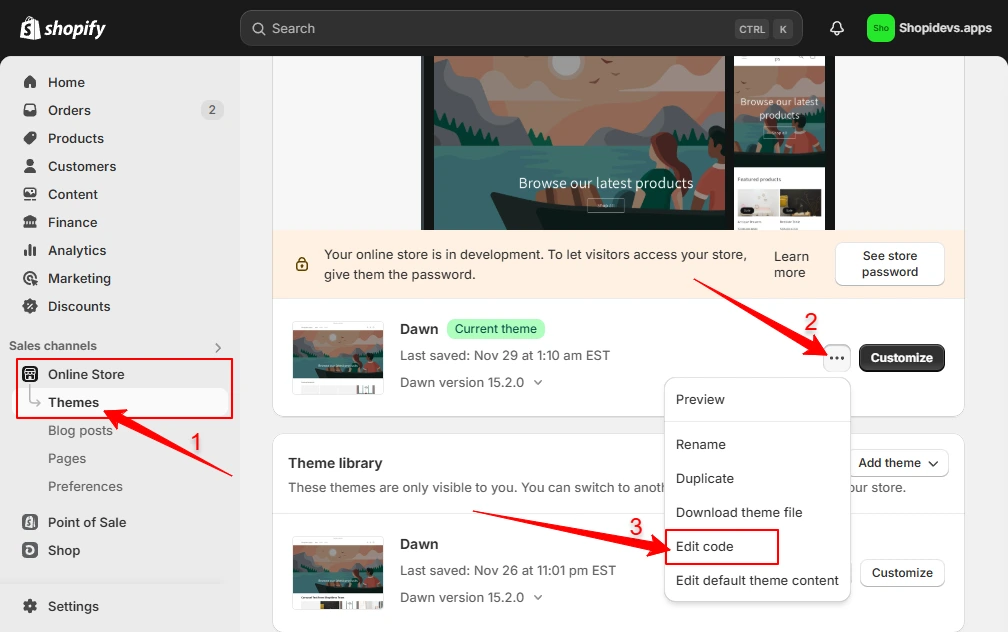
- Log in to your Shopify admin dashboard.
- Navigate to Online Store > Themes.
- Find your current theme and click Actions > Edit code.
Step 2: Create a New Product Template
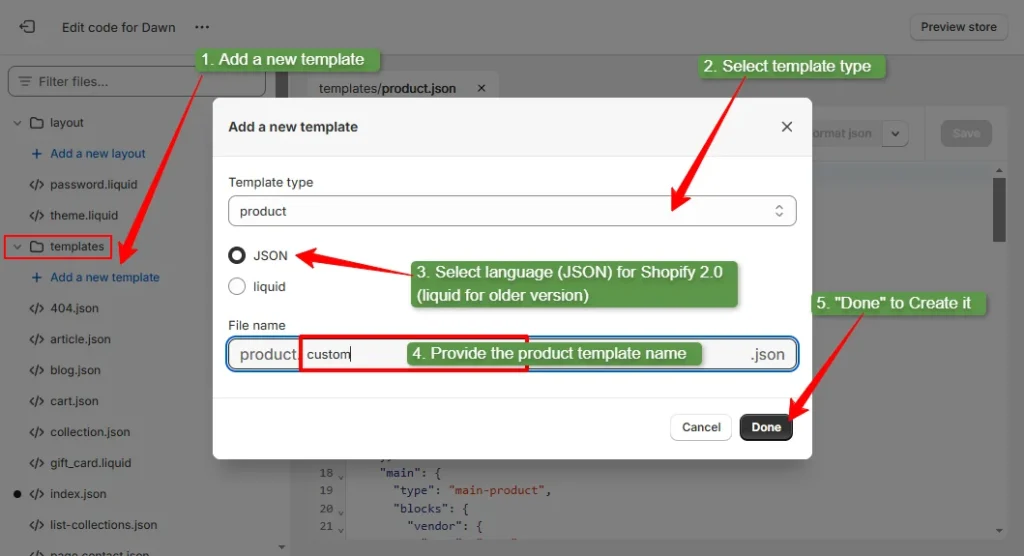
- In the Templates directory, click Add a new template.
- Select the template type, for example, I have selected “product” as my custom template type.
- Choose JSON for Shopify 2.0 themes or Liquid for older versions.
- Name your new template (e.g., product.custom).
- Click “Done” to create the custom product template.
It will automatically import all JSON data from the main product page. By any chance, if your custom page doesn’t import data from the ‘main product’ template, you can easily do it manually.
Step 3: Add/Customize Code for the Shopify Custom Template
- Modify the code in your custom template to achieve the desired layout and functionality.
- This may include adding custom sections, changing the arrangement of elements, or incorporating additional features.
- Ensure that any custom code is properly formatted and tested.
- Click on the “Save” button to save all code changes.
Note: If you want to change or add any customized section from the custom template, you need to add a new custom product’s liquid file from the “Sections”.
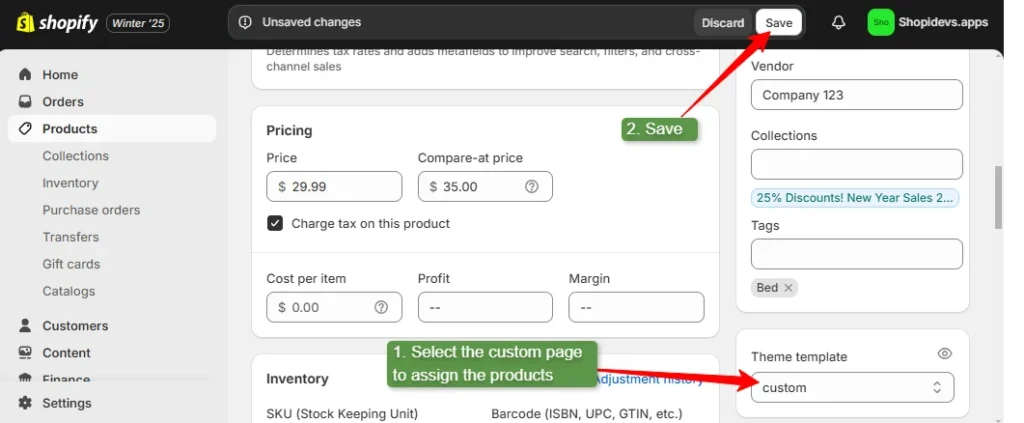
Step 4: Assign Products to the Custom Template
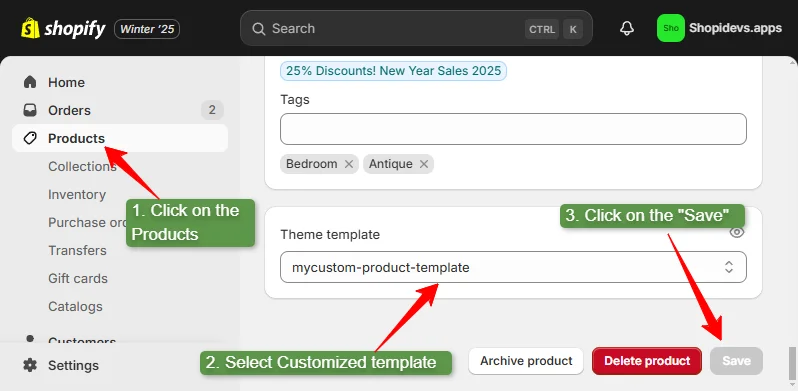
- In your Shopify admin, go to Products and select the product you wish to assign to the custom template.
- In the Theme Templates section, select your custom template from the drop-down menu.
- Save the product.
Step 5: Customize the Template Using Shopify Theme Editor
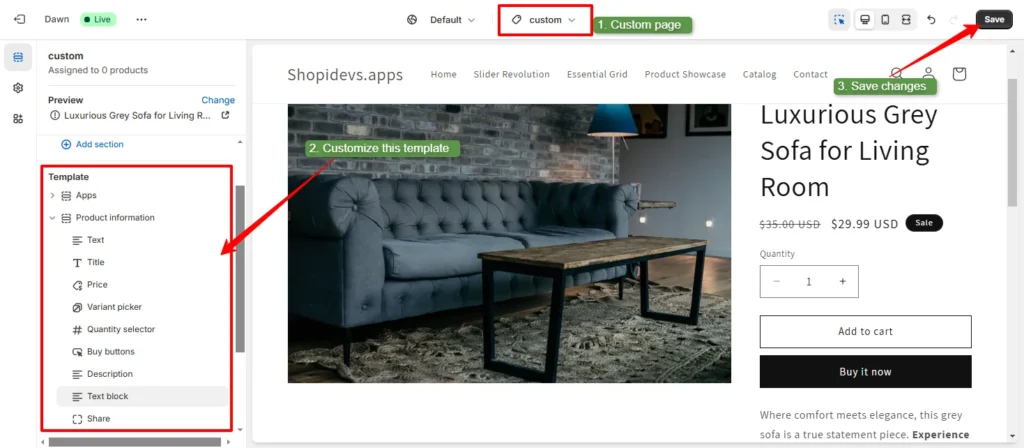
- Return to the Shopify admin panel Online Store > Themes > Customize to open the Theme Editor.
- Click on the dropdown menu to select the new custom product template (or any other template you have designed).
- Make any additional visual adjustments as needed, such as changing colors, fonts, or images.
- Save your changes.
Though you have extensive customization options for a template, this is really difficult to do. It is time-consuming and requires coding skills and attention to detail. So, I will suggest you to create a custom template using the slider revolution app.
Method 3: Use Slider Revolution for Shopify Page Template Customization

Whether you want to create a custom template for a homepage, collection page, or product page, get 300+ pre-designed custom templates for Shopify. These templates are built to save you time and make your store stand out with dynamic sliders.
These custom Shopify templates are fully customizable and mobile-friendly. Also, you can add your brand’s logo, colors, and content in just a few clicks. Additionally, dynamic design, animation, effects, and visual elements make your store more engaging.
So, start customizing your products, collections, homepage, 404 pages, blog page, coming soon page, landing pages, etc with 0 coding knowledge. These custom templates are great for creating unique layouts that improve your branding.
Ready to explore the variety of modern styles and layouts?
5 Examples Designed with Slider Revolution’s Custom Templates
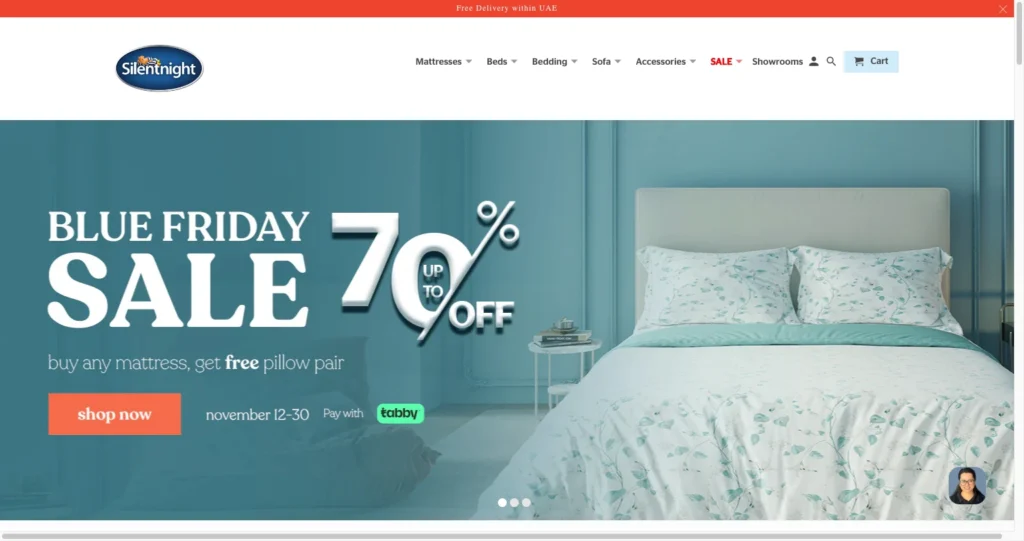
Over 5000 active merchants are using Slider Revolution templates in their Shopify stores. Dynamic and attractive templates help store owners to increase engagement and conversions. Here are 5 winning store examples that have increased their sales significantly after using the Slider Revolution app’s custom templates.
TechTron

Alla Moda Furniture

Silent Night
EnGenius Store Europe

Maentum

5 Tips to Create and Customize Winning Custom Page Templates on Shopify
A well-designed template not only enhances your store’s visual appeal but also drives conversions. But creating a winning custom page templates on Shopify requires strategic planning. Here are five secret tips for creating stunning custom templates:
- Understand Your Audience: First study customer behavior and analytics to understand their needs. Then design templates that match your customer’s shopping preferences. Focus on elements that resonate with your target market to increase engagement and sales.
- Maintain Consistency: Use your brand color schemes, typography, and branding elements consistently. Also, keep fonts and spacing uniform to align with your brand guidelines for building trust and authenticity.
- Ensure Mobile-Friendly: Test your customized templates on different devices. Especially, optimize images and layouts for mobile. Because almost 75% of customers visit Shopify stores using their mobile phones.
- Utilize Shopify’s Resources: Leverage Shopify’s built-in tools, documentation, support, and community help to simplify the template customization process.
- Test Before Publishing: Preview on multiple browsers and devices before final publishing. Check load times, verify all links and buttons work, and get feedback from test users to be confident about the template.
If you implement these tips on your Shopify custom templates, it will ensure the best user experience. Which will help to satisfy your store visitors and increase sales.
Conclusion
Shopify custom templates are a powerful way to make a unique, personalized, and user-friendly store. You can design pages that fit your brand and improve the shopping experience with custom templates. Also, you will have endless control over your store our store’s design and functionality.
You have 3 ways to use a custom template on your Shopify store. Using Shopify’s default theme editor is the easiest method for a custom page that offers basic features. The next method is by using custom code, which offers endless control but requires technical knowledge and time.
So, using a Shopify app like Slider Revolution & Sections can be the best solution for creating custom pages. Because you can do endless customization within a short time without any coding knowledge.
FAQs
Can You Create Your Own Template in Shopify?
Yes, you can create your own template in Shopify. Shopify allows you to add new custom templates using the Theme Editor or by editing the theme code. You can create templates for products, collections, or pages.
Does Shopify Allow Custom Products?
Yes, Shopify allows custom products. You can add custom options like text fields, dropdowns, or checkboxes to your product pages by using Theme Editor. However, advanced features require technical (coding) knowledge, or you can hire a Shopify expert to customize products.
How Can I Create a New Custom Page Template?
You can create a new custom page template in Shopify by following the steps below:
- Open the Theme Code Editor from your Shopify admin.
- Go to the Templates folder and click Add a New Template.
- Name your template and customize it using code or sections.
- Save the template and assign it to the desired page.
Jakaria is an SEO Content Writer in Shopify, Ecommerce, WordPress, and Tech Industry with 4+ years of experience. He specialises in developing engaging, helpful content by simplifying complex topics into an amazing story for B2B, SaaS, and Shopify businesses. He’s also passionate about staying updated on SEO strategies and Shopify trends.
