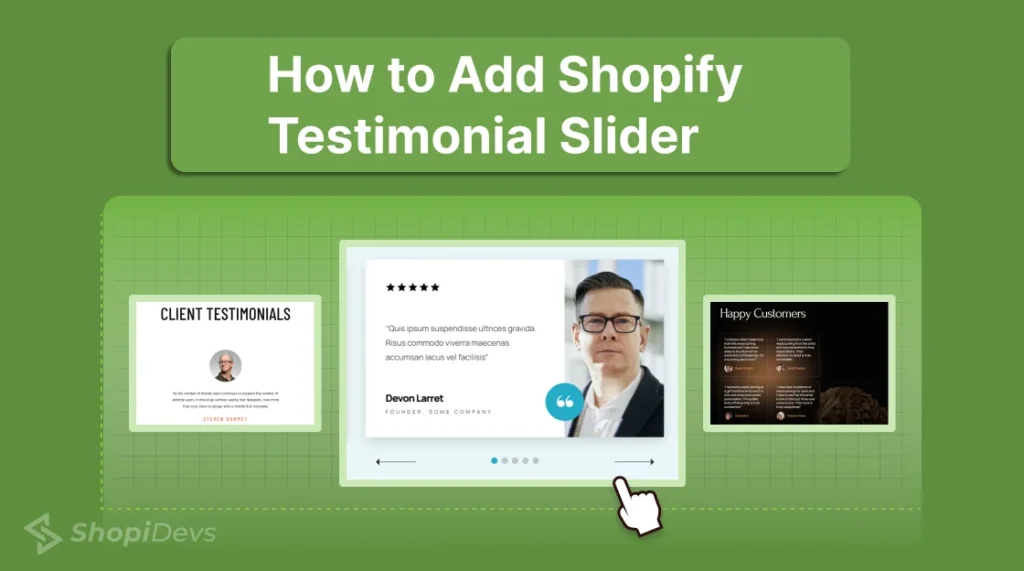
A Shopify Testimonial Slider is a great way to display customer reviews in a slider/moving format. This slider helps build trust and keeps visitors engaged with eye-catching testimonials. When shoppers see positive reviews, they feel more confident about buying. This social proof encourages them to make a purchase.
If you want to add a testimonial slider to your Shopify store, you have two simple options. You can use a ready-made testimonial slider template from an app or add it manually using custom code. Both methods let you display customer feedback effectively.
Let’s walk you through the step-by-step process of both ways to add testimonial sliders on Shopify.
5 Benefits of Using a Testimonial Slider on Shopify
Before diving into the process of adding a testimonial slider to your Shopify store, let’s know about a few major benefits of using it. It displays real customer reviews in an attractive way which boosts confidence. Here are 5 advantages:
- Builds trust and credibility: Real customer reviews build trust and show proof that your store is reliable.
- Increases conversion rates: Positive reviews can help to convince visitors to buy, leading to more sales.
- Highlights key features that customers love: Testimonials explain what value your product brings to your customers.
- Enhances brand image: A well-made slider gives your website a professional look.
- Engaging presentation: The dynamic slider catches attention and keeps visitors interested. Which may encourage visitors to explore your products and make purchases.
Moreover, a testimonial slider on the Shopify store can improve UX, reduce bounce rate, improve SEO, and showcase authenticity. These added benefits make a testimonial slider even more valuable for your Shopify store.
How to Add Shopify Testimonial Slider Using Templates
Using apps could be the first and easiest way to add Shopify testimonial sliders to your online store. This method doesn’t require an advanced level of technical knowledge. You just need to choose a template and integrate the template into your Shopify store. Let’s dive into a detailed step-by-step guide:
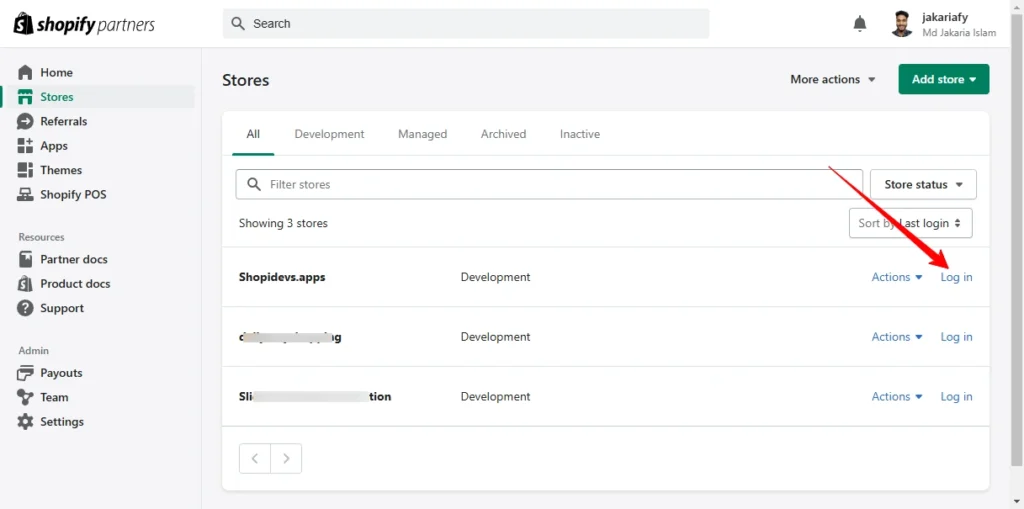
Step 1: Log in to the Shopify Store Dashboard
- Log in to your Shopify store with your credentials.
- Access your admin dashboard.
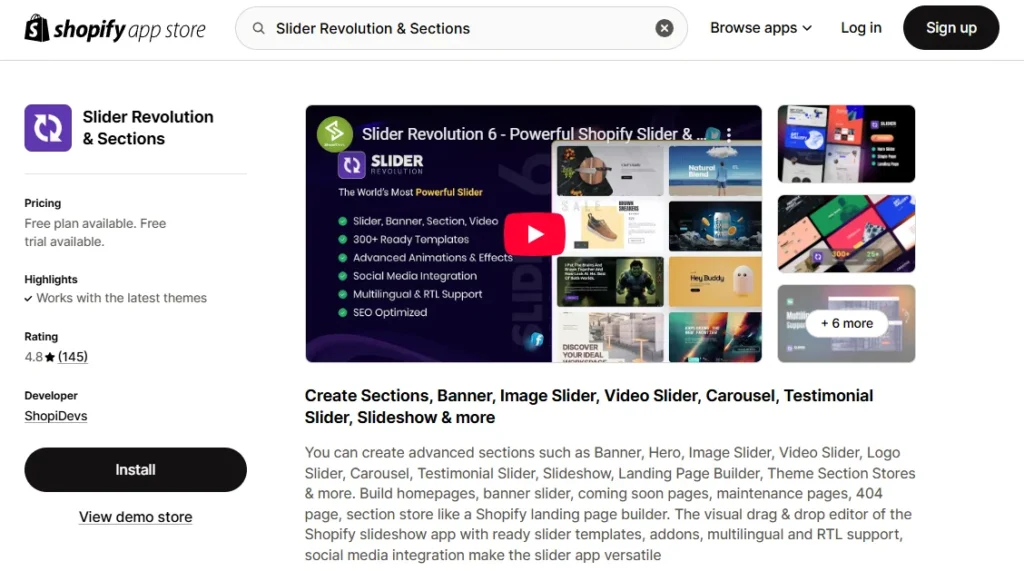
Step 2: Go to the Shopify App Store & Install the Slider Revolution App
- Navigate to the ‘Apps’ section or Go to the Shopify app store.
- Search for the “Slider Revolution & Sections” app.
- Then click on the “Install” button to add it to your Shopify store.
After completing the installation process, you will be redirected to the Slider Revolution dashboard.
Step 3: Activate the Slider Revolution App
- Click on the “Enable” button of the embed slider.
- It will redirect you to the Shopify store app embeds section.
- Ensure activate the Slider Revolution app, then click on the “Save” button.
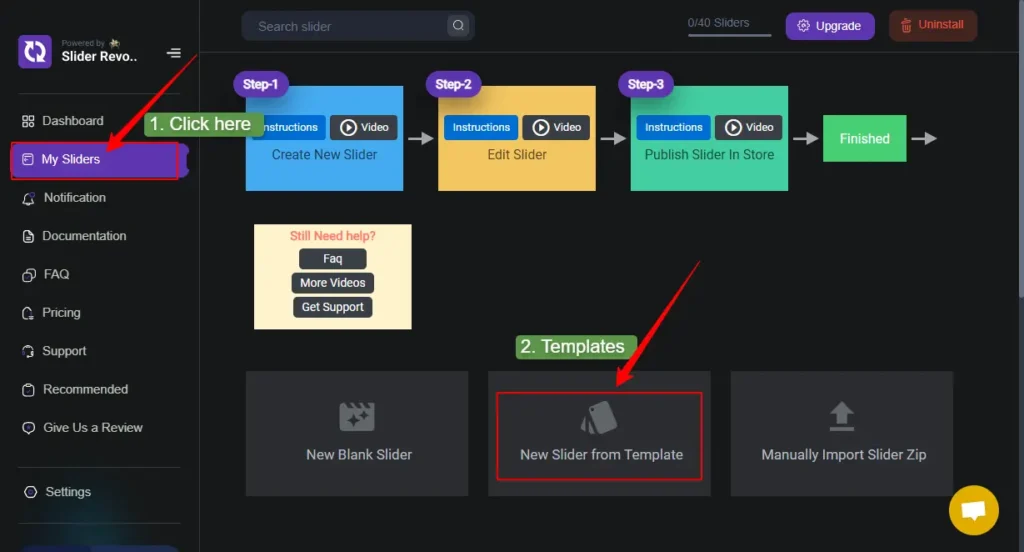
Step 4: Go to “My Slider” > “New Slider from Template”
- From the Slider Revolution & Section dashboard, go to the “My Slider” section.
- Then click on the “New Slider from Templates” to explore all templates.
Step 5: Install a Testimonial Template
- Search for “Testimonial” and brown a lot of testimonial templates for the Shopify store.
- Choose a template that fits your Shopify store and click on the plus “+” icon.
- Click on the “Install Template” button.

Step 6: Click on the Edit Icon
- Hover over the testimonial slider template.
- Then click on the “Pen/Edit” icon to customize the testimonial template.
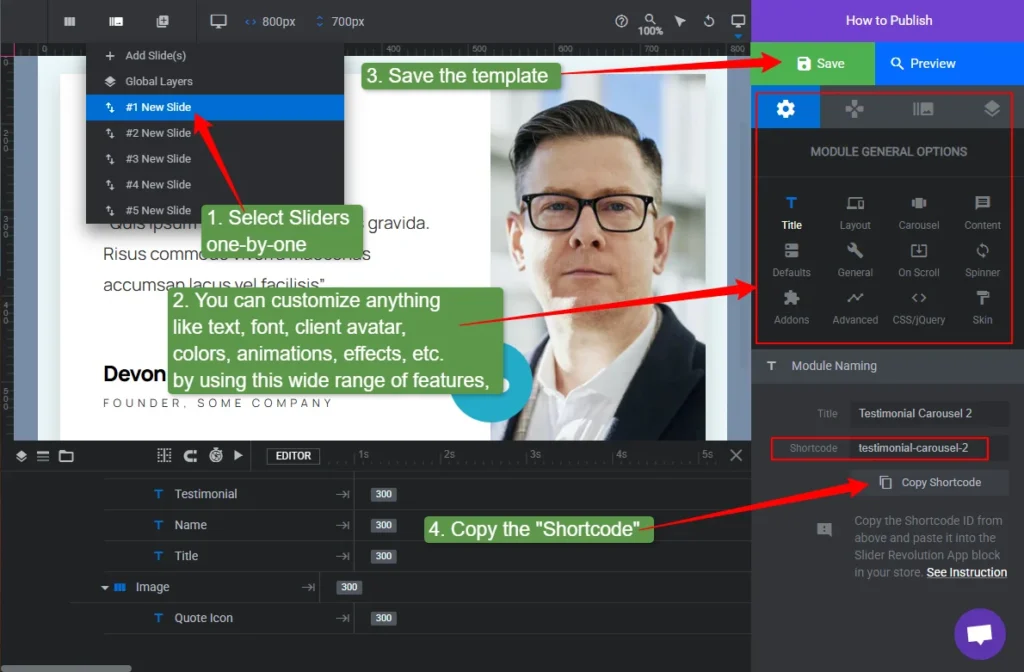
Step 7: Customize the Testimonial Slider & Copy Shortcode
- Hover over the “Sliders” section, then select testimonials one after one to customize them.
- Customize your customer name, image, position, review, slider duration, animations, effects, etc.
- After completing the customization process, preview the testimonial slider template.
- If you find everything is okay, then click on the “Save” button.
- Finally, copy the shortcode from Module General Icon > Title > Copy Shortcode.
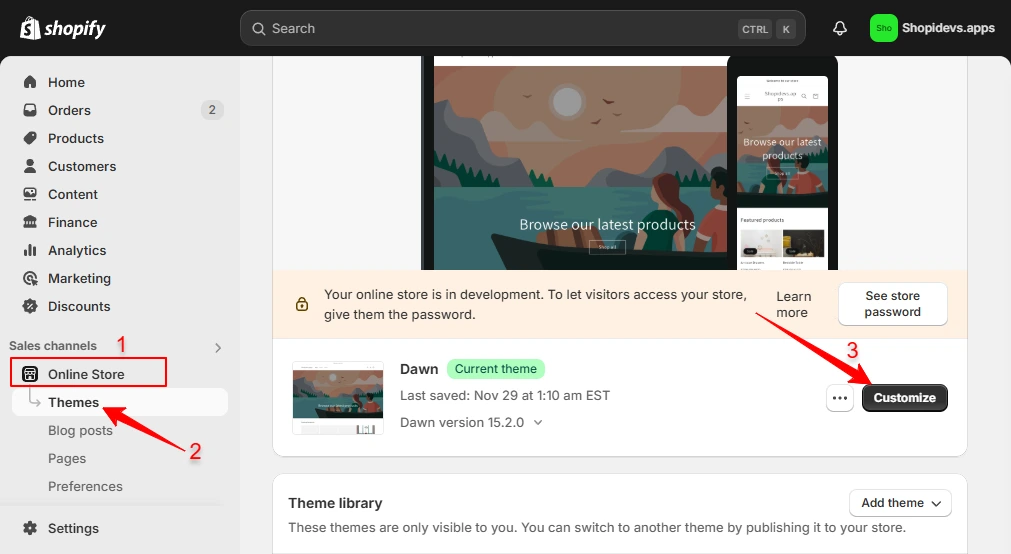
Step 8: Go to the Shopify Store Theme Editor
- Visit your Shopify store dashboard.
- Click on the “Online Store” > “Themes” > “Customize”.
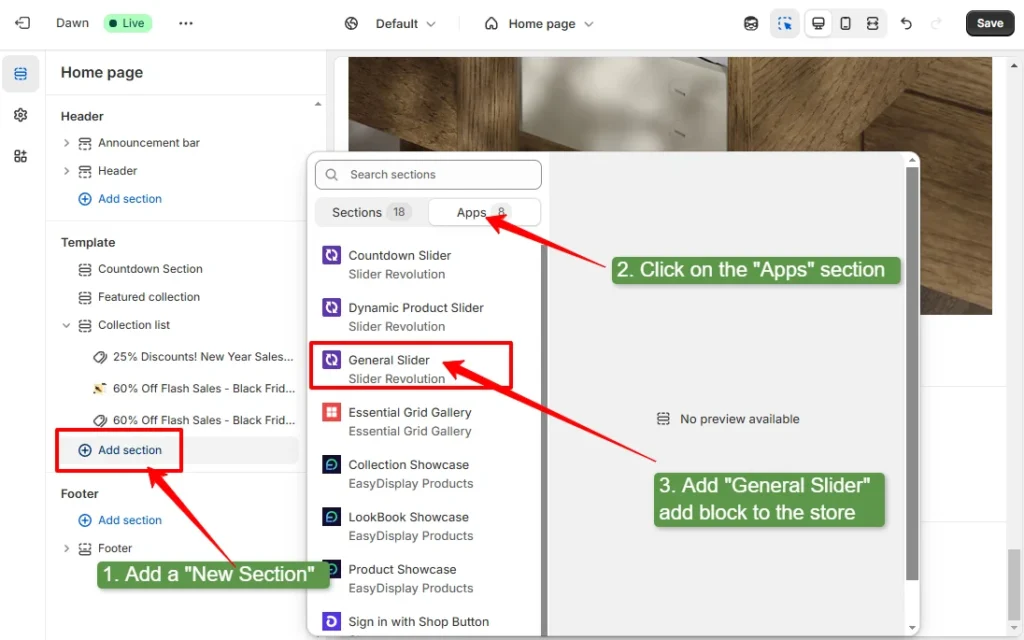
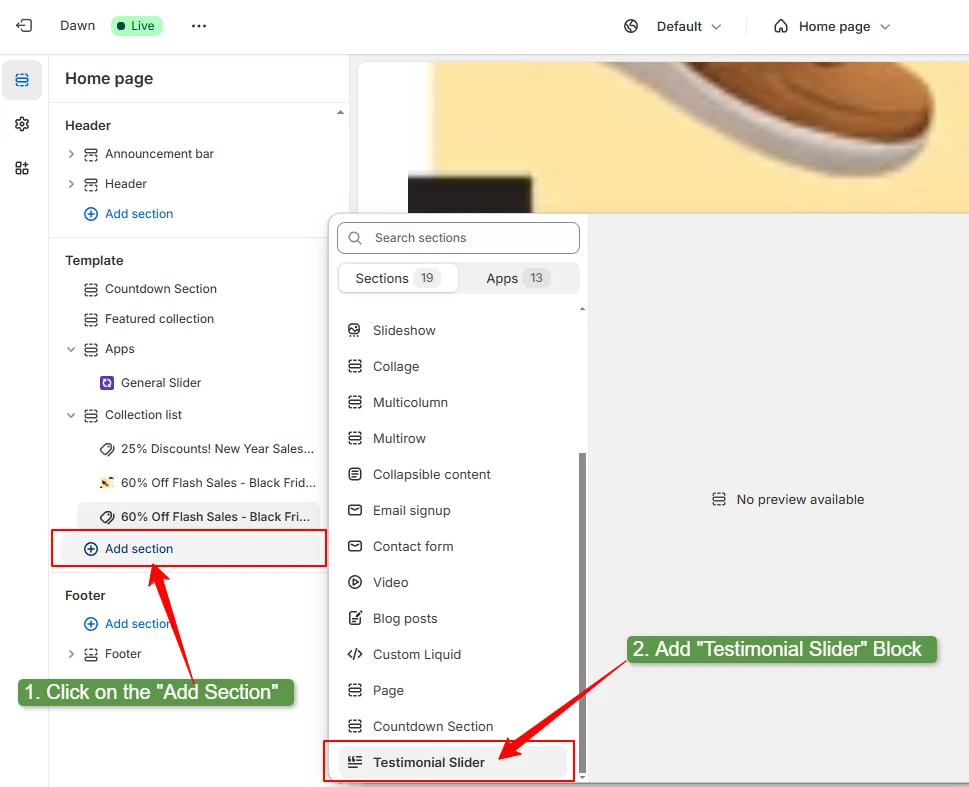
Step 9: Add ‘New Section’ > General Slider App Block
- Add a New Section to your store where you want to add the testimonial slider section.
- Go to the “Apps” section and add the “General Slider” app block.
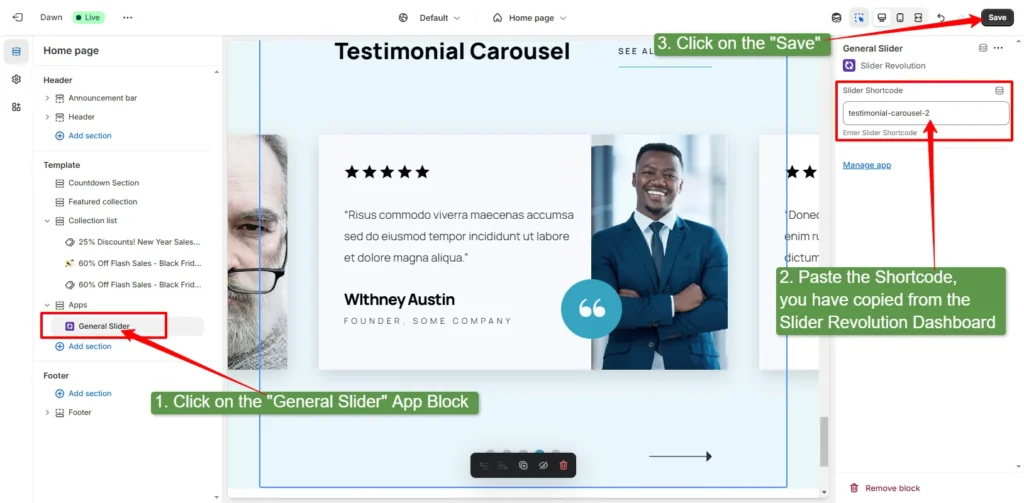
Step 10: Paste the Shortcode and ‘Save’
- Click on the “General Slider” app block, it will open a field to put the slider template shortcode.
- Paste the shortcode you have copied in Step 6.
- Then click on the “Save” button to save the slider on your shopify store.
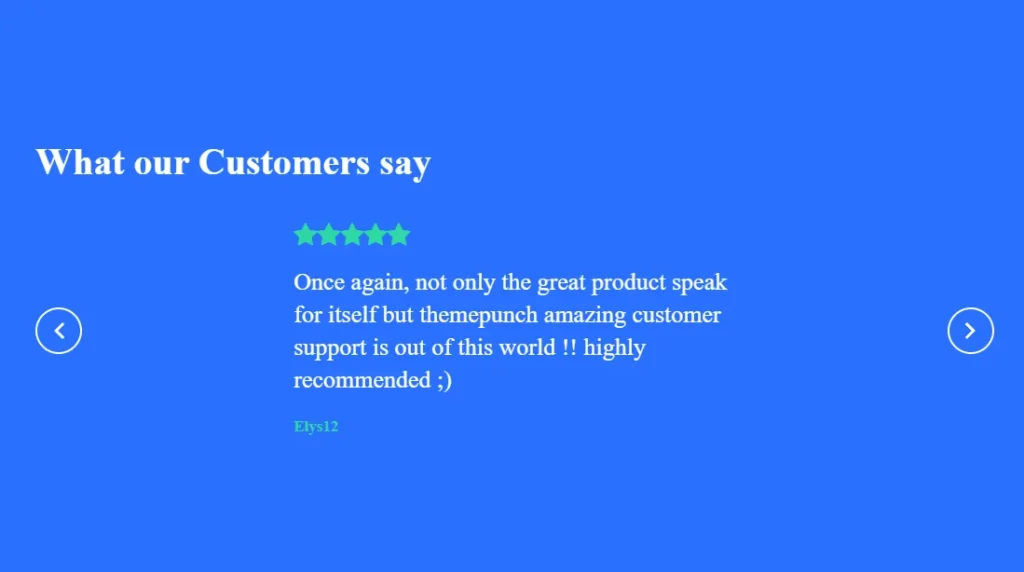
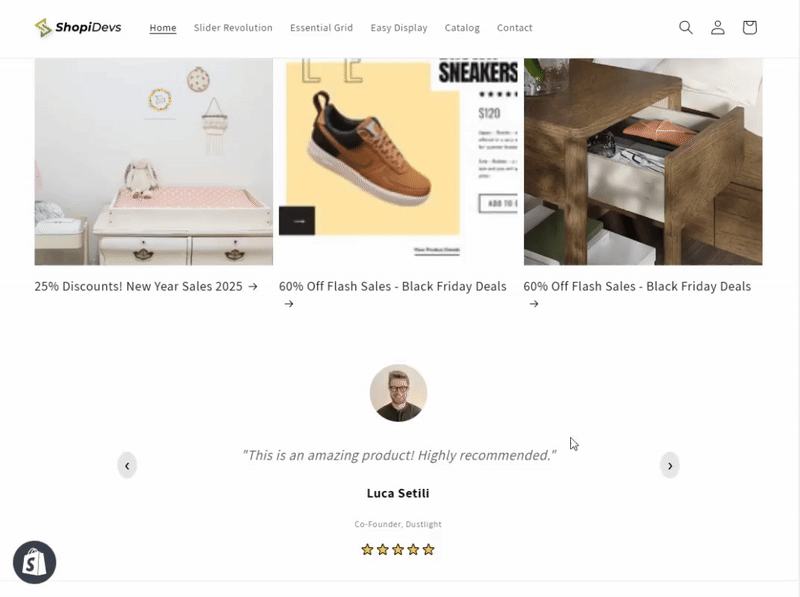
Shopify Testimonial Slider Preview
Let’s visit your storefront that how the testimonial looks on your storefront.

Note: Here I have shown only one testimonial template in this tutorial. But there are hundreds of hero banners, videos, images, Shopify carousels, product banners, and more available on Slider Revolution. However, let’s explore the 10 best testimonial templates of the Slider Revolution app.
10 Best Testimonial Slider Templates for Shopify
Testimonial sliders are essential to showcase social proof on your Shopify stores. Here are the top 10 testimonial slider templates for Shopify which help to build trust, boost engagement, and drive sales.
1. Coworking Space Testimonial Slider Template
The Coworking Space Testimonials template offers a modern design perfect for creative workspaces. This template builds trust and attracts customers with vibrant and real reviews. It is perfect for community-driven success stories and ideal for collaborative environments.

2. G AI Testimonial Slider Template
Generative AI Testimonial is a simple yet attractive slider template for innovative brands. Its clean design and bold text with avatar images showcase full-width reviews. This will help to boost engagement by creating a cutting-edge presentation for customer feedback.

3. App Website Testimonial Slider Template
App Website Testimonials sliders offer a sleek, modern design ideal for tech and app businesses. This template showcases the testimonial slider in bold text a clear customer image with a solid background.

4. Zen Testimonial Sliders Template
The Zen Testimonial Sliders template offers a sleek and classic way to display customer feedback. With a minimalist design, smooth transitions, and bold typography, it enhances credibility. This is perfect for any Shopify store while keeping testimonials visually appealing and easy to read.

5. Corporate Testimonial Slider Template
Corporate Testimonials feature a professional design that is perfect for large businesses. This testimonial template displays customer reviews in a formal layout that builds trust and reinforces credibility. Also, it improves your brand’s corporate image effectively through clear, authoritative presentation.

6. Landing Page Testimonial Template
Landing Page Testimonials offers a static layout to showcase client reviews for landing pages. Well-designed frames and simple layouts can capture attention quickly and help to boost conversions.

7. TechCo Testimonial Slider Template
TechCo Testimonials is a simple Shopify review slider template without a client’s avatar. However, you can change the background, ratings, client name, company, and more. This is a great way to showcase reviews without any clutter.
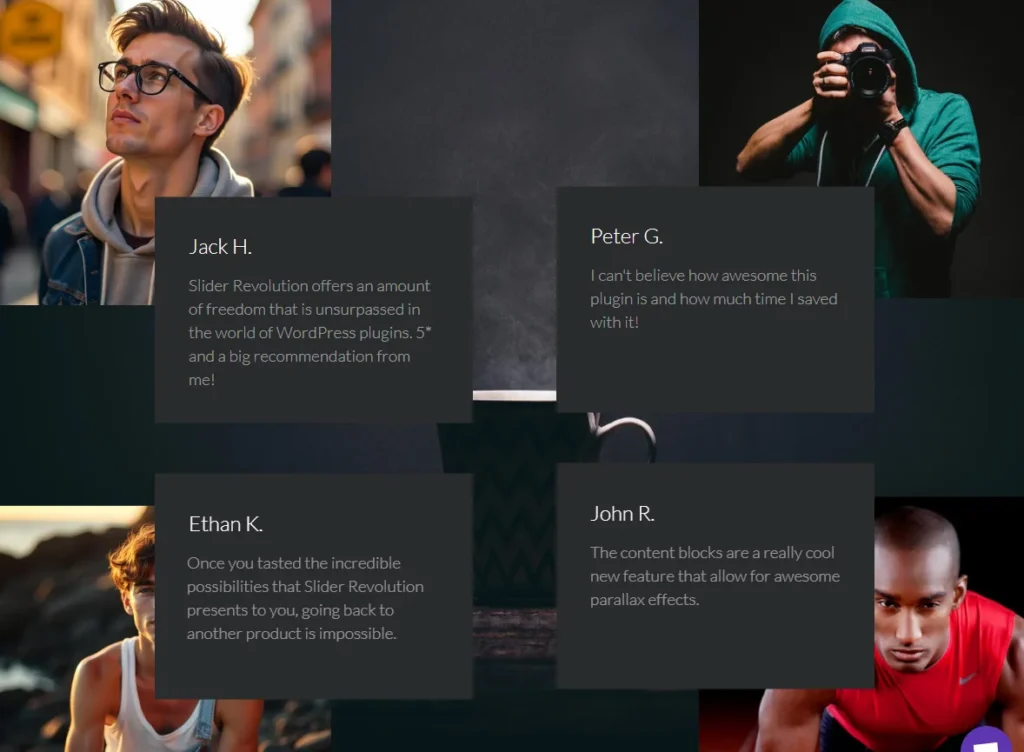
8. Content Block – Shopify Testimonial Templates
Content Block Testimonials slider template is a unique design that can attract your visitors. It neatly displays 4 reviews at once in 4 blocks with the customer image, name, and the review. Additionally, the Content Block Shopify testimonial slider has two different versions that will perfectly match your theme.
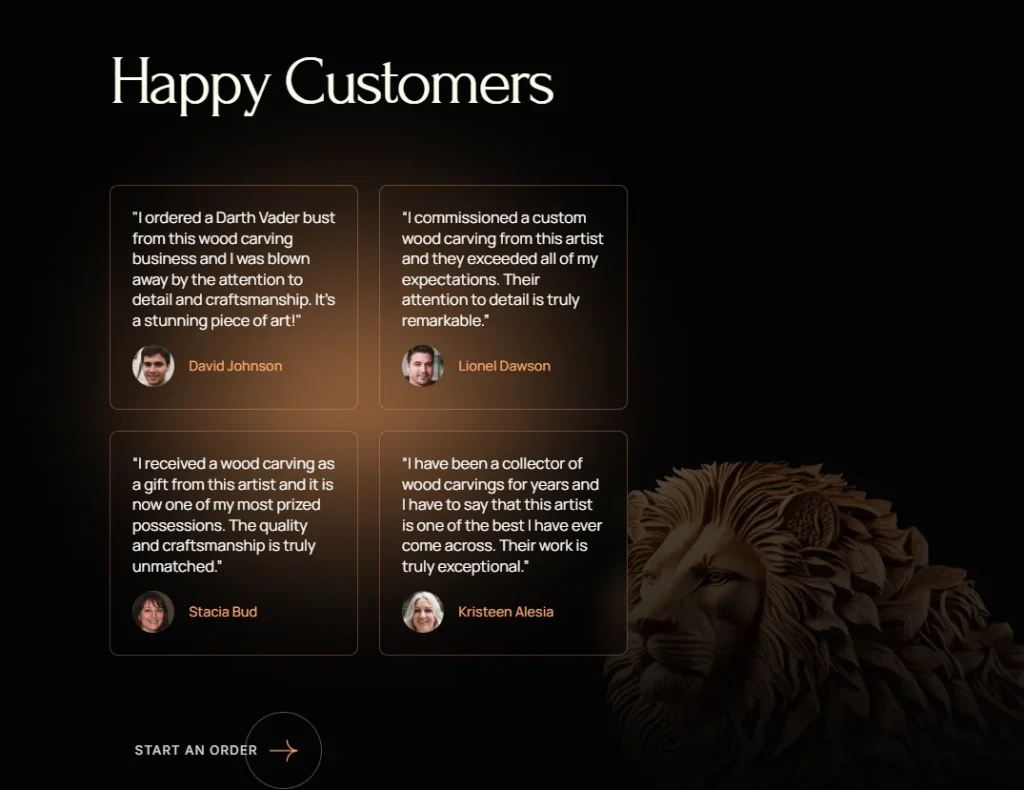
9. Woodworking Testimonial Slider
A Woodworking Testimonial is a smart template to show customer reviews on your woodworking site. It displays feedback in a slider with a rustic, wood-inspired look and beautiful animations. This template helps visitors feel confident about your wood products.
10. Testimonial Carousel Pack – Shopify Testimonial Templates
Testimonial Carousel Pack is a bundle of several carousel templates. It rotates customer testimonials in an engaging format. Also, it encourages visitors to explore products on your Shopify store with seamless motion.

These Shopify testimonial banners are effective in engaging with customers, building trust, and increasing conversion rates on your Shopify store.
Free Shopify Testimonial Slider Code to Add a Testimonial Slider
Don’t worry, if you aren’t comfortable with the Slider Revolution & Sections app, get the free code with a step-by-step guide to add a testimonial slider.
Step 1: Login to the Shopify Store Dashboard
- Go to the Shopify store admin panel and log in to your store dashboard.
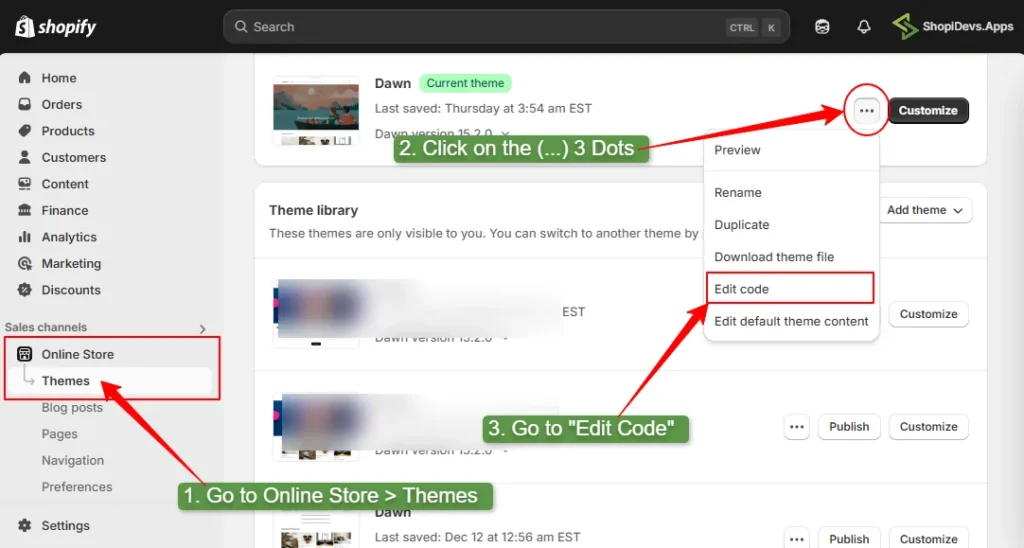
Step 2: Go to “Online Store > Themes > Edit Code”
- Click on “Online Store > Themes”
- Click on the 3 dots (…) button at the left side of the ‘Customize’ button and go to “Edit Code” to add the custom code for testimonial sliders.
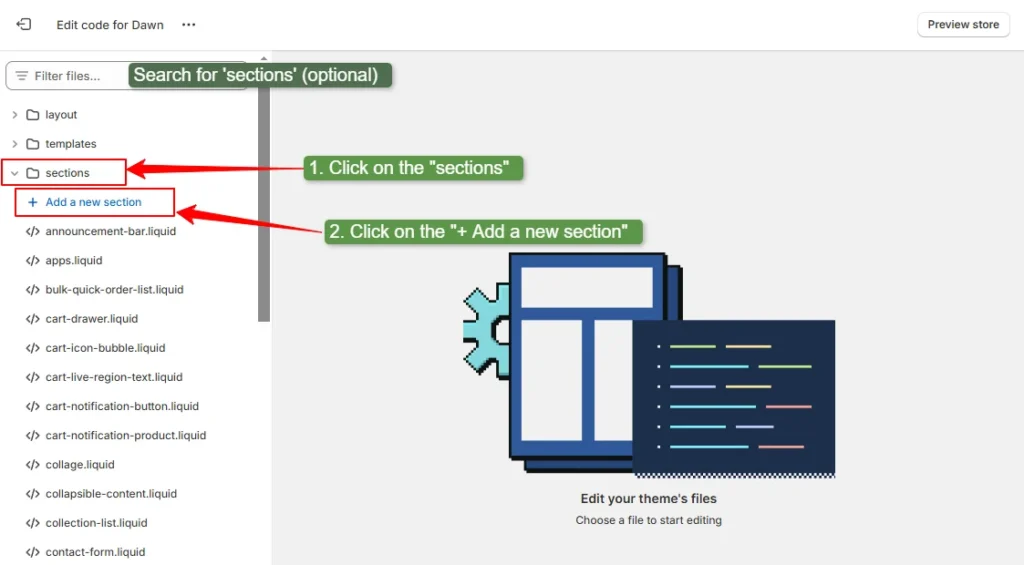
Step 3: Add a New ‘Testimonial Slider’ Section
- Search for a “Section” or “Navigate to the “Sections” files.
- Then click on the “Add a New Section” to add a testimonial slider.
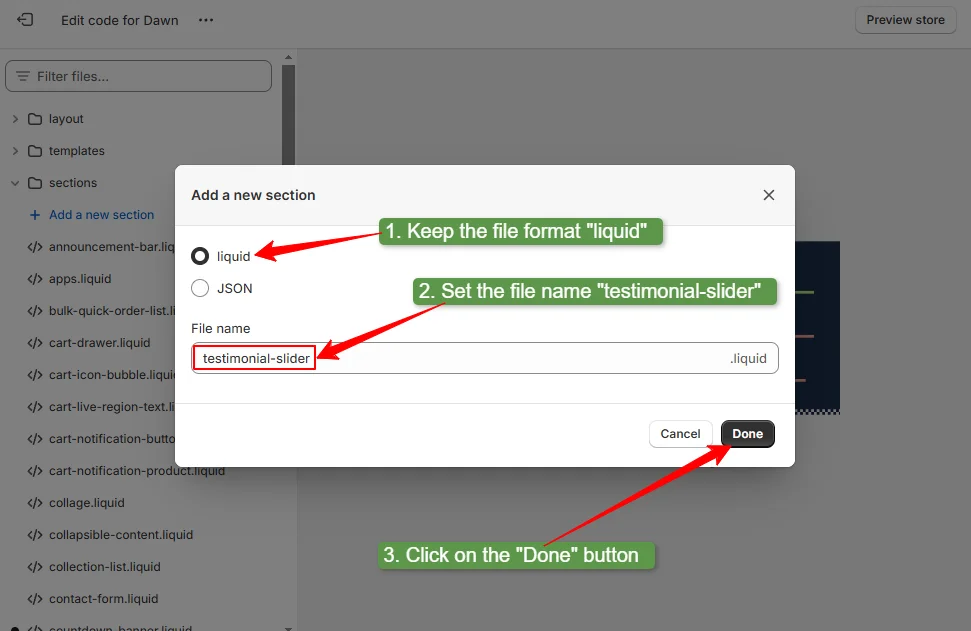
Step 4: Select the File Extension & Name the File
- Keep the testimonial slider file extension in a liquid format.
- Provide the file name “testimonial-slider”.
- Then click on the “Done” button.
Step 5: Copy the Custom Code Below
{% schema %}
{
"name": "Testimonial Slider",
"settings": [],
"blocks": [
{
"type": "testimonial",
"name": "Testimonial",
"settings": [
{
"type": "image_picker",
"id": "avatar",
"label": "Customer Avatar"
},
{
"type": "text",
"id": "name",
"label": "Customer Name",
"default": "John Doe"
},
{
"type": "text",
"id": "company",
"label": "Company Name",
"default": "ABC Corp"
},
{
"type": "text",
"id": "position",
"label": "Position",
"default": "CEO"
},
{
"type": "textarea",
"id": "quote",
"label": "Testimonial Text",
"default": "This is an amazing product! Highly recommended."
},
{
"type": "select",
"id": "rating",
"label": "Star Rating",
"options": [
{ "value": "1", "label": "1 Star" },
{ "value": "2", "label": "2 Stars" },
{ "value": "3", "label": "3 Stars" },
{ "value": "4", "label": "4 Stars" },
{ "value": "5", "label": "5 Stars" }
],
"default": "5"
}
]
}
],
"presets": [
{
"name": "Testimonial Slider"
}
]
}
{% endschema %}
<style>
.testimonial-slider {
position: relative;
overflow: hidden;
width: 100%;
max-width: 800px;
margin: auto;
}
.slider-container {
display: flex;
transition: transform 0.5s ease-in-out;
white-space: nowrap;
}
.testimonial-slide {
min-width: 100%;
box-sizing: border-box;
display: flex;
flex-direction: column;
align-items: center;
text-align: center;
padding: 20px;
}
.testimonial-slide img {
border-radius: 50%;
width: 80px;
height: 80px;
object-fit: cover;
margin-bottom: 10px;
}
.testimonial-slide p {
font-size: 1.9rem;
color: #555;
font-style: italic;
}
.testimonial-slide .star-rating {
color: #fbbf24; /* Yellow */
font-size: 1.5rem;
margin-top: 10px;
}
.testimonial-slide h3 {
font-weight: bold;
margin-top: 5px;
}
.testimonial-slide .company-position {
font-size: 1.2rem;
color: #777;
margin-top: 3px;
}
.add-a-water-text-shopidevs {
opacity: 0.7;
margin-top: 10px;
font-size: 0.9rem;
}
.add-a-water-text-shopidevs a {
text-decoration: none;
color: #555;
}
.slider-nav {
position: absolute;
top: 50%;
transform: translateY(-50%);
background: rgba(0, 0, 0, 0.1);
border: none;
padding: 10px;
cursor: pointer;
border-radius: 50%;
}
.slider-nav:hover {
background: rgba(0, 0, 0, 0.3);
}
.prev { left: 10px; }
.next { right: 10px; }
</style>
<div class="testimonial-slider">
<div class="slider-container">
{% for block in section.blocks %}
<div class="testimonial-slide">
{% if block.settings.avatar %}
<img
src="{{ block.settings.avatar | img_url: '80x80' }}"
alt="{{ block.settings.name }}"
width="80"
height="80">
{% endif %}
<p>"{{ block.settings.quote }}"</p>
<h3>{{ block.settings.name }}</h3>
<div class="company-position">{{ block.settings.position }}, {{ block.settings.company }}</div>
<div class="star-rating">
{% case block.settings.rating %}
{% when '1' %} ⭐
{% when '2' %} ⭐⭐
{% when '3' %} ⭐⭐⭐
{% when '4' %} ⭐⭐⭐⭐
{% when '5' %} ⭐⭐⭐⭐⭐
{% endcase %}
</div>
<div class="add-a-water-text-shopidevs">
<a target="_blank" href="https://apps.shopify.com/revolution-slider?utm_source=Shopidevs_article&utm_medium=shopify_testimonial_slider&utm_campaign=ShopiDevs_marketing&utm_term=provided_free_code">Get More Templates</a>
</div>
</div>
{% endfor %}
</div>
<button class="slider-nav prev" onclick="prevSlide()">❮</button>
<button class="slider-nav next" onclick="nextSlide()">❯</button>
</div>
<script>
document.addEventListener("DOMContentLoaded", function () {
const slider = document.querySelector(".slider-container");
const slides = document.querySelectorAll(".testimonial-slide");
let index = 0;
function updateSlider() {
slider.style.transform = `translateX(-${index * 100}%)`;
}
function nextSlide() {
index = (index + 1) % slides.length;
updateSlider();
}
function prevSlide() {
index = (index - 1 + slides.length) % slides.length;
updateSlider();
}
document.querySelector(".next").addEventListener("click", nextSlide);
document.querySelector(".prev").addEventListener("click", prevSlide);
// Auto-slide every 5 seconds
setInterval(nextSlide, 5000);
});
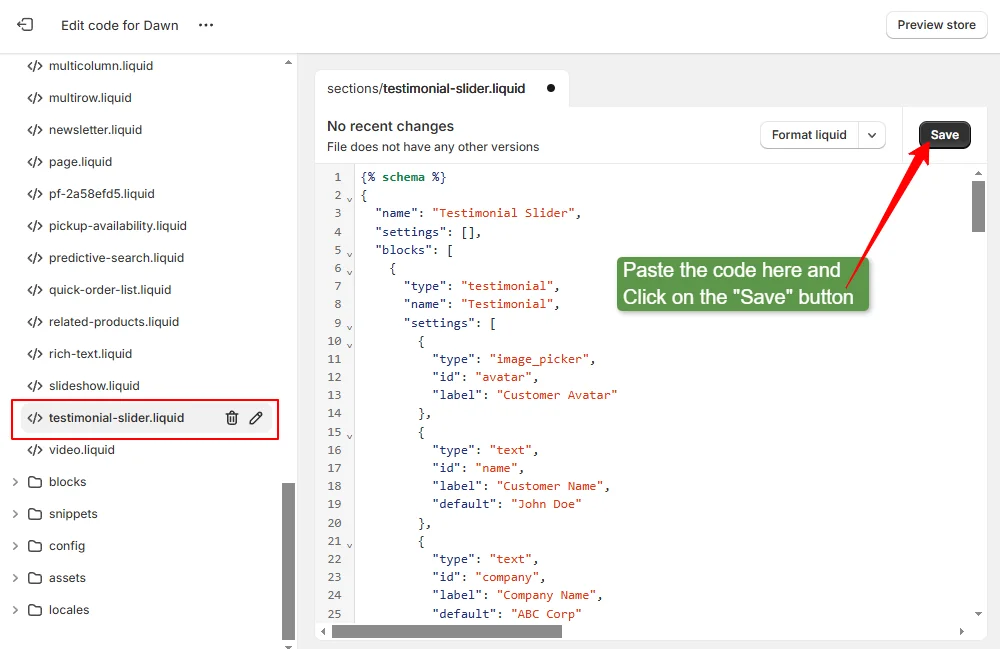
</script>Step 6: Paste the Code to the Testimonial Slider File
- Remove the existing (default) code.
- Then paste the custom code you have copied in the previous step.
- Click on the “Save” button to save the custom code for the testimonial slider.
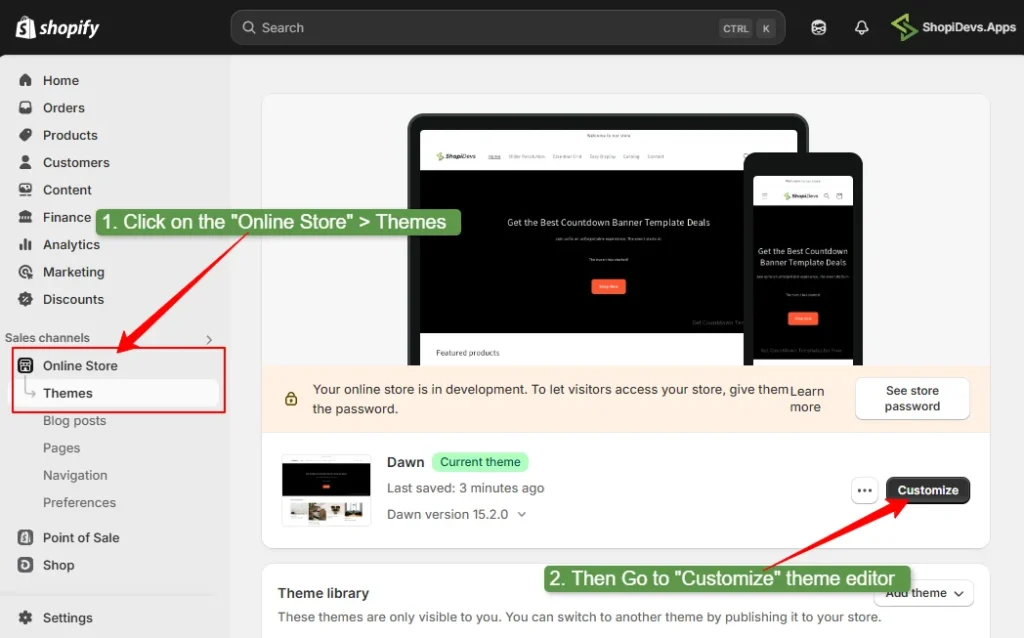
Step 7: Go to Theme Editor
- Now go back to the Shopify store theme editor from “Online Store > Themes > Customize”.
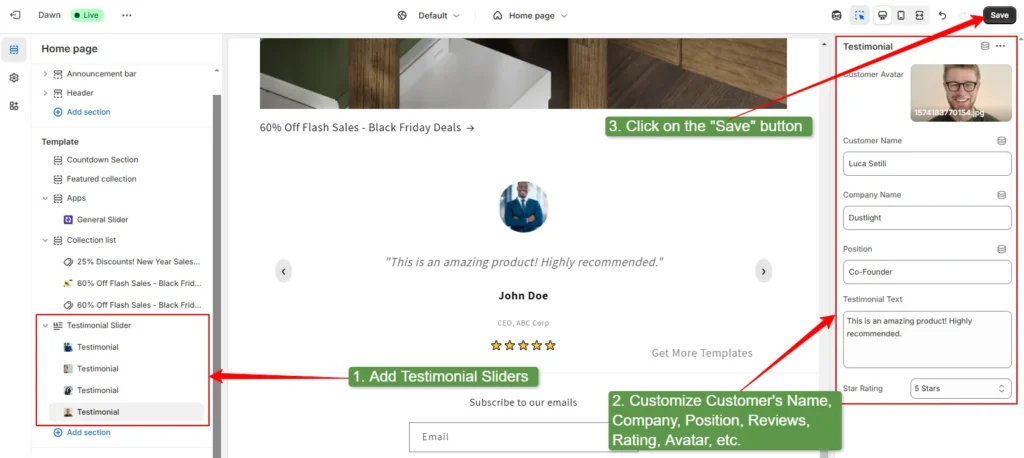
Step 8: Add a Testimonial Slider Section
- Click on the “Add section”.
- Add the “Testimonial Slider” block.
Step 9: Add & Customize Testimonials Then Save It
- Click on the “Add Testimonial” under the ‘Testimonial Section’.
- Add the customer’s name, avatar, company name, position, review text, ratings, etc.
- Then click on the “Save” button to add the testimonial slider.
Step 10: Preview the Storefront
By following these 10 simple steps and using the free custom code provided by the ShopiDevs support team, you can create amazing testimonial sliders.
5 Expert Tips to Follow While Adding Testimonial Slider
A testimonial slider can boost trust and engagement in your Shopify store. But you need to follow best practices to make it truly effective. Here are five expert tips to create a compelling testimonial slider:
- Keep It Simple and Visually Appealing: Use a clean design with easy-to-read text and smooth transitions. Avoid overcrowding slides and let each testimonial breathe for maximum impact.
- Use Real Customer Identity: Add authentic photos, names, and companies to build credibility and trust. Because real identities make testimonials feel genuine and relatable with your potential customers.
- Highlight Key Benefits and Results: Showcase how your product or service has helped customers. Shoppers trust concrete results over vague praise like ‘amazing’, ‘great products’, etc.
- Optimize for Mobile Responsiveness: Ensure your testimonial slider looks great and functional on all devices.
- Add Social Proof Elements: Include star ratings, logos, or customer quotes to enhance credibility.
With these tips, your testimonial slider won’t just share feedback it’ll increase conversions and strengthen your brand’s reputation.
Conclusion
Now you are at the end of the “How to add Shopify testimonial sliders” blog. Here I have provided 2 different ways to add testimonial sliders. First, you can add testimonial sliders using the Slider Revolution & Sections app templates. Second, you can use the free custom code.
Using custom code to add a testimonial slider may provide more flexibility and control but it requires advanced technical knowledge. On the other hand, Slider Revolution & Sections offers a wide range of testimonial templates with complete customization options.
So, choosing a method for adding testimonials depends on your requirements and knowledge level. Additionally, by following the expert tips, you can make your slider more attractive and high-converting.
FAQs
What is a Testimonial Slider?
A testimonial slider is a rotating section on a website that displays customer reviews. It helps build trust by showing positive feedback in a visually appealing way while saving web space.
How Do I Add Testimonials to Shopify for Free?
You can add testimonials for free by using Shopify’s built-in sections (if available) or by manually creating a custom section in your theme. Here you have two options to add testimonials: using custom code that I have provided in this article or you can use apps like Slider Revolution & Sections.
Where Do You Store Testimonials?
You can store customer testimonials in dedicated digital storage like Google Drive (Sheets), Dropbox, Evernote, etc. These tools help to organize product testimonials professionally and access them easily from any device or location.
Jakaria is an SEO Content Writer in Shopify, Ecommerce, WordPress, and Tech Industry with 5+ years of experience. He specialises in developing engaging, helpful content by simplifying complex topics into an amazing story for B2B, SaaS, and Shopify businesses. He’s also passionate about staying updated on growth marketing strategies and Shopify trends.