Ready to learn how to launch Shopify store? Maybe you came up with a wonderful idea for the product and now you would like to see if people are willing to buy it. Well, you’re in luck because you no longer have to be an experienced web developer to build a Shopify Store in less than 15 minutes.
What is Shopify And How Does It Work?
Shopify might be one of the best-known brands in the eCommerce world, but not everyone knows what this tool is or how it works. Shopify is one kind of software that pays to use the SaaS model. In other words, you subscribe to the service. Generally, if you pay for one year of support at once, you will benefit from a slightly reduced cost.
With Shopify, merchants and eCommerce business owners can create a website and use an integrated shopping cart solution to sell digital and physical products to customers around the world. Shopify even offers a system that allows customers to quickly and easily manage things like shipping requirements and inventory tracking. Using Shopify, you can gain access to a state-of-the-art admin panel, where you can view the products you have for sale, write descriptions, process orders, and much more.
Shopify Pricing: How Much Does Shopify Cost?
Here is a breakdown of the prices for each plan:
- Lite Plan – $ 9 per month + a Buy button
- Basic Shopify Plan – $ 29 per month + 2.9% and 30 ¢ per transaction
- Shopify Plan – $ 79 per month + 2.6% and 30 ¢ per transaction
- Advanced Shopify Plan – $ 299 per month + 2.4% and 30 ¢ per transaction
- Shopify Plan Plus – pricing plans start at around $ 2000 per month + 2.15% per transaction
Shopify’s Response to the Covid-19 Pandemic
It is a difficult time for all business owners right now. However, you don’t have to wait until the pandemic is over before you start building an online presence.
As one of the leading providers of eCommerce technology, Shopify has implemented a number of strategies to support small businesses in the coming times.
For example:
- Digital and physical gift cards are available at all Shopify Retirement: This means your customers can continue to support you without purchasing physical products.
- Small business financing is available in the US: If you are in the US, almost $ 200 million on Shopify Capital is now available for small businesses.
- Community support and live webinars are now supported: You can access a host of virtual meetings with other members of the Shopify growing community.
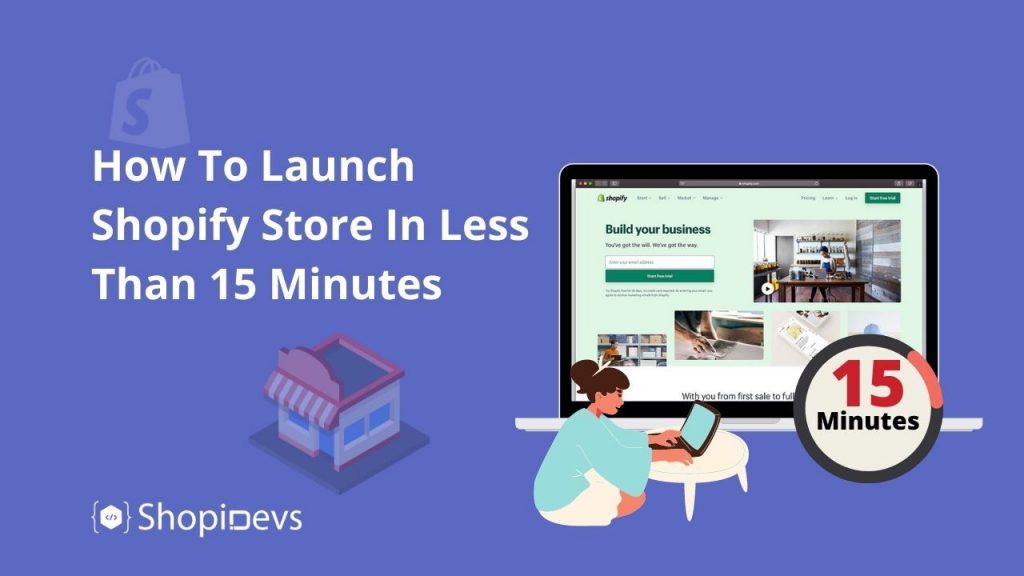
How to Launch Shopify Store in 15 Minutes
It’s no more secret we think. Shopify is a great eCommerce platform, there’s a reason it tops our list. Previously, setting up an eCommerce store took many hours and a lot of technical knowledge. Today, however, that has changed, and setting up an online store only takes a few minutes. With a few clicks of the mouse and a little typing, you can set up your own online store on the web.
There is a reason why Shopify is such a popular platform. Perhaps the most important reason lies in the fact that creating your first online store has never been easier. Here we will discuss briefly how you can set up your own Shopify online store in less than 15 minutes.
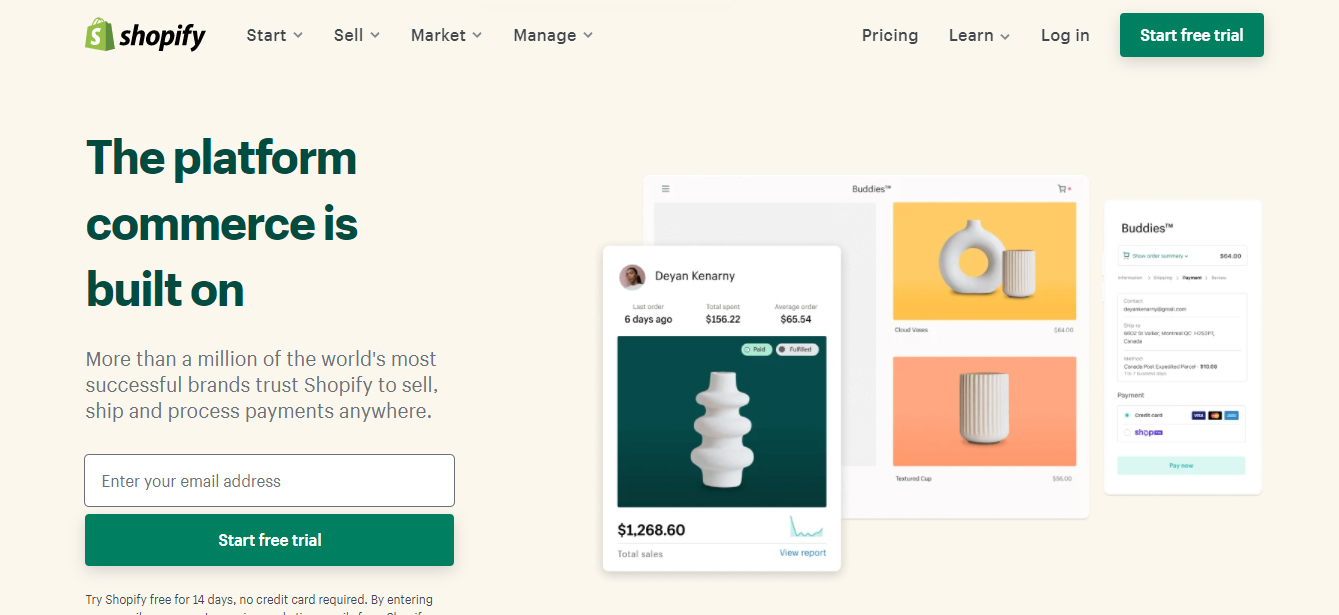
Step 1: SignUp for Shopify
The first stage of setting up your Shopify store is also the easiest. To start using Shopify, all you need to do is sign up for an account.
Navigate to Shopify and click the Get Started button. Fill in your desired email address, password, and store name.
Remember, you will have to choose a unique name for your store, otherwise, Shopify will not allow you to buy the domain.
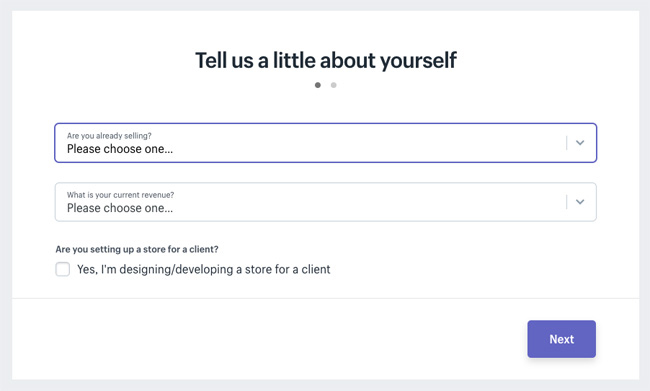
After clicking “Next”, tell Shopify about yourself by specifying how much you plan to sell and if you’re already selling. Click the “Enter My Store” button when you are done.
Then it will ask you if you want to make a brick-and-mortar store or an online store. For this tutorial we are only going to make an online store, so select that option and click Next.
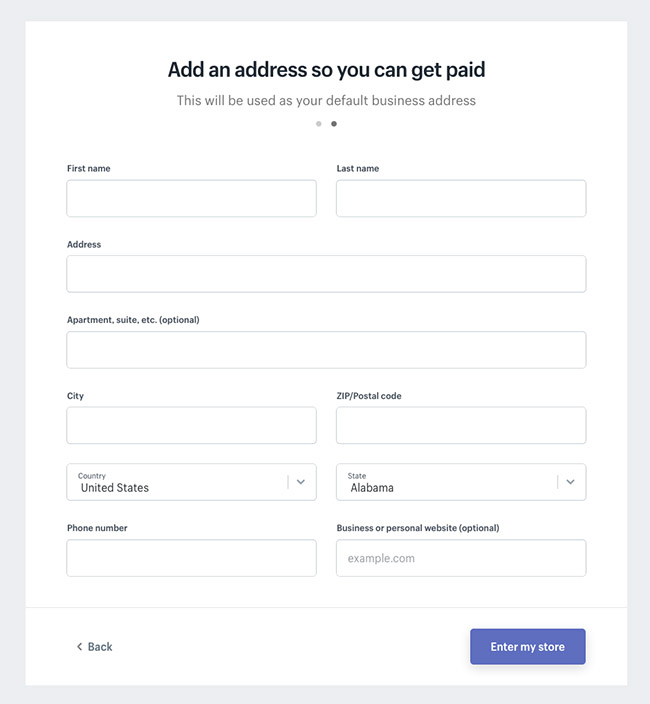
The next page asks you to fill in your personal information, such as your name, address, and phone number, all of which are used to set the currencies and tax rates.
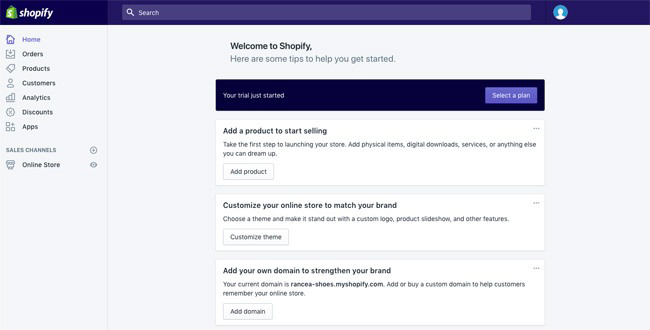
Once you have successfully registered with Shopify, the software will take you directly to the admin screen of your new website. This is where you can start customizing your store and uploading products for your customers to peruse.
When you go to your Shopify backend it describes a good step-by-step process on how to fully configure your store. The first button asks you to add a product, so you have to click on that first.
The Add Product page is similar to something you would see in WordPress. You can fill in details like a title, description, price, and vendor. Feel free to fill out most of the product pages you want. Just make sure to save the product at last.
Remember, the images connected to your product can increase or decrease your chances of a sale, so it makes sense to choose images that are attractive to your target audience. Don’t make the mistake of overlooking the importance of images on your website.
Another thing to keep in mind is that you can also set up product collections or groups according to your individual needs. For example, if you had a clothing website, you could set up a page specifically for men’s clothing, or specifically for shoes and accessories.
With Shopify, you can arrange for the same products to appear in multiple different collections, making it easier than ever for your customers to find the items they need. When adding a collection to your store, you will be able to select how the products should be added. For example, you can have products that meet certain criteria automatically added to your store.
Step 2: Add a Product to Your Shopify Store
Once you have successfully registered with Shopify, the software will take you directly to the admin screen of your new website. This is where you can start customizing your store and uploading products for your customers to peruse.
When you go to your Shopify backend it describes a good step-by-step process on how to fully configure your store. The first button asks you to add a product, so you have to click on that first.
The “Add Product” page is similar to something you would see in WordPress. You can fill in details like a title, description, price, and vendor. Feel free to fill out most of the product pages you want. Just make sure to save the product last.
Remember, the images connected to your product can increase or decrease your chances of a sale, so it makes sense to choose images that are attractive to your target audience. Don’t make the mistake of overlooking the importance of images on your website.
Another thing to keep in mind is that you can also set up product collections or groups according to your individual needs. For example, if you were a clothing website, you could set up a page specifically for men’s clothing, or specifically for shoes and accessories.
With Shopify, you can arrange for the same products to appear in multiple different collections, making it easier than ever for your customers to find the items they need. When adding a collection to your store, you will be able to select how the products should be added. For example, you can have products that meet certain criteria automatically added to your store.
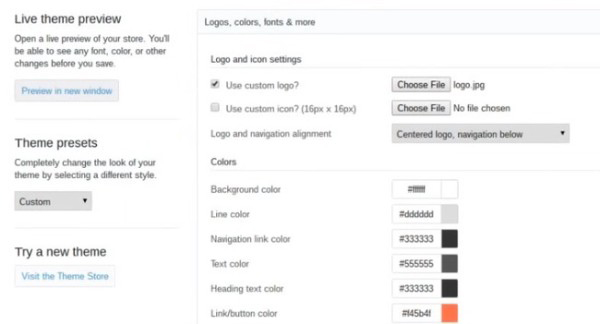
Step 3: Customize the Look of Your Shopify Website
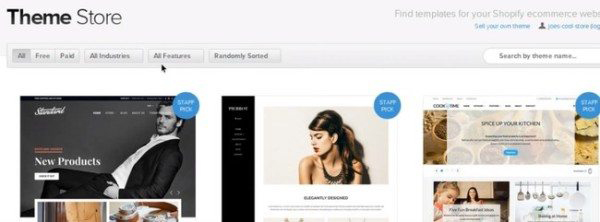
Return to the main panel and select the Customize the Appearance of your site button. This area asks you to customize anything from logos to colors. This requires a bit of tinkering, but the main part you want to focus on is the link that asks you to visit the theme store.
Here you can browse through the hundreds of themes on Shopify to make your site look impressive.
While free themes are great, premium themes can be very attractive. Premium themes will come with additional modifications, so if you want to dig into the smallest details of how your website looks, then it might be a good idea to pay a little more for a professional theme. You will also find that you can make many adjustments to the look and performance of your site by accessing the CSS and HTML aspects of the theme. If you don’t have an in-house coding expert, you can always check out the Shopify Experts page for additional help.
There are many Shopify experts specializing in product descriptions, Shopify themes, email marketing, and much more. You can take advantage of the Shopify Community of Experts for just about anything.
Some of the things you will be able to change about your Shopify theme:
- Sources
- Color schemes
- Items that appear on the page.
- Related item functionality
- Home Page Carousel Slides
- logos
Step 4: Set Up Your Domain with Shopify
After choosing your template and designing your website to your liking, it’s time to select a domain to make your site official and make it live.
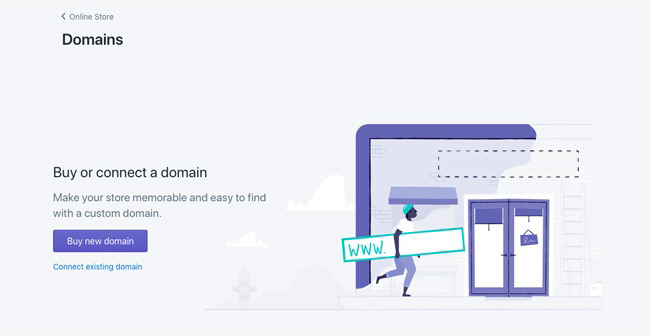
Go back to the dashboard and click where it asks to add a domain. This asks if you want to transfer a domain or register a new one. Choose the domain you like and follow the steps to make the purchase. You will also need to specify which Shopify paid you would like to go with.
Remember, you can buy a domain from Shopify and have it added directly to your store, or you can buy your domain name elsewhere and add it to Shopify – it’s entirely up to you. However, you will need to update your DNS records if you are uploading an existing name.
After activation, you can go to that particular domain and view its website.
While you’re in the main area of your Shopify website, make sure the following information is complete:
- General information: Keep all your information complete in the settings area, including your billing information and legal details.
- Tax: Make sure you have the box next to “collect tax” in the Variants section of your website that you have clicked on to help you with your accounting.
- Shipping: You will need to click on the “shipping required” option next to the products to find out which products require an additional price for shipping and packaging. Remember to select a shipping specification based on weight or choose something that helps you sell as many products as possible.
You can also test your ordering system before you start selling online by going to the Admin section of Shopify, click Settings, and go to the Payments settings. From the Payments area, disable it before continuing, then select a credit card gateway to test.
Step 5: Activate Your Payment Processor
Click on the tab to the left of the dashboard called Payments. This area allows you to select from dozens of payment processors like Stripe and Authorize.net. Shopify also has its own payment processor, which is very easy to implement. Just follow the steps to activate your payment processor. This allows you to accept payments and put those payments into an account.
Payment gateways are some of the most important things you will need to keep in mind when building the best Shopify store. Remember, the gateway that is right for you will depend on many different things, including:
- Transaction fees: Most payment gateways will charge you a small fee every time someone purchases something from their website. Make sure you go for the gateway that offers you the lowest possible price.
- Card types: It is important to select a payment gateway that accepts a wide variety of card types and other payment options, including PayPal and Stripe.
- Off-site payment: Some payment gateways will remove the payment process from your website and take you to their own server using a form. This payment gateway strategy can be a bit more secure, but it is also a bit difficult for customers.
After all, is said and done, you can click the Launch Website button to make the store live.
Congratulations! Now it has a fully functional function. Shopify online store.
How do Shopify Payments Work?
Once your Shopify store is up and running, the next thing you will need to think about is how you are going to start receiving payments from your Shopify customers.
Shopify offers the ” Shopify Payments ” It’s probably one of the simplest ways to access and manage your payments online (read our Shopify Payments Review ) The payment system means you don’t have to set up a merchant account with another provider like Square or Stripe. Plus Shopify Payments fully integrates with your online store, so you can view all your payments as Shopify admin easily
If you choose to use Shopify Payments for accepting cash from the customer, then you will need to set up something called “Payment Period”. Basically, this is the amount of time between the day your customer places their order at your store and the time the funds from the order are sent to their bank account. Funds from orders placed on Friday and weekends are generally pooled and shipped in a single payment.
Crucially, just because there is an option to set automated payment dates in your Shopify account, it doesn’t mean you have to wait forever to receive your money. By default, the Shopify payment portal will give you the money that you earned for a specific day as soon as those funds are processed and therefore available. However, if you prefer to be paid weekly or at another interval, then you can choose to do that as well. If you select a recurring date for which you expect to receive payment, the payment will be scheduled for that specific day. To schedule your payments:
- Go to Settings and payment providers
- Click “Manage” in Shopify Payments
- Click on “Payment Details” in the Payment Schedule
- Click Save
Shopify Payments comes with access to some useful features, such as payment balances and rate tracking. Within the administration section of your Shopify account, you can sync your payments with your orders and therefore see how much you receive from an individual order. The Shopify payment system also comes with a single fee – the card fee that you have to provide to the card company for the transaction. There is no subscription transaction fee.
Many third-party payment processors come with a subscription fee that you must pay along with the price of typical credit card fees.
How Does Shopify Shipping Work?
We addressed Shopify Shipping Options briefly in the sections above. However, if you are planning to sell physical products from your online store, you will need a plan for how exactly you will ship the items to your customers.
The good news is that the Shopify Store Builder comes with a built-in suite that allows you to automatically calculate the rates that might be right for you and your customers using reliable sources like DHL and UPS. With the Shopify Shipping feature, you will be able to process orders online quickly and print valuable shipping labels without worrying about hassles like dealing with additional plugins. This is one of the features that really make Shopify stand out from other eCommerce website builders.
Unlike other online software solutions such as WooCommerce, Shopify has pre-existing agreements with some of the largest shipping carriers in the world to help customers reduce the costs of serving their customers as much as possible. Also, shipping features are included in every Shopify platform, to find them, you just need to go into your Settings page and click on the shipping option.
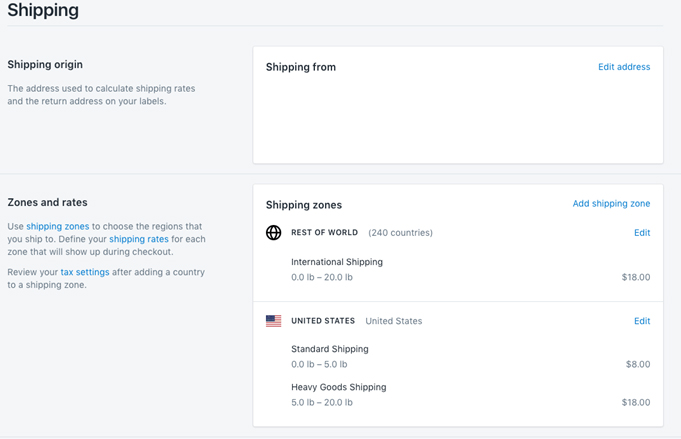
To get the most out of Shopify shipping for your business, you’ll need to make sure you fill in as many of the available details as you can. This means listing dimensions and weights for your products and their available variations. Once you’ve linked your operators with Shopify, you can start filling orders for your customers.
Generally, there will be several shipping options available below your product information. You can choose to let your customers choose the selected speed that is suitable for them, or you can upgrade your customer to a cheaper or faster service. Remember, while Shopify gives you the option to choose from a wide range of shipping options on your back-end, your customers will only see the calculated shipping rates you’ve already given them.
How Does Shopify Work? Does Dropshipping Work?
One of the main reasons people love using Shopify as their online store building solution, it is incredibly flexible. You don’t have to follow a single strategy to sell. With Shopify, there are many different ways to sell the products that matter most to you.
One option is to switch from the standard store and shipping strategy to dropshipping. Dropshipping is fast becoming one of the most popular Completed Order methods available on the market because you don’t have to find places to store and manage your products before delivering them to customers. Also, with dropshipping, there is no risk that you will end up spending all your money on stocks, only to find that you can’t change those stocks when you need to.
Dropshipping allows merchants to choose a supplier or another person in the world of eCommerce to do the fulfillment part of the sales process for them. You simply list an item that someone else has on your website, and when someone orders the product, they submit their details to the company they are dropshipping with. That company will then ship the item to the customer.
Only a handful of tools available for CRM eCommerce store management can offer drop shipping right now. Luckily, Shopify is one of them. Shopify offers a variety of ways for you to take dropshipping credit card orders as part of your Shopify.
With Shopify dropshipping, you can link digital products and physical products from drop shippers to your website with services like Oberlo. Oberlo is a dedicated dropshipping app that works exclusively with the Shopify environment.
How Does Print on Demand Work?
If you are currently learning how to make Shopify work for you, and dropshipping is not your preferred option, you can always look for other ways to improve your eCommerce store. For example, one of the advanced Shopify features available to users today includes “Print on Demand”.
If you’ve never heard of Print on Demand before, it’s a lot like dropshipping, in the way you work with a third-party provider. With print on demand, you create a pricing plan with a vendor who customizes private label products for you, such as bags and hats. It’s a great way for online businesses to add something unique to their sales strategy. Learn more about Print on Demand’s online business strategy here.
Like dropshipping with Shopify, the Print on Demand Shopify account eCommerce solution works through plugins that you can implement into your Shopify experience. You’ll find dozens of tools in the Shopify app store that you can use to customize your eCommerce site. Most of these plugins are very easy to use and convenient. For example, some of the plugin options include:
- Print: Printful is one of the best-known Shopify apps for print-on-demand services. It offers a wide selection of products and brands to explore as well as easy-to-use generators for mockups. In addition to an easy-to-use interface, Printful comes with access to direct-to-garment prints that are great for direct media printing, cut-and-sew printing, and embroidery. With Printful, you can also add your own features to the unpacking experience, going beyond product descriptions and unique payment methods with stickers, package inserts, and more.
- Lulu Xpress: Another common print-on-demand option specifically for Shopify account holders, Lulu Xpress ensures that business owners have all the tools they need to print and distribute and print e-books. While other basic Shopify apps solutions for print-on-demand are all about clothing and smartphone cases, Lulu Xpress is unique in that it focuses exclusively on books. The best thing about this plugin is that it comes with downloadable templates to get you started and a transparent pricing calculator. Unfortunately, there is no built-in editor or multi-day free trial to check the system.
- Printify: Printify is another well-known solution for people using Shopify planning to build their website online. If you want to use Shopify to improve your online store and you are looking for a printing system, Printify will allow you to access a wide range of white label products that you normally cannot find anywhere else. Besides clothing, you can also find customizable jewelry, shoes, watches, and water bottles. The lite plan for Printify is free to use, there is a premium subscription available that will give you access to a 20% discount on all your products for a base price of $ 29 per month. This might be a good option for some Shopify account store owners who want to save some money.
What Is It? Is It Shopify Lite?
If you’ve been looking through Shopify account options lately, wondering which one might be right for you, then you may have found Shopify Account Lite the Shopify Plan Lite is a solution for anyone who already has an existing website and just wants to upgrade. with some cutting edge Shopify functionality
Essentially, if you want to sell products without maintaining a full eCommerce store for your business, then Shopify Lite might be just what you need. This plan allows users to sell their articles on social media, add shopping carts to existing blogs, and more. Also, although it is available for a very low price, the plan comes with access to all the standards. Shopify point of sale systems you need. There is no option to build your own website or play around with things like SEO (search engine optimization) or domain names with Shopify Lite. However, you can use the app to access a point of sale when selling at trade shows or pop-up stores.
The Shopify Lite is perfect for selling social media and basic Shopify shopping cart features, and it comes with a much lower pricing plan than most of the other options on Shopify. For just $ 9 per month, you can integrate the shopping cart functionality into any existing website, whether it’s with Wix, Magneto, Squarespace, or something else entirely.
One important thing to remember is that although you can sell offline with Shopify Lite, you cannot build an online store with it.
Ready to learn how to launch your Shopify store? Maybe you came up with a wonderful idea for the product and now you would like to see if people are willing to buy it. Well, you’re in luck because you no longer have to be an experienced web developer to build a Shopify Store in less than 15 minutes.
Sell on Facebook with Shopify Lite
The Shopify Lite Plan is attractive to some businesses because it also allows them to take the sale of the eCommerce site to social media. If you are looking for a new sales channel to help you capture your audience and sell more products, Shopify Lite offers a fully integrated Facebook store option.
The Sell on Facebook option comes with a fully integrated store for your Facebook account, allowing you to seamlessly sell your products on Facebook. Shopify Lite will also merge with the existing Facebook Business account that you have already set up for your business. The system creates a Shop tab for your social media campaign that comes with product galleries and a secure shopping cart. The Store tab will also be fully mobile-friendly for on-the-go shopping.
The merged experience between Shopify Lite and Facebook Business will simplify your product management strategy by putting all your product information and any changes you need to make in the Facebook space. You won’t have to worry about updating prices and availability, not even for product descriptions and product images on both channels.
The easy-to-use interface available with Shopify Lite also comes with collection orders only available on Shopify. If you save this feature in Shopify, everything changes in your Facebook account. When your products are no longer available or unavailable, then Shopify will automatically remove that item from your store, so you don’t disappoint your customers.
Connect with Customers and Sell Through Facebook Messenger
If you choose the slightly less expensive version of Shopify Lite, then you will get the live chat module for Facebook Messenger included. This is a fantastic additional feature, as it offers businesses a great way to connect with customers whenever they need it.
The Shopify Facebook integration comes with a simple and efficient checkout module within the Facebook interface. This reduces the number of steps your customers need to take before buying something from your brand. This is important when you consider the fact that 73% of customers say that the customer experience is crucial to their purchasing decisions.
Facebook Messenger is more than just a chatbox – it’s a way for customers to explore your products and make purchases with the Messenger app. There are built-in automatic responses, and customers can even get instant answers to their most common questions this way.
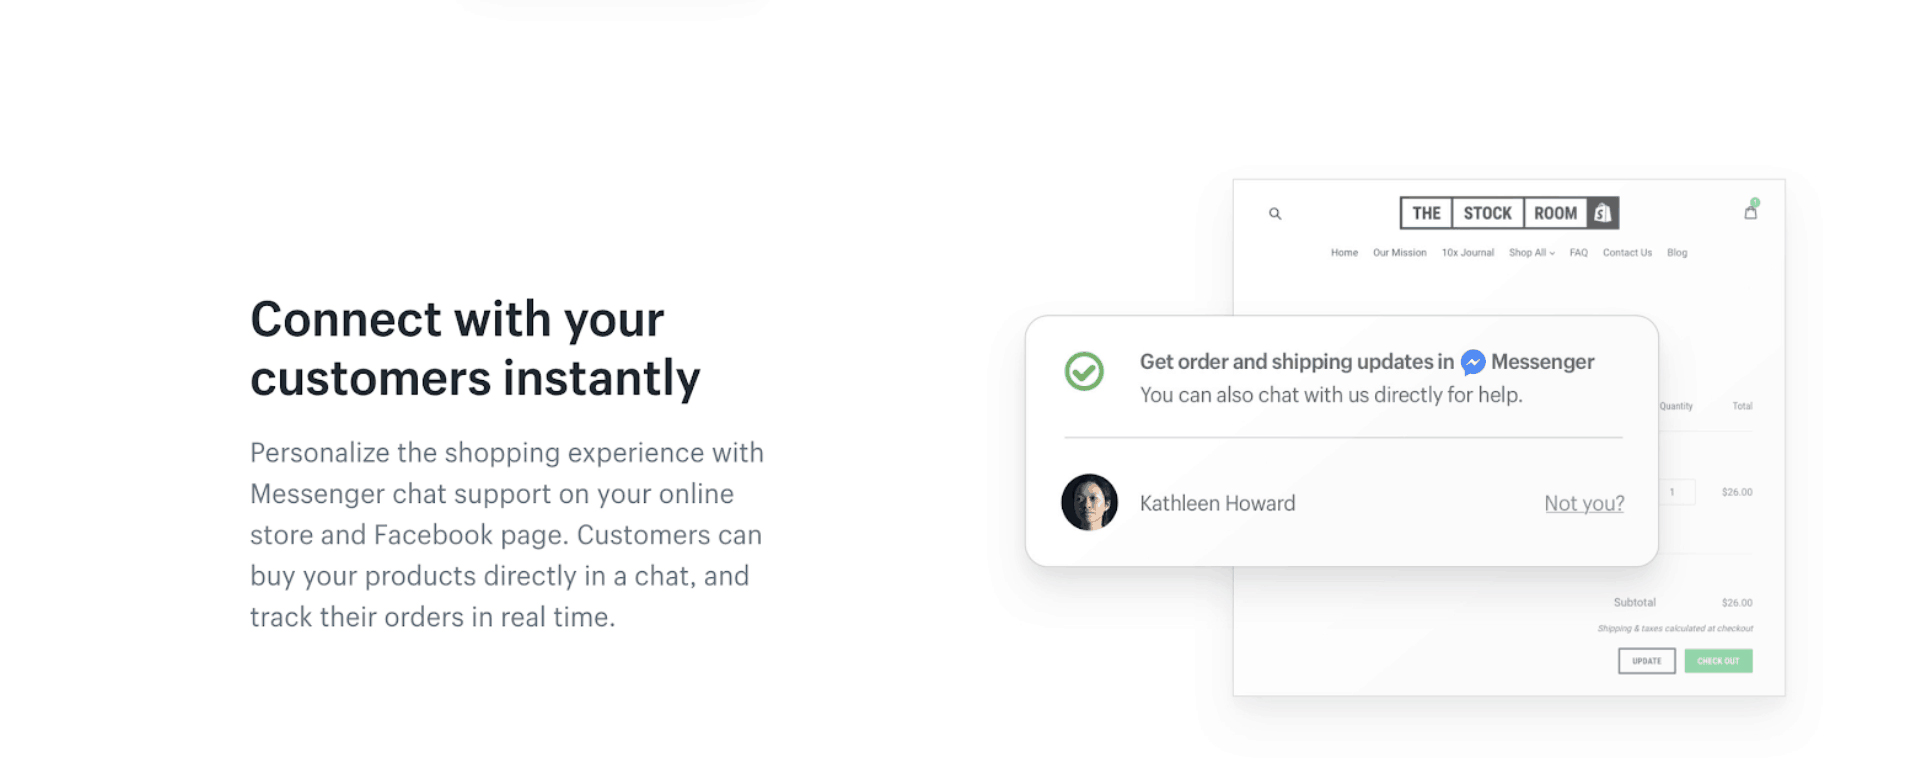
Every reply that you can automatically send from Facebook Messenger has a call to action at the end of each reply, so shoppers can continue their shopping journey with things like reading a product description or simply making a purchase. Facebook Messenger also ensures that your customer is informed after purchase, with automated messages that include shipping information and tracking codes.
Set Up a Facebook Store with Shopify
Remember, with Facebook and Shopify, you can display Shopify products directly on your Facebook page with the Facebook store option. This is crucial if you plan to add Shopify’s Facebook messaging feature to your online selling strategy.
When you set up your Facebook Store solution, Facebook will automatically create a store section on your Facebook page, displaying your Shopify products. You will be able to make changes to products, review your sales strategy, and verify orders using Shopify. To get started, make sure your store meets the requirements that have been listed for merchants on Facebook. You will need a Facebook page for your business, and you will also need in-depth knowledge of the policies required for selling Facebook.
Add your Facebook store to your Shopify admin portal when it’s ready, and Facebook will review it if it’s suitable. Once your store is approved, you can add collections and products to your Facebook page and make them available on the Facebook store. This will allow your customers to automatically buy Facebook products, without having to jump to another page.
To add a Facebook store to your Shopify experience, here are some of the steps you’ll need to follow:
- Click the + button in the Sales Channels section of your Shopify admin page.
- Click on the “add sales channel” option and then click on the Facebook option
- Choose “Add Channel” to connect the Facebook account you want to link to your business.
- Click on the “Facebook Store” option and go to your account settings to connect your account.
- If you are already signed in to Facebook, you may be asked to confirm if you want to connect that account.
- Follow the information provided when trying to log into Facebook to allow Shopify to link to your company’s Facebook page
- Wait for Facebook to review your store. This process can take up to two days, and you will receive an email alert when it has been approved.
There you go! You’re ready to start selling directly with Facebook through Shopify.
You May Also Read: Shopify Chat App Review: A Brilliant Chat Tool That Increases Your Store Sales
What is the Shopify Button?
Aside from selling through Facebook with Shopify Lite, you can also take routes to earn income. For example, there is also the option to explore the benefits of the Shopify Buy button. This simple button allows users to add WordPress, Tumblr, Magneto, and other website eCommerce functionality. All you need to do is insert a buy button in your store.
The really cool thing about the Shopify Buy button is customizable to suit any theme, and the shopping carts also offer secure payments. You can even head over to the Shopify Expert Community for a Developer if you need additional help.
There are several ways to add the Shopify Buy Button on your site, including:
- Sidebar – Start selling instantly from the sidebar and find out how similar your customers are to clicking buttons and buying your products.
- Landing page: Add an eCommerce option to a landing page that you have designed specifically for a certain offering or unique product.
- On your content: Implement your buy button directly on some of your highest-performing content. Paste the code you generate for your button on your blog and it will appear as part of the content.
So how does the buy button work?
Essentially, with a Shopify Buy Button, you can add products to your blog and external website without having to create a full eCommerce website. Buy buttons make it easy to purchase products and services by allowing customers to purchase something without having to go to a separate online page to finalize their purchase.
A buy button is a lot like giving your customers a shortcut to access your products. You can add purchase buttons to your site or blog without having to purchase a full Shopify account. You will also be able to keep track of the orders that customers implement through your buy button using their Shopify admin account. Although you don’t get a full back-end system with Shopify Lite and Shopify buttons, you will still be able to keep track of where and how you are. selling online.
The purchase buttons are used more frequently by companies with Shopify Lite Offer, but you will be able to access this function with all the plans that come from Shopify. You can also use the Buy Button feature in Shopify to create payment links that can be shared with customers using an external campaign, such as the one you might use with your email marketing.
How Shopify Works? Do You Work with Amazon?
One of the things that Shopify makes a great choice for many businesses is how easy it is to integrate with other leading sales solutions. We have already discussed how Shopify naturally integrates with Facebook. However, Shopify can also combine forces with Amazon as well. Shopify’s integration with Amazon makes it easy to list your products using one of the largest market environments in the world, so you can access next-level reach as a growing brand.
While your personal online store will help you gain more control over how your business connects with customers, selling on Amazon can significantly increase your sales by helping you reach new customers who are not yet familiar with your business.
To get started, you will need to visit Amazon Services and create a professional seller account with the Amazon merchant program. As long as you add Amazon as an integration to your Shopify the experience is free on Shopify. In the end, you have to pay your Amazon seller account. To become a professional seller, you will have to pay a fee of $ 39.99 per month. There is also a small referral fee to pay, but the cost will depend on the category or niche of your product.
Once you have your seller account, you can check to see if you have a product that fits into Amazon’s “approved categories” section. If approval is required to sell your products, you will need to make sure you submit your request as soon as possible. The faster you enter your request, the faster you can start selling.
With your professional sellers account ready and approved, you can add your Amazon sales channel to your Shopify store. Just go to your Shopify admin page and click the “+” button next to your sales channels option. From there, click on “Amazon by Shopify” and select “Add Channel”.
Create Amazon Listings for Your Product
There are a few more things you’ll need to do before you start selling with Amazon using Shopify. For example, you will need to buy something called UPC for your products. This is basically a unique identifier for your article. If you don’t give Amazon a UPC or an ISBN for your products, then you’ll end up with nothing but error messages.
If you are using the dropshipping method to resell someone else’s products, then they may already have access to the UPCs that they can use. However, if you have created the product yourself, you will need to purchase a UPC. If you are an Amazon trademark, Amazon waives this requirement for you.
With your UPC aligned, if you are not currently selling on Amazon, then you will need to start making some product listings that will convince your audience to buy what you have to sell. You can design and implement product listings from your Shopify account. Just head over to the Amazon sales channel and fill in the required details. If your product was manufactured by another brand, you may need to include specific information shared by that brand.
If you’re not sure what to write, you can always check Amazon’s search function to see if something similar has already been posted on Amazon.
Remember, you can also claim any existing listings you already have on Amazon in your Shopify store. If you sell any category on Amazon, you can claim existing product listings in your Shopify Store and simply improve the visibility of your product. Similarly, if you want to start selling products on Amazon in unsupported categories, you will be able to create listings with Amazon and add them to your Shopify store.
All existing listings that are associated with your Amazon professional seller account must be viewable from the Amazon listings page on Shopify. Just start by selecting “Link Products” and make sure all your sales strategies are connected.
The best thing about the seamless integration between Amazon and Shopify is that your products and listings will automatically sync with Shopify through the order page. If orders are placed on Amazon, they will be marked as such in your Shopify Admin Portal, so you can see exactly how well you are selling on different platforms. Remember, you will need to complete the orders you receive from any account through Shopify. If you don’t, your order will continue to appear unresolved.
How Shopify Works? Do You Work with eBay?
Amazon isn’t the only retail environment you might want to sell with when starting Shopify. If you want to further expand your sales strategy, you can choose to explore the Shopify and eBay integration as well. After all, eBay has around 170 million buyers to attract everyone.
Like the Shopify integrations with Facebook and Amazon, you can expect the eBay integration to naturally sync with your Shopify store. All you need to do is change a couple of things in your admin account to get started.
Start by adding all the products you want to sell on eBay to your Shopify account, then sync your product information to the available eBay sales channel to create a new eBay listing. You won’t need to manually enter the same product information twice this way, saving you time and effort. Shopify also saves you the hassle by allowing you to sync your available inventory in Shopify with all active sales channels for which you have accounts. Remember, you will need a seller account on eBay to start selling products that way Shopify.
To make life even easier, Shopify also provides some instant reports on which of your accounts are performing the best, from Amazon to eBay and more. With eBay and the Shopify integration, you can:
- Manage all your eBay orders and inventory through the familiar Shopify interface.
- Fulfill your eBay orders directly within your Shopify manager account
- Reconcile Your Income From eBay Sales Using Your Shopify Reports
- Set specific prices for eBay listings that are separate from other prices.
- Manage your eBay business policies within Shopify
- Communicate with your customers using eBay’s messaging features.
As with the other integration options available in Shopify, you will need to click the plus sign (+) under the Sales Channels option in the Shopify admin to select eBay as a sales option. You can also visit the Shopify App Store to learn more about the eBay integration.
Selling Offline with Shopify
Clearly, there are many ways to buy and sell online with Shopify – but what if you want to go out into the world and meet your customers in person? Can you still access the great functionality of the Shopify experience? You can with the Shopify POS.
If you’re selling in person at pop-ups, exhibitions, and markets, then Shopify Lite comes with a standard point-of-sale feature, including the option to accept credit card payments in person using PayPal, Square, or Stripe. With Shopify Lite, you also have access to a plug-and-play card reader that you can take with you on the go if you need to accept payments online and offline.
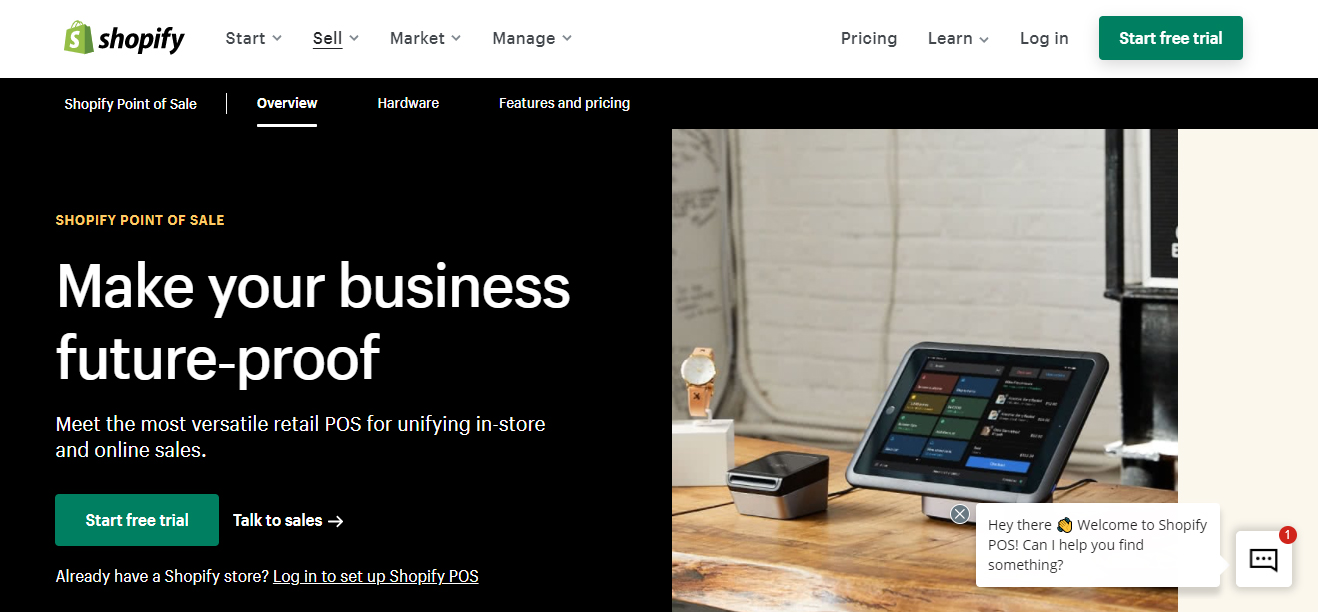
The POS feature allows businesses to accept credit card payments, customize tax requirements, and apply discounts. You can also offer to ship products at checkout, process refunds, and take gift cards for partial payment. Shopify also comes with its own dedicated POS team as part of the deal. You even get automatic inventory sync across all the channels you’re selling with!
Shopify Website Builder: What are the Differences between Shopify and WooCommerce?
If you’re looking for an eCommerce selling solution for the first time, you’ve probably noticed that there are a lot more options available outside of Shopify. One of the most popular options is the tool designed to integrate directly with the world’s leading CRM tool, WordPress. WooCommerce is a digital sales solution similar to Shopify, but it works exclusively with the WordPress environment.
Although Shopify offers an all-in-one shopping system where you pay a monthly fee to use the company’s eCommerce, web design, and product management features, WooCommerce works in a slightly different way. The WooCommerce service is a plugin that must be installed on a WordPress website.
To help you get a better look at what sets Shopify apart from other eCommerce site-building tools on the market, let’s take a look at when you would use Shopify, and when you could use another service like WooCommerce to build your store.
When do You Want to Use Shopify to Create an Online Store?
Shopify is a solid tool for beginners and people who don’t want to spend too much time on development. It’s also nice to steer clear of hiring a developer. You can sell as many products as you want and most companies have no problem scaling up.
Create Your Own Online Store: When Do You Want To Use WooCommerce?
WooCommerce works wonders for those interested in ultimate customization. Since WordPress is open-source, you can implement a wide range of plugins and code enhancements to rate your site however you like. It is also viable for those with a little additional development knowledge. If you are more into a challenge and want absolute control over how your site looks and works, WooCommerce is worth looking into.
What about Creating an Online Store with WordPress?
Clearly, Shopify has a lot to offer to today’s online merchants and sellers. However, there is no guarantee that it will decide that Shopify is the right choice for you. Instead, you may want to explore some of the other leading sales options on the internet today. For example, as we mentioned earlier, one of Shopify’s main competitors is WordPress, with the WooCommerce sales solution.
This is what you can do if you want to create an online store with WordPress instead of Shopify.
Step 1: Choose a Domain and Hosting Account
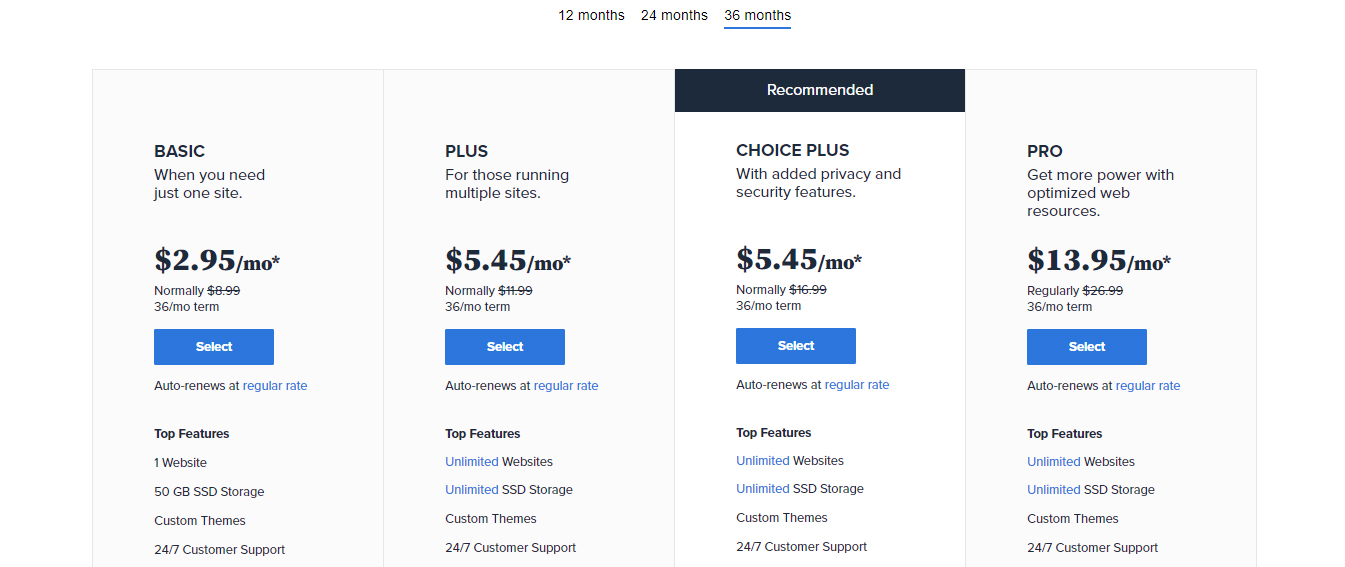
The first step in implementing a WooCommerce store is choosing a hosting account to host all the files for your website. We recommend Bluehost as it is a reliable, secure, and easy-to-use platform, and they offer a one-click WordPress install button.
Not to mention the Bluehost company provides a great monthly service that integrates WordPress with WooCommerce, so you don’t have to do anything.

Go to the Bluehost page that explains all the integration. Click the Start Now button to continue. With the WooCommerce package you receive hosting, positive SSL eCommerce security, at least 100GB of website space, and much more. But the most important thing is that WooCommerce is already installed and optimized.
Pick a plan, then move on.
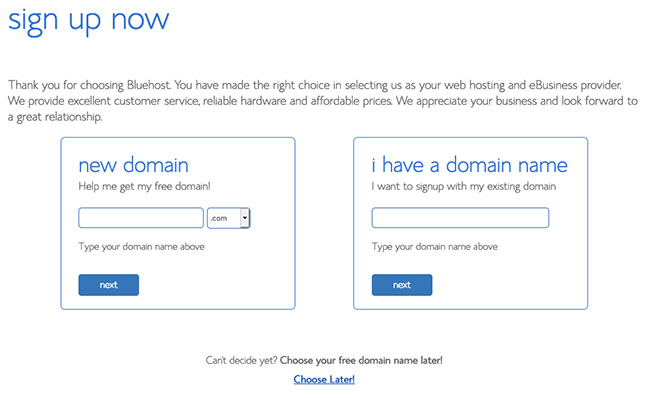
The next page asks you to choose a domain or transfer one. After marking a domain, it will tell you if it is available. The next page then asks for your personal and package information. I would recommend simply choosing your desired plan and skipping the extras.
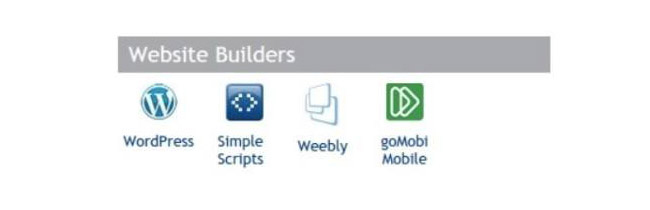
Keep going through the setup process where it asks you to create your own Bluehost login credentials. Once it takes you to the Bluehost CPanel, you can locate the WordPress button under the Website Builders heading. This allows you to go through a few steps to complete the entire WordPress installation.
In the end, it will tell you the domain that you can access to log into your WordPress server.
Step 2: Buy the Divi Theme
This part is simple. Go to the Divi Purchase Page and follow the steps to purchase this WordPress theme.
Step 3: Install the Divi Theme
If you opted for the WooCommerce / Bluehost service, you already have WooCommerce installed on your website. If not, download WooCommerce and install it on your website.
Now is the time to install a WooCommerce optimized theme. There are many options, but we recommend the Divi theme as it is very easy to bookmark and design for your own purposes.
Purchase and download the Divi theme. Upload the file to the backend of your WordPress dashboard and make it your main theme. This can be done by going to Appearance> Themes> Add New.
Step 4: Add a Product to WooCommerce
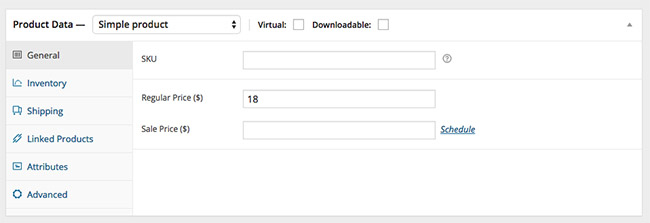
Go to Products> Add Product.
This opens a new page similar to a blog post that you would generally create on a WordPress site. Create a title for your product, along with a description. Scroll down a bit and you’ll see lots of other details to fill in, like inventory, shipping, pricing, and linked products.
Note that there is a lot more to do with your WooCommerce website, but you can find most of the technical details in the WooCommerce Documentation. For now, this should be enough to get your site up and running.
Regardless of whether you choose Shopify or WooCommerce, we wish you luck on your eCommerce journey! Feel free to leave any questions you may have in the comment section below.
I’m a digital marketing expert and mobile app developer with a deep understanding of Shopify App Store optimization. I contribute insightful articles on Shopify to help businesses thrive online.