How to add social media to Shopify? Is it really necessary? Yes, it is very crucial for your brand. Proper integration of social media in your Shopify store can improve your brand awareness significantly among your potential customers. As people can easily check your social channels, your brand becomes more credible to them. If you find social media integration is difficult, just follow the instructions I am sharing in this article. You will learn how to add social share buttons to a Shopify.
There are two options to add social media to Shopify, and you can follow any of them that is suitable for you. The first option is to get a theme with default social media buttons. Another option is to edit the code of your theme. If you are a developer and love to customize the Shopify theme, you can do a little coding to add social media to your Shopify store.
Let’s see how to add social media to Shopify
Using a theme with Social Media
Most of the new Shopify themes have social media buttons in them. If you get a new Shopify theme, there is more chance that the theme has a built-in social media option. So, if you are planning to launch or redesign a Shopify store, you should buy a theme that has social media options.
Changing code in an existing theme
If you use a theme that doe not have social media option, you can write a few lines of codes to add social media buttons to it. I am sharing two different ways that you can use. Follow the steps I am showing below:
How to add social share buttons to a Shopify: Method-1
If you follow this method, you can use any icon such as PNG, JPEG, SVG. This is a flexible way to add social media icon button in your Shopify store. This method involves a few steps to follow:

Step-1: First, log in to your Shopify store.
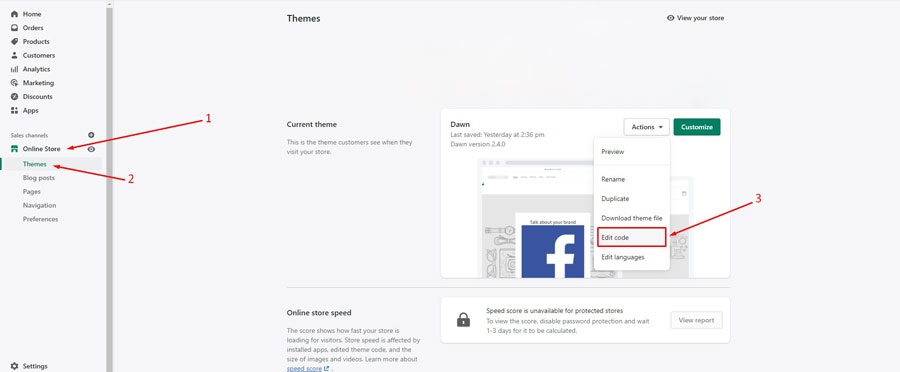
Step-2: Now from “Online Store,” go to “Themes” and click on Edit code.”
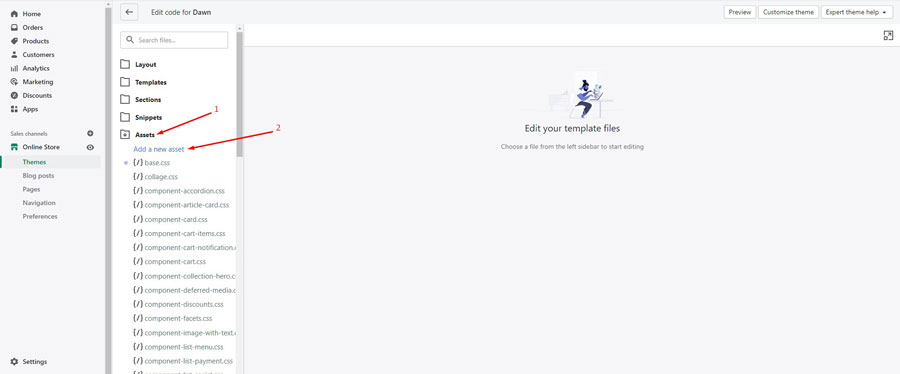
Step-3: Open the “Assets” folder and click on “Add a new asset”

Step-4: Now browse the files and select the icon you want to add.
Step-5: As you have added the icon. Now you have to decide where to display by coding.
Step-6: Now open the “theme.liquid” file and place the code mentioned below, where you want to show the social media icon button.
{{ 'icon-facebook.png' | asset_url | img_tag | link_to: 'https://www.facebook.com' }}
Step-7: Click on the “Save” button. You should see the social media button in certain areas of your Shopify store.
This method should work fine in your store, and you should not worry about how to add social media to Shopify anymore. If you want to try another technique, you can use the second method.
You may also read: The Complete Guide To Shopify Theme Customization
How to add social share buttons to a Shopify: Method-2
This method works only for SVG format. If you choose to use an SVG social media icon, then you can follow this method.

Step-1: First, log in to your Shopify store.

Step-2: Now from “Online Store,” go to “Themes” and click on “Edit code.”
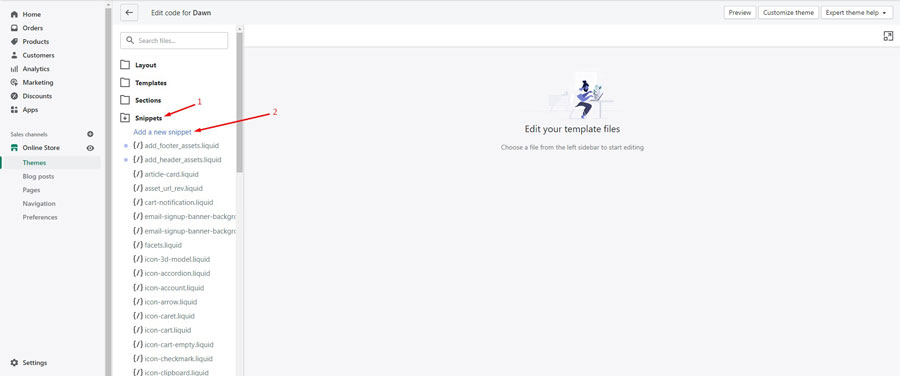
Step-3: Open the “Snippets” and click on “Add a new snippet”. Give the name of the snippet and click on “Save”.
Step-4: Now, place the source code of the SVG icon in the new snippet.
Step-5: Now, place the code shown below, where you want to show the social media icon button. Remember, change the destination and snippet name accordingly.
<a href="https://www.facebook.com/"> {% render 'icon-facebook' %} </a>There is something you need to consider. If you use the Shopify blocks, you have to use the code shown below.
<a href="https://www.facebook.com/"> {% render 'icon-facebook', block: block %} </a>Step-5: Click on the “Save” button. You should see the button in certain areas of your Shopify store.
Conclusion
After reading the article, you should have gained enough knowledge about how to add social media to Shopify. Moreover, following any of the mentioned methods, you will be able to add social media to your Shopify store.
I’m a digital marketing expert and mobile app developer with a deep understanding of Shopify App Store optimization. I contribute insightful articles on Shopify to help businesses thrive online.
